Secure TLS Communication With MQTT, mbedTLS, and lwIP (Part 1)
Now that we've learned about the individual components, let's dive into encrypting our IoT communications with TLS, MQTT, and lwIP.
Join the DZone community and get the full member experience.
Join For FreeOne of the most important aspects of the ‘IoT’ world is having secure communication. Running MQTT on lwIP (see MQTT with lwIP and NXP FRDM-K64F Board) is no exception. Despite the popularity of MQTT and lwIP, I have not been able to find an example using a secure TLS connection over raw/native lwIP TCP. Could it be that such an example exists, and I have not found it? Or that someone implemented it, but has not published it? Are others asking for the same kind of thing “running MQTT on lwIP with TLS” with no answer? So I have to answer my question, which seems to be a good thing anyway: I can learn new things the hard way.
This article describes how to enable a bare-metal (no RTOS) in RAW/native (no sockets, TCP only) lwIP application running the MQTT protocol with TLS.
The project used in this article is available on GitHub.
The project runs an MQTT client application, which initiates TLS handshaking and then communicates securely with a Mosquitto broker.
Prerequisites: Software/Tools
In this series, I'll use the following software and tools:
- MQTT broker running with TLS on port 8883, e.g. see Enable Secure Communication with TLS and the Mosquitto Broker
- MCUXpresso IDE v10.0.0 b344: http://www.nxp.com/mcuxpresso/ide
- MCUXpresso SDK for FRDM-K64F: https://mcuxpresso.nxp.com/ which includes
- lwIP 2.0.0
- mbed TLS 2.3.0
- MQTT lwIP stub from lwIP 2.0.2: https://savannah.nongnu.org/projects/lwip/
- mbed TLS 2.4.2 (Apache): https://tls.mbed.org/download
- Optional: Processor Expert v3.2.0 (see MCUXpresso IDE: Installing Processor Expert into Eclipse Neon)
- TCP based (raw) example, e.g. the lwIP TCP ping application (or the project from MQTT with lwip and NXP FRDM-K64F Board).
But any other software/tool combination should do it too :-).
As outlined in Introduction to Security and TLS (Transport Layer Security), I have selected mbed TLS because its licensing terms are very permissive (Apache).
Get mbed TLS (I recommend the Apache version as it is permissive).
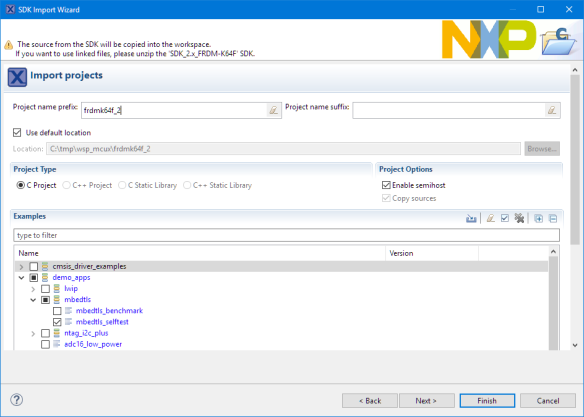
Another way is to get it from the NXP MCUXpresso SDK for the FRDM-K64F. Use the ‘import SDK examples’ function from the quickstart panel and import the mbedtls_selftest example. The advantage of this method is that it comes with the random number generator drivers (RNG):
Adding mbedTLS
From the mbed TLS distribution, add the ‘mbedtls’ folder to the project. You need
- mbedtls\include\mbedtls
- mbedtls\library
The mbed TLS implementation uses a ‘port’ which takes advantage of the hardware encryption unit of the on the NXP Kinetis K64F device. That ‘port’ is part of the MCUXpresso SDK, place it inside mbedtls\port.
And finally I need the driver for the mmCAU (Memory-Mapped Cryptographic Acceleration Unit) of the NXP Kinetis device:
- mmcau_common: common mmCAU files and interface
- \libs\lib_mmcau.a: library with cryptographic routines
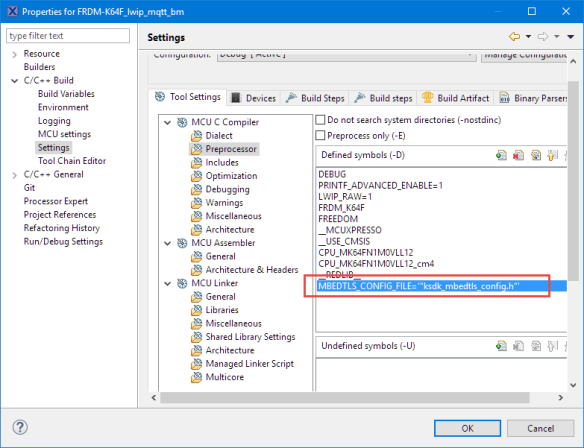
The mbed configuration file is included with a preprocessor symbol. Add the following to compiler Preprocessor defined symbols:
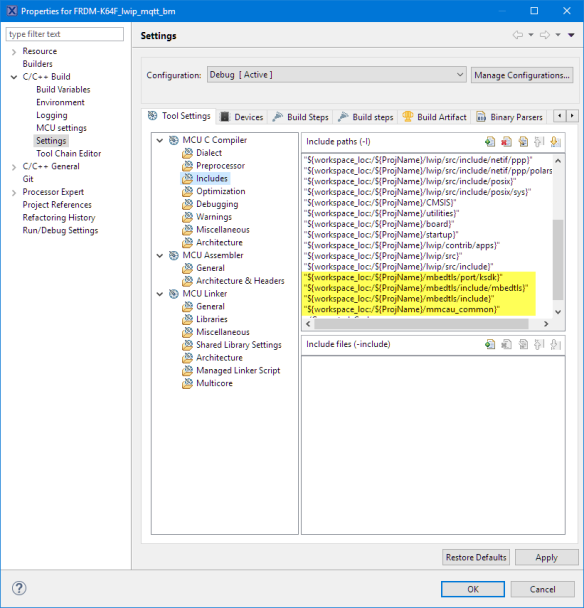
MBEDTLS_CONFIG_FILE='"ksdk_mbedtls_config.h"'Next, add the following to compiler include path settings so it can find all the needed header files:
"${workspace_loc:/${ProjName}/mbedtls/port/ksdk}"
"${workspace_loc:/${ProjName}/mbedtls/include/mbedtls}"
"${workspace_loc:/${ProjName}/mbedtls/include}"
"${workspace_loc:/${ProjName}/mmcau_common}"And add the mmCAU library to the linker options so it gets linked with the application (see Creating and using Libraries with ARM gcc and Eclipse):
Last but not least, make sure that the random number generator (RNG) source files of the MCUXpresso SDK are part of the project:
- drivers/fsl_rnga.c
- drivers/fsl_rnga.h
This completes the files and settings to add mbed TLS to the project.
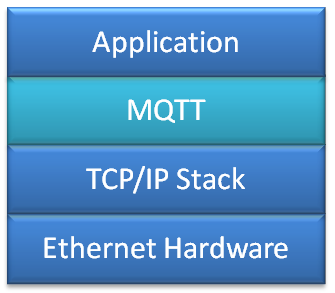
In an application with MQTT, the MQTT communication protocol is handled between the application and the stack:
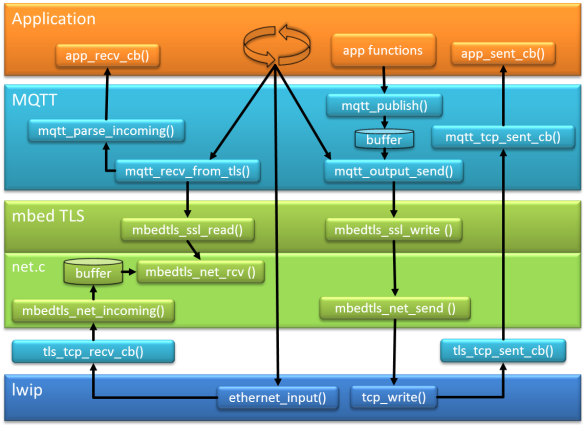
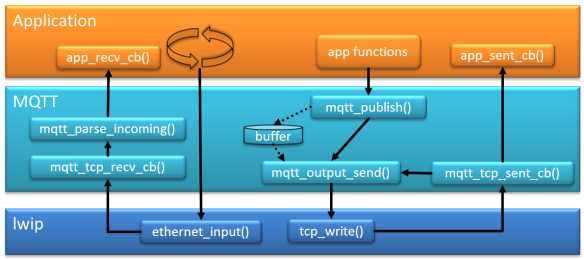
The block diagram below shows the general flow of the MQTT application interacting with lwip in RAW (tcp) mode. With lwip the application has basically two call backs:
- recv_cb(): callback called when we receive a packet from the network
- sent_cb(): callback called *after* a packet has been sent
There is yet another call back, the error callback. To keep things simple, I ignore that callback here.s
In raw/bare metal mode, the application calls ethernet_input() which calls the ‘received’ callback. With using MQTT, the MQTT parses the incoming data and passes it to the application (e.g. CONNACK message).
If the application is e.g. sending a PUBLISH request, that TCP message is constructed by the MQTT layer and put into a buffer (actually a ring buffer). That data is only sent if the mqtt_output_send() is called (which is not available to the application). mqtt_output_send() is called for ‘sending’ functions like mqtt_publish() or as a side effect of the mqtt_tcp_sent_cb() callback which is called after a successful tcp_write(). The MQTT sent_cb() is forwarded to the application sent_cb() callback.
Conclusion
Now that we've done some of the legwork, next time, we'll start putting everything together. Part 2 will focus on combining TLS with MQTT, setting up our encryption in detail.
Published at DZone with permission of Erich Styger, DZone MVB. See the original article here.
Opinions expressed by DZone contributors are their own.




Comments