Securing Legacy Apps With OAuth 2.0 and Spring Cloud Gateway
Join the DZone community and get the full member experience.
Join For FreeDo you find it painful to modernize your old, form-based logins? It doesn’t have to be that way. The lack of support in the underlying framework can make adding OAuth 2.0 support to legacy applications tough, but this blog post will show you a low-code way to use Spring Cloud Gateway and Okta to secure your legacy apps.
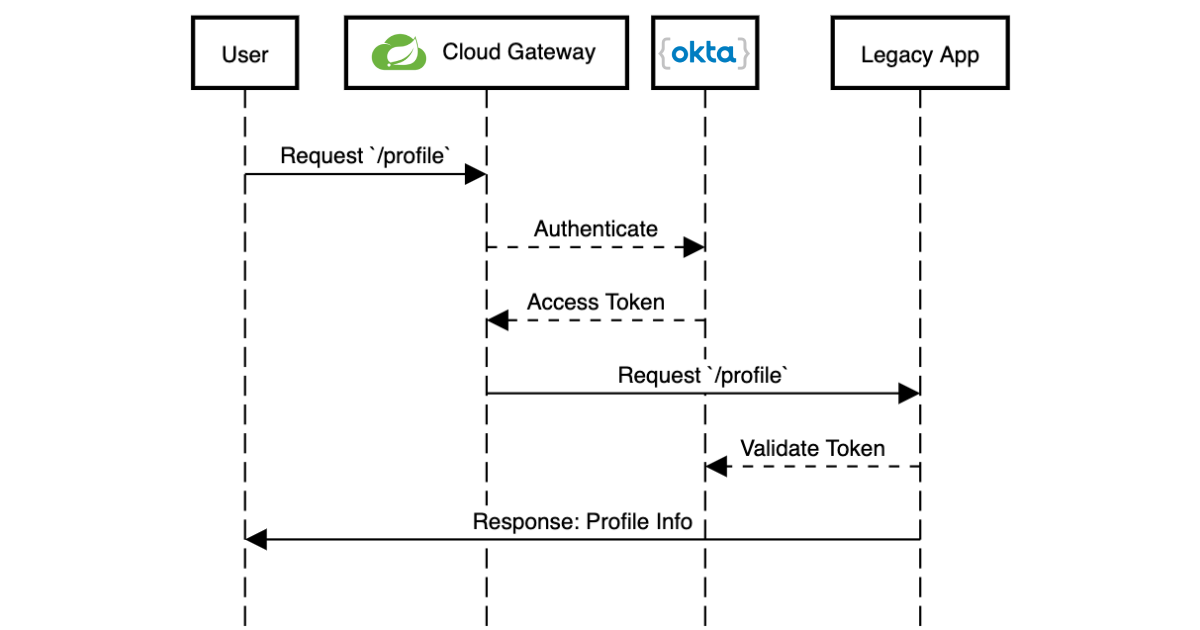
Learn how to set up Spring Cloud Gateway as a standalone application that proxies HTTP requests and handles OAuth before sending the request to your app.
Create a Spring Cloud Gateway Project
The first step is to create a new project on the Spring Initializr. I typically create it from my IDE or the command line:
curl https://start.spring.io/starter.tgz -d dependencies=okta,cloud-gateway,cloud-security \
-d groupId=com.okta.tutorial \
-d artifactId=example-gateway \
-d packageName=com.okta.tutorial \
-d baseDir=cloud-gateway \
-d bootVersion=2.2.2.RELEASE | tar -xzvf -
cd cloud-gateway
 |
If you create the project through your IDE or the Web interface, use the dependencies "Okta", "Gateway", and "Cloud Security." |
Rename your src/main/resources/application.properties to application.yml (more on that in a moment).
Next, secure the new application with OIDC/OAuth 2.0.
If you already have an Okta account, see the Create a Web Application in Okta sidebar below. Otherwise, we created a Maven plugin that configures a free Okta developer account + an OIDC app (in under a minute!).
To use it run: ./mvnw com.okta:okta-maven-plugin:setup to create an account and configure your Spring Boot app to work with Okta.
Create a Web Application in Okta
Log in to your Okta Developer account (or sign up if you don’t have an account).
From the Applications page, choose Add Application.
On the Create New Application page, select Web.
Give your app a memorable name, add
http://localhost:8080/login/oauth2/code/oktaas a Login redirect URI, select Refresh Token (in addition to Authorization Code), and click Done.
Copy the issuer (found under API > Authorization Servers), client ID, and client secret into application.yml for both projects.
xxxxxxxxxx
okta
oauth2
issuer$yourOktaDomain/oauth2/default
client-id$clientId
client-secret$clientSecret
Configure Spring Cloud Gateway Routes
Next, you’ll configure Spring Cloud Gateway to forward routes to your legacy application. For this post, the legacy application serves two paths / and /profile.
Once again in your application.yml file, add the following block:
xxxxxxxxxx
spring
cloud
gateway
routes
idservlet-app
urihttp//localhost8000
predicates
Path=/profile,/
filters
TokenRelay=
| The Base URL for the "legacy" application. | |
Define the two paths to forward: /profile and / |
|
| Includ OAuth access tokens to the downstream request |
If this is too much YAML for you, replace the above block with the following Java code in DemoApplication:
xxxxxxxxxx
package com.okta.tutorial;
import org.springframework.boot.SpringApplication;
import org.springframework.boot.autoconfigure.SpringBootApplication;
import org.springframework.cloud.gateway.route.RouteLocator;
import org.springframework.cloud.gateway.route.builder.RouteLocatorBuilder;
import org.springframework.cloud.security.oauth2.gateway.TokenRelayGatewayFilterFactory;
import org.springframework.context.annotation.Bean;
public class DemoApplication {
public static void main(String[] args) {
SpringApplication.run(DemoApplication.class, args);
}
public RouteLocator customRouteLocator(RouteLocatorBuilder builder, TokenRelayGatewayFilterFactory tokenRelay) {
return builder.routes()
.route("servlet-app", r -> r.path("/profile", "/")
.filters(f -> f.filter(tokenRelay.apply()))
.uri("http://localhost:8000"))
.build();
}
}
That’s it! Start it up by running ./mvnw spring-boot:run.
A quick recap before we move on: that application.yml has a lot going on. It contains the OAuth 2.0 configuration (issuer, client ID, client secret) and everything needed to securely proxy to the legacy application.
Update a Legacy Application
Updating a legacy application usually isn’t simple; if it were, you probably wouldn’t have assigned the "legacy" label to it! To keep things focused, I’ve created a straightforward servlet application that contains a single servlet:
xxxxxxxxxx
(name = "UserProfile", urlPatterns = {"/", "/profile"})
public class UserProfileServlet extends HttpServlet {
protected void doGet(HttpServletRequest request, HttpServletResponse response) throws ServletException, IOException {
request.setAttribute("email", "[email protected]"); // faking an existing service
Map<String, String> attributes = new HashMap<String, String>();
attributes.put("sub", "[email protected]"); // more fake data
request.setAttribute("userAttributes", attributes);
request.getRequestDispatcher("/WEB-INF/user-profile.jsp").forward(request, response);
}
}
Grab the full code on GitHub (in the original-servlet-app branch):
xxxxxxxxxx
git clone https://github.com/oktadeveloper/okta-legacy-with-cloud-gateway-example.git -b original-servlet-app
cd okta-legacy-with-cloud-gateway-example/legacy-servlet-app
The above example uses static strings, a real application likely has a form to collect a username and password along with a user service that connects to a database; you can use your imagination. ��
Start this application with ./mvnw jetty:run and browse to http://localhost:8080.
 |
This application is running on port 8000 and the gateway application above on port 8080. Make sure you are using the 8080 URL in order to access the application through the gateway. |
Turn the Legacy Application Into an OAuth Resource Server
You can now access the servlet application through Spring Cloud Gateway! Now it’s time to secure it. To do that, add a servlet Filter to validate the access token added by Spring Cloud Gateway.
Add a new class: src/main/java/com/okta/example/BearerTokenFilter.java
xxxxxxxxxx
package com.okta.example;
import com.okta.jwt.AccessTokenVerifier;
import com.okta.jwt.Jwt;
import com.okta.jwt.JwtVerificationException;
import com.okta.jwt.JwtVerifiers;
import javax.servlet.Filter;
import javax.servlet.FilterChain;
import javax.servlet.FilterConfig;
import javax.servlet.ServletException;
import javax.servlet.ServletRequest;
import javax.servlet.ServletResponse;
import javax.servlet.annotation.WebFilter;
import javax.servlet.http.HttpServletRequest;
import javax.servlet.http.HttpServletResponse;
import java.io.IOException;
(urlPatterns = "*")
public class BearerTokenFilter implements Filter {
public static final String ACCESS_TOKEN = "jwtAccessToken";
private static final String ISSUER_KEY = "okta.oauth2.issuer";
private AccessTokenVerifier tokenVerifier;
public void init(FilterConfig filterConfig) throws ServletException {
String issuer = System.getProperty(ISSUER_KEY, filterConfig.getInitParameter(ISSUER_KEY));
tokenVerifier = JwtVerifiers.accessTokenVerifierBuilder()
.setIssuer(issuer)
.build();
}
public void doFilter(ServletRequest servletRequest, ServletResponse servletResponse, FilterChain filterChain) throws IOException, ServletException {
HttpServletRequest request = (HttpServletRequest) servletRequest;
HttpServletResponse response = (HttpServletResponse) servletResponse;
String authHeader = request.getHeader("Authorization");
if (authHeader == null || !authHeader.startsWith("Bearer ")) {
request.getServletContext().log("Missing or invalid 'Authorization' header");
respondWith401(response);
return;
}
String token = authHeader.replaceFirst("^Bearer ", "");
try {
Jwt jwtAccessToken = tokenVerifier.decode(token);
// invalid access tokens will throw an exception
// add the access token as a request attribute
request.setAttribute(ACCESS_TOKEN, jwtAccessToken);
filterChain.doFilter(request, response);
} catch (JwtVerificationException e) {
request.getServletContext().log("Failed to parse access token", e);
respondWith401(response);
}
}
private void respondWith401(HttpServletResponse response) throws IOException {
response.setStatus(401);
response.setHeader("WWW-Authenticate","Bearer");
response.getWriter().write("Authentication required");
}
public void destroy() {
tokenVerifier = null;
}
}
Update the Servlet with Access Token Data
The last step is to update the UserProfileServlet with data from the JWT access token. To do so, replace the doGet() method with the one below:
xxxxxxxxxx
protected void doGet(HttpServletRequest request, HttpServletResponse response) throws ServletException, IOException {
Jwt accessToken = (Jwt) request.getAttribute(BearerTokenFilter.ACCESS_TOKEN);
request.setAttribute("email", accessToken.getClaims().get("sub"));
request.setAttribute("userAttributes", accessToken.getClaims());
request.getRequestDispatcher("/WEB-INF/user-profile.jsp").forward(request, response);
}
Test Out Your Secure Application!
Before restarting the servlet application, grab the "issuer" URL you used in the first step by copying it from src/main/resources/application.yml. You can also find this in your Okta Admin Console under API → Authorization Servers.
Start the legacy application with:
xxxxxxxxxx
./mvnw jetty:run -Dokta.oauth2.issuer=${yourIssuer}
That is it! Open an incognito/private browser and navigate to http://localhost:8080/ where you’ll be redirected to Okta for login and then back to the profile page!

Learn More About Java Web Security
In this post, you learned how to secure a simple servlet application with OAuth 2.0 and just a few lines of code (plus a healthy dose of configuration and error handling). You also used Spring Cloud Gateway to proxy and secure requests before they even get to your application!
The full source code for this post is available on GitHub.
If you want to learn more about Java, Spring, and securing applications, check out the following posts:
- Spring Method Security with PreAuthorize
- Angular 8 + Spring Boot 2.2: Build a CRUD App Today!
- A Quick Guide to Spring Boot Login Options
To discover more posts like this one, follow @oktadev on Twitter and subscribe to our YouTube channel.
Published at DZone with permission of Brian Demers. See the original article here.
Opinions expressed by DZone contributors are their own.
Comments