Server-Side Pagination Using ASP.NET Core and Angular 8
Join the DZone community and get the full member experience.
Join For Free
Introduction
In this article, we will learn how to create server-side pagination, which is very useful whenever we have to display a large number of records.
This will come in a total of three articles. In this article, we are displaying a number of records, and with that, we will calculate the number of pages needed. But, in one page, we can see only selected records, so rather than fetching all records at one time, we are going to fetch records based on pages. This will increase our performance.
How Will it Work?
Suppose we have 500 records to display in the frontend and we are displaying only 100 records per page. When you click on page 2, it will display the next 100 records and so on. In Angular, we can use pipes and install some packages to display pagination, but here, if we are only showing 100 records at one time, then why fetch all 500 records at once?
It would be better if we fetch only 100 records at one time and when you click on next page, the application will fetch the next 100 records of that particular page.
Prerequisites
- Basic knowledge of Angular.
- Visual Studio Code must be installed.
- Angular CLI must be installed.
- Node JS must be installed.
- Microsoft Visual Studio 2017 must be installed.
- SQL server 2014.
You may also like: Pagination and Sorting With Spring Data JPA.
Backend
Here we will be implementing most of our logic with SQL server. The very first step is to create a database.
Step 1
Let’s create a database on your local SQL Server. I hope you have installed SQL Server 2017 in your machine (you can use SQL Server 2008, 2012, or 2016, as well).
create database company
Step 2
Create Company Details Table by using the following code:
xxxxxxxxxx
CREATE TABLE [dbo].[CompanyDetails](
[CompanyId] [int] IDENTITY(1,1) NOT NULL,
[CompanyName] [nvarchar](100) NULL,
[City] [nvarchar](50) NULL,
[State] [nvarchar](50) NULL,
[Owner] [nvarchar](50) NULL,
[PublishYear] [int] NULL,
CONSTRAINT [PK_CompanyDetails] PRIMARY KEY CLUSTERED
(
[CompanyId] ASC
)WITH (PAD_INDEX = OFF, STATISTICS_NORECOMPUTE = OFF, IGNORE_DUP_KEY = OFF, ALLOW_ROW_LOCKS = ON, ALLOW_PAGE_LOCKS = ON) ON [PRIMARY]
) ON [PRIMARY]
GO
Now, let's add a Store Procedure.
Step 3
Create a Stored Procedure with the following code:
GetAllCompanies
xxxxxxxxxx
Create Proc [dbo].[Usp_GetAllCompanies]
@PageNo INT ,
@PageSize INT ,
@SortOrder VARCHAR(200)
As
Begin
Select * From (Select ROW_NUMBER() Over (
Order by CompanyName ) AS 'RowNum', *
from [CompanyDetails]
)t where t.RowNum Between ((@PageNo-1)*@PageSize +1) AND (@PageNo*@pageSize)
End
GetAllCompaniesCount
xxxxxxxxxx
Create Proc [dbo].[Usp_getAllCompaniesCount]
As
Begin
select count(CompanyId) from [CompanyDetails]
End
Web API
Create an ASP.NET Core application
Follow these steps to create an ASP.NET Core application.
Step 1
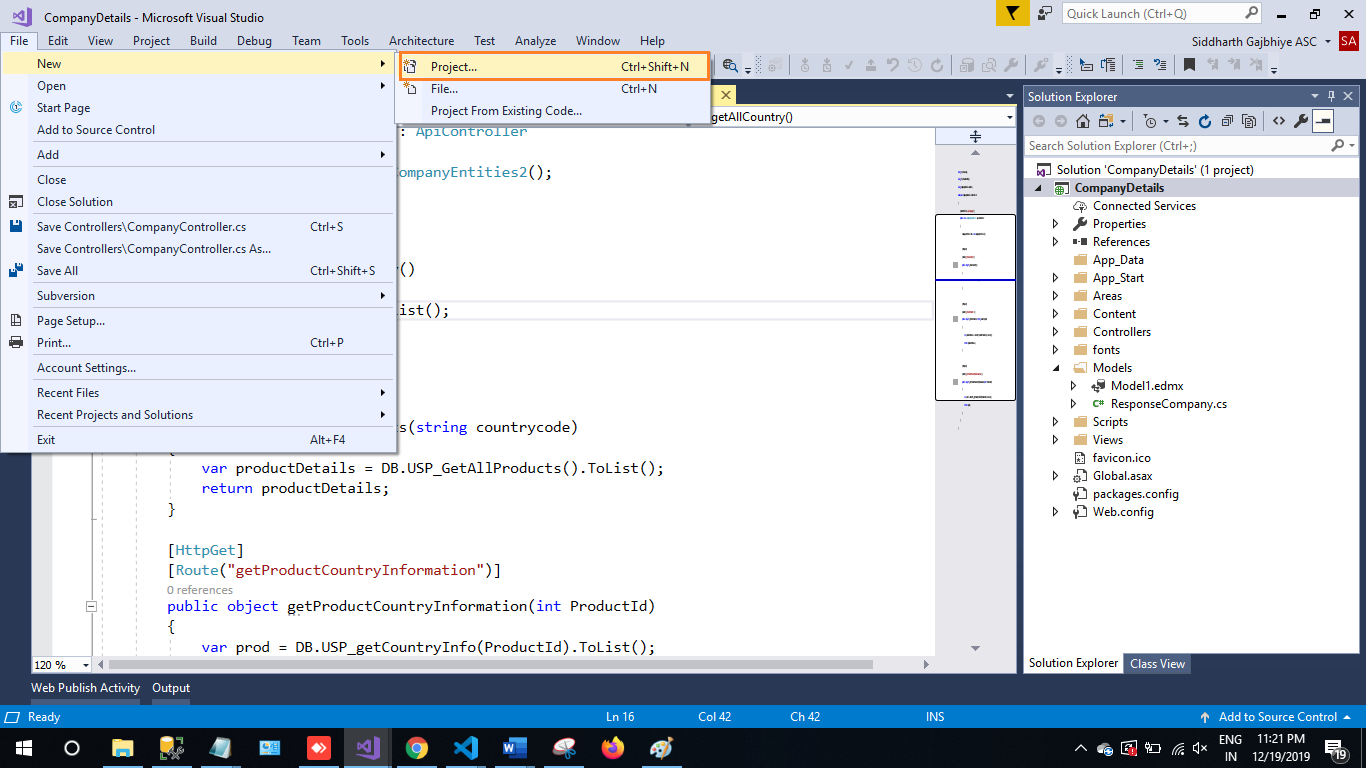
In Visual Studio 2019, click on File -> New -> Project.
Step 2
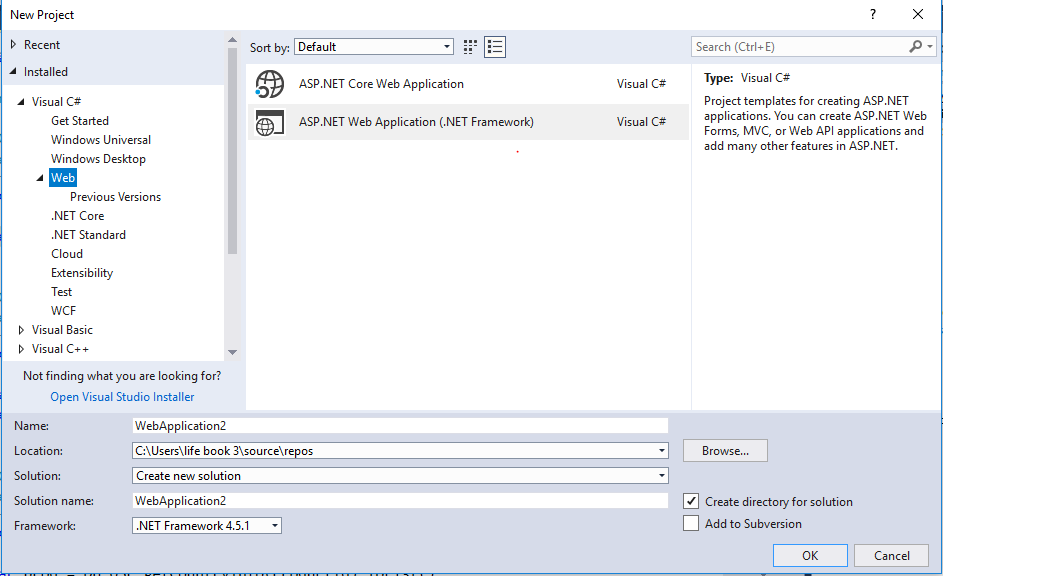
Choose the Create option and select ASP.NET web application.
Step 3
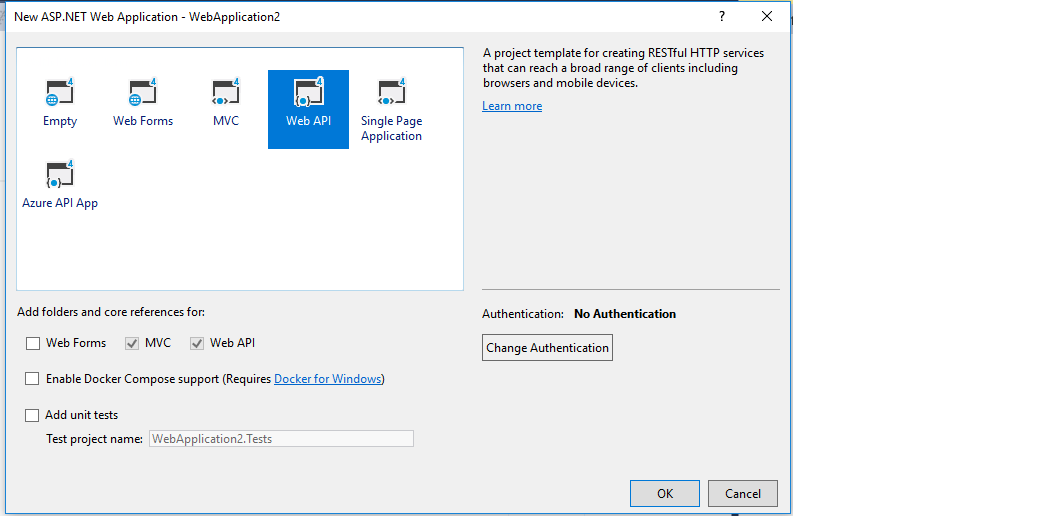
Select Web API and click Ok.
Step 4
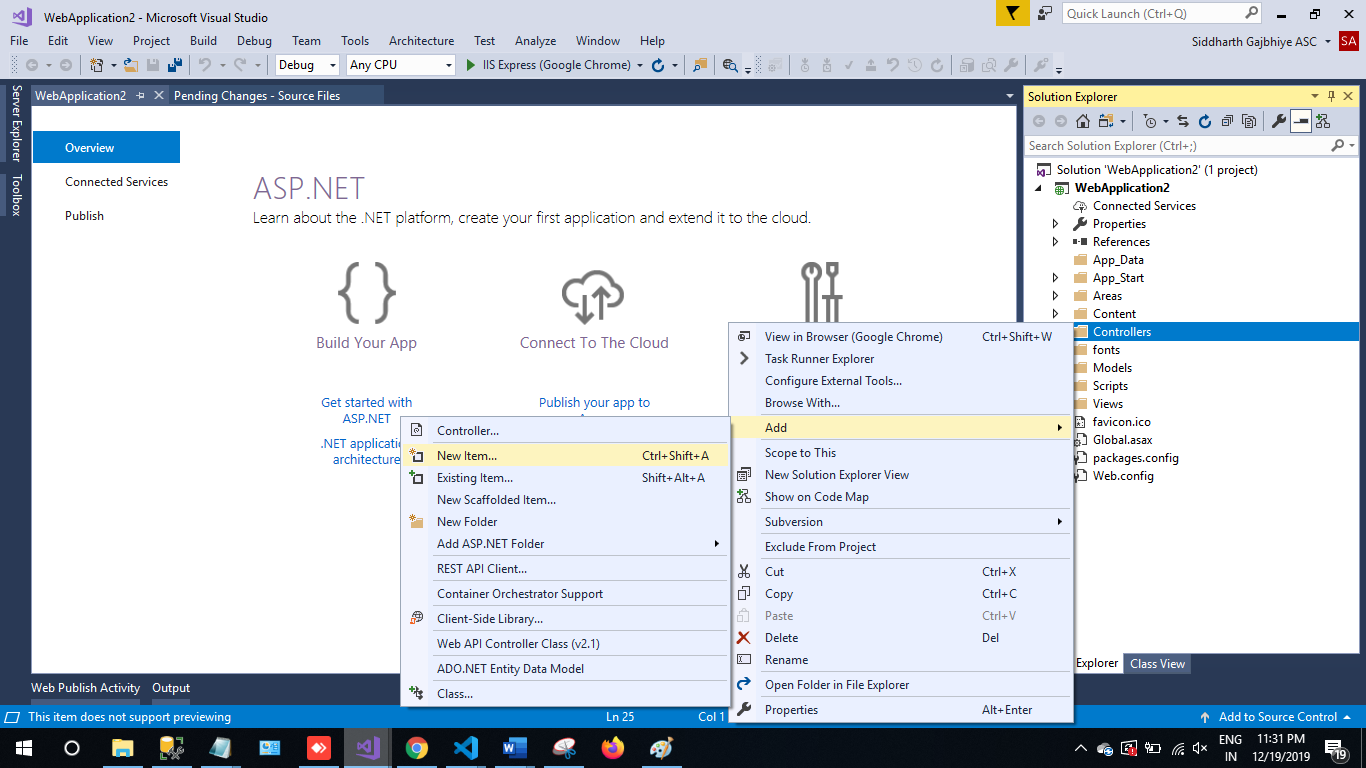
Now, right-click on controller and then add a new item.
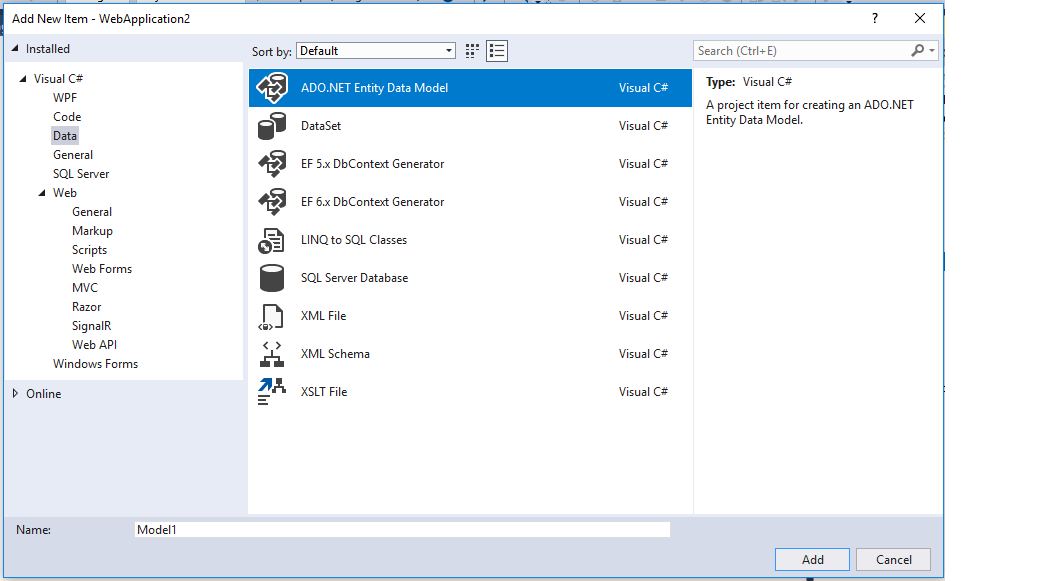
Step 5
Choose ADO.NET Entity Data Model and then click on Add.
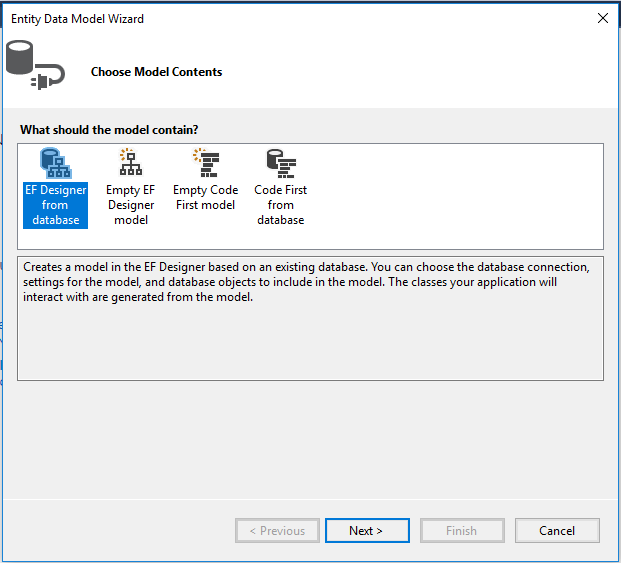
Step 6
The next step is EF Designer; just click on Next.
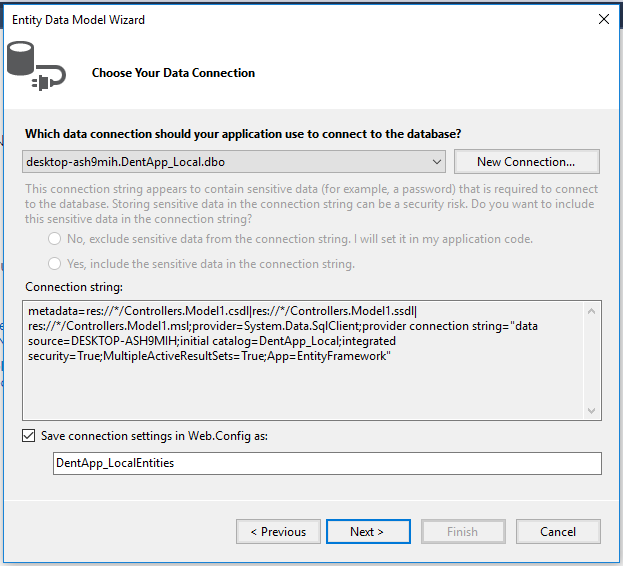
Step 7
A new pop-up will show. Click on next. If yours isn't established, then click on new connection.
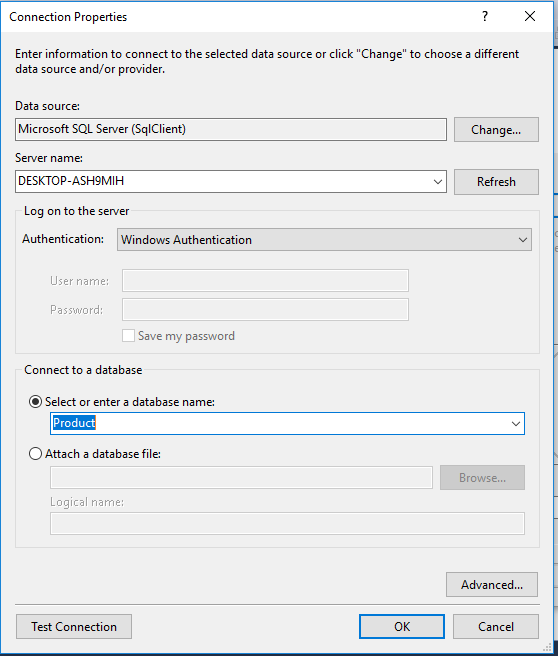
Step 8
Copy your database connection server name and paste it in the server name textbox. You will see all the databases; select your database and click Ok.
Step 9
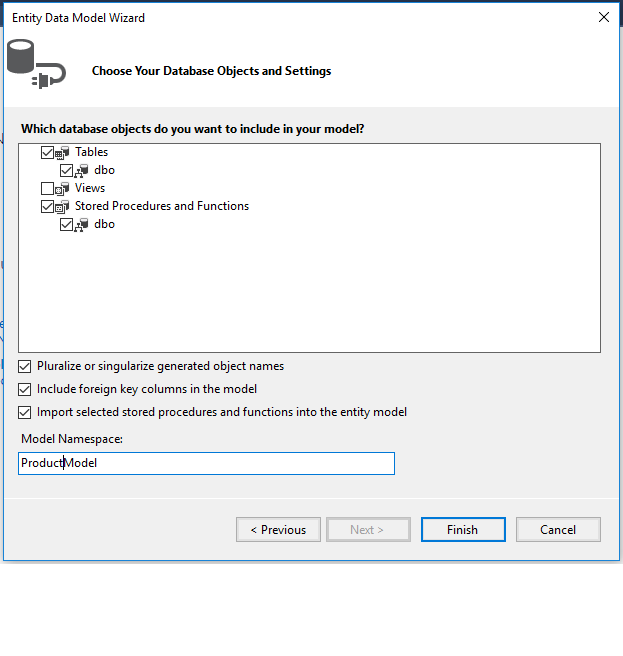
The next popup will show. Paste your database server name, choose the correct database, test for the connection, and then click Next. Here, in the new screen, select your tables and store the procedure. Then, click Finish.
Our next step is to right-click on the controllers folder and add a new controller. Name it Paginationcontroller and add the following namespace in the Paginationcontroller.
Here is the complete code for getting all the Pagination records.
Complete Pagination controller code
xxxxxxxxxx
using System.Collections.Generic;
using System.Data.Entity.Core.Objects;
using System.Linq;
using System.Web.Http;
using Pagination.Models;
namespace Pagination.Controllers
{
public class PaginationController : ApiController
{
CompanyEntities2 db = new CompanyEntities2();
[HttpGet]
public object getAllCompanies(int pageNo, int pageSize, string sortOrder)
{
var oMyString = new ObjectParameter("totalCount", typeof(int));
var companyDetails = db.Usp_GetAllCompanies(pageNo, pageSize, sortOrder).ToList();
return companyDetails;
}
[HttpGet]
public object getAllCompaniesCount()
{
var companyDetailsCount = db.Usp_getAllCompaniesCount().SingleOrDefault();
return companyDetailsCount;
}
}
}
Frontend
Step 1
Let's create an Angular project using the following npm command:
xxxxxxxxxx
ng new pagination
Step 2
Open the newly created project in Visual Studio Code and install Bootstrap in the project:
xxxxxxxxxx
npm install bootstrap --save
Now, open the styles.css file and add a Bootstrap file reference. To add a reference in the styles.css file, add this line:
xxxxxxxxxx
@import '~bootstrap/dist/css/bootstrap.min.css';
Step 3
Now, let's create a new component by using the following command:
xxxxxxxxxx
ng g c pagination
Step 4
Now, create a new service using the following command:
xxxxxxxxxx
ng generate service pagination
Step 5
Now, open the pagination.component.html file and paste the following code to see the HTML template.
xxxxxxxxxx
<div class="row">
<div class="col-12 col-md-12">
<div class="card">
<div class="card-header">
Companies 1-{{pageSize}} (Total:{{totalCompaniesCount}})
</div>
<div class="card-body position-relative">
<div class="table-responsive cnstr-record companie-tbl">
<table class="table table-bordered heading-hvr">
<thead>
<tr>
<th style="cursor: pointer;" [ngClass]="order =='CompanyNumber'? 'active':''"
(click)="setOrder('CompanyNumber')" width="80">Company Name.</th>
<th style="cursor: pointer;" [ngClass]="order =='CompanyType'? 'active':''"
(click)="setOrder('CompanyType')" width="75">City</th>
<th [ngClass]="order =='CompanyName'? 'active':''" style="cursor: pointer;"
(click)="setOrder('CompanyName')">State
</th>
<th [ngClass]="order =='OrgNo'? 'active':''" style="cursor: pointer;" (click)="setOrder('OrgNo')"
width="75">Owner
</th>
<th [ngClass]="order =='Street'? 'active':''" style="cursor: pointer; width:250px"
(click)="setOrder('Street')">Publish Year</th>
</tr>
</thead>
<tbody>
<tr *ngFor="let item of companies">
<td>{{item.CompanyName}}</td>
<td>{{item.City}}</td>
<td>{{item.State}}</td>
<td>{{item.Owner}}</td>
<td>{{item.PublishYear}}</td>
</tr>
</tbody>
</table>
</div>
<!-- Code by pagination -->
<div class="container mw-100">
<div class="row">
<div class="col-md-3"> </div>
<div *ngIf="companies !=0" class="col-md-6">
<ul class="pagination justify-content-center">
<li *ngFor="let page of pageField;let i=index" class="page-item">
<a (click)="showCompaniesByPageNumber(page,i)" [ngClass]="pageNumber[i] ? 'pageColor':'page-link'"
style=" margin-right: 5px;;margin-top: 5px">{{page}}</a>
</li>
</ul>
<div style="text-align: center;">
Page {{currentPage}} of Total page {{paginationService.exactPageList}}
</div>
</div>
</div>
</div>
</div>
</div>
</div>
</div>
Step 6
After this, open pagination.component.ts file and add the following code in this file:
xxxxxxxxxx
import { Component, OnInit } from '@angular/core';
import { ApiService } from './api.service';
import { PaginationService } from './pagination.service';
@Component({
selector: 'app-pagination',
templateUrl: './pagination.component.html',
styleUrls: ['./pagination.component.css']
})
export class PaginationComponent implements OnInit {
companies = [];
pageNo: any = 1;
pageNumber: boolean[] = [];
sortOrder: any = 'CompanyName';
//Pagination Variables
pageField = [];
exactPageList: any;
paginationData: number;
companiesPerPage: any = 5;
totalCompanies: any;
totalCompaniesCount: any;
constructor(public service: ApiService, public paginationService: PaginationService) { }
ngOnInit() {
this.pageNumber[0] = true;
this.paginationService.temppage = 0;
this.getAllCompanies();
}
getAllCompanies() {
this.service.getAllCompanies(this.pageNo, this.companiesPerPage, this.sortOrder).subscribe((data: any) => {
this.companies = data;
this.getAllCompaniesCount();
})
}
//Method For Pagination
totalNoOfPages() {
this.paginationData = Number(this.totalCompaniesCount / this.companiesPerPage);
let tempPageData = this.paginationData.toFixed();
if (Number(tempPageData) < this.paginationData) {
this.exactPageList = Number(tempPageData) + 1;
this.paginationService.exactPageList = this.exactPageList;
} else {
this.exactPageList = Number(tempPageData);
this.paginationService.exactPageList = this.exactPageList
}
this.paginationService.pageOnLoad();
this.pageField = this.paginationService.pageField;
}
showCompaniesByPageNumber(page, i) {
this.companies = [];
this.pageNumber = [];
this.pageNumber[i] = true;
this.pageNo = page;
this.getAllCompanies();
}
getAllCompaniesCount() {
this.service.getAllCompaniesCount().subscribe((res: any) => {
this.totalCompaniesCount = res;
this.totalNoOfPages();
})
}
}
Step 7
Next, open the pagination.component.css file and paste the code to add some styling:
xxxxxxxxxx
@charset "utf-8";
/* CSS Document */
@media all{
*{padding:0px;margin:0px;}
div{vertical-align:top;}
img{max-width:100%;}
html {font-smoothing:antialiased; osx-font-smoothing:grayscale;}
body{overflow:auto!important; width:100%!important;}
html, body{background-color:#e4e5e6;}
html {position:relative; min-height:100%;}
.card{border-radius:4px;}
.card-header:first-child {border-radius:4px 4px 0px 0px;}
/*Typekit*/
html, body{font-family:'Roboto', sans-serif; font-weight:400; font-size:13px;}
body{padding-top:52px;}
p{font-family:'Roboto', sans-serif; color:#303030; font-weight:400; margin-bottom:1rem;}
input, textarea, select{font-family:'Roboto', sans-serif;}
h1,h2,h3,h4,h5,h6{font-family:'Roboto', sans-serif; font-weight:700;}
h1{font-size:20px; color:#000000; margin-bottom:10px;}
h2{font-size:30px;}
h3{font-size:24px;}
h4{font-size:18px;}
h5{font-size:14px;}
h6{font-size:12px;}
.row {margin-right:-8px; margin-left:-8px;}
.col, .col-1, .col-10, .col-11, .col-12, .col-2, .col-3, .col-4, .col-5, .col-6, .col-7, .col-8, .col-9, .col-auto, .col-lg, .col-lg-1, .col-lg-10, .col-lg-11, .col-lg-12, .col-lg-2, .col-lg-3, .col-lg-4, .col-lg-5, .col-lg-6, .col-lg-7, .col-lg-8, .col-lg-9, .col-lg-auto, .col-md, .col-md-1, .col-md-10, .col-md-11, .col-md-12, .col-md-2, .col-md-3, .col-md-4, .col-md-5, .col-md-6, .col-md-7, .col-md-8, .col-md-9, .col-md-auto, .col-sm, .col-sm-1, .col-sm-10, .col-sm-11, .col-sm-12, .col-sm-2, .col-sm-3, .col-sm-4, .col-sm-5, .col-sm-6, .col-sm-7, .col-sm-8, .col-sm-9, .col-sm-auto, .col-xl, .col-xl-1, .col-xl-10, .col-xl-11, .col-xl-12, .col-xl-2, .col-xl-3, .col-xl-4, .col-xl-5, .col-xl-6, .col-xl-7, .col-xl-8, .col-xl-9, .col-xl-auto {padding-right:8px; padding-left:8px;}
.card-header{background-color:#f0f3f5; border-bottom:1px solid #c8ced3; font-size:13px; font-weight:600; color:#464646; text-transform:uppercase; padding:.75rem 8px;}
.cnstr-record th{white-space:nowrap;padding:.45rem .2rem; font-size:13px; border-bottom-width:0px!important;}
.cnstr-record thead{background:#f0f3f5;}
.cnstr-record .form-control{font-size:13px; padding:0px 0rem 0px 0.2rem; height:calc(2rem + 2px);}
.cnstr-record select.form-control{padding-left:.05rem;}
.cnstr-record .table td, .cnstr-record .table th {vertical-align:middle;}
.cnstr-record .table td{padding:.3rem;}
.cnstr-record .table td h4{margin:0px;}
.wp-50{width:50px;}
.wp-60{width:60px;}
.wp-70{width:70px;}
.wp-80{width:80px;}
.wp-90{width:90px;}
.wp-100{width:100px;}
.mw-auto{min-width:inherit;}
.expand-row{width:100%; border:solid 1px #596269; display:inline-block; border-radius:3px; width:16px; height:16px; vertical-align:top; background:#596269; color:#ffffff!important;}
.expand-row img{vertical-align:top; position:relative; top:2px;}
.sub-table th{font-weight:400; font-size:12px;}
.sub-table td{background:#efefef;}
.no-bg td{background:inherit;}
.mw-100{max-width:100%;}
.activeTabColor{
color: #fff;
background-color: #000000;
}
.page-item:first-child .page-link {
margin-left: 0;
border-top-left-radius: .25rem;
border-bottom-left-radius: .25rem;
}
.pageColor{
position: relative;
display: block;
padding: .5rem .75rem;
margin-left: -1px;
line-height: 1.25;
color: white!important;
background-color: black!important;
border: 1px solid #dee2e6;
}
.notAllowed{
position: relative;
display: block;
padding: .5rem .75rem;
margin-left: -1px;
line-height: 1.25;
color: #007bff;
background-color: #fff;
border: 1px solid #dee2e6;
cursor: not-allowed;
}
.page-link {
position: relative;
display: block;
padding: .5rem .75rem;
margin-left: -1px;
line-height: 1.25;
color: #007bff;
background-color: #fff;
border: 1px solid #dee2e6;
}
}
Step 8
Lastly, open pagination.service.ts file and add services to call our API.
xxxxxxxxxx
import { Injectable } from '@angular/core';
@Injectable()
export class PaginationService {
//Pagination Variables
temppage: number = 0;
pageField = [];
exactPageList: any;
constructor() {
}
// On page load
pageOnLoad() {
if (this.temppage == 0) {
this.pageField = [];
for (var a = 0; a < this.exactPageList; a++) {
this.pageField[a] = this.temppage + 1;
this.temppage = this.temppage + 1;
}
}
}
}
Step 9
Let's add the following code in the api.service.ts file:
xxxxxxxxxx
import { Injectable } from '@angular/core';
import { HttpClient } from '@angular/common/http';
import { Observable } from 'rxjs';
@Injectable({
providedIn: 'root'
})
export class ApiService {
private url = "";
constructor(public http: HttpClient) {
}
getAllCompanies(pageNo,pageSize,sortOrder): Observable<any> {
this.url = 'http://localhost:59390/api/Pagination/getAllCompanies?pageNo=' + pageNo+'&pageSize='+pageSize+'&sortOrder='+sortOrder;
return this.http.get(this.url);
}
getAllCompaniesCount(): Observable<any> {
this.url = 'http://localhost:59390/api/Pagination/getAllCompaniesCount';
return this.http.get(this.url);
}
}
Step 10
The next and last step is to add the app module file in your project.
xxxxxxxxxx
import { BrowserModule } from '@angular/platform-browser';
import { NgModule } from '@angular/core';
import { AppComponent } from './app.component';
import { ApiService } from './pagination/api.service';
import { HttpClientModule } from '@angular/common/http';
import { PaginationService } from './pagination/pagination.service';
import { PaginationComponent } from './pagination/pagination.component';
@NgModule({
declarations: [
AppComponent,
PaginationComponent
],
imports: [
BrowserModule,
HttpClientModule
],
providers: [ApiService,PaginationService],
bootstrap: [AppComponent]
})
export class AppModule { }
Step 11
Now, it's time to see the output. To do this, open your terminal and type ng serve -o to compile and open automatically in your browser.
Here, the total number of records is 33. Based on the logic implemented in our frontend, we will calculate the number of pages we need. We are displaying five records per page, so we need seven total pages, where the last will only display three records. 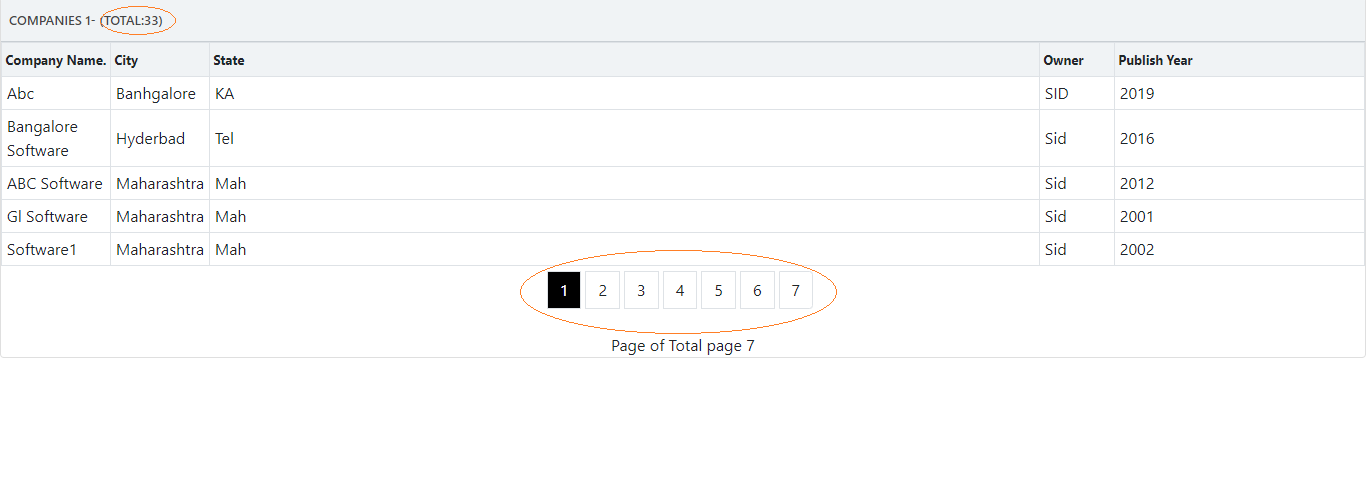
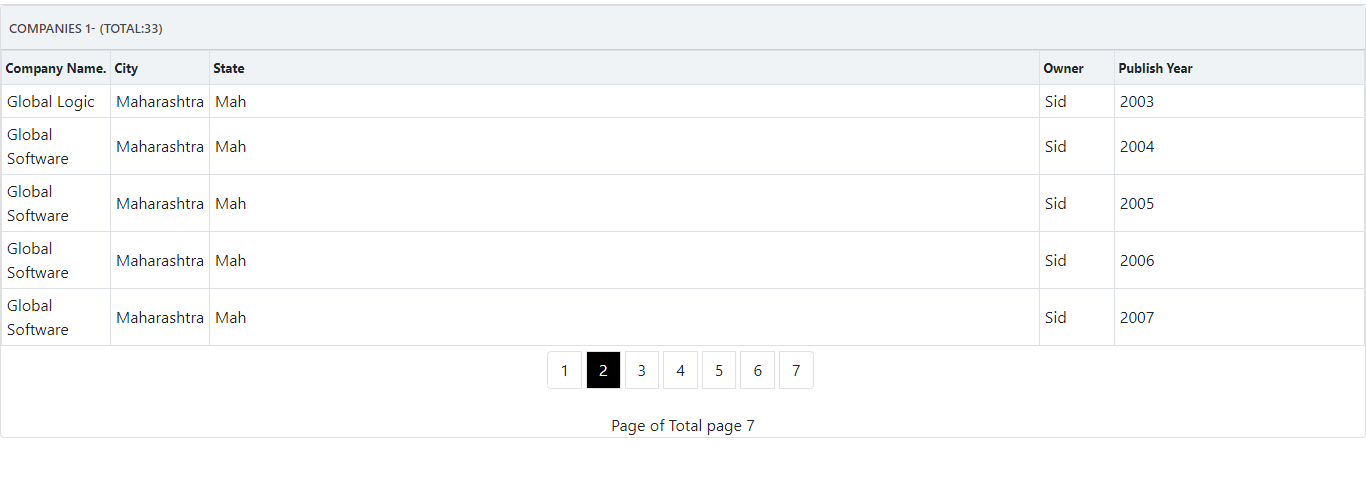
On the second page, the total number of records to display is 5.
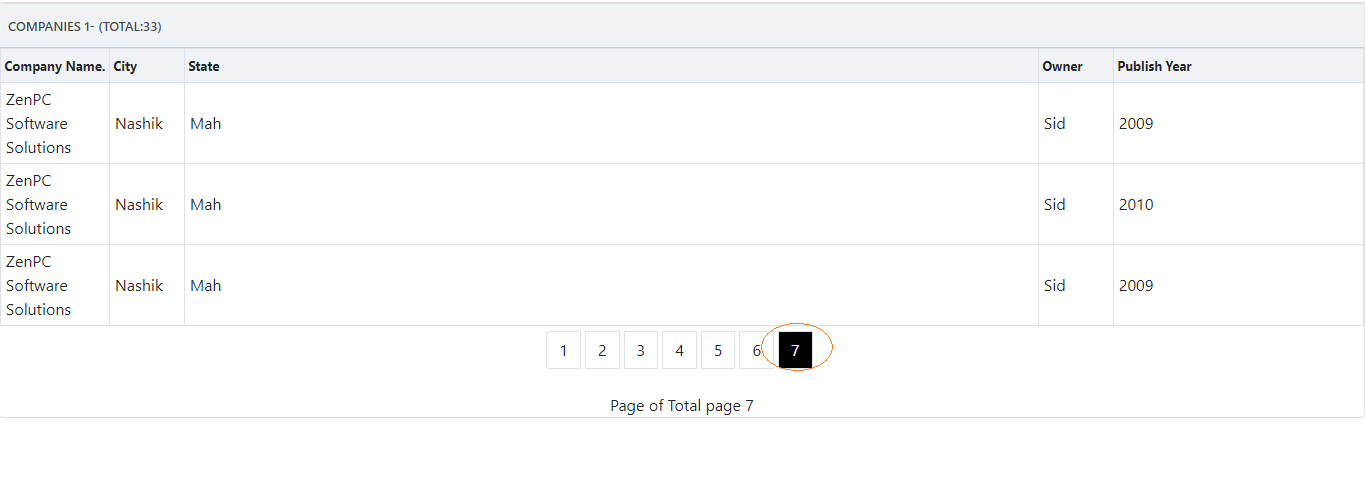
The last page will only show 3 records.
With this step, we have successfully completed our frontend, Web API, and backend.
Further Reading
- Angular Essentials.
- Angular Directives Tutorial.
- The A to Z Guide to the Lifecycle of Angular Components.
Opinions expressed by DZone contributors are their own.
Comments