Setting Up CI/CD Pipelines for Docker Kubernetes Project With Google Cloud Platform
Combine containers, orchestration, cloud, and DevOps in this tutorial demonstrating an simple CI/CD pipeline.
Join the DZone community and get the full member experience.
Join For FreeIntroduction
This article is a first in the series of 4 articles. We will set up continuous delivery pipelines for containerized (Docker) application to Kubernetes (hosted in Google Cloud Platform in our case here).
In the first (current) article, we will go through containerizing a simple HTML application using Docker,, building the image, uploading it to Docker hub and deploying it to Kubernetes (Google Cloud Platform Kuber
In the subsequent articles, we will continue the discussion to:
- Setup Continuous Deployment Pipelines of Java Maven Docker application to Kubernetes
- Setup Continuous Deployment Pipelines of Python (flask) Docker application to Kubernetes
- Setup Continuous Deployment Pipelines of Nodejs (Angular5) Docker application to Kubernetes
The source code is hosted at Github here.
Sample application is hosted on Google Cloud Platform Kubernetes Engine here.
Through this code we target to create a CI/CD pipeline with everything as code:
- Pipeline as code: We use Jenkinsfile to create declarative pipelines
- Infrastructure as code: We containerize the application using Docker
- Deployment as code: We use Kubernetes as our container orchestrator. Our deployments are declarative via code.
NOTE: This project is deliberately simplified to explain the basics of CI/CD for Docker Kubernetes project. This project should not be used as it is for production environments, as there are a lot of considerations to be taken for production environments (e.g. static code analysis, security/vulnerability scanning, networking security, etc.) that aren't covered here.
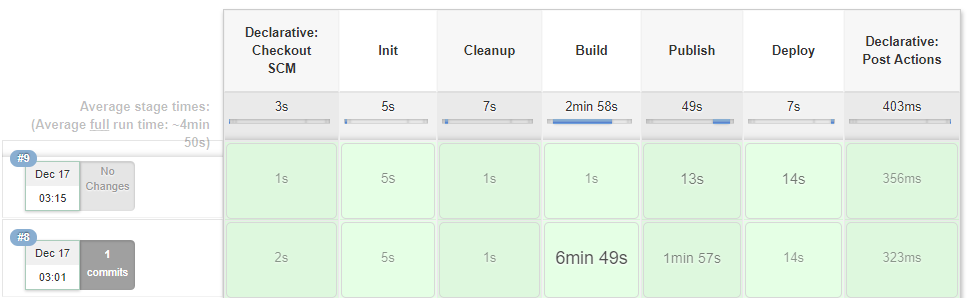
Here is how our Jenkins CI/CD pipeline would look like once we are done:
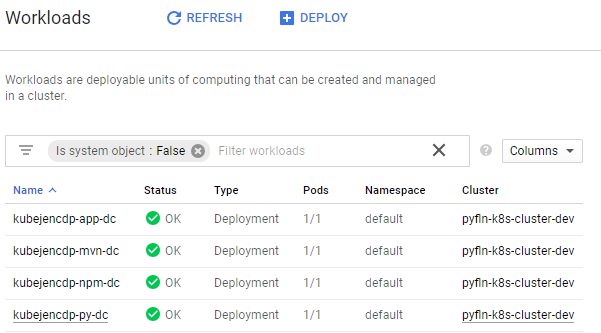
Here is how our cluster would look like once we're done deploying the apps:
Prerequisites
As a prerequisite, you should be familiar with the fundamentals of:
- Jenkins (we are going to run this app on Jenkins).
- Docker must be installed on the Jenkins server.
- Kubernetes cluster. We will deploy the apps on Kubernetes so a basic familiarity with Kubernetes is essential. Moreover, we would talk through some of the basics of Kubernetes so you can follow along.
- Google Cloud Platform Account (This is optional but good to have. Google Cloud Platform offers a 12-month free trial with $300 credit to use with any GCP services. In this article, we are using Google Kubernetes engine).
- google-cloud-sdk is required to operate on Google Cloud Platform Kubernetes Engine.
Structure of The Code
Let us take a look at how the code has been structured in our sample.
- src: This directory contains the source code of the application we are going to build and deploy
- Dockerfile: This file contains the containerization code for our app
- files: This directory contains the files which might be required by our Dockerfile to build the image. This may contain local yum repo configuration, pip files, npm configurations, etc.
- env_vars: This directory contains the property file application.properties which can be changed to suit your project and your Docker/Google Cloud/Kubernetes/Openhift account
- Jenkinsfile: This file contains the CI CD pipeline code which will be executed by Jenkins
Setting Up The Project
To set up the project to your Jenkins, just fork the project and follow the steps below:
Updating Your Project Specific Variables
The project is parameterized with parameters defined in env_vars/project.properties file. Let us take a look at some of the parameters here:
| Parameter | Function | Example |
| APP_NAME | The application name - this will be used to create image name in Jenkins file | kubejencdp |
| PROJECT_NAME | Name of the project | amitthk |
DOCKER_REGISTRY_URL |
URL of the Docker registry. e.g. we are using Docker hub here | registry.hub.docker.com |
RELEASE_TAG |
Release tag for Docker image. This can be taken from release branch name as well. | 1.0.0 |
DOCKER_PROJECT_NAMESPACE |
Docker project namespace. | e.g. my account on Docker Hub is amitthk which is also my default namespace |
JENKINS_DOCKER_CREDENTIALS_ID |
This is the username password credential which will be added to Jenkins for login to Docker registry.(If you are using openshift, you may want to login with $(oc whoami -t) for token | JENKINS_DOCKER_CREDENTIALS_ID |
JENKINS_GCLOUD_CRED_ID |
This is the Google Cloud Platform service account key which is added to Jenkins as a file credential. For more information please refer here. | JENKINS_GCLOUD_CRED_ID |
JENKINS_GCLOUD_CRED_LOCATION |
Unused. (If you prefer to not add file credential to Jenkins and to store the service account key at Jenkins and directly access from slave then use this) | /var/lib/jenkins/lateral-ceiling-220011-5c9f0bd7782f.json |
GCLOUD_PROJECT_ID |
This is the Google Cloud Project ID | lateral-ceiling-220011 |
GCLOUD_K8S_CLUSTER_NAME |
This is our cluster name on Google Cloud | pyfln-k8s-cluster-dev |
Adding Credentials to Jenkins
We need to add two credentials to Jenkins for the pipeline to use. The usage may vary based on your setup.
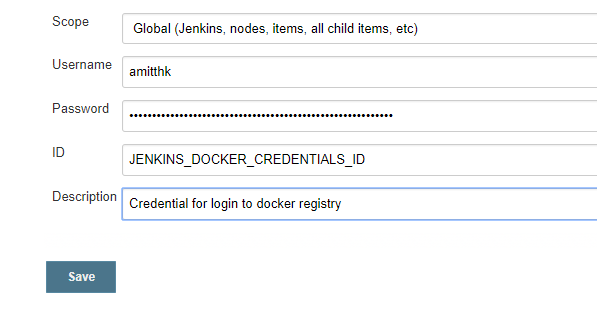
JENKINS_DOCKER_CREDENTIALS_ID is a username password credential which looks like this (Please notice the ID of the credential, I am using the same Id JENKINS_DOCKER_CREDENTIALS_ID for simplicity):
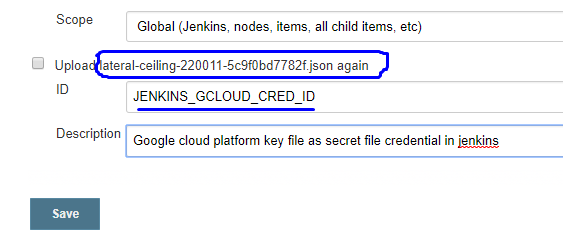
JENKINS_GCLOUD_CRED_ID is a secret file credential which contains the GCP Key it looks like below:
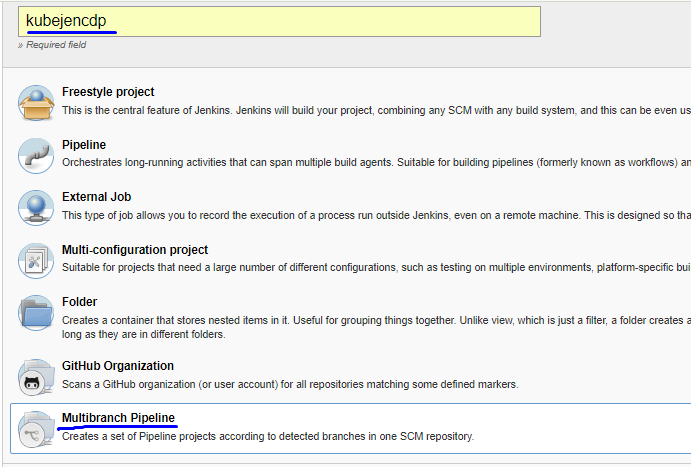
Creating the Pipeline
Now we create a multibranch pipeline (You may decide to go with freestyle/pipeline as per your convenience):
We add the repo URL according to your project:
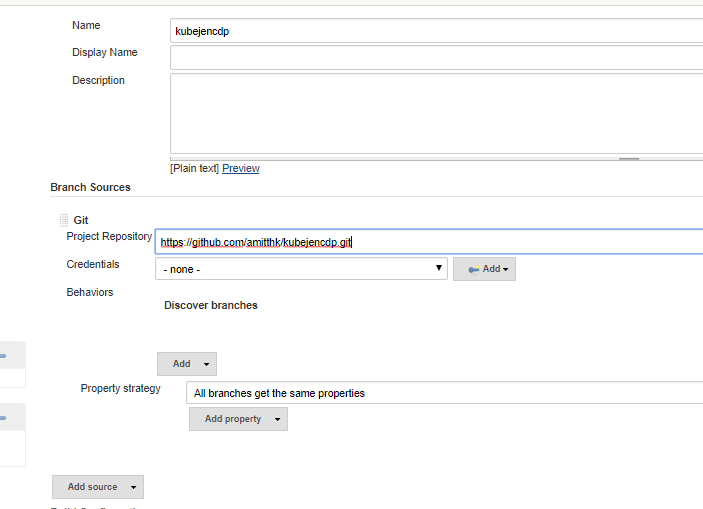
Once we save, the build should start and we should have the base CICD running as shown in the screen above. Now let us look at the code.
Understanding the Code
Dockerfile
This is the first project in series, and we wanted to keep a simple Dockerfile. This Dockerfile deploys a basic bootstrap HTML page into a container. The container uses Apache HTTPD server to host the static HTML content.
The code is pretty straightforward:
- We set up some environment variables customizable through some of the arguments passed during build.
- Then we copy some of the required files for our installation or setup from /app/files directory.
- We install HTTPD.
- Then we copy the configuration files for HTTPD to correct location and set permissions
- Then we copy our app (the simple HTML web page from /app/dist directory to our container's $APP_BASE_DIR)
- We set up the entrypoint and start command.
FROM centos/nodejs-8-centos7

ARG APP_NAME=kubejencdp-ui
ARG APP_BASE_DIR=/var/www/html
ARG APP_BUILD_DIR=/opt/app-root/src/
ARG API_ENDPOINT=http://127.0.0.1:8000
ENV APP_BASE_DIR $APP_BASE_DIR
ENV APP_NAME ${APP_NAME}
ENV API_ENDPOINT ${API_ENDPOINT}
ENV LD_LIBRARY_PATH /opt/rh/rh-nodejs8/root/usr/lib64
ENV PATH /opt/rh/rh-nodejs8/root/usr/bin:/opt/app-root/src/node_modules/.bin/:/opt/app-root/src/.npm-global/bin/:/opt/app-root/src/bin:/opt/app-root/bin:/usr/local/sbin:/usr/local/bin:/usr/sbin:/usr/bin:/sbin:/bin
ENV NPM_CONFIG_PREFIX /opt/app-root/src/.npm-global

EXPOSE 8080

USER root

COPY files ${APP_BASE_DIR}/files


#RUN cp ${APP_BASE_DIR}/files/pyfln.rep /etc/yum.repos.d/ \
#    && update-ca-trust force-enable

RUN yum install -y httpd httpd-tools

RUN cp ${APP_BASE_DIR}/files/npm/npmrc ~/.npmrc \
    && cp ${APP_BASE_DIR}/files/httpd/httpd.conf /etc/httpd/conf/ \
    && cp ${APP_BASE_DIR}/files/httpd/default-site.conf /etc/httpd/conf.d/default-site.conf \
    && chown apache:apache /etc/httpd/conf/httpd.conf \
    && chmod 755 /etc/httpd/conf/httpd.conf \
    && chown -R apache:apache /etc/httpd/conf.d \
    && chmod -R 755 /etc/httpd/conf.d \
    && touch /etc/httpd/logs/error_log /etc/httpd/logs/access_log \
    && chmod -R 766 /etc/httpd/logs \
    && chown -R apache:apache /etc/httpd/logs \
    && chown -R apache:apache /var/log/httpd \
    && chmod -R g+rwX /var/log/httpd \
    && chown -R apache:apache /var/run/httpd \
    && chmod -R g+rwX /var/log/httpd


COPY dist/. ${APP_BASE_DIR}

RUN cd $APP_BASE_DIR/ \
    && cp ${APP_BASE_DIR}/files/entrypoint.sh ${APP_BASE_DIR}/ \
    && chmod -R 0775 $APP_BASE_DIR/ \
    && chown -R apache:apache $APP_BASE_DIR/

WORKDIR $APP_BASE_DIR
USER apache
ENTRYPOINT ["./entrypoint.sh"]
CMD ["/usr/sbin/httpd","-f","/etc/httpd/conf/httpd.conf","-D","FOREGROUND"]
Kubernetes – Deployment, Service, Ingress
In Kubernetes the containers are deployed inside pods. A pod can run multiple containers, but ideally, one pod runs one container. The smallest unit of scaling in Kubernetes is the pod. When we scale our cluster up or down, we increase or decrease the number of pods. The pods can be directly addressed by services but ideally, we deploy them as part of a deployment.
- Deployment: A Kubernetes deployment contains the definition from which container image deploys and instructs how many replicas of the pod we want, which ports we would expose, any environment parameters we need to pass to container, etc. In addition, deployment contains a lot of runtime, storage, and networking information for the pod. Below is the simple deployment for our application. The variable names prefixed & suffixed with double underscores (e.g. APPNAME) will be replaced by processfiles.sh script mentioned later:
apiVersion: extensions/v1beta1 kind: Deployment metadata: name: __APP_NAME__-dc spec: replicas: 1 template: metadata: labels: app: __APP_NAME__ spec: containers: - name: __APP_NAME__-ctr image: >- __IMAGE__ imagePullPolicy: Always ports: - name: httpport containerPort: 8080 env: - name: API_ENDPOINT value: "http://127.0.0.1:8082/" - Service: We can scale up or down our cluster and the pods get added and removed. However, the rest of the components (pods/services) interact with our cluster of pods via a reliable endpoint called service. Service in a way acts as a load balancer and rest of the services can continue interacting with service while underlying pods are created and destroyed. Below is a simple service. This service points to all the pods marked with label app: APPNAME . Please note that labels play an important role in Kubernetes. We labeled our pods such in above deployment. The labels must match for the service "selector" to work.
apiVersion: v1 kind: Service metadata: labels: app: __APP_NAME__ name: __APP_NAME__-svc spec: ports: - name: httpport port: 8080 protocol: TCP targetPort: 8080 selector: app: __APP_NAME__ sessionAffinity: None type: NodePort - Ingress: Inside the cluster the Pods/services can interact with each other via service endpoints. However, to exposes HTTP and HTTPS routes to services within the cluster to the outside world, we use ingress. Below is a simple ingress which points to our service and also points to the HTTP port it will expose externally. We get a publicly accessible endpoint through ingress.
apiVersion: extensions/v1beta1
kind: Ingress
metadata:
  labels:
    app: __APP_NAME__
  name: __APP_NAME__-ingress
spec:
  backend:
    serviceName: __APP_NAME__-svc
    servicePort: httpport
Jenkinsfile
Our Jenkinsfile is located at the root of the project and it contains the code for operating various steps in sequence. Let us take a look at the stages one by one:
- Checkout and Initialization: We have a declarative pipeline so we get the declarative git checkout SCM as first step. We have a helper function called getEnvVar which reads the values from our env_vars/application.properties file defined above:
def getEnvVar(String paramName){
    return sh (script: "grep '${paramName}' env_vars/project.properties|cut -d'=' -f2", returnStdout: true).trim();
}
And here is how our initialization step looks like. We set the variables here. Most of them come from the application.properties file mentioned above.stage('Init'){ steps{ //checkout scm; script{ env.BASE_DIR = pwd() env.CURRENT_BRANCH = env.BRANCH_NAME env.IMAGE_TAG = getImageTag(env.CURRENT_BRANCH) env.APP_NAME= getEnvVar('APP_NAME') env.IMAGE_NAME = "${APP_NAME}-app" ... ... } } }- Cleanup: We are performing cleanup here, this is optional. We are cleaning up the dangling images and images older than 2 days:
stage('Cleanup'){ steps{ sh ''' docker rmi $(docker images -f 'dangling=true' -q) || true docker rmi $(docker images | sed 1,2d | awk '{print $3}') || true ''' } } - Building the Docker image: In this step we build the image. We include the DOCKER_REGISTRY_URL in the tag because we will push this image later to our Docker registry.
sh ''' docker build -t ${DOCKER_REGISTRY_URL}/${DOCKER_PROJECT_NAMESPACE}/${IMAGE_NAME}:${RELEASE_TAG} --build-arg APP_NAME=${IMAGE_NAME} -f app/Dockerfile app/. ''' - Publishing the image to Docker registry: For this we need to use the username password credentials which we added. We log in to Docker registry first and publish the image to our Docker registry. (registry.hub.docker.com in our case).
withCredentials([[$class: 'UsernamePasswordMultiBinding', credentialsId: "${JENKINS_DOCKER_CREDENTIALS_ID}", usernameVariable: 'DOCKER_USERNAME', passwordVariable: 'DOCKER_PASSWD']]) { sh ''' echo $DOCKER_PASSWD | docker login --username ${DOCKER_USERNAME} --password-stdin ${DOCKER_REGISTRY_URL} docker push ${DOCKER_REGISTRY_URL}/${DOCKER_PROJECT_NAMESPACE}/${IMAGE_NAME}:${RELEASE_TAG} docker logout ''' } - Deploying to Google Cloud Platform Kubernetes Engine: In this step we make use of Google Cloud Platform's gcloud cli to activate the service account. We also make use of the JENKINS_GCLOUD_CRED_ID secret file credential which we added to Jenkins credentials to get the Google cloud cluster credentials. We have a utility script named process_files.sh. This utility script replaces the variables which we pass as arguments. Below is how the utility script looks like:
#!/bin/bash

if (($# <4))
  then
    echo "Usage : $0 <DOCKER_PROJECT_NAME> <APP_NAME> <IMAGE_TAG> <directory containing k8s files>"
    exit 1
fi

PROJECT_NAME=$1
APP_NAME=$2
IMAGE=$3
WORK_DIR=$4

main(){
find $WORK_DIR -name *.yml -type f -exec sed -i.bak1 's#__PROJECT_NAME__#'$PROJECT_NAME'#' {} \;
find $WORK_DIR -name *.yml -type f -exec sed -i.bak2 's#__APP_NAME__#'$APP_NAME'#' {} \;
find $WORK_DIR -name *.yml -type f -exec sed -i.bak3  's#__IMAGE__#'$IMAGE'#' {} \;
}
main
Above utility script is placed next to our deployment , service and egress files. Once executed, it will process the files with requisite arguments.stage('Deploy'){ steps{ withCredentials([file(credentialsId: "${JENKINS_GCLOUD_CRED_ID}", variable: 'JENKINSGCLOUDCREDENTIAL')]) { sh """ gcloud auth activate-service-account --key-file=${JENKINSGCLOUDCREDENTIAL} gcloud config set compute/zone asia-southeast1-a gcloud config set compute/region asia-southeast1 gcloud config set project ${GCLOUD_PROJECT_ID} gcloud container clusters get-credentials ${GCLOUD_K8S_CLUSTER_NAME} chmod +x $BASE_DIR/k8s/process_files.sh cd $BASE_DIR/k8s/ ./process_files.sh "$GCLOUD_PROJECT_ID" "${IMAGE_NAME}" "${DOCKER_PROJECT_NAMESPACE}/${IMAGE_NAME}:${RELEASE_TAG}" "./${IMAGE_NAME}/" cd $BASE_DIR/k8s/${IMAGE_NAME}/. kubectl apply -f $BASE_DIR/k8s/${IMAGE_NAME}/ gcloud auth revoke --all """ } } }
Conclusion
In this article, we looked at how to containerize a simple static web application and continuously deploy it using Jenkins pipeline as code to a Kubernetes cluster. In the articles which follow, we will take a look at how to:
- Setup Continuous Deployment Pipelines of Java Maven Project to Kubernetes
- Setup Continuous Deployment Pipelines of Python (flask) project to Kubernetes
- Setup Continuous Deployment Pipelines of Nodejs (Angular5) project to Kubernetes
Opinions expressed by DZone contributors are their own.
Comments