Setting Up Your Own Arduino IoT Cloud Server
Want to get your IoT project working in the cloud? Not a problem.
Join the DZone community and get the full member experience.
Join For Free
If you have had a chance to play around with some of the new Arduino-enabled hardware platforms such as the ESP8266 Wi-Fi SoC, you may already have used an online IoT service for your project. In this article, we will show you how to set up your own online service by setting up a Virtual Private Server (VPS) and server software for your Arduino IoT project.
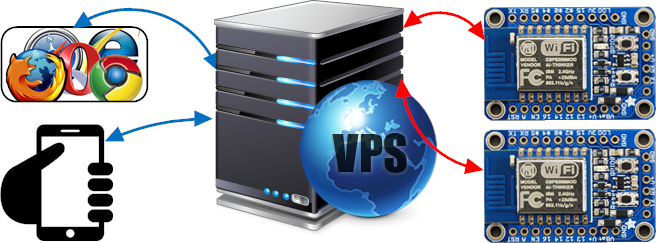
In addition to setting up your own VPS, we will show you how to install a simple example that lets you control LEDs, lights, etc., by using a browser. The following figure shows how any number of devices can be controlled in real-time by navigating to your own VPS using a browser. The online VPS functions as a proxy and makes it possible for any number of users to control the devices via the online server.

Some of the benefits of using an online server and operating it as a proxy for routing messages between users and the devices are:
Enables users on one network to control devices on another network. For example, a device connected to a home network can be controlled via a smartphone connected to the cellular network.
Devices operate as network (TCP/IP) clients, thus no router port forwarding or other tricks are required for gaining access to the devices via the online server.
Devices acting as network clients operate in stealth mode, thus greatly improving the security of the devices. We will get more into security later.
Small devices typically do not have the resources for providing a direct web interface. The online server manages all the heavy lifting of providing a web interface for the devices, thus greatly minimizing the code complexity in the devices.
Virtual Private Server
Setting up your own VPS may sound complicated and expensive, but the reality is that setting up a VPS is very easy and the cost can be minimal. It is possible to find VPS services as low as $8 a year. My favorite site for shopping for a budget VPS is lowendbox.com and one of my favorite VPS providers is securedragon, where you can get a three-month lease for less than $6 and a yearly lease for $12.
Memory Limitation
A limitation with a budget VPS is the amount of memory available. The budget VPS we are using in this article has only 64Mbyte of memory, thus limiting the selection of IoT server solutions that can be used. The IoT solution we will use in this article is an application server framework that includes an IoT protocol, a web server, a server-side scripting language, and a database in one unit. This software package can easily run on a budget VPS, and in my test environment, I was able to connect 10,000 devices to the online server. I performed the test by using a number of additional Virtual Private Servers, where I ran a number of simulated devices.
Linux
A budget VPS will be running Linux. If you have never used Linux, you may think that this is not for you; however, nothing can be further from the truth. An online VPS is the best starting point for anyone new to learning command-line Linux because no matter what you do with the VPS, an easy-to-use web-based VPS control interface will let you restore the VPS to its original configuration by a button click.
For this reason, playing around with an online VPS is a great way to learn command line Linux. If you get your Linux VPS into a state where you are unable to recover it, log into the VPS web control panel and click the re-install button. A fresh Linux VPS will then be available in one to two minutes, and you can start over.
Remote Login via SSH
An online VPS enables you to remotely login by using SSH (Secure Shell). If your own computer is running Windows, download the SSH client Putty and start the executable from any directory. Mac and Windows computers typically include a command-line SSH client, thus you can simply type ssh in a command line on Linux and Mac.
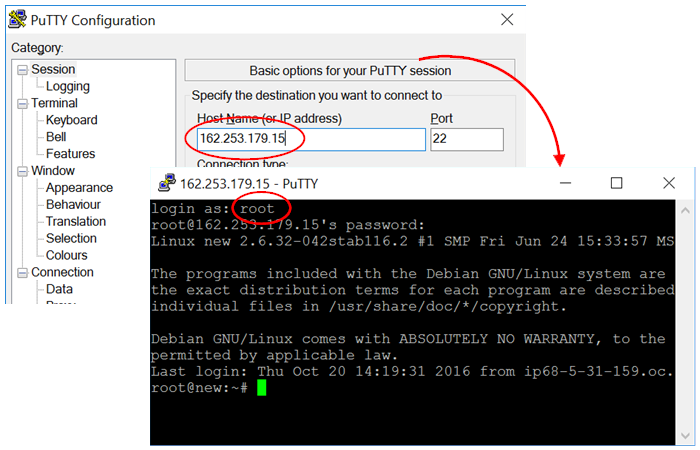
When you sign up for a VPS service, such as the budget securedragon VPS (O64), you will receive an email with instructions for how to remotely log into your VPS by using SSH. The instructions include the IP address of your new VPS and the root (admin) password. The following figure shows how to enter the IP address in Putty and how to log in as user root in the command line window.

At this point, feel free to try a few Linux commands. Don't worry about corrupting the VPS since a simple button click in the VPS control panel will re-install the Linux operating system.
Installing the IoT Server
To install the server software and the example program, copy all of the following and paste the commands into the SSH console window.
 wget http://makoserver.net/install/brokerX86/install.sh;
chmod +x install.sh;
./install.sh
The following video shows the complete installation sequence, from setting up a free domain name, logging into the VPS, installing the software, to verifying that it works by using a browser.
A few notes on the above video:
- The suggested VPS provider Berry is no longer in business. Use securedragon, as suggested above, or navigate to LowEndTalk and select a VPS provider from the community-rated top VPS provider poll list.
- The last part of the video shows how to install the edge node software on your own computer for test purposes. You do not need to do this if you have an ESP8266 and if you follow the ESP8266 software installation instructions below.
- The IoT server installation script has been updated since the video was produced. The installation script now also installs a web-based source code editor that optionally enables you to edit the server-side code and HTML UI by using your browser. See the previous video in this article, under the section Installing the IoT Server On Your Own Computer, for details on how to use the web IDE.
Downloading and Compiling the Arduino Sketch
The Arduino example has been tested on an Arduino compatible ESP8266 Wi-Fi. However, you should be able to use an Arduino with only minor changes to the startup code.
Download and unpack the Arduino Sketch in any directory:
https://realtimelogic.com/downloads/SMQ/SMQ-Arduino.zip
The following video shows how to compile the code and upload the code to the ESP8266
Open the sketch file SMQ.ino in your Arduino IDE and scroll down until you see:
#error REMOVE THIS LINE AND SET THE TWO VARIABLES BELOW
static const char* ssid = "";
static const char* password = "";
Remove the first line above and set variable 'ssid' to your wireless network ID and 'password' to your wireless password.
Open the file led-example.cpp and scroll down until you see:
#define SIMPLEMQ_DOMAIN "http://simplemq.com"Change the domain name "simplemq.com" to the IP address of your VPS.
Compile and upload the sketch file to your Arduino board. If everything goes as it should, the Arduino device should show up in the web interface. You get to the web interface by using a browser and navigating to your VPS IP address.
The above is all you need for setting up an online server that you can use for controlling your Arduino devices in real-time by using a browser. The complete application can be used "as is" for controlling anything that provides an on/off state such as LEDs, lights, motors, etc. The complete application consists of two parts: (1) A JavaScript-powered web application running in your browser and that is connected to the online server. (2) the Arduino code running on the Arduino board and that is also connected to the online server. The online server acts as a generic proxy and routes messages between devices and browsers.
The IoT protocol used in this application is called SMQ, which provides one-to-one communication (via the online proxy) in addition to the publish/subscribe pattern. The publish/subscribe (pub/sub) feature in SMQ is similar to other pub/sub-protocols such as MQTT and AMQP. An online proxy server is typically referred to as a broker when using pub/sub-protocols. The broker is in charge of routing messages between publishers and subscribers. A detailed explanation of how the JavaScript application and the Arduino code work can be found here.
Using FreeRTOS
The Arduino environment is great for beginners, but Arduino is very limited in its functionality. Instead of using Arduino, you may also use a ready to use FreeRTOS environment called the esp-open-rtos, but don't worry, you do not need to go through the complex esp-open-rtos setup. Instead, you may use a pre-configured and completely ready to use environment with an easy to use web-based IDE. The web-based IDE is great for Arduino users that are accustomed to the easy to use Arduino IDE.
Navigate to RTL and download the free ESP8266 IDE.
The IDE, which is designed for educational purposes, includes a pre-configured esp-open-rtos bundled with an easy-to-use web-based C source code IDE. The IDE requires VMWare or VirtualBox. I prefer VMWare over VirtualBox since I find it easier to use. Note that VMWare is free for non-commercial use.
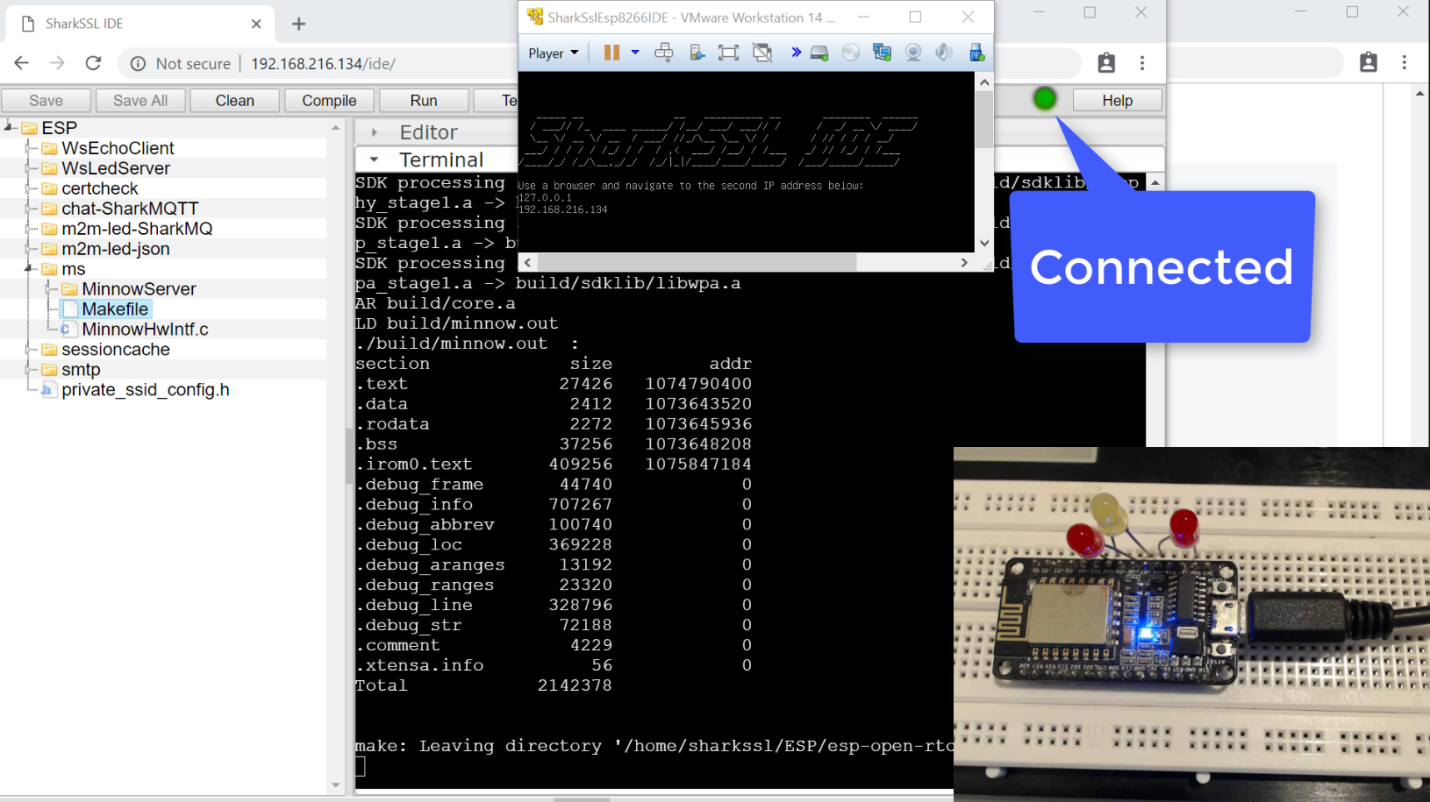
The screenshot below shows the virtual machine and the web-based IDE connected to the virtual machine. Notice how the virtual machine has taken ownership of the ESP8266 USB connection. The web-based IDE detects this and shows the ESP8266 as connected and ready to be flashed with new firmware.

Note that the IP address of your VM will most likely be different than in the above figure. Make sure to click in the virtual machine window for the IP address. If the window is blank, click the window and then press the enter key. You must enter this IP address in your browser to open the web IDE.
Additional Platforms
The edge node C code is also available for many additional platforms. See the SMQ page on GitHub for details.
Installing the IoT Server On Your Own Computer
Installing the IoT Server on your own computer instead of on an online server is a great way to get started with using the IoT Server for learning purposes.
You may use the above VPS installation script on your own computer if you are using Linux x86 or Windows 10.
The installation script is designed for Linux, but the installation script also works on Windows 10 if you install the Linux subsystem. If you are using Windows, open Microsoft Store and search for "debian". Install the Debian Windows Subsystem for Linux and open a bash shell.
The following video shows how to use the installation script on the Windows Subsystem for Linux. You would use the same installation on a standard Linux distribution.
IoT Security
I have updated this article and added some information on security.
So how safe is this solution?
The SMQ protocol used in the above tutorial has superb security features, but it all boils down to security measures you have to make.
Authentication
The example code designed for this tutorial does not use password authentication for the SMQ protocol. You can easily add password authentication to the example code. I will not go into detail, but the SMQ protocol supports strong authentication. The authentication can be made secure even on a non-TLS connection by using what is known as seeded hash-based authentication.
The SMQ protocol provides the seed value. You just need to decide on the hashing algorithm to use. The C function SMQ_init() provides a seed value as an out parameter, and this seed value can be used to create, for example, an HMAC hash. The HMAC hash is then used as the credentials when calling SMQ_connect. See the SMQ C code reference documentation for details. The server-side authentication callback function performs the same calculation using the seed provided as one of the arguments. See the SMQ broker's authenticating callback for details.
Authorization
The SMQ protocol also supports authorization and the article "Have We Forgotten the Ancient Lessons About Building Defense Systems?" goes into details as to why it is a good idea to use authorization.
Opinions expressed by DZone contributors are their own.

Comments