Shared Microservice Configurations Using Spring Cloud Config
The microservice architecture pattern enables businesses to distribute functionality between many small applications instead of larger monolithic portions.
Join the DZone community and get the full member experience.
Join For FreeThe microservice architecture pattern, which is used widely across tech companies large and small, enables businesses to distribute functionality between many small applications, instead of larger monolithic portions. Each piece has a specifically defined task, along with communications and other services, usually via a REST API channel. The benefits of utilizing a microservice architecture include, but are not limited to:
Simple development and maintenance of applications: developers and teams are able to focus on one application rather than multiple, with the benefit of faster development, and fewer hitches (such as bug and easy to miss errors) in the larger project.
Dependable fault tolerance: with the microservice architecture, a service failure will not crash the entire program or project.
Flexibility: With the capability to personalize the language and framework for each project you work on, you also can allocate the appropriate hardware/infrastructure.
One of the most popular frameworks is Spring Boot, which is well adept at creating microservices. In addition, its popularity makes it common with many technical guides and examples online, making it one of the most accessible frameworks.
With Spring Boot you are able to create as many microservices for your project as you need, however, this can lead to complications in the configuration of the conglomerate of services. Normally, Spring Boot configuration comes with the application, which is common and easy to follow through on smaller monolithic applications. The difficulty comes from trying to connect dozens of services and a hundred plus configuration files, which can be a headache to manage.
Spring Cloud Config to the Rescue!
This is where Spring Cloud Config, a framework integrated with Spring Boot, is useful. A dedicated “config server” is brought online from which each microservice can download its configuration data. This dramatically simplifies the management of many microservices by centralizing their configuration in one location and provides the ability to “live” refresh a microservice’s configuration without redeploying the service. As a bonus, Spring Cloud Config provides out-of-the-box support for storing/reading configuration from Git repositories, giving you a full audit history of changes in one location.
In this tutorial, you will:
- Create a central configuration server using Spring Boot.
- Create two separate microservices/applications using Spring Boot, which read their configuration from the server.
- Secure the applications using OAuth 2.0 and Okta.
- Demonstrate how to (securely) refresh a service’s configuration without redeploying.
Let’s get started!
Prerequisites: Java 11
Create a Spring Cloud Config Server
First, you will create a Spring Boot application that behaves as the configuration server. This application will provide configuration settings to your microservices.
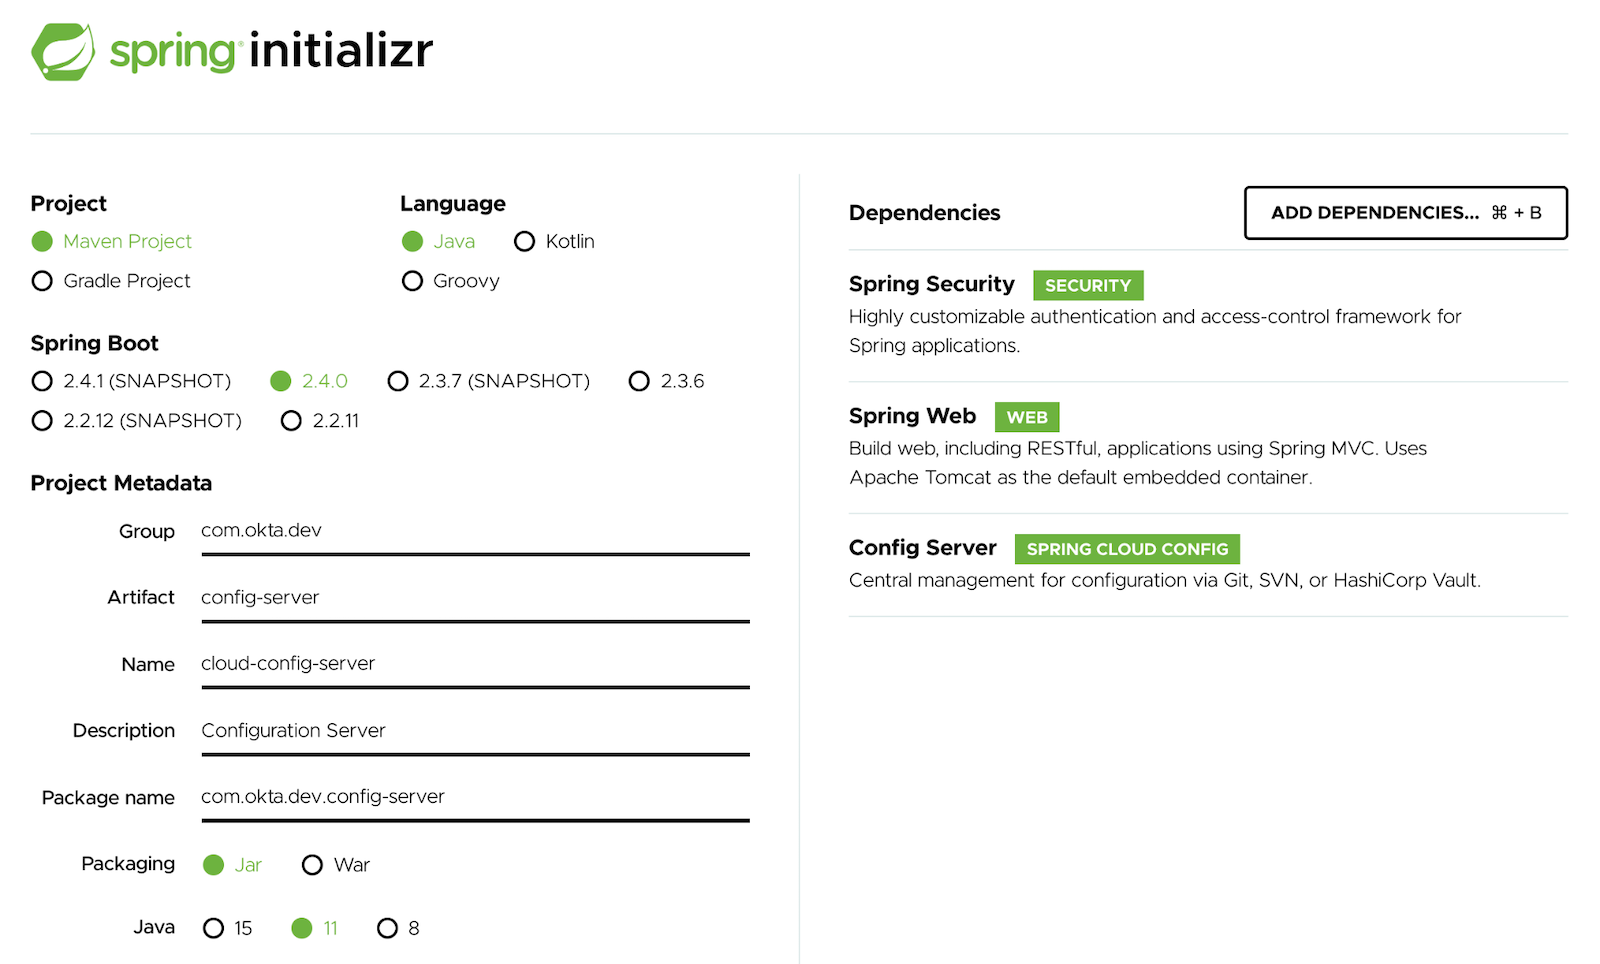
Click this link or go to start.spring.io and select the following options in your browser:
- Project:
Maven Project - Language:
Java - Spring Boot:
2.4.0
Under Project Metadata, set the values to the following:
- Group:
com.okta.dev - Artifact:
config-server - Name:
cloud-config-server - Description: Configuration Server
- Package:
com.okta.dev.configserver - Packaging:
Jar - Java:
11
Select the following dependencies:
- Spring Security
- Spring Web
- Config Server
Click Generate to download the project files. Unzip the file and import the project files into your favorite IDE.
Open the project in your IDE and update src/main/resources/application.properties with the following key-value pairs:
server.port=8888
spring.cloud.config.server.native.search-locations=/path/to/config/folder
spring.security.user.name=configUser
spring.security.user.password=configPass
The property spring.cloud.config.server.native.search-locations is the location where you store your configuration files. Replace the value with a folder on your filesystem where these files will be saved. For example, file://${user.home}/config.
Normally your configuration files would be stored in a remote location, for example, a GitHub repository or an Amazon S3 bucket. For instructions on how to store your config files in a git repository, see this section in the Spring Cloud Config documentation. To keep this tutorial simple, you will use the “native” filesystem option above.
Open your application’s main class and add the @EnableConfigServer annotation:
xxxxxxxxxx
import org.springframework.cloud.config.server.EnableConfigServer;
public class CloudConfigServerApplication { ... }
Create an OpenID Connect Application
Sign up for a free developer account at https://developer.okta.com/signup. This will be used to secure your microservices using OAuth 2.0 and OpenID Connect (OIDC). After signing up, log in to your Okta account at https://your-okta-domain.okta.com.
Click Applications in the top nav menu.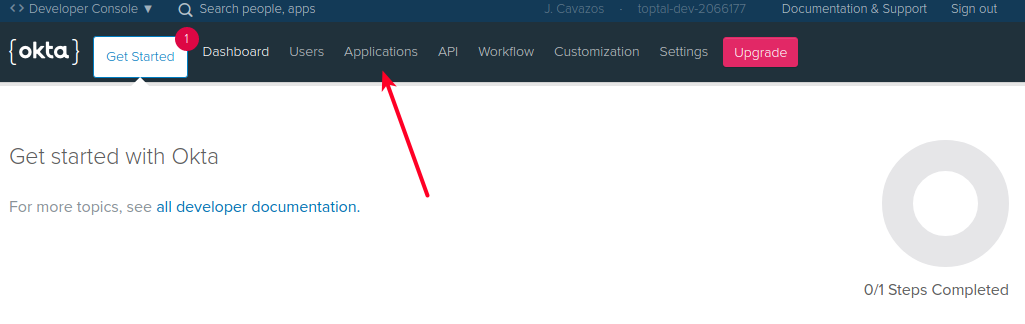
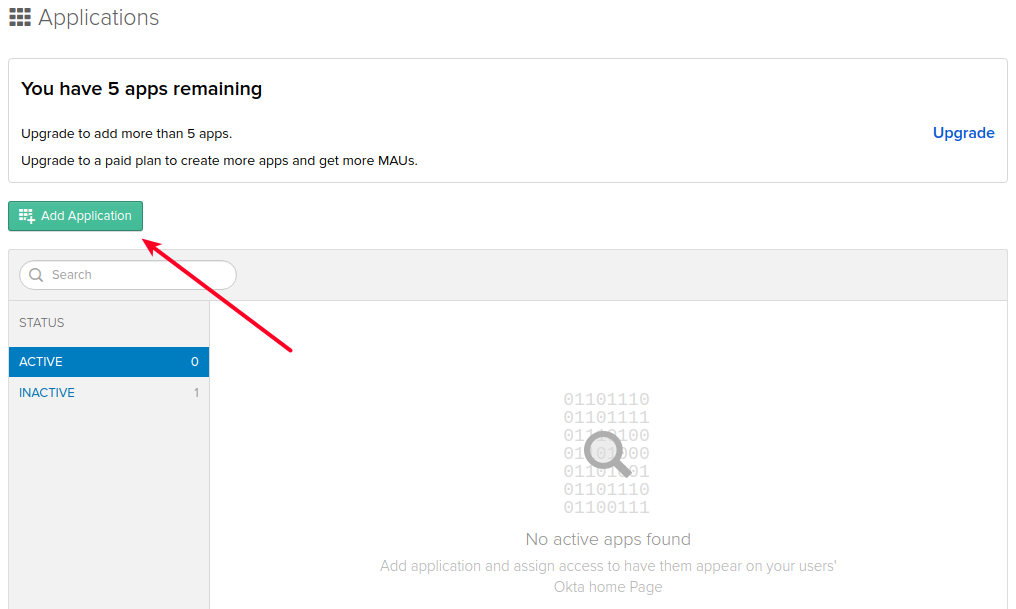
Click Add Application.
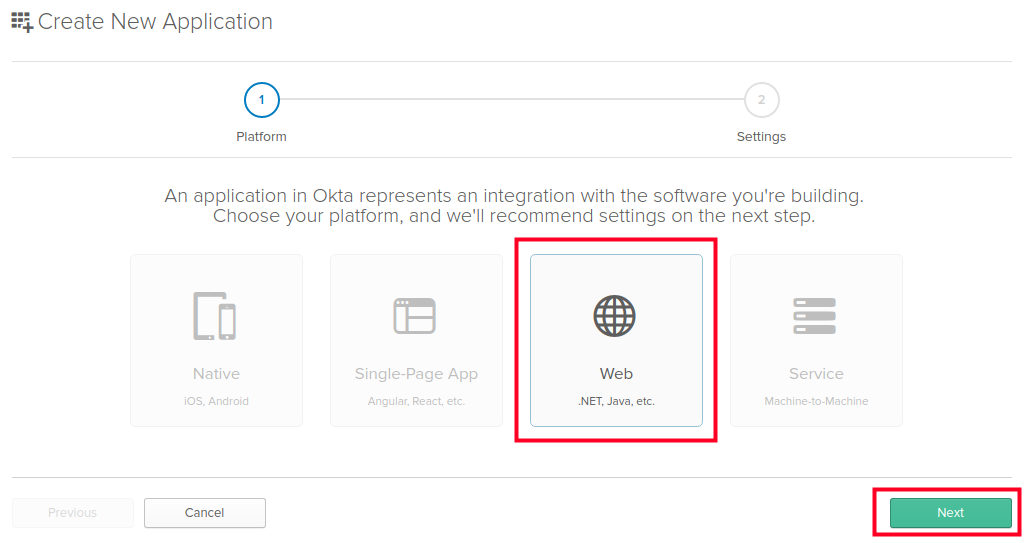
Select Web and click Next.
In Application Settings fill in the following values:
- Name:
My Spring Cloud App(or another name of your choosing) - Base URIs:
http://localhost:8001andhttp://localhost:8002 - Login Redirect URIs:
http://localhost:8001/login/oauth2/code/oktaandhttp://localhost:8002/login/oauth2/code/okta - Logout Redirect URIs:
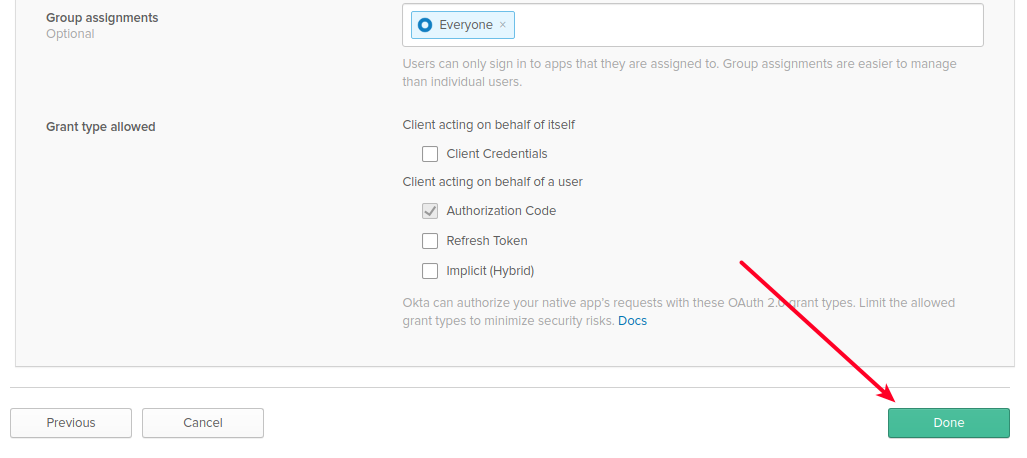
http://localhost:8001andhttp://localhost:8002 - Group Assignments:
Everyone(should be selected by default) - Grant type allowed:
Authorization Code
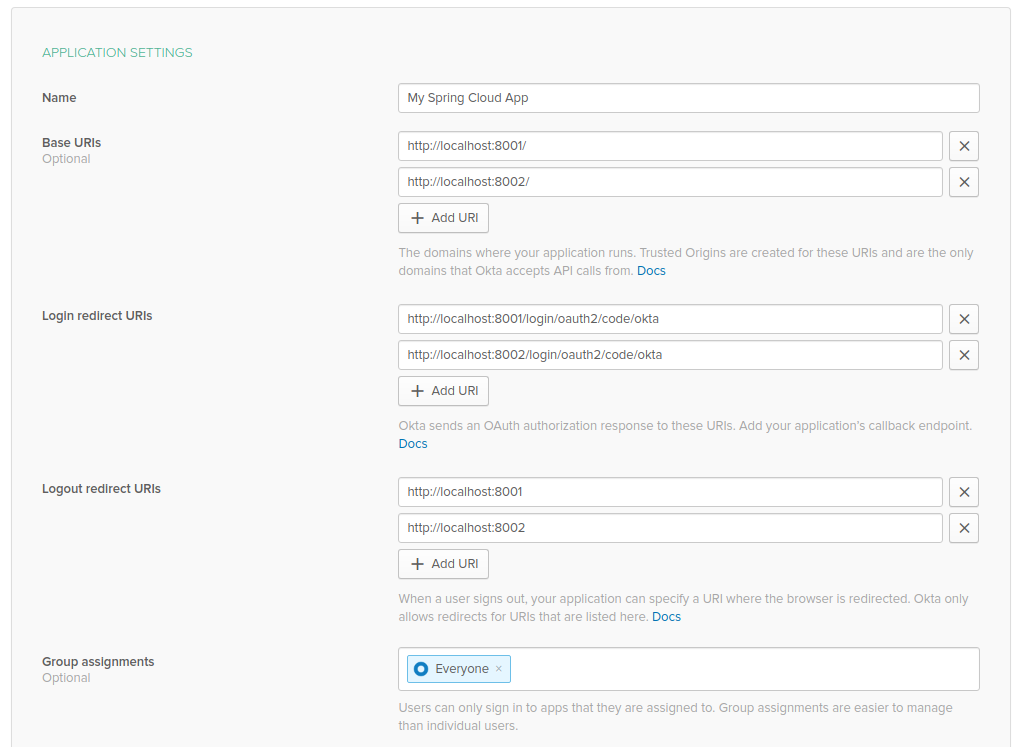
Click Done.
Take note of the values for Client ID and Client secret. These will be necessary for securing your microservices with OAuth 2.0.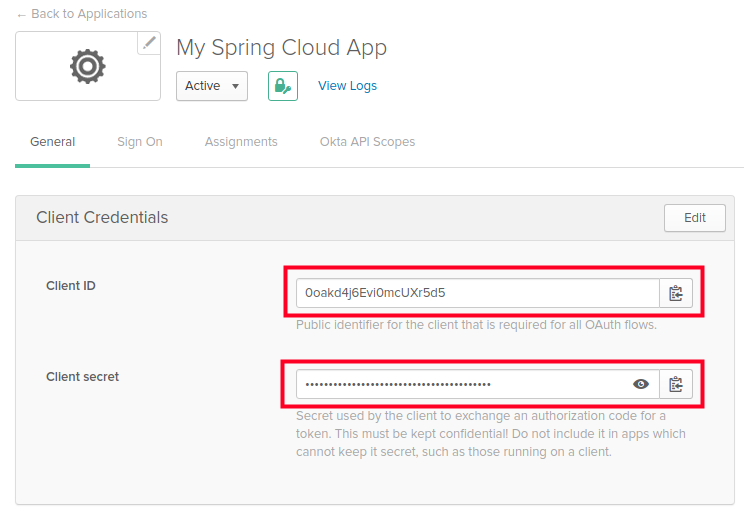
Configure Security for Your Microservices Architecture
Next, you’ll need to create the configuration files which will be used by your microservices. Create or open the directory specified above for spring.cloud.config.server.native.search-locations and add the following files:
service-one.yml
xxxxxxxxxx
server:
port: 8001
okta:
oauth2:
issuer: https://YOUR_DOMAIN.okta.com/oauth2/default
clientId: YOUR_CLIENT_ID
clientSecret: YOUR_CLIENT_SECRET
xxxxxxxxxx
service-one-profile1.yml
hello:
message: "Service One Profile One"
service-one-profile2.yml
hello:
message: "Service One Profile Two"
service-two.yml
server:
port: 8002
okta:
oauth2:
issuer: https://YOUR_DOMAIN.okta.com/oauth2/default
clientId: YOUR_CLIENT_ID
clientSecret: YOUR_CLIENT_SECRET
service-two-profile1.yml
hello:
message: "Service Two Profile One"
service-two-profile2.yml
hello:
message: "Service Two Profile Two"
- Replace
YOUR_DOMAINwith your Okta account’s domain. It should look something likedev-0123456, e.g.https://dev-0123456.okta.com/oauth2/default, - Replace
YOUR_CLIENT_IDwith the value of theClient IDyou created earlier. - Replace
YOUR_CLIENT_SECRETwith your app’sClient secret.
Let’s take a moment to discuss the naming convention for the configuration files. The filenames are important and must be in a certain pattern for your microservices to pick them up:
xxxxxxxxxx
/{application}/{profile}[/{label}]
/{application}-{profile}.yml
/{label}/{application}-{profile}.yml
/{application}-{profile}.properties
/{label}/{application}-{profile}.properties
Where:
{application}is the name of your microservice specified via your microservice’sspring.application.nameproperty. In this case,service-oneandservice-two.{profile}matches the list of profiles your microservice is running via thespring.profiles.activeproperty. In this case,profile1andprofile2.{label}is an additional descriptor usually corresponding to a version control branch, e.g.devorstg. It can be manually set via thespring.cloud.config.labelproperty in the microservice’sbootstrap.propertiesfile or set on the command line (-Dspring.cloud.config.label).
In this tutorial, you have two sets of configuration files: one set for Service One (service-one.yml) and one for Service Two (service-two.yml).
Enter your config server’s project directory and run the application:
xxxxxxxxxx
cd /path/to/config-server
./mvnw spring-boot:run -Dspring-boot.run.profiles=native
The native profile tells the application to server configuration files from the filesystem directory you populated above.
Create Spring Boot Microservice #1
Let’s create the first of your two microservices.
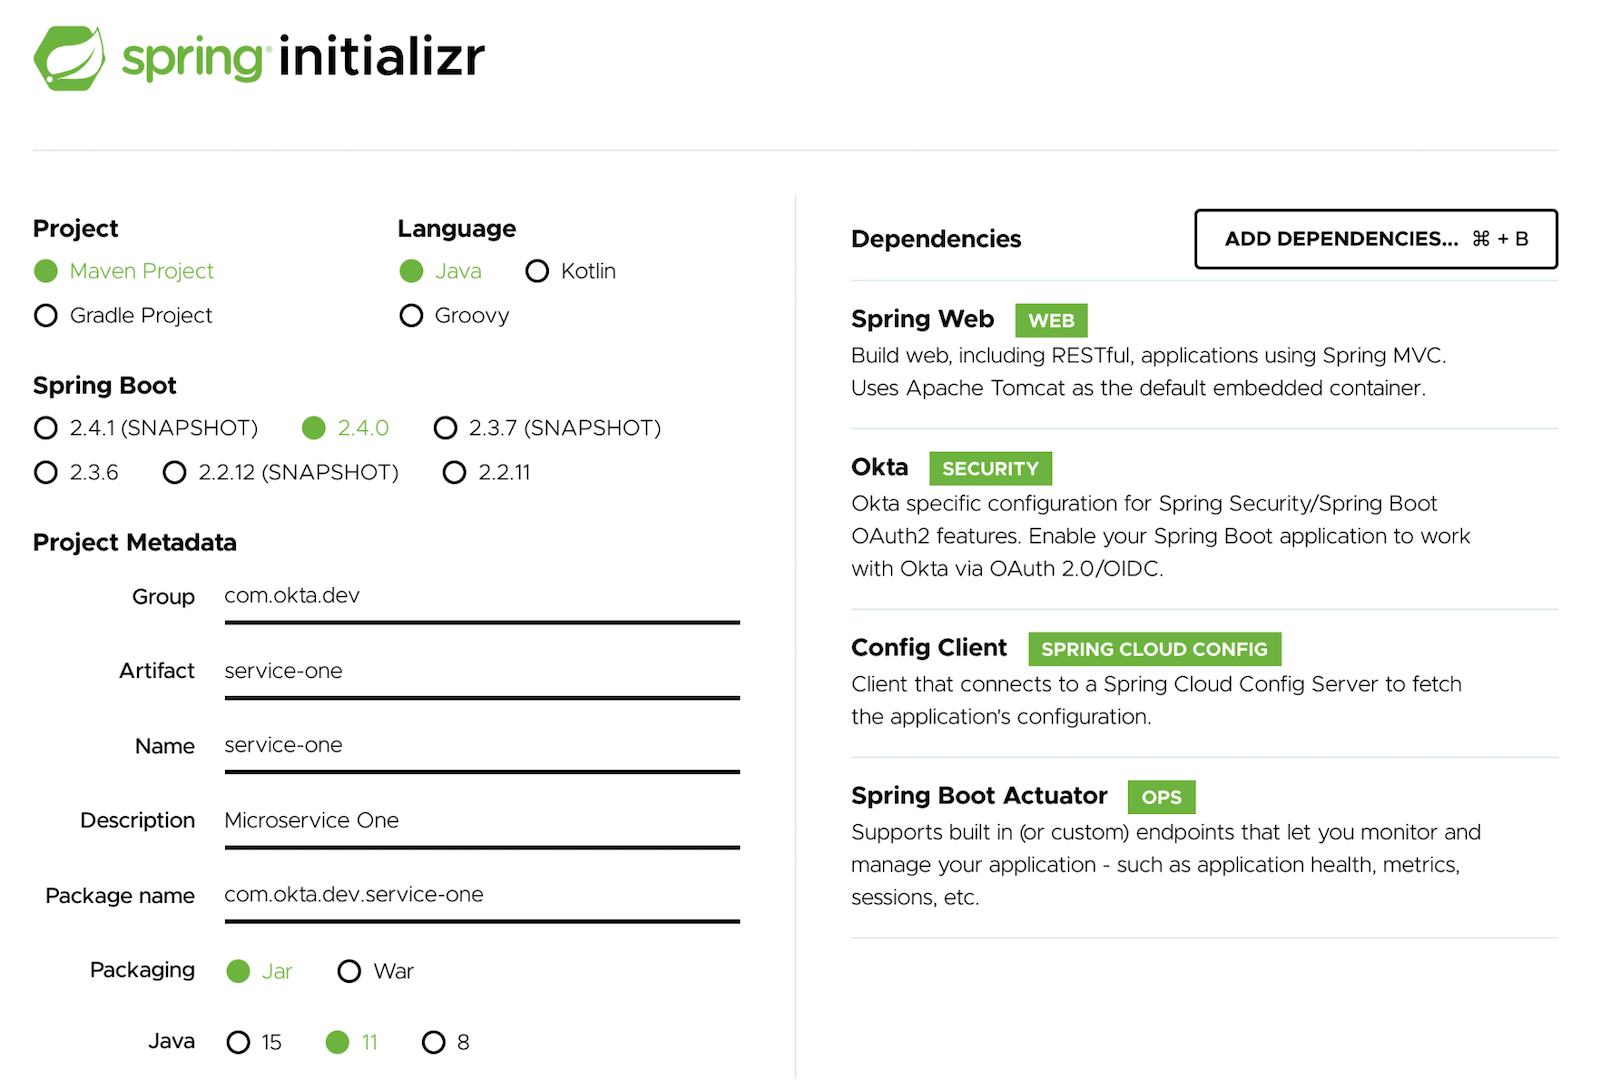
Open the Spring Initializr or click here.
Select the following options:
- Project:
Maven Project - Language:
Java - Spring Boot:
2.4.0
Under Project Metadata fill in the following information:
- Group:
com.okta.dev - Artifact:
service-one - Name:
service-one - Description: Microservice One
- Package:
com.okta.dev.service-one - Packaging:
Jar - Java:
11
Select the following dependencies:
- Spring Web
- Okta
- Config Client
- Spring Boot Actuator
Click Generate and import the project files into your favorite IDE.
Open the project in your IDE and update src/main/resources/application.properties with the following key-value pairs:
xxxxxxxxxx
spring.application.name=service-one
spring.config.import=configserver:
spring.cloud.config.uri=http://localhost:8888
spring.cloud.config.username=configUser
spring.cloud.config.password=configPass
spring.application.nameis the name of this microservice and must match the{application}parameter in the filename convention described above.spring.cloud.config.uriis the location of the config server currently running.spring.cloud.config.usernameandspring.cloud.config.passwordare used by your microservice to authenticate with the config server while retrieving configuration files. The values must match the values ofspring.security.user.nameandspring.security.user.passworddefined in your config server’sapplication.properties.
To secure your microservice using Okta and OAuth 2.0, open your microservice’s main class and add the following configuration class:
xxxxxxxxxx
public static class ApplicationSecurityConfig extends WebSecurityConfigurerAdapter {
public void configure(HttpSecurity http) throws Exception {
http
.authorizeRequests()
.anyRequest().authenticated()
.and()
.oauth2Login();
}
}
Next, add a basic REST controller, which will respond with a message defined in your service’s configuration file (hosted on the config server):
xxxxxxxxxx
("/secure")
public static class SecureController {
("${hello.message}")
private String helloMessage;
public String secure(Principal principal) {
return helloMessage;
}
}
The resulting application class should now look like this:
xxxxxxxxxx
package com.okta.dev.serviceone;
import org.springframework.beans.factory.annotation.Value;
import org.springframework.boot.SpringApplication;
import org.springframework.boot.autoconfigure.SpringBootApplication;
import org.springframework.cloud.context.config.annotation.RefreshScope;
import org.springframework.context.annotation.Configuration;
import org.springframework.security.config.annotation.web.builders.HttpSecurity;
import org.springframework.security.config.annotation.web.configuration.WebSecurityConfigurerAdapter;
import org.springframework.web.bind.annotation.GetMapping;
import org.springframework.web.bind.annotation.RequestMapping;
import org.springframework.web.bind.annotation.RestController;
import java.security.Principal;
public class CloudConfigServiceOneApplication {
public static void main(String[] args) {
SpringApplication.run(CloudConfigServiceOneApplication.class, args);
}
public static class ApplicationSecurityConfig extends WebSecurityConfigurerAdapter {
public void configure(HttpSecurity http) throws Exception {
http
.authorizeRequests()
.anyRequest().authenticated()
.and()
.oauth2Login();
}
}
("/secure")
public static class SecureController {
("${hello.message}")
private String helloMessage;
public String secure(Principal principal) {
return helloMessage;
}
}
}
Enter your config server’s project directory and run the application with profile1 set:
xxxxxxxxxx
cd /path/to/service-one
./mvnw spring-boot:run -Dspring-boot.run.profiles=profile1
Open a browser and navigate to http://localhost:8001/secure. You should be redirected to Okta for authentication. After successfully authenticating, you should see the following message:
xxxxxxxxxx
Service One Profile One
This is the same message defined in the service-one-profile.yml file you created earlier. Neat!
Next, you will switch your microservice’s active profile to profile2 and observe a different message. Stop your application and re-run with profile2 active:
xxxxxxxxxx
./mvnw spring-boot:run -Dspring-boot.run.profiles=profile2
Navigate to http://localhost:8001/secure. You should now see the message defined in service-one-profile2.yml:
xxxxxxxxxx
Service One Profile Two
Refresh the Configuration in Your Spring Cloud Config Server
Spring Cloud Config provides the ability to “live” reload your service’s configuration without stopping or re-deploying. To demonstrate this, first, stop service-one and add the @RefreshScope annotation to your REST controller:
xxxxxxxxxx
import org.springframework.cloud.context.config.annotation.RefreshScope;
...
("/secure")
public static class SecureController {
("${hello.message}")
private String helloMessage;
public String secure(Principal principal) {
return helloMessage;
}
}
When this annotation is applied to a Spring component (i.e., a @Component, @Service, @RestController, etc.), the component is re-created when a configuration refresh occurs, in this case giving an updated value for ${hello.message}.
You can refresh an application’s configuration by including the Spring Boot Actuator dependency, exposing the /actuator/refresh endpoint, and sending an empty POST request.
The Spring Boot Actuator has already been included in your microservice’s dependencies. Edit your configuration files to expose the refresh endpoint:
service-one.yml
xxxxxxxxxx
server:
port: 8001
okta:
oauth2:
issuer: https://YOUR_DOMAIN.okta.com/oauth2/default
clientId: YOUR_CLIENT_ID
clientSecret: YOUR_CLIENT_SECRET
management:
endpoints:
web:
exposure:
include: "refresh"
service-two.yml
xxxxxxxxxx
server:
port: 8002
okta:
oauth2:
issuer: https://YOUR_DOMAIN.okta.com/oauth2/default
clientId: YOUR_CLIENT_ID
clientSecret: YOUR_CLIENT_SECRET
management:
endpoints:
web:
exposure:
include: "refresh"
Next, add a security class inside your main application class to secure the endpoint with basic authentication:
xxxxxxxxxx
public static class ActuatorSecurityConfig extends WebSecurityConfigurerAdapter {
public void configure(HttpSecurity http) throws Exception {
http
.csrf().disable()
.antMatcher("/actuator/*")
.authorizeRequests()
.antMatchers("/actuator/*").authenticated()
.and()
.httpBasic();
}
protected void configure(AuthenticationManagerBuilder auth) throws Exception {
auth.inMemoryAuthentication()
.withUser("serviceOneUser")
.password("{noop}serviceOnePassword")
.roles("USER");
}
}
Almost finished! Since your application is already authenticated with OIDC using Okta, you need to make these two security configuration classes play nicely with each other. Add the @Order annotations to both so ActuatorSecurityConfig takes precedence. This will allow you to refresh the configuration via /actuator/refresh without triggering the OAuth 2.0 flow.
Your application class should now look like this:
xxxxxxxxxx
package com.okta.dev.serviceone;
import org.springframework.beans.factory.annotation.Value;
import org.springframework.boot.SpringApplication;
import org.springframework.boot.autoconfigure.SpringBootApplication;
import org.springframework.cloud.context.config.annotation.RefreshScope;
import org.springframework.context.annotation.Configuration;
import org.springframework.core.annotation.Order;
import org.springframework.security.config.annotation.authentication.builders.AuthenticationManagerBuilder;
import org.springframework.security.config.annotation.web.builders.HttpSecurity;
import org.springframework.security.config.annotation.web.configuration.WebSecurityConfigurerAdapter;
import org.springframework.web.bind.annotation.GetMapping;
import org.springframework.web.bind.annotation.RequestMapping;
import org.springframework.web.bind.annotation.RestController;
import javax.servlet.http.HttpServletRequest;
import java.security.Principal;
public class CloudConfigServiceOneApplication {
public static void main(String[] args) {
SpringApplication.run(CloudConfigServiceOneApplication.class, args);
}
(1)
public static class ActuatorSecurityConfig extends WebSecurityConfigurerAdapter {
public void configure(HttpSecurity http) throws Exception {
http
.csrf().disable()
.antMatcher("/actuator/*")
.authorizeRequests()
.antMatchers("/actuator/*").authenticated()
.and()
.httpBasic();
}
protected void configure(AuthenticationManagerBuilder auth) throws Exception {
auth.inMemoryAuthentication()
.withUser("serviceOneUser")
.password("{noop}serviceOnePassword")
.roles("USER");
}
}
(2)
public static class ApplicationSecurityConfig extends WebSecurityConfigurerAdapter {
public void configure(HttpSecurity http) throws Exception {
http
.authorizeRequests()
.anyRequest().authenticated()
.and()
.oauth2Login();
}
}
("/secure")
public static class SecureController {
("${hello.message}")
private String helloMessage;
public String secure(Principal principal) {
return helloMessage;
}
}
}
Start your application using profile1:
xxxxxxxxxx
./mvnw spring-boot:run -Dspring-boot.run.profiles=profile1
Navigate to http://localhost:8001/secure and note the message still says Service One Profile One.
Open your configuration file at /path/to/config/folder/service-one-profile1.yml and edit the message:
service-one-profile1.yml
xxxxxxxxxx
hello:
message: "Things have changed"
Save the file and refresh the page at http://localhost:8001/secure. Note that the message has not changed yet and still says Service One Profile One. To have your application receive the updated configuration, you must call the /actuator/refresh endpoint:
xxxxxxxxxx
curl -u serviceOneUser:serviceOnePassword -X POST http://localhost:8001/actuator/refresh
Refresh the page at http://localhost:8001/secure, and you should see the updated message!
Create Spring Boot Microservice #2
Next, you will create a second Spring Boot application, acting as a second microservice, which will also have its configuration provided by your configuration server.
Open the Spring Initializr or click this link.
Select the following options:
- Project:
Maven Project - Language:
Java - Spring Boot:
2.4.0
Under Project Metadata fill in the following information:
- Group:
com.okta.dev - Artifact:
service-two - Name:
service-two - Description: Microservice Two
- Package:
com.okta.dev.service-two - Packaging:
Jar - Java:
11
Select the following dependencies (the same list as service-one):
- Spring Web
- Okta
- Config Client
- Spring Boot Actuator
Click Generate and import the project files into your favorite IDE.
Open the project in your IDE and update src/main/resources/application.properties with the following properties:
xxxxxxxxxx
spring.application.name=service-two
spring.config.import=configserver:
spring.cloud.config.uri=http://localhost:8888
spring.cloud.config.username=configUser
spring.cloud.config.password=configPass
Note the value for spring.application.name is different.
Make the same changes to your main application class as above:
xxxxxxxxxx
package com.okta.dev.servicetwo;
import org.springframework.beans.factory.annotation.Value;
import org.springframework.boot.SpringApplication;
import org.springframework.boot.autoconfigure.SpringBootApplication;
import org.springframework.cloud.context.config.annotation.RefreshScope;
import org.springframework.context.annotation.Configuration;
import org.springframework.core.annotation.Order;
import org.springframework.security.config.annotation.authentication.builders.AuthenticationManagerBuilder;
import org.springframework.security.config.annotation.web.builders.HttpSecurity;
import org.springframework.security.config.annotation.web.configuration.WebSecurityConfigurerAdapter;
import org.springframework.web.bind.annotation.GetMapping;
import org.springframework.web.bind.annotation.RequestMapping;
import org.springframework.web.bind.annotation.RestController;
import java.security.Principal;
public class ServiceTwoApplication {
public static void main(String[] args) {
SpringApplication.run(ServiceTwoApplication.class, args);
}
(1)
public static class ActuatorSecurityConfig extends WebSecurityConfigurerAdapter {
public void configure(HttpSecurity http) throws Exception {
http
.csrf().disable()
.antMatcher("/actuator/*")
.authorizeRequests()
.antMatchers("/actuator/*").authenticated()
.and()
.httpBasic();
}
protected void configure(AuthenticationManagerBuilder auth) throws Exception {
auth.inMemoryAuthentication()
.withUser("serviceTwoUser")
.password("{noop}serviceTwoPassword")
.roles("USER");
}
}
(2)
public static class ApplicationSecurityConfig extends WebSecurityConfigurerAdapter {
public void configure(HttpSecurity http) throws Exception {
http
.authorizeRequests()
.anyRequest().authenticated()
.and()
.oauth2Login();
}
}
("/secure")
public static class SecureController {
("${hello.message}")
private String helloMessage;
public String secure(Principal principal) {
return helloMessage;
}
}
}
Note the different credentials for the in-memory user: serviceTwoUser / serviceTwoPassword.
Run the application:
xxxxxxxxxx
cd /path/to/service-two
./mvnw spring-boot:run -Dspring-boot.run.profiles=profile1
Navigate to http://localhost:8002/secure and authenticate with Okta. When you are redirected back to your application you will see the welcome message for service-two:
xxxxxxxxxx
Service Two Profile One
You’re done! You’ve created two microservices, secured by Okta and OAuth 2.0, which receive their configuration settings from a shared Spring Cloud Config server. Very cool!
Learn More About Spring Cloud Config and Microservices
This tutorial showed you how to distribute your security configuration between microservices. There’s a lot more you can do with Spring Cloud Config, like encrypting the values you store, and using it with Spring Vault to store your secrets in a more secure location.
For in-depth examples and use cases not covered in this tutorial, see Spring’s official documentation for Spring Cloud Config.
The source code for this example is on GitHub in the oktadeveloper/okta-spring-cloud-config-example repository.
Check out these other articles on integrating Spring Boot with Okta:
- Secure Secrets With Spring Cloud Config and Vault
- A Quick Guide to OAuth 2.0 with Spring Security
- Easy Single Sign-On with Spring Boot and OAuth 2.0
- Use PKCE with OAuth 2.0 and Spring Boot for Better Security
- Spring Security SAML and Database Authentication
Please provide comments, questions, and any feedback in the comments section below.
Follow us on social media (Twitter, Facebook, LinkedIn) to know when we’ve posted more articles like this, and please subscribe to our YouTube channel for tutorials and screencasts!
We’re also streaming on Twitch, follow us to be notified when we’re live.
Published at DZone with permission of Joe Cavazos. See the original article here.
Opinions expressed by DZone contributors are their own.
Comments