Smart and Efficient Byte-Range Caching With NGINX
When it comes to performance, you need both smart and efficient. Here's a guide to smart, efficient byte-range caching on NGINX. We'll look at the test framework, default caching behavior, and slice-by-slice caching.
Join the DZone community and get the full member experience.
Join For FreeWhen correctly deployed, caching is one of the quickest ways to accelerate web content. Not only does caching place content closer to the end-user (thus reducing latency), it also reduces the number of requests to the upstream origin server, resulting in greater capacity and lower bandwidth costs.
The availability of globally-distributed cloud platforms like AWS and DNS-based global load balancing systems such as Route53 make it possible to create your own global content delivery network (CDN).
In this article, we’ll look at how NGINX and NGINX Plus can cache and deliver traffic that is accessed using byte-range requests. A common use case is HTML5 MP4 video, where requests use byte ranges to implement trick-play (skip and seek) video playback. Our goal is to implement a caching solution for video delivery that supports byte ranges and minimizes user latency and upstream network traffic.
Our Test Framework
We need a simple, reproducible test framework to investigate alternative caching strategies.
We start with a 10 MB test file, containing the byte offset every 10 bytes so that we can verify that byte-range requests function correctly:
origin$ perl -e 'foreach $i ( 0 ... 1024*1024-1 ) { printf "%09d\n", \ $i*10 }' > 10Mb.txtThe contents of the file are as follows:
origin$ head 10Mb.txt
000000000
000000010
000000020
000000030
000000040
000000050
000000060
000000070
000000080
000000090
A curl request for the middle byte range in the file (500,000 to 500,009) returns the expected byte range:
client$ curl -r 500000-500009 http://origin/10Mb.txt
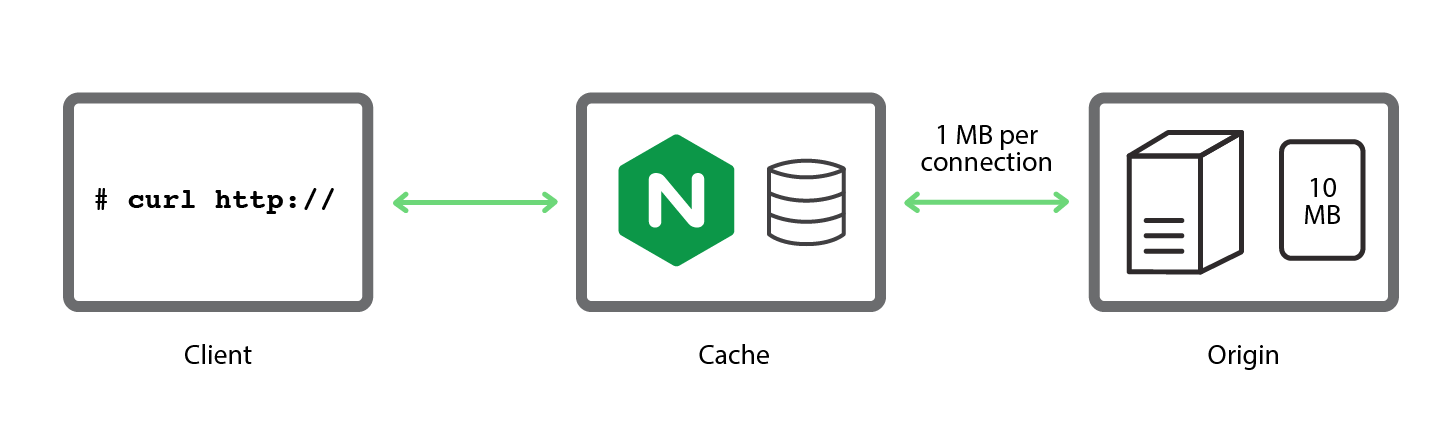
000500000Now let’s add a 1 MB/s bandwidth limit to individual connections between the origin server and the NGINX proxy cache:
origin# tc qdisc add dev eth1 handle 1: root htb default 11
origin# tc class add dev eth1 parent 1: classid 1:1 htb rate 1000Mbps
origin# tc class add dev eth1 parent 1:1 classid 1:11 htb rate 1Mbps
To check that delay is working as expected, we retrieve the entire file directly from the origin server:
cache$ time curl -o /tmp/foo http://origin/10Mb.txt
  % Total    % Received % Xferd  Average Speed   Time    Time     Time  Current
                                 Dload   Upload  Total   Spent    Left  Speed
100 10.0M  100 10.0M    0     0   933k      0  0:00:10  0:00:10 --:--:--  933k


real    0m10.993s
user    0m0.460s
sys     0m0.127s
It takes nearly 11 seconds for the file to be delivered, which is a reasonable simulation of the performance an edge cache that is pulling large files from an origin server over a bandwidth-limited WAN network.
NGINX’s Default Byte-Range Caching Behavior
Once NGINX has cached an entire resource, it services byte-range requests directly from the cached copy on disk.
What happens when content is not cached? When NGINX receives a byte-range request for uncached content, it requests the entire file (not a byte range) from the origin server and begins streaming the response to temporary storage.
As soon as NGINX receives the data required to satisfy the client’s original byte-range request, NGINX sends the data to the client. In the background, NGINX continues streaming the full response to a file in temporary storage. When the transfer is complete, NGINX moves the file to the cache.
We can demonstrate the default behavior quite easily with the following simple NGINX configuration:
proxy_cache_path /tmp/mycache keys_zone=mycache:10m;


server {
    listen 80;

    proxy_cache mycache;

    location / {
        proxy_pass http://origin:80;
    }
}
We start by emptying the cache:
cache # rm –rf /tmp/mycache/*Then we request the middle ten bytes of 10Mb.txt:
client$ time curl -r 5000000-5000009 http://cache/10Mb.txt
005000000


real    0m5.352s
user    0m0.007s
sys     0m0.002s
NGINX sends a request to the origin server for the entire 10Mb.txt file and starts loading it into the cache. As soon as the requested byte range is cached, NGINX delivers it to the client. As reported by the time command, this happens in just over 5 seconds.
In our previous test, it took just over 10 seconds to deliver the entire file, meaning that after the middle byte range is delivered to the client, it takes about 5 more seconds for the entire contents of 10Mb.txt to be retrieved and cached. The access log for the virtual server records the transfer of the 10,486,039 bytes (10 MB) in the complete file, with a status code of 200:
192.168.56.10 - - [08/Dec/2015:12:04:02 -0800] "GET /10Mb.txt HTTP/1.0" 200 10486039 "-" "-" "curl/7.35.0"If we repeat the curl request after the entire file is cached, the response is immediate because NGINX serves the requested byte range from the cache.
However, this basic configuration (and the resulting default behavior) presents a problem. If we request the same byte range a second time, after it is cached but before the entire file has been added to the cache, NGINX sends a new request for the entire file to the origin server, and begins a new cache fill operation. We can demonstrate this behavior with this command:
client$ while true ; do time curl -r 5000000-5000009 http://dev/10Mb.txt ; doneEvery new request to the origin server triggers a new cache-fill operation and the cache doesn’t “settle down” until a cache-fill operation completes without other operations in progress.
Imagine a scenario where users start viewing a video file immediately after it is published. If the cache-fill operation takes 30 seconds (as an example), but the delay between additional requests is less than this, the cache might never fill and NGINX would continue to send more and more requests for the entire file to the origin server.
NGINX offers two caching configurations that can be effective solutions for this problem:
- Cache lock – With this configuration, during the cache-fill operation that is triggered by the first byte-range request, NGINX forwards any subsequent byte-range requests directly to the origin server. After the cache-fill operation has completed, NGINX serves all requests, for both byte ranges and the entire file, from the cache.
- Cache slicing – With this strategy, introduced in NGINX Plus R8 and NGINX 1.9.8, NGINX segments files into smaller subranges that can be retrieved quickly, and requests each subrange from the origin server as required.
Using a Cache Lock for a Single Cache-Fill Operation
The following configuration triggers an immediate cache-fill when the first byte-range request is received, and forwards all other requests to the origin server while the cache fill operation is in progress:
proxy_cache_path /tmp/mycache keys_zone=mycache:10m;


server {
    listen 80;

    proxy_cache mycache;
    proxy_cache_valid 200 600s;
    proxy_cache_lock on;

    # Immediately forward requests to the origin if we are filling the cache
    proxy_cache_lock_timeout 0s;

    # Set the 'age' to a value larger than the expected fill time
    proxy_cache_lock_age 200s;

    proxy_cache_use_stale updating;

    location / {
        proxy_pass http://origin:80;
    }
}proxy_cache_lockon– Sets the cache lock. When NGINX receives the first byte-range request for a file, it requests the entire file from the origin server and starts a cache fill operation. NGINX does not convert subsequent byte-range requests into requests for the entire file or start a new cache fill operation. Instead, it queues the requests until either the first cache-fill operation completes or the lock times out.proxy_cache_lock_timeout– Controls how long the cache is locked (the default is 5 seconds). When the timeout expires, NGINX forwards each queued request to the origin server unmodified (as byte-range requests with theRangeheader preserved, not as requests for the entire file) and does not cache the response returned by the origin server.In situations like our test with 10Mb.txt, the cache fill operation is likely to take a significant time, so we set the lock timeout to 0 (zero) seconds because there’s no point to queuing the requests. NGINX forwards any byte-range requests for the file to the origin server immediately until the cache fill operation completes.proxy_cache_lock_age– Sets a deadline for the cache fill operation. If the operation doesn’t complete within the specified time, NGINX forwards one more request to the origin server. It always needs to be longer than the expected cache fill time, so we increase it from its default of 5 seconds to 200 seconds.proxy_cache_use_stale updating– Tells NGINX to use the currently cached version of a resource immediately if NGINX is in the process of updating the resource. This makes no difference on the first request (which triggered the cache update) but accelerates responses to clients for subsequent requests.
We repeat our test, requesting the middle byte range of 10Mb.txt. The file is not cached, and as in the previous test, time shows that it takes a bit over 5 seconds for NGINX to deliver the requested byte range (recall the network is limited to 1 Mb/s throughput):
client # time curl -r 5000000-5000009 http://cache/10Mb.txt
005000000


real    0m5.422s
user    0m0.007s
sys     0m0.003s
Because of the cache lock, subsequent requests for byte ranges are satisfied almost immediately while the cache is being filled. NGINX forwards these requests to the origin server without trying to satisfy them from the cache:
client # time curl -r 5000000-5000009 http://cache/10Mb.txt
005000000


real    0m0.042s
user    0m0.004s
sys     0m0.004s
In the following extract from the origin server’s access log, the entries with status code 206 confirm that the origin server is serving byte-range requests during the time it takes for the cache fill operation to complete. (We used the log_format directive to include the Range request header in log entries, to identify which requests were modified and which were not.)
The final line, with the status code 200, corresponds to the completion of the first byte-range request. NGINX modified this to a request for the entire file and triggered a cache fill operation.
192.168.56.10 - - [08/Dec/2015:12:18:51 -0800] "GET /10Mb.txt HTTP/1.0" 206 343 "-" "bytes=5000000-5000009" "curl/7.35.0"
192.168.56.10 - - [08/Dec/2015:12:18:52 -0800] "GET /10Mb.txt HTTP/1.0" 206 343 "-" "bytes=5000000-5000009" "curl/7.35.0"
192.168.56.10 - - [08/Dec/2015:12:18:53 -0800] "GET /10Mb.txt HTTP/1.0" 206 343 "-" "bytes=5000000-5000009" "curl/7.35.0"
192.168.56.10 - - [08/Dec/2015:12:18:54 -0800] "GET /10Mb.txt HTTP/1.0" 206 343 "-" "bytes=5000000-5000009" "curl/7.35.0"
192.168.56.10 - - [08/Dec/2015:12:18:55 -0800] "GET /10Mb.txt HTTP/1.0" 206 343 "-" "bytes=5000000-5000009" "curl/7.35.0"
192.168.56.10 - - [08/Dec/2015:12:18:46 -0800] "GET /10Mb.txt HTTP/1.0" 200 10486039 "-" "-" "curl/7.35.0"
When we repeat the test after the entire file is cached, NGINX serves any further byte-range requests from the cache:
client # time curl -r 5000000-5000009 http://cache/10Mb.txt
005000000


real    0m0.012s
user    0m0.000s
sys     0m0.002s
Using a cache lock optimizes the cache-fill operation, but at the cost of sending all subsequent user traffic to the origin server during the cache-fill period.
Filling the Cache Slice-by-Slice
The Cache Slice module, introduced in NGINX Plus R8 and NGINX 1.9.8, offers an alternative method for filling the cache, which is more efficient when bandwidth is heavily constrained and cache-fill operations take a long time.
Using the cache-slice method, NGINX breaks the file into smaller segments and requests each segment when it is required. The segments are accumulated in the cache, and requests for the resource are satisfied by delivering appropriate parts of one or more segments to the client. A request for a large byte range (or indeed, the entire file) triggers subrequests for each of the required segments, which are cached as they arrive from the origin server. As soon as all the segments are cached, NGINX assembles the response from them and sends it to the client.
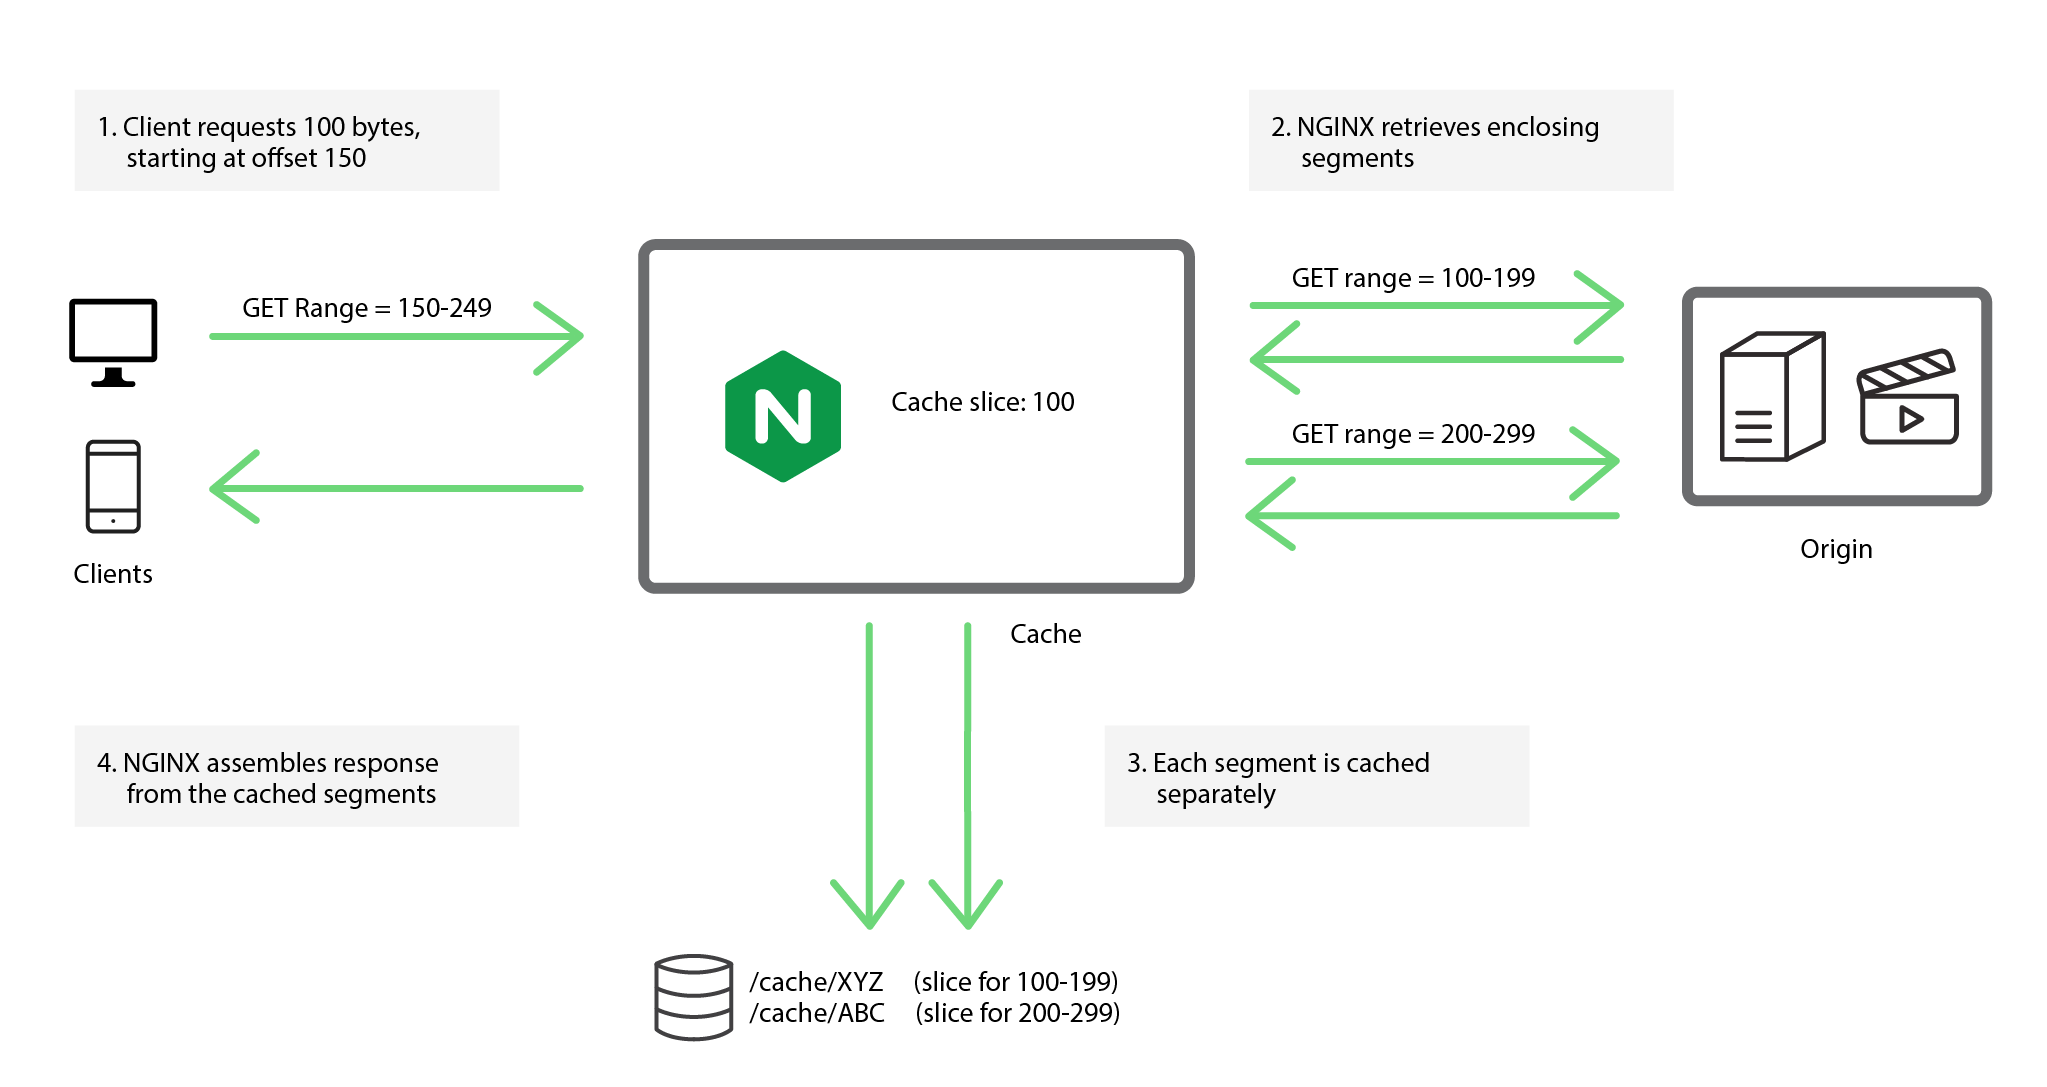
In the following configuration snippet, the slice directive (introduced in NGINX Plus R8 and NGINX 1.9.8) tells NGINX to segment each file into 1 MB fragments.
When using the slice directive, we must also add the $slice_range variable to the proxy_cache_key directive in order to differentiate between the fragments of the file, and we must replace the Range header in the request so that NGINX requests the appropriate byte-ranges from the origin server. We upgrade the request to HTTP/1.1 because HTTP/1.0 does not support byte-range requests.
proxy_cache_path /tmp/mycache keys_zone=mycache:10m;


server {
    listen 80;

    proxy_cache mycache;

    slice              1m;
    proxy_cache_key    $host$uri$is_args$args$slice_range;
    proxy_set_header   Range $slice_range;
    proxy_http_version 1.1;
    proxy_cache_valid  200 206 1h;

    location / {
        proxy_pass http://origin:80;
    }
}
As before, we request the middle byte range in 10Mb.txt:
client$ time curl -r 5000000-5000009 http://cache/10Mb.txt
005000000


real    0m0.977s
user    0m0.000s
sys     0m0.007s
NGINX satisfies the request by requesting a single 1 MB file segment – byte range 4194304–5242879 – which encloses the requested byte range, 5000000–5000009.
KEY: www.example.com/10Mb.txtbytes=4194304-5242879
HTTP/1.1 206 Partial Content
Date: Tue, 08 Dec 2015 19:30:33 GMT
Server: Apache/2.4.7 (Ubuntu)
Last-Modified: Tue, 14 Jul 2015 08:29:12 GMT
ETag: "a00000-51ad1a207accc"
Accept-Ranges: bytes
Content-Length: 1048576
Vary: Accept-Encoding
Content-Range: bytes 4194304-5242879/10485760
If a byte-range request spans several segments, NGINX requests all of the required segments (that are not already cached) and then assembles the byte-range response from the cached segments.
The Cache Slice module was developed for delivery of HTML5 video, which uses byte-range requests to pseudo stream content to the browser. It’s ideal for video resources where the initial cache fill operation might take several minutes because bandwidth is constrained, and the file does not change after publication.
Choosing the Optimal Slice Size
Set the slice size to a value small enough that each segment can be transferred quickly (for example, within a second or two). This will reduce the likelihood the multiple requests will trigger the continuous updating behavior described above.
On the other hand, it’s possible to make the slice size too small. If a request for the entire file triggers thousands of small requests at the same time, the overhead can be high, resulting in excessive memory and file descriptor usage and more disk activity.
In addition, because the Cache Slice module splits resources into independent segments, it’s not possible to change the resource once it has been cached. The module verifies the resource’s ETag header each time it receives a segment from the origin, and if the ETag changes, NGINX aborts the transaction because the underlying cached version is now corrupt. We recommend that you use cache slicing only for large files that do not change once published, such as video files.
Summary
If you’re delivering large resources using byte ranges, both the cache-lock and cache-slice techniques minimize network traffic and give your users great content-delivery performance.
Use the cache-lock technique if cache-fill operations can be performed quickly, and you can accept a spike of traffic to the origin server while the fill is in progress.
Use the new cache-slice technique if cache-fill operations are very slow and the content is stable (does not change).
Whichever method is appropriate for you, the NGINX team is here to help you build the perfect caching edge network or CDN for your content.
Want to check out NGINX Plus’ caching techniques for yourself? Take advantage of our free 30-day trial or contact us for a live demo!
Published at DZone with permission of Patrick Nommensen. See the original article here.
Opinions expressed by DZone contributors are their own.
Comments