Smart Home Tutorial: ESP8266, Alexa, and Amazon Echo
Want to automate your home?
Join the DZone community and get the full member experience.
Join For FreeThis tutorial describes how to build a smart home project using ESP8266, Alexa, and Amazon Echo. In more detail, this project integrates ESP8266 with Alexa through Amazon Echo so that you can control devices connected to the ESP8266. As a result of this project, you can turn on and off several connected devices using voice commands. As you may already know, voice-enabled devices are gaining popularity. The voice interaction between humans and remote devices is evolving and opening new opportunities for home automation everywhere.
The target of this tutorial is to demonstrate how we can build a smart home system that can control LEDs using Alexa and Amazon Echo. This project can be further expanded by adding other kinds of devices. To make things simple, we will show how to add a remote IoT device to Amazon Echo and how to send a simple command using voice.
Let us start building this smart home project.
Adding a Device to Alexa: How to Configure ESP8266 With Alexa
This is the first step of our project. Before using an IoT device with our voice through Alexa, it is necessary to register the device so that Amazon Echo can handle it.
In this tutorial, we will use LEDs connected to ESP8266, so Amazon Echo has to add the ESP8266 to the device list. To this purpose, this smart home project uses fauxmoESP, which simplifies the project. Let us suppose you use the Arduino IDE to develop this project. First, we need to install it. You have to download the .zip file and add it to Arduino IDE. This library requires two more libraries:
You can install these two libraries in the same way you did for fauxmoESP. Once the libraries are installed correctly, it is time to build the ESP8266 sketch to register the ESP8266 on Amazon Echo:
#include <ESP8266WiFi.h>
#include <ESPAsyncTCP.h>
#include <fauxmoESP.h>

fauxmoESP fauxmo;

void setup() {
  Serial.begin(115200);

  if (connectWifi()) {
    // Setup fauxmo
     Serial.println("Adding LED device");
     fauxmo.setPort(80);
     fauxmo.enable(true);
     fauxmo.addDevice("Led");
  }
}

void loop() {
  fauxmo.handle();
}

boolean connectWifi() {
  // Let us connect to WiFi
  WiFi.begin(ssid, password);

  while (WiFi.status() != WL_CONNECTED) {
    delay(500);
    Serial.print(".");
  }

  Serial.println(".......");
  Serial.println("WiFi Connected....IP Address:");
  Serial.println(WiFi.localIP());

  return true;
}
This ESP8266 registers a device named Led. Now, we can use the Alexa app to discover the ESP8266, as shown below:
You have to click on "Add new device" and then:

Finally, the Alexa starts looking for new connected devices, and then:

That's all. The device now is connected to Amazon Echo. As you have noticed, using a few lines of code, we have connected our ESP8266 to Amazon Echo through Alexa.
How to Listen to Voice Command Through Alexa
Once the ESP8266 is connected to Amazon Echo, it is possible to send commands using voice through Amazon Alexa. To get notified when the user interacts their voice with our ESP8266, it is necessary to add a method to the code shown above:
...
fauxmo.onSetState([](unsigned char device_id, const char * device_name,
                    bool state, unsigned char value) {
    Serial.print("Device name:");
    Serial.println(device_name);
    // Here we handle the command received
}
...
Using the state value, the ESP8266 knows if it is necessary to turn on or off the LEDs connected to it. Now, we are able to send commands to Amazon Echo:
Alexa, turn on the <device_name>Alexa, turn off the <device name>Building a Smart Home Project Using Amazon Alexa, ESP8266, and Amazon Echo
Now, we know how to interact with our ESP8266 using voice commands exploiting the Amazon Alexa capabilities to understand our language. Now, we can build a more complex smart home project supposing we want to control two different LED strips:
- A Neopixel Ring Led
- A Neopixel Strip Led
In this project, we want to control them independently, so it is necessary to register two different devices to Amazon Echo.
ESP8266 Schematic
Before diving into the details about how to control these two different devices using Amazon Alexa, ESP8266, and Amazon Echo, it is useful to have an overview of how to connect these devices with ESP8266. The schematic below shows how to do it:
The connections are quite simple, the only interesting aspect is that ESP8266 uses D1 and D2 to control the LEDs.
To control these two LED devices, we use the Neopixel library. The code below shows how to do it:
#include <Adafruit_NeoPixel.h>

#define PIN D2
#define PIN_STRIP D1
#define NUM_LEDS 12
#define NUM_LEDS_STRIP 8

// LEDS
Adafruit_NeoPixel pixelsRing(NUM_LEDS, PIN, NEO_GRB + NEO_KHZ800);
Adafruit_NeoPixel pixelsStrip(NUM_LEDS_STRIP, PIN_STRIP, NEO_GRB + NEO_KHZ800);

void setup() {
  Serial.begin(115200);
  pixelsRing.setBrightness(200);
  pixelsRing.begin();
  pixelsStrip.begin();
  ...
}

void turnOffRing() {
  pixelsRing.fill();
  pixelsRing.show();
}


void turnOffStrip() {
  pixelsStrip.fill();
  pixelsStrip.show();
}

void setRingColor(int r, int g, int b) {
  for (int i=0; i < NUM_LEDS; i++)
    pixelsRing.setPixelColor(i, pixelsRing.Color(r,g,b));

  pixelsRing.show();
}

void setStripColor(int r, int g, int b) {
  pixelsStrip.fill(pixelsStrip.Color(r,g,b));
  pixelsStrip.show();
}
In this code, we simply assign two different colors to these two devices when they are turned on.
Controlling LEDs Using Alexa and Amazon Echo
The last step of this smart home project based on Alexa is registering two different devices with Amazon Echo and control their status using voice commands. To do it, we will register two different devices:
 fauxmo.addDevice("Ring");
 fauxmo.addDevice("Strip");
Let us start the discovering process again:

And finally, we can control them using voice commands:
fauxmo.onSetState([](unsigned char device_id, const char * device_name,
                     bool state, unsigned char value) {
       Serial.print("Device name:");
       Serial.println(device_name);
       if (strcmp(device_name, "Ring") == 0) {
          Serial.print("Ring status:");
          Serial.print(state);
          Serial.println("");
          // Set RGB Color
          if (state)
             setRingColor(10,100,40);
          else
             turnOffRing();
       }
       else if (strcmp(device_name, "Strip") == 0) {
         Serial.print("Strip status:");
          Serial.print(state);
          Serial.println("");
          // Set RGB Color
          if (state)
             setStripColor(180,30,40);
          else
             turnOffStrip();
       }
     });
   }
The code above simply checks the device name and changes its state according to the Alexa voice command.
Now, we can use these commands with Alexa:
Alexa, turn on the ring:
If you want to turn on the strip led, then the command to use is:
Alexa, turn on the strip:
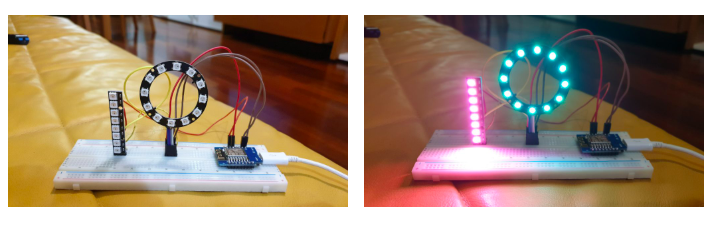
The picture below shows both devices turned on or off:
This post described how to integrate ESP8266 with Alexa using Amazon Echo. Using them, it is possible to control some LEDs using voice commands. The project demonstrated how easy it is building a smart home project based on ESP8266, Alexa, and Amazon Echo.
Published at DZone with permission of Francesco Azzola. See the original article here.
Opinions expressed by DZone contributors are their own.
Comments