Scheduling Tasks With Polling in Mule ESB
Polling is a integral part of enterprise integration. Since Mule ESB is an integration platform, it supports polling — and it does so in various ways.
Join the DZone community and get the full member experience.
Join For FreePolling, as the name suggests, is an engineering pattern in which you write or create a task once and then schedule it to run at a specific frequency. This frequency can be anywhere from milliseconds to days.
Polling is a integral part of enterprise integration. Since Mule ESB is an integration platform, it supports polling — and it does so in various ways. Today, I will be showing you how to poll any of your resources using the polling component of Mule ESB.
Before we start, below are some use cases in which polling can be of use.
- Creating reports on some data periodically.
- Synchronizing data between two systems by polling one and sending it to the other.
- Fetching data from your cloud applications (i.e., CRM, ERP, etc.) for further processing.
I will be using SalesForce as a poll example and creating a polling batch where I will be continually polling accounts from SalesForce and printing them to logs.
As soon as a new account is created in SalesForce, we will get it in our flow and then log it in the logger. We can very easily replace this logger with some other system, like DB or some kind of BI process where this data could be of use.
I am not going to cover how setup salesforce connector for that please refer to my other article or watch my YouTube tutorial for SalesForce.
Flow

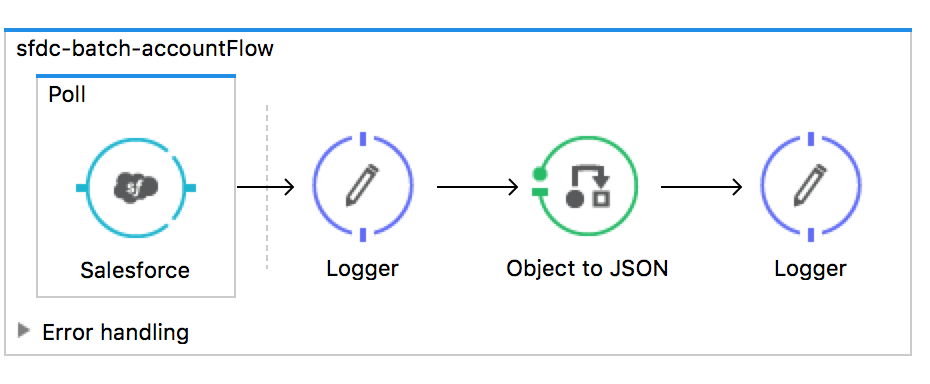
As is clear from the image above, our flow is very simple. We have created a poll component, and in the scope of poll is the SalesForce connector. Our polling component will fire repeatedly based the frequency we set and will fire the SalesForce connector.
In this polling component, we will be setting a watermark that will be persisted by the polling component in our object store and will be updated every time the SalesForce connector returns some result.
Polling Component

Above, I have set the frequency to be fired in every 30 seconds. In the Watermark section, I am setting the name of watermark. This name will be available to us as flow variable, can be used in every run of flow, and will be updated by polling component with the value of CreatedDate at the end of each execution of flow.
default.last.creation.date = 2005-10-08T01:02:03ZOnce we reach the last row in SalesForce and there are no more results, then the process part of flow will not be executed until unless new data is created in SalesForce. We will get the newly created data in the next run of flow, i.e., after 30 sec.
Using Watermark

Here, I am using the watermark set in the polling component to query SalesForce to get the latest values by using flowVars.lastCreationDate.
Testing

As you can see in the first run, we get 19 records. In the second run, I got next 6. In the end, once all records are consumed, we start getting empty data and no more records. This message is displayed:
Watermark value will not be updated since poll processor returned no results.
One more important thing to remember is that you can only use watermark if the processing strategy of your flow is synchronous.

Complete flow XML:
<flow name="sfdc-batch-accountFlow" processingStrategy="synchronous"> <poll doc:name="Poll"> <fixed-frequency-scheduler frequency="15" timeUnit="SECONDS" /> <watermark variable="lastCreationDate" default-expression="${default.last.creation.date}" selector="LAST" selector-expression="#[payload.CreatedDate]" /> <sfdc:query config-ref="Salesforce__Basic_Authentication" query="dsql:SELECT AccountNumber,BillingCity,BillingPostalCode,CreatedById,CreatedDate,LastModifiedById,LastModifiedDate,Name FROM Account where CreatedDate>#[flowVars.lastCreationDate]" fetchSize="10" doc:name="Salesforce" /> </poll> <logger message="Payload size is #[payload.size()] and watermark is #[flowVars.lastCreationDate]" level="INFO" doc:name="Logger" /> <json:object-to-json-transformer doc:name="Object to JSON" /> <logger message="#[payload]" level="INFO" doc:name="Logger" /></flow>That is all. If you liked this tutorial, do let me know.
Opinions expressed by DZone contributors are their own.

Comments