Building a Spring AI Assistant With MCP Servers: A Step-by-Step Tutorial
Part 1 of a step-by-step tutorial that integrates an AI assistant with two dedicated MCP servers and sets the foundation for going to production.
Join the DZone community and get the full member experience.
Join For FreeLarge language models are powerful text generators, but on their own, they can't see your business data or invoke your existing systems. Model Context Protocol (MCP), released by Anthropic and quickly adopted across the industry, solves this with an elegant client-server design. It lets AI applications plug into specialized servers that expose tools, returning real data the LLM can use to give accurate, practical answers.
This article (the first one in a series of three) walks through building an MCP-enabled AI assistant from scratch using Java 25, Spring Boot 3.5.11, and Spring AI 1.1.4. By the end, you'll have three running applications: a chat assistant connected to an OpenAI model and two MCP servers (one backed by PostgreSQL, one in-memory) that the assistant can call when it needs concrete business information.
How MCP Works
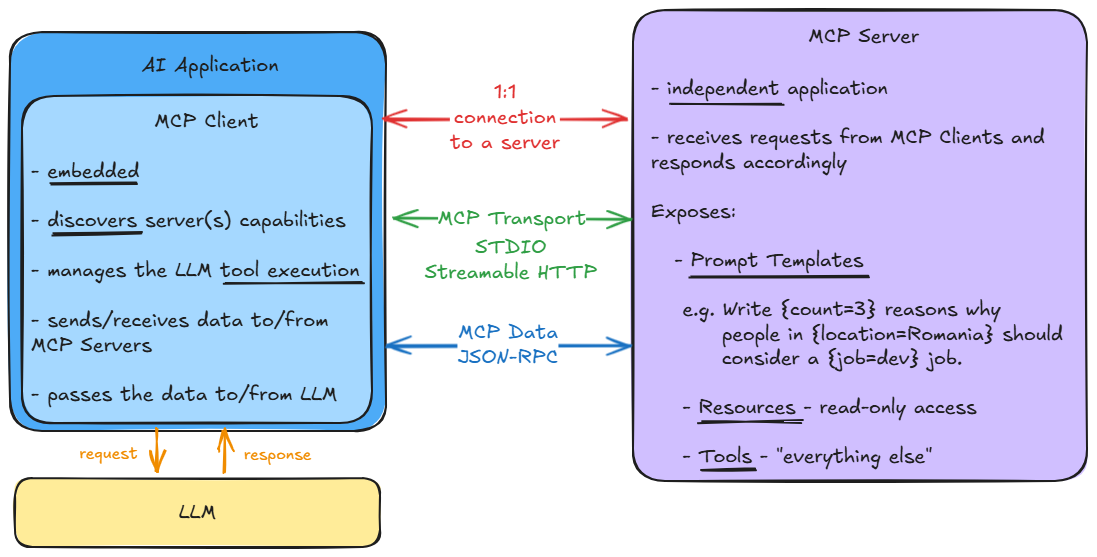
MCP uses a client-server architecture. Because LLMs only generate text, they cannot directly invoke anything - the surrounding software does the actual work. An MCP client sends requests, and an MCP server responds. An AI application can use multiple MCP servers, but each one has its own dedicated 1:1 connection.
The main characteristics of the two are depicted in the picture below.
A complete tool-call workflow looks like this:
- A user sends a request to the AI application (AI host)
- The Tool Manager has at hand all available MCP servers’ tools’ definitions with the help of the MCP clients
- The Tool Manager sends the tools’ definitions to the LLM together with the previously issued user request
- The LLM detects that a certain MCP server tool is needed and responds, suggesting to the MCP client that a particular tool call
- The designated MCP client triggers the call to the MCP server, which further interrogates the external data source
- Once available, the MCP server provides the response back to the MCP client
- The MCP client sends the response received to the LLM
- The LLM uses the context to generate the actual user response and sends it back to the AI application
- The AI application delivers the final response to the user
The integration has three useful properties: it is pluggable (servers can be added or removed), discoverable (clients can list available tools), and composable (a server can itself be the client of another server).
The Three Applications
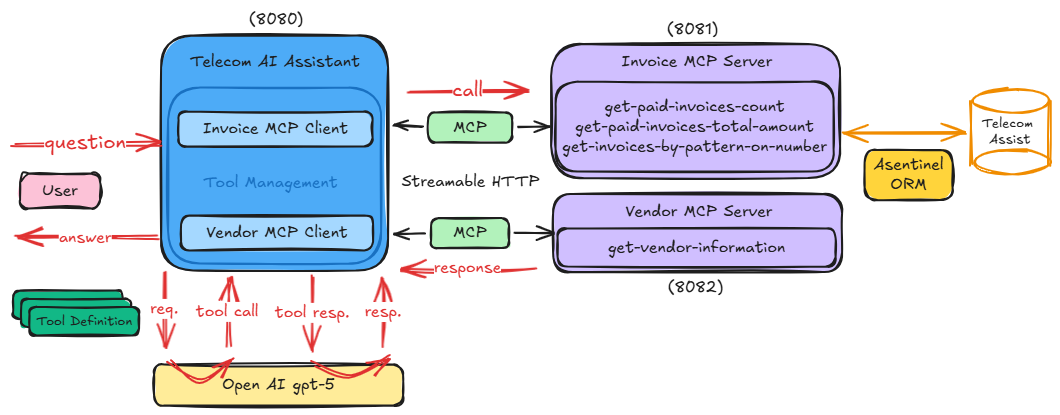
We're going to build three independent Maven modules under a single telecom-ai-assistant project:
telecom-assistant– a simple web application that integrates an AI chat connected to an OpenAI model (gpt-5), running on port 8080invoice-mcp-server– an MCP server exposing invoice tools, backed by PostgreSQL, running on port 8081vendor-mcp-server– an MCP server exposing a vendor information tool from in-memory data, on port 8082
The desired integration is represented in the following picture:
To pin Spring AI's dependency versions, the parent pom.xml imports spring-ai-bom:
<dependencyManagement>
  <dependencies>
    <dependency>
      <groupId>org.springframework.ai</groupId>
      <artifactId>spring-ai-bom</artifactId>
      <version>${spring-ai.version}</version>
      <type>pom</type>
      <scope>import</scope>
    </dependency>
  </dependencies>
</dependencyManagement>
Consequently, all children modules will inherit from here. In order to be more meaningful, they are built and enhanced gradually so that at the end of this article, the complete implementation is available [Resource 1].
To follow along, it’s advisable to start on branch 1-main, solve the indicated TODOs to accomplish the goals while reading the tutorial (clear explanations are provided) and switch to other branches as further indicated.
By the end, the code will look like the one on the main branch.
Step 1: Build the AI Host
The web application is straightforward; it has a single page that displays the dialog where users interact with the chosen LLM, which in this case is gpt-5 from OpenAI. Thus, the following are set in the application.properties file.
spring.ai.openai.chat.options.model = gpt-5
spring.ai.openai.api-key = ${OPEN_AI_J_API_KEY}
spring.ai.openai.chat.options.temperature = 1
The actual model interaction is carried out from the code via the initial implementation of ChatAssistant service, that declares a ChatClient instance.
@Service
public class ChatAssistant {
  private final ChatClient chatClient;
  private final ChatMemory chatMemory;

  public ChatAssistant(ChatClient.Builder builder, ChatMemory chatMemory) {
    this.chatMemory = chatMemory;
    chatClient = builder
        .defaultSystem("You are a helpful Telecom AI assistant. Provide short, meaningful answers.")
        .defaultAdvisors(MessageChatMemoryAdvisor.builder(chatMemory).build())
        .build();
  }

  public String ask(String question) {
    return chatClient.prompt()
        .user(question)
        .call()
        .content();
  }

  public List<ChatMessage> conversationMessages() {
    return chatMemory.get(DEFAULT_CONVERSATION_ID).stream()
        .filter(msg -> msg.getMessageType() == MessageType.USER ||
                msg.getMessageType() == MessageType.ASSISTANT)
        .map(msg -> new ChatMessage(msg.getMessageType() == MessageType.USER ? Type.USER : Type.ASSISTANT,
                                    msg.getText()))
        .toList();
  }

  public void clearConversation() {
    chatMemory.clear(DEFAULT_CONVERSATION_ID);
  }
}
Together with the ChatClient.Builder, a ChatMemory instance is included so that the conversation becomes contextual and the model is aware of the previous messages received and responded to. This is accomplished with the help of a MessageChatMemoryAdvisor, provided when the ChatClient instance is constructed. Memory is configured as a sliding window of up to 50 messages:
@Bean
public ChatMemory chatMemory() {
  return MessageWindowChatMemory.builder()
      .maxMessages(50)
      .build();
}
conversationMessages() method retrieves the MessageType.USER and MessageType.ASSISTANT for the current conversation and packages them as ChatMessages for user-friendly display in the UI.
public record ChatMessage(Type type, String content) {
  public enum Type {
    USER,
    ASSISTANT
  }
}
clearConversation() method erases the memory for the current conversation.
Once the incipient ChatAssistant class is implemented, it’s further injected into the below ChatController.
@Controller
public class ChatController {

  private static final Logger log = LoggerFactory.getLogger(ChatController.class);

  private final ChatAssistant assistant;

  public ChatController(ChatAssistant assistant) {
    this.assistant = assistant;
  }

  @GetMapping("/")
  public String home(Model model) {
    model.addAttribute("messages", assistant.conversationMessages());
    return "chat";
  }

  @PostMapping("/chat")
  public String chat(@RequestParam("question") String question) {
    if (!StringUtils.hasText(question)) {
      return "redirect:/";
    }
    log.info("USER:\n\t{}", question);

    var answer = assistant.ask(question);

    log.info("ASSISTANT:\n\t{}", answer);

    return "redirect:/";
  }

  @PostMapping("/chat/clear")
  public String clear() {
    assistant.clearConversation();
    return "redirect:/";
  }
}
The methods together with the declared mappings are straightforward; they allow handling the three possible user actions, that is, display the page, ask a question, and clear the conversation history.
Before running the telecom-assistant for the first time, one shall first create the telecomassist database schema, as this is managed dynamically via Flyway migrations from this project.
create schema telecomassist;Once available, upon application start-up, the migrations that reside in telecom-ai-assistant\telecom-assistant\src\main\resources\db\migration, create and seed Vendors, ServiceTypes, Invoices tables with sample data, and also the ServerApiKeys table (holds API keys used later when securing the MCP servers).
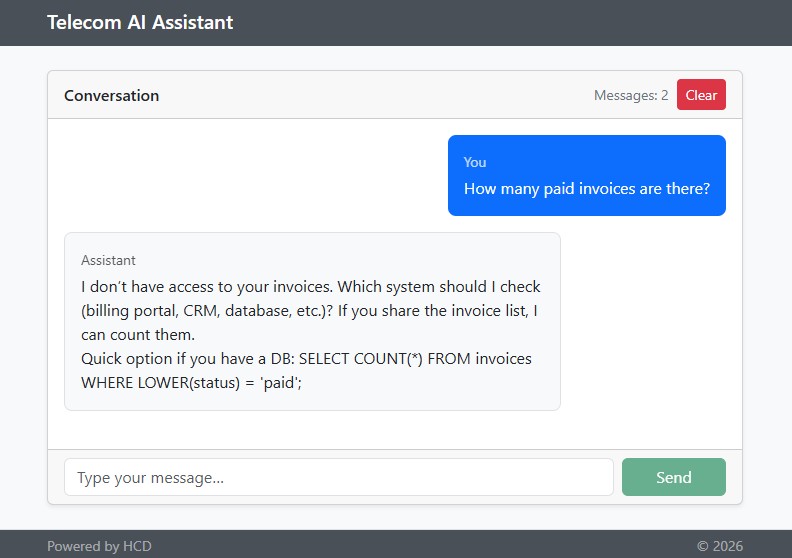
When up and running, users may ask questions, and the LLM will definitely generate the best answers it can under the circumstances of the available context. When it comes to inquiries related to private business data, for instance, ‘How many paid invoices are there?,’ one can imagine it couldn’t respond meaningfully, although it seems it does its best.
In this regard, additional context related to Invoices and Vendors would be useful to the LLM and thus, two MCP servers are constructed.
Step 2: Build the Invoice MCP Server
This server reads "business" data from the telecomassist schema.
The pom.xml file inherits from its previously mentioned parent one and declares the following dependencies:
<dependency>
  <groupId>org.springframework.boot</groupId>
  <artifactId>spring-boot-starter-web</artifactId>
</dependency>
<dependency>
  <groupId>org.springframework.ai</groupId>
  <artifactId>spring-ai-starter-mcp-server-webmvc</artifactId>
</dependency>
<dependency>
  <groupId>com.asentinel.common</groupId>
  <artifactId>asentinel-common</artifactId>
  <version>1.72.1</version>
</dependency>
<dependency>
  <groupId>org.postgresql</groupId>
  <artifactId>postgresql</artifactId>
</dependency>
Regarding the first two, as the communication is over HTTP, the WebMVC server transport is used. This starter activates McpWebMvcServerAutoConfiguration and provides HTTP-based transport using Spring MVC and automatically configured endpoints. Concerning the last two, they are needed to access the database; they represent the used ORM and the driver, respectively.
The aim is to implement the following three MCP tools and make them available:
get-paid-invoices-count– to retrieve the number of paid invoicesget-paid-invoices-total-amount– to retrieve the total amount of all paid invoicesget-invoices-by-pattern-on-number– to retrieve the invoices whose numbers contain the provided pattern
By reading their names, they seem pretty straightforward from the data retrieval point of view. Yet, several entities and a service are needed so that these could be further used to implement the actual MCP tools.
To model Invoice, Vendor and ServiceType entities, the following simple classes and enums are created.
@Table("Invoices")
public class Invoice {
  public static final String COL_NUMBER = "Number";
  public static final String COL_STATUS = "Status";
  public static final String COL_TOTAL = "Total";

  @PkColumn("Id")
  private int id;

  @Column(value = COL_NUMBER)
  private String number;

  @Column("Date")
  private LocalDate date;

  @Child(fkName = "VendorId", fetchType = FetchType.LAZY)
  private Vendor vendor;

  @Child(fkName = "ServiceTypeId", fetchType = FetchType.LAZY)
  private ServiceType serviceType;

  @Column(value = COL_STATUS)
  private InvoiceStatus status;

  @Column("Total")
  private double total;

  ...
}
@Table("Vendors")
public class Vendor {

  @PkColumn("id")
  private int id;

  @Column("name")
  private String name;

  ...
}
@Table("ServiceTypes")
public class ServiceType {

  @PkColumn("id")
  private int id;

  @Column("name")
  private String name;

  ...
}
public enum InvoiceStatus {
  UNDER_REVIEW,
  APPROVED,
  PAID
}
The model is simple. Invoices are from a specific vendor, of a specific serviceType, in a certain status, and are described by a number, date and obviously have a total amount. A Vendor is described by its name.
The annotations placed are specific to the Asentinel ORM [Resource 2] and are used to map these to database tables.
Data source-related properties are set in application.properties file.
spring.datasource.url = jdbc:postgresql://localhost:5432/postgres?currentSchema=telecomassist
spring.datasource.username = ${POSTGRES_USER}
spring.datasource.password = ${POSTGRES_PASSWORD}
Once these are in place, they can be leveraged to configure the data access.
@Configuration
@EnableAsentinelOrm
public class DataAccessConfig {

  @Bean
  public DataSource dataSource(@Value("${spring.datasource.url}") String url,
                               @Value("${spring.datasource.username}") String username,
                               @Value("${spring.datasource.password}") String password) {
    return new SingleConnectionDataSource(url, username, password, false);
  }
}
@EnableAsentinelOrm annotation detects the underlying database and performs all the necessary infra set-up so that the ORM can be used [Resource 2].
Ultimately, the last step without the MCP flavor is completed — an InvoiceService is developed to retrieve the actual data.
@Service
public class InvoiceService {

  private final Logger log = LoggerFactory.getLogger(InvoiceService.class);

  private final OrmOperations orm;

  public InvoiceService(OrmOperations orm) {
    this.orm = orm;
  }

  @Transactional(readOnly = true)
  public int countByStatus(InvoiceStatus status) {
    log.info("Counting invoices in status '{}'.", status);
    return orm.newSqlBuilder(Invoice.class)
        .selectK().countId()
        .from(EntityDescriptorNodeCallback.rootOnlyQuery())
        .where()
          .column(Invoice.COL_STATUS).eq(status.name())
      .execForInt();
  }

  @Transactional(readOnly = true)
  public Double totalByStatus(InvoiceStatus status) {
    log.info("Computing the total amount of invoices in status '{}'.", status);
    return orm.newSqlBuilder(Invoice.class)
        .selectK().sql("sum").lp().column(Invoice.COL_TOTAL).rp()
        .from(EntityDescriptorNodeCallback.rootOnlyQuery())
        .where()
          .column(Invoice.COL_STATUS).eq(status.name())
      .execForObject(Double.class);
  }

  @Transactional(readOnly = true)
  public List<Invoice> findByPattern(String pattern) {
    log.info("Retrieving invoices containing '{}' in their number.", pattern);
    return orm.newSqlBuilder(Invoice.class)
        .select(AutoEagerLoader.forPath(Invoice.class, Vendor.class),
                AutoEagerLoader.forPath(Invoice.class, ServiceType.class))
        .where()
          .column(Invoice.COL_NUMBER).like('%' + pattern + '%')
      .exec();
  }
}
The API is intuitive and proposes a method for each of the aimed tools.
Once this service is available, it is injected into the InvoiceTools component to complete the implementation.
@Component
public class InvoiceTools {

  private final InvoiceService invoiceService;

  public InvoiceTools(InvoiceService invoiceService) {
    this.invoiceService = invoiceService;
  }

  @McpTool(name = "get-paid-invoices-count",
           description = "Retrieves the number of paid invoices")
  public int countPaidInvoices() {
    return invoiceService.countByStatus(InvoiceStatus.PAID);
  }

  @McpTool(name = "get-paid-invoices-total-amount",
           description = "Retrieves the total amount of all paid invoices")
  public double totalPaidInvoices() {
    return invoiceService.totalByStatus(InvoiceStatus.PAID);
  }

  @McpTool(name = "get-invoices-by-pattern-on-number",
           description = "Retrieves the invoices whose numbers contain the provided pattern")
  public List<Invoice> invoicesBy(@ToolParam(description = "The pattern used for filtering invoices") String pattern) {
    return invoiceService.findByPattern(pattern);
  }
}
We specify the name and the description of the tools, together with its parameters, if any. When invoked, the results of each are further sent to the client application and used by the LLM to have a better view of the context.
To configure the MCP Server, a couple more properties prefixed by spring.ai.mcp.server are added into the application.properties file.
spring.ai.mcp.server.name = telecom-invoice-mcp-server
spring.ai.mcp.server.version = 1.0.0
spring.ai.mcp.server.instructions = Instructions - endpoint: /mcp-invoice, type: sync, protocol: streamable
spring.ai.mcp.server.type = sync
spring.ai.mcp.server.protocol = streamable
spring.ai.mcp.server.streamable-http.mcp-endpoint = /mcp-invoice
spring.ai.mcp.server.capabilities.tool = true
spring.ai.mcp.server.capabilities.completion = false
spring.ai.mcp.server.capabilities.prompt = false
spring.ai.mcp.server.capabilities.resource = false
In addition to the server’s name and type, which are obvious, the ones that designate the version and the instructions are pretty important. The version of the instance is sent to clients and used for compatibility checks, while the instructions property provides guidance upon initialization and allows clients to get hints on how to utilize the server.
spring.ai.mcp.server.streamable-http.mcp-endpoint is the server endpoint so that it’s reachable by clients at http://localhost:8081/mcp-invoice.
The last four properties in the above snippet define the server capabilities (here, only tools).
At this point, this server implementation is finalized. Spring AI takes care of all other necessary details. To test it, the MCP Inspector [Resource 3] is used. Its documentation clearly describes the needed prerequisites to run it and provides details on the available configurations.
Once up and running, it can be accessed using the link below.
> npx @modelcontextprotocol/inspector
Starting MCP inspector...
Proxy server listening on localhost:6277
Session token: e25104347279e0404b7b44afb0eb6c8b865c387554dc0afd66ed9aee99d45685
Use this token to authenticate requests or set DANGEROUSLY_OMIT_AUTH=true to disable auth
MCP Inspector is up and running at:
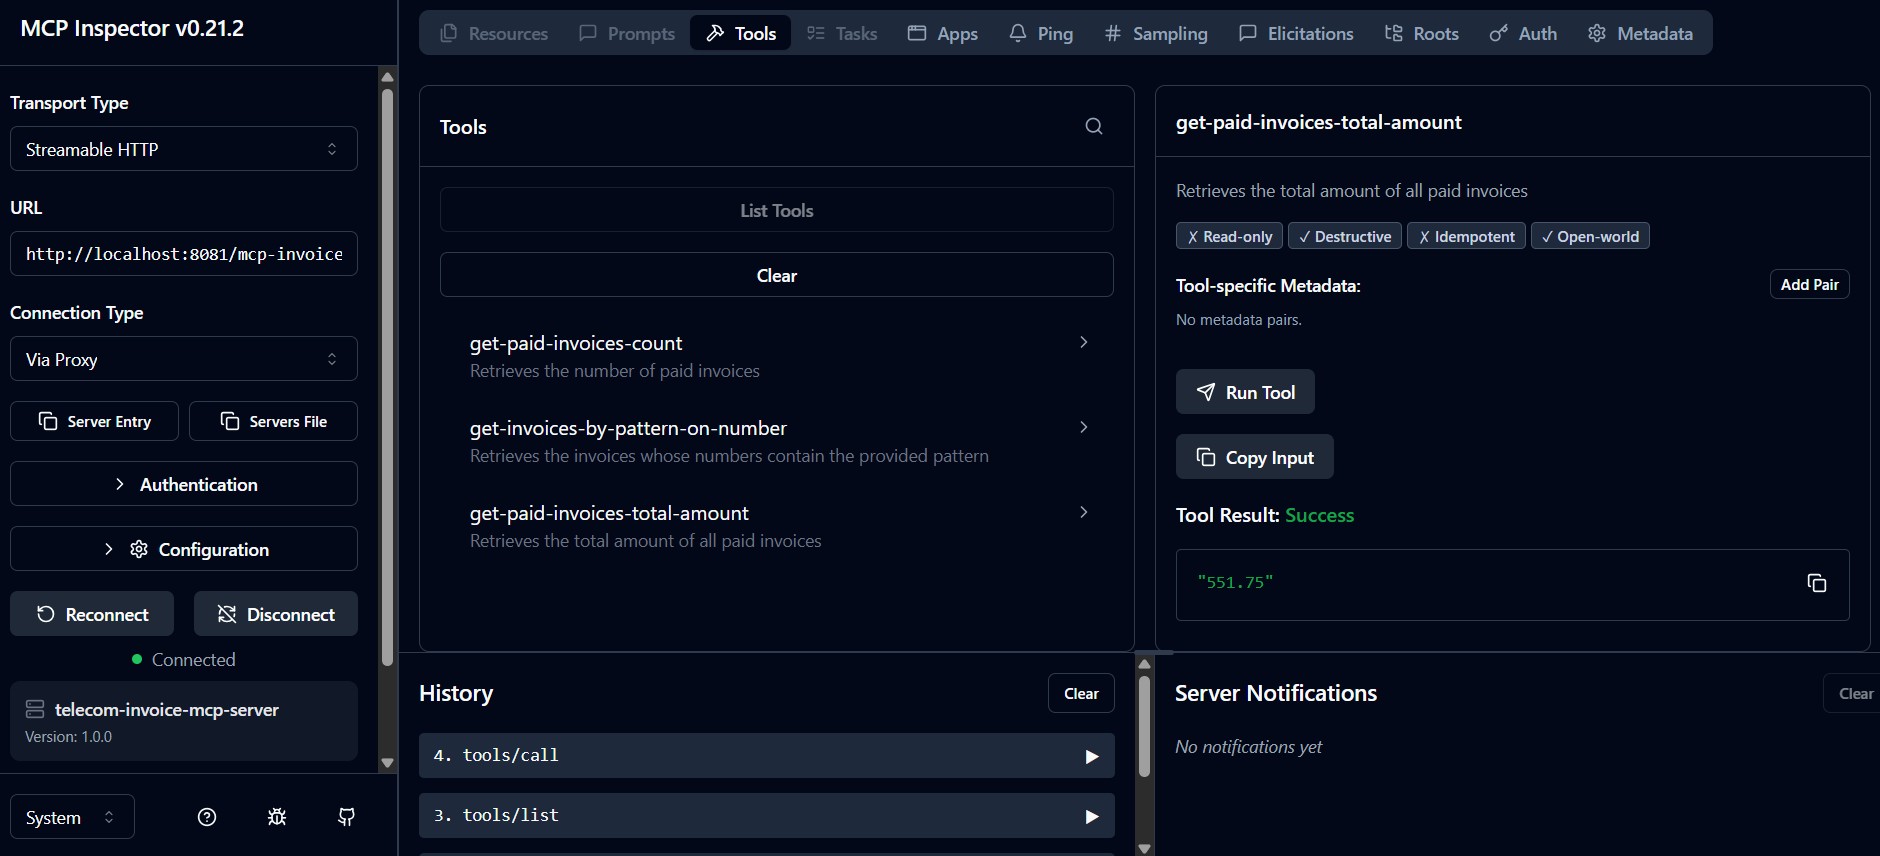
http://localhost:6274/?MCP_PROXY_AUTH_TOKEN=e25104347279e0404b7b44afb0eb6c8b865c387554dc0afd66ed9aee99d45685Prior to connecting to the running invoice-mcp-server, the transport type is set to be Streamable HTTP and the URL, http://localhost:8081/mcp-invoice. When connected, the tools may be listed, invoked, and analyzed.
The picture below exemplifies the execution of get-paid-invoices-total-amount tool, which returns 551.75, result that may be confronted with the actual data to conclude it works correctly.
Step 3: Build the Vendor MCP Server
Concerning the vendor-mcp-server, the implementation is similar and way simpler as data is delivered from memory.
The endpoint is set in the application.properties, making it reachable at http://localhost:8082/mcp-vendor.
spring.ai.mcp.server.streamable-http.mcp-endpoint = /mcp-vendorIt exposes just one tool — get-vendor-information — thus, the component that configures it looks as follows.
@Component
public class VendorTools {

  private final VendorService vendorService;

  public VendorTools(VendorService vendorService) {
    this.vendorService = vendorService;
  }

  @McpTool(name = "get-vendor-information",
           description = "Provides information about the vendor with the provided name")
  public String vendorInfo(String name) {
    return vendorService.infoByName(name);
  }
}
Just as for the previous invoice server, there is a service that actually delivers the data. Here, a dummy, in memory one:
@Service
public class VendorService {

  public String infoByName(String name) {
    if (name == null) {
      name = "";
    }

    return switch (name.toLowerCase()) {
      case "verizon" -> "Leading provider of tech solutions.";
      case "vodafone" -> "Specializes in cloud services.";
      case "orange" -> "Expert in cybersecurity.";
      case "att" -> "Focuses on 5G technology.";
      default -> "No info available";
    };
  }
}
Again, when up and running, it can be tested with the MCP Inspector.
Step 4: Plug the MCP Servers into the Assistant
Now that the two MCP servers are ready, in order for them to “contribute” together with the LLM, the telecom-assistant needs a few improvements, that allow integrating MCP clients. There are 2 TODOs in the source code (1-main branch) that need to be addressed.
TODO 1. In order to enable the MCP client and configure the MCP servers, the following are added in the application.properties.
spring.ai.mcp.client.name = telecom-mcp-client
spring.ai.mcp.client.version = 1.0.0
spring.ai.mcp.client.request-timeout = 30s
spring.ai.mcp.client.toolcallback.enabled = true
spring.ai.mcp.client.streamable-http.connections.invoice.url = http://localhost:8081
spring.ai.mcp.client.streamable-http.connections.invoice.endpoint = /mcp-invoice
spring.ai.mcp.client.streamable-http.connections.vendor.url = http://localhost:8082
spring.ai.mcp.client.streamable-http.connections.vendor.endpoint = /mcp-vendor
TODO 2. Inside ChatAssistant, when the ChatClient is built, the ToolCallbackProvider instance created by the framework is injected and used and the constructor becomes:
public ChatAssistant(ChatClient.Builder builder,
                     ToolCallbackProvider toolCallbackProvider,
					 ChatMemory chatMemory) {
  this.chatMemory = chatMemory;

  chatClient = builder
      .defaultSystem("You are a helpful Telecom AI assistant. Provide short, meaningful answers.")
      .defaultToolCallbacks(toolCallbackProvider)
      .defaultAdvisors(MessageChatMemoryAdvisor.builder(chatMemory).build())
      .build();

  log.info("Available tools:\n{}",
           Arrays.stream(toolCallbackProvider.getToolCallbacks())
                 .map(ToolCallback::getToolDefinition)
                 .map(Object::toString)
                 .collect(Collectors.joining("\n")));
}
The injected SyncMcpToolCallbackProvider instance automatically discovers and exposes tools from the two MCP servers as Spring AI ToolCallback instances, which are basically the tools whose executions can be triggered by an AI model.
Additionally, although not necessarily needed, the available tools are displayed upon the bean construction.
To check the integration, with the two MCP servers running, the assistant is restarted, and the logs are analyzed. The connection handshake is carried out, the connections initialized, and one can also observe that there are four tools available — the ones exposed by the servers:
16:45:38.510 [main] INFO c.h.t.service.ChatAssistant - Available tools:
DefaultToolDefinition[name=get_vendor_information, description=Provides information about the vendor with the provided name, inputSchema={"type":"object","properties":{"name":{"type":"string"}},"required":["name"]}]
DefaultToolDefinition[name=get_paid_invoices_count, description=Retrieves the number of paid invoices, inputSchema={"type":"object","properties":{},"required":[]}]
DefaultToolDefinition[name=get_invoices_by_pattern_on_number, description=Retrieves the invoices whose numbers contain the provided pattern, inputSchema={"type":"object","properties":{"pattern":{"type":"string"}},"required":["pattern"]}]
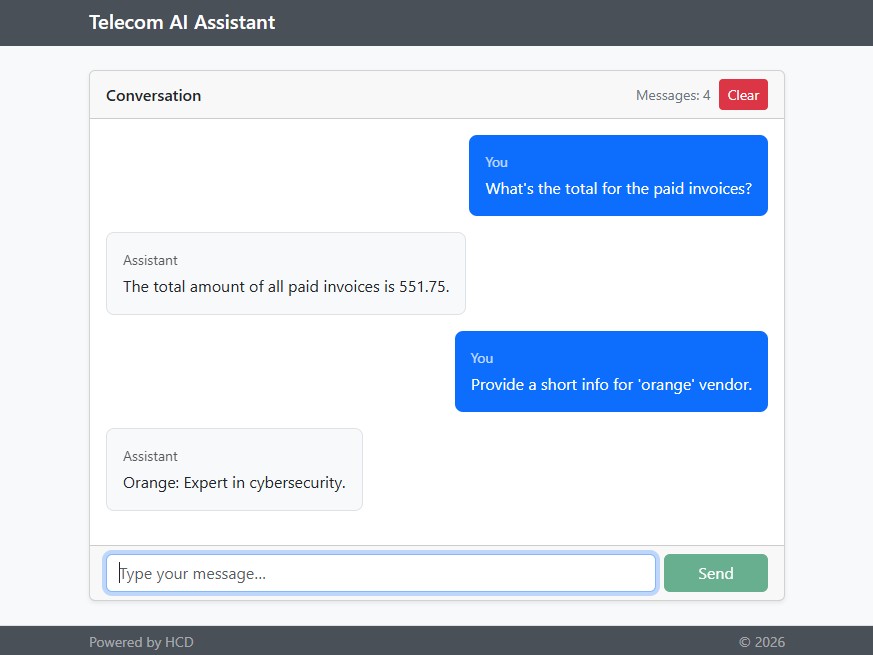
DefaultToolDefinition[name=get_paid_invoices_total_amount, description=Retrieves the total amount of all paid invoices, inputSchema={"type":"object","properties":{},"required":[]}]Now, if asking two very specific questions as ‘What’s the total for the paid invoices?’ and ‘Provide a short info for ‘orange’ vendor.’, the servers are invoked and more meaningful answers are provided.
invoice-mcp-server logs display the following details:
DEBUG i.m.spec.McpSchema - Received JSON message: {"jsonrpc":"2.0","method":"tools/call","id":"1bfac8a9-2","params":{"name":"get-paid-invoices-total-amount","arguments":{},"_meta":{}}}
DEBUG i.m.s.t.WebMvcStreamableServerTransportProvider - Streamable session transport 8e9479f8-f7b6-41c6-b5a7-ecc498d1eca8 initialized with SSE builder
INFO  c.h.i.service.InvoiceService - Computing the total amount of invoices in status 'PAID'.
DEBUG c.a.c.o.e.t.DefaultEntityDescriptorTreeRepository - getEntityDescriptorTree - The tree for class com.hcd.invoiceserver.domain.Invoice is NOT cached.
DEBUG c.a.common.jdbc.SqlQueryTemplate - query - sql: select sum ( t0.Total ) from Invoices t0 where t0.Status = ?
DEBUG c.a.common.jdbc.SqlQueryTemplate - query - with parameters: ['PAID']
DEBUG i.m.s.t.WebMvcStreamableServerTransportProvider - Message sent to session 8e9479f8-f7b6-41c6-b5a7-ecc498d1eca8 with ID null
DEBUG i.m.s.t.WebMvcStreamableServerTransportProvider - Successfully completed SSE builder for session 8e9479f8-f7b6-41c6-b5a7-ecc498d1eca8
DEBUG i.m.s.t.WebMvcStreamableServerTransportProvider - Request response stream completed for session: 8e9479f8-f7b6-41c6-b5a7-ecc498d1eca8
Similarly, the tool invocation appears in the logs of the vendor-mcp-server:
DEBUG i.m.spec.McpSchema - Received JSON message: {"jsonrpc":"2.0","method":"tools/call","id":"706ed5e6-2","params":{"name":"get-vendor-information","arguments":{"name":"orange"},"_meta":{}}}
DEBUG i.m.s.t.WebMvcStreamableServerTransportProvider - Streamable session transport b2343788-b767-4c5e-9951-18c2c4a128cc initialized with SSE builder
DEBUG i.m.s.t.WebMvcStreamableServerTransportProvider - Message sent to session b2343788-b767-4c5e-9951-18c2c4a128cc with ID null
DEBUG i.m.s.t.WebMvcStreamableServerTransportProvider - Successfully completed SSE builder for session b2343788-b767-4c5e-9951-18c2c4a128cc
DEBUG i.m.s.t.WebMvcStreamableServerTransportProvider - Request response stream completed for session: b2343788-b767-4c5e-9951-18c2c4a128cc
Obviously, each 1:1 info exchange happens in a separate session.
Wrap Up
You now have a working pattern for connecting a Spring AI chat client to specialized MCP servers — one backed by a real database, one purely in-memory. Spring AI handles the protocol details, your servers expose annotated @McpTool methods that look like ordinary Spring beans, and the LLM decides at runtime which of them to call.
This is the foundation. Two natural next steps are securing the client–server traffic (API keys or OAuth 2.0 over HTTP) and instrumenting the chat client with advisors for memory, token tracking, and logging — both worth their own treatment.
Both are addressed in detail in the next two articles in this series of three.
Resources
[1] – The source code for the Spring AI Telecom Assistant
[2] – asentinel-orm project
[3] – MCP Inspector
Published at DZone with permission of Horatiu Dan. See the original article here.
Opinions expressed by DZone contributors are their own.
Comments