

Spring Cloud Sleuth + RabbitMQ + Zipkin + ElasticSearch
As more and more microservices are deployed in the system, service dependencies are getting more complicated. Use this tutorial as a guide for you.
Join the DZone community and get the full member experience.
Join For Free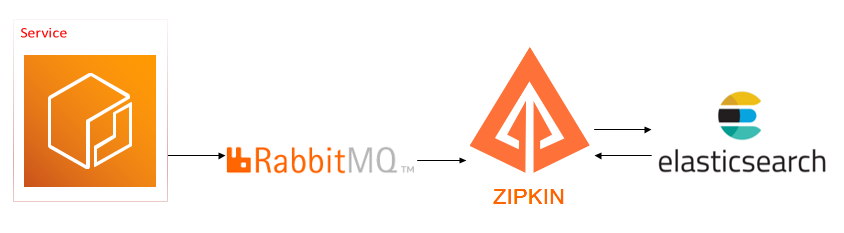
Add Sleuth, RabbitMQ, and Zipkin in Spring Cloud Project
This article assumes that you know how to set up a spring cloud or spring boot project; also, the RabbitMQ and ElasticSearch servers are ready.
Add the dependencies in maven pom.xml:
<dependency>
  <groupId>org.springframework.cloud</groupId>
  <artifactId>spring-cloud-starter-sleuth</artifactId>
</dependency>
<dependency>
	<groupId>org.springframework.boot</groupId>
	<artifactId>spring-boot-starter-amqp</artifactId>
</dependency>
<!--
<dependency>
    <groupId>org.springframework.cloud</groupId>
    <artifactId>spring-cloud-starter-zipkin</artifactId>
</dependency>
-->
<!--Spring Sleuth3.0 removed spring-cloud-starter-zipkin:
https://docs.spring.io/spring-cloud-sleuth/docs/3.0.0-M3/reference/html/#sleuth-with-zipkin-via-http
Use the following dependency instead
-->
<dependency>
    <groupId>org.springframework.cloud</groupId>
    <artifactId>spring-cloud-sleuth-zipkin</artifactId>
</dependency>
Set up the RabbitMQ properties in Spring Cloud: Common Application Properties:
xxxxxxxxxx
spring.rabbitmq.addresses={rabbitmq_host}:5672
spring.rabbitmq.virtual-host: app_vhost
spring.rabbitmq.username=username
spring.rabbitmq.password=password
...
Set up the Zipkin properties: Spring Cloud Sleuth Common Application Properties, set the property "spring.Zipkin.sender.type=rabbit." Sleuth can send messages to Zipkin via HTTP, RabbitMQ
OR
Kafka: Sleuth with Zipkin:
xxxxxxxxxx
spring.zipkin.sender.type=rabbit
spring.zipkin.rabbitmq.queue=zipkin
....
Rebuild and restart the service; a RabbitMQ queue "Zipkin" will be created.
Setup Zipkin, Zipkin-dependencies Services With Docker Image
Docker Compose file includes Zipkin and Zipkin-dependencies services; Zipkin_RabbitMQCollector.
”Zipkin-dependencies” is a process service that combines Zipkin indices: “Zipkin-span-xxx” into “Zipkin-dependency-xx”; in the following sample docker-compose.xml, it is set to run every hour:
xxxxxxxxxx
version: '3.7'
services:
zipkin:
image: openzipkin/zipkin
deploy:
replicas: 1
update_config:
parallelism: 1
delay: 1m30s
failure_action: rollback
rollback_config:
parallelism: 1
delay: 1m30s
restart_policy:
condition: on-failure
delay: 5s
max_attempts: 3
resources:
limits:
memory: 500M
reservations:
memory: 100M
ports:
- 9411:9411
environment:
RABBIT_CONCURRENCY: 1
RABBIT_CONCURRENCY: 1
RABBIT_CONNECTION_TIMEOUT: 60000
RABBIT_QUEUE: zipkin
RABBIT_ADDRESSES: {rabbitmq_host}:5672
RABBIT_PASSWORD: password
RABBIT_USER: user
RABBIT_VIRTUAL_HOST: app_vhost
RABBIT_USE_SSL: "false"
STORAGE_TYPE: elasticsearch
ES_HOSTS: http://{elasticsearch_host}:9200
healthcheck:
test: wget --no-verbose --tries=1 --spider http://localhost:9411/health || exit 1
interval: 10s
start_period: 15s
retries: 3
zipkin-dependencies:
image: openzipkin/zipkin-dependencies
deploy:
replicas: 1
restart_policy:
delay: 1h
resources:
limits:
memory: 550M
reservations:
memory: 100M
environment:
STORAGE_TYPE: elasticsearch
ES_HOSTS: http://{elasticsearch_host}:9200
It fetches the Sleuth messages from RabbitMQ and stores the data in ElasticSearch. Check the ES indices.
Deploy the services in Docker Host, and access it with this URL.
Trace logs:
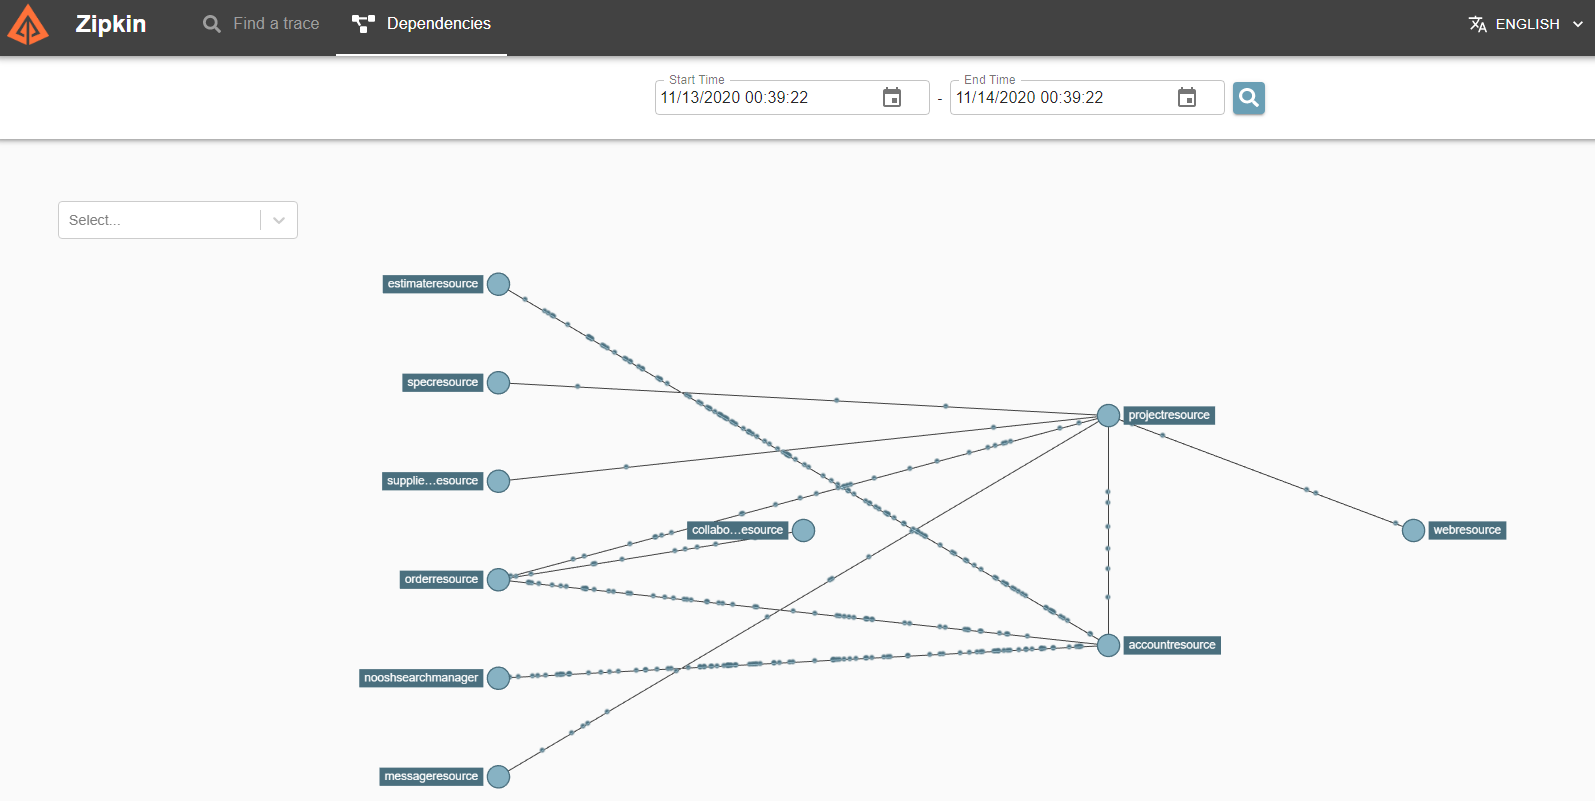
Service Dependencies:
Setting Up Zipkin Data Clean up Policy in ElasticSearch
To archive, the old data, set up the ElasticSearch index policy to remove the data created 180 days before.
Create the Index Lifecycle “Zipkin-cleanup_policy”:
xxxxxxxxxx
curl -X PUT "http://$ES_HOST:9200/_ilm/policy/zipkin-cleanup_policy?pretty" \
-H 'Content-Type: application/json' \
-d '{
"policy": {
"phases": {
"hot": {
"actions": {}
},
"delete": {
"min_age": "180d",
"actions": { "delete": {} }
}
}
}
}'
Create the Index template with the “Zipkin-cleanup_policy.”
xxxxxxxxxx
curl -X PUT "http://$ES_HOST:9200/_template/zipkinidx_template" \
-H 'Content-Type: application/json' \
-d ' {
"index_patterns": ["zipkin*"],
"settings": {"number_of_shards": 1, "number_of_replicas": 1,
"index.lifecycle.name": "zipkin-cleanup_policy"
}
}'
Apply the “Zipkin-cleanup_policy” to existing indices:
xxxxxxxxxx
curl -X PUT "http://$ES_HOST:9200/zipkin*/_settings?pretty" \
-H 'Content-Type: application/json' \
-d '{ "lifecycle.name": "zipkin-cleanup_policy" }'
Check out more details on this page: Spring Cloud Sleuth.
Opinions expressed by DZone contributors are their own.
Comments