Integration Between Java and Slack With Webhooks
I will explain how to create simple integration between Java and Slack with use of Slack Incoming Webhooks and Spring Framework.
Join the DZone community and get the full member experience.
Join For FreeAs you probably know, Slack is one of the most common company communicators nowadays. All possible plugins, apps, and bots, which can extend its functionalities, are a hot topic recently, especially as of now when more and more companies are forced to work remotely. Through the course of this article, I will try to show how to create a simple, yet useful, integration between Java and Slack. I will use links to Slack documentation and tutorials which provide detailed description of Slack features.
What are Slack Incoming Webhooks?
Here the answer is simple but meaningful. Webhooks are an easy (probably the easiest) way to post messages from custom apps to Slack users and channels. They use JSON as messages data format, and they also allow us to use the standard Slack formatting and layout blocks.
To use them, you have to create a Slack app. I did not manage to find a properly descriptive tutorial.
I recommend to open this link https://api.slack.com/apps and click the big green button Create an App. In a new modal, you will have to choose the name and workspace for the app. After creating the app, you have to enable Incoming Webhooks. On the bottom of the screen, with Webhooks enabling checkbox, you will see a button Add New Webhook to Workspace, which will allow you to get the Webhook of a particular channel. Now you have to copy the last part of a new Webhook.
In the example below the part, which should be copied is marked in red:
https://hooks.slack.com/servic/T016M7S1PK4/B0187LJ9FFZ/Nw1hTMVJldSQQaXfpFYf2Y2e
If you have any troubles with configuring app Webhooks or simply want to know more about them, I recommend you to read this article. The article comes from official Slack documentation and concerns sending messages with Webhooks.
Before we start – a quick disclaimer.
I know that the code quality and design of provided examples can be considered questionable. Please remember that it is a more PoC rather than something that is ready for production.
Let’s create our app step by step
Step 1
We will need a new spring boot project as a base. I chose Spring Boot as it provides plenty of configurations out of the box and has a number of modules which allow us to set up our app faster and add new features to it later on. It is also a very well integrated with IntelliJ. If you do not have IntelliJ installed I recommend to use Spring Initializr. We will need only one artifact, namely, Spring Web so project configuration should not be hard for anyone.
Step 2
After the previous step, we have a fully functioning Spring Boot app. Now, it is time to add something useful there. We start with creating a POJO named Message which will represent our message from the HTTP request.
Then, we create a simple REST controller called MessageInterceptorController.
We will also create a service called MessageSender, which we will further inject into the controller. A code after this step should be more or less like this:
xxxxxxxxxx
//imports
public class MessageInterceptorController {
private final MessageSender messageSender;
public MessageInterceptorController(MessageSender messageSender) {
this.messageSender = messageSender;
}
}
xxxxxxxxxx
//imports
public class MessageSender {
}
xxxxxxxxxx
public class Message {
private String text;
public String getText() {
return text;
}
}
Step 3
Now, when we have the base of our middleware, we will add some functionalities. In the controller, we add a single endpoint with @PostMapping and path /messages/{userName} . The endpoint will get the value of variable userName with usage of @PathVariable and our message with help of @RequestBody.
Both values will be further used to call newly created method sendMessage in MessageSender, which will be the most vital method of this app. After this step our code should be similar to the one from below. I did not paste the content of Message class because it remains unchanged from the previous step.
xxxxxxxxxx
//imports
public class MessageInterceptorController {
private final MessageSender messageSender;
public MessageInterceptorController(MessageSender messageSender) {
this.messageSender = messageSender;
}
(path = "/messages/{userName}", consumes=MediaType.APPLICATION_JSON_VALUE)
public void sendMessage( String userName, Message message) {
messageSender.sendMessage(userName, message);
}
}
xxxxxxxxxx
//imports
public class MessageSender {
public void sendMessage(String userName, Message message) {
}
}
Step 4
In this step, we will add a Map, which will store the relation between a user name and the particular user channel Webhook, so the user name will be Map key and the channel Webhook will we Map value. We will also add a constant field which will store a common part of Webhooks URL. Your code after this step should be similar to the one below. Of course your user name and channel Webhook should be different then my.
xxxxxxxxxx
//imports
public class MessageSender {
private static final String HOOKS_URL = "https://hooks.slack.com/services/%s";
private static final Map<String, String> USER_TO_CHANNEL_WEBHOOK =
Map.of("Pask", "T016M7S1PK4/B0187LJ9FF/Nw1hTMVJldSQQaXfpFYf2Y2e");
public void sendMessage(String userName, Message message) {
}
}
Step 5
Here, we will implement sendMessage itself. Firstly, we will get the channel Webhook from our Map and create a full Webhook URL with it. Secondly we instantiate RestTemplate which will be our HTTP client. Thirdly we have to create JSON from our message. We will do it using ObjectMapper . The next thing to create HTTP Header for ContentType with value aplication/json . Then we create HttpEntity of type String and use it to call exchange method from RestTemplate which will send our request to the Slack.
xxxxxxxxxx
//imports
public class MessageSender {
private static final String HOOKS_URL = "https://hooks.slack.com/services/%s";
private static final Map<String, String> USER_TO_CHANNEL_WEBHOOK =
Map.of("Pask", "T016M7S1PK4/B0187LJ9FFZ/Nw1hTMVJldSQQaXfpFYf2Y2e");
public void sendMessage(String userName, Message message) throws JsonProcessingException {
String userChannelId = USER_TO_CHANNEL_WEBHOOK.get(userName);
String userWebhookUrl = String.format(HOOKS_URL, userChannelId);
RestTemplate restTemplate = new RestTemplate();
HttpHeaders headers = new HttpHeaders();
headers.setContentType(MediaType.APPLICATION_JSON);
ObjectMapper objectMapper = new ObjectMapper();
String messageJson = objectMapper.writeValueAsString(message);
HttpEntity<String> entity = new HttpEntity<>(messageJson, headers);
restTemplate.exchange(userWebhookUrl, HttpMethod.POST, entity, String.class);
}
}
xxxxxxxxxx
//imports
public class MessageInterceptorController {
private final MessageSender messageSender;
public MessageInterceptorController(MessageSender messageSender) {
this.messageSender = messageSender;
}
(path = "/messages/{userName}", consumes=MediaType.APPLICATION_JSON_VALUE)
public void sendMessage( String userName, Message message) throws JsonProcessingException {
messageSender.sendMessage(userName, message);
}
}
Step 6
With the main functionality done, it is time for short refactor. We will focus on improving exception handling. We will also change our endpoint to return ResponseEntity object with the correct HTTP code depending on how the request will be processed.
xxxxxxxxxx
//imports
(path = "/messages/{userName}", consumes = MediaType.APPLICATION_JSON_VALUE)
public ResponseEntity<String> sendMessage( String userName, Message message) {
try {
messageSender.sendMessage(userName, message);
return ResponseEntity.ok().build();
} catch (JsonProcessingException e) {
return ResponseEntity.badRequest().build();
}
}
Et voila - integration done
Tests
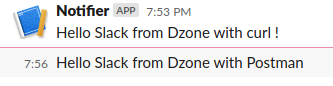
For such simple tests, I recommend curl, but it can be also done with Postman, depending on which one you prefer. I will try to describe an example for both of them.
I will start with curl.
Here the only thing that you need is one line of script from below
xxxxxxxxxx
curl -X POST -H 'Content-type: application/json' --data '{"text":"Hello Slack from Dzone with curl !"}' http://localhost:8080/messages/Pask
In Postman you have to choose POST as request method then copy this URL: http://localhost:8080/messages/Pask into proper field. You also have to specify the body content type with value JSON. To do so, you have to copy this string into the body tab located below URL field. As you can see i provided a screen-shot with the Postman configuration.

The last thing to do is to click the Send button. You should get a desired message on a selected Slack channel.
Now our integration has been tested.
Ideas How To Make It Better
1. As for now the list of channels’ Webhooks is static and requires a new deployment to update. Here it is the first place to make our middleware better. For example we can use the properties file, a simple text file or even a database. H2 will be extremely useful here (remember to encode Webhooks).
2. Add an endpoint for sending a message to many users from one request
3. Put the common part of Webhook URL in Spring Boot application.properties file
Summing up
That is all for today. Thanks for your time. I hope that you find this example useful and it will give you some new ideas on how to make Slack integrations.
Opinions expressed by DZone contributors are their own.
Comments