Streaming Analytics With Snowflake
In this demo, we’re going to build a simple system to ingest and alert in parallel for maximum speed. This architecture can be used for a cybersecurity threat.
Join the DZone community and get the full member experience.
Join For FreeSnowpipe Streaming
Snowflake introduced Snowpipe Streaming and is set to be a key technology for near-real-time streaming workloads.
Data ingestion is, however, only one part of the story.
You can ingest data and store it for analytics, but in some cases, you need to be faster.
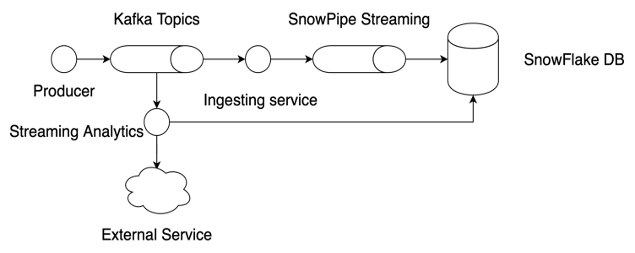
You need streaming analytics. Snowpipe Streaming reads from a Kafka topic and ingests data into a connected table.
If you connect a service on the same Kafka topic for analytics before ingesting, then you can perform near-real-time analytics and raise an alert before data is ingested.
The alert is sent to a notification service and written to the database. The alerter service can join data with existing records in the database and provide context.
For example, to implement an alerter service for your cybersecurity threat and incident detection system.
At the same time, the Snowpipe Stream is ingested, and all events are made available.
Demo
In this demo, we’re going to build a simple system to ingest and alert in parallel for maximum speed.
- High-speed analytics for alerting
- Streaming data ingestion
This architecture can, for example, be used for a cybersecurity threat and incident detection workload.
Solution Architecture
Check Out the Project
The code for the demo is available at GitHub.
Snowflake Trial Account
For this demo, you should have access to a Snowflake instance and be able to configure key authentication for a user. You need the SECURITYADMIN role, and if you don’t have it, you can create a trial account on Snowflake and try it out.
The tables are set up as follows:
create database streaming_demo;
create or replace table events (timestamp timestamp, value numeric);
create or replace table alerts (timestamp timestamp, value numeric, alert string);
On the command line, execute the command to copy the public key:
pbcopy < app/src/main/resources/ssh_keys/rsa_key.pub
Remove the header and footer of the key.
alter user <user> set rsa_public_key='<PUBLIC KEY GOES HERE>';Set Up Confluent Kafka
We will use Confluent Kafka for this demo. Confluent now offers KRaft, in development, a Kafka without Zookeeper — ideal for development on your laptop with practically zero set-up effort.
The Kafka Client is used:
// https://mvnrepository.com/artifact/org.apache.kafka/kafka-clients
implementation 'org.apache.kafka:kafka-clients:3.4.0'
The demo project contains the scripts to download and configure Kafka.
You can either run them or look at the commands and use them manually.
Download and install Kafka Confluent:
./init_kafka.sh
wget https://packages.confluent.io/archive/7.3/confluent-community-7.3.2.tar.gz

tar -xf confluent-community-7.3.2.tar.gz

cd confluent-7.3.2

./bin/kafka-storage format --config ./etc/kafka/kraft/server.properties --cluster-id $(./bin/kafka-storage random-uuid)
Start the Kafka server:
./start_kafka.sh
./bin/kafka-server-start ./etc/kafka/kraft/server.properties
Create the topic:
./init_topic.sh
./bin/kafka-topics --bootstrap-server localhost:9092 --delete --topic streaming-demo

./bin/kafka-topics --bootstrap-server localhost:9092 --create --topic streaming-demo

./bin/kafka-console-consumer --bootstrap-server localhost:9092 --topic streaming-demo --from-beginning
The next time you only need to run:
./start_kafka.sh
If you run ./init_topic.sh then the topic will be re-created, and the consumer will be started. The produced messages are written to the terminal.
You can test the Kafka topic with the producer:
./start_producer.sh
./bin/kafka-console-producer --bootstrap-server localhost:9092 --topic streaming-demo
Test your Kafka setup with: TestKafka.java
package com.snowice23;

import org.apache.kafka.clients.producer.KafkaProducer;
import org.apache.kafka.clients.producer.ProducerRecord;

import java.util.Properties;
import java.util.Random;

import static com.snowice23.ConnectionHelper.KAFKA_TOPIC;

public class TestKafka {

    public static void main(String[] args) throws InterruptedException {

        Properties props = ConnectionHelper.getKafkaProducerProperties();

        // create the producer
        KafkaProducer<String, String> producer = new KafkaProducer<>(props);

        Random random = new Random();

        while (true) {
            Thread.sleep(500);

            // random numbers from [0, 10>
            Integer value = random.nextInt(10);

            // create a producer record
            ProducerRecord<String, String> producerRecord =
                    new ProducerRecord<>(KAFKA_TOPIC, String.valueOf(value));

            // send data - asynchronous
            producer.send(producerRecord);

            // flush data - synchronous
            producer.flush();
        }
    }
}
Producer Service
The Producer is a simple Java class with a main method that produces random numbers. The numbers are put on a Kafka topic.
The producer is very similar to the test class, so there’s no need to show the code here.
Snowflake Key Authentication
The ingester and alerter need to write to the Snowflake database. The connection is secured and authenticated with a public/ private key pair. The sample code to perform key authentication is located in: ConnectionHelper.java
How to generate a key pair is described here.
I won’t go over the details, but please note the following:
// JDBC needs the PrivateKey object
props.put("privateKey", PrivateKeyReader.getPrivateKey(PRIVATE_KEY_FILE));

// SnowPipe needs the private key as string to parse it internally
props.put("private_key", PrivateKeyReader.getPrivateKeyAsString(PRIVATE_KEY_FILE));
JDBC and Snowpipe have different syntax and arguments for the private key.
The Bouncy Castle libraries are needed:
// https://mvnrepository.com/artifact/org.bouncycastle/bcprov-jdk18on
implementation 'org.bouncycastle:bcprov-jdk18on:1.73'

// https://mvnrepository.com/artifact/org.bouncycastle/bcpkix-jdk18on
implementation 'org.bouncycastle:bcpkix-jdk18on:1.73'
The full code:
package com.snowice23;

import org.apache.kafka.clients.consumer.ConsumerConfig;
import org.apache.kafka.clients.producer.ProducerConfig;
import org.apache.kafka.common.serialization.StringDeserializer;
import org.apache.kafka.common.serialization.StringSerializer;
import org.bouncycastle.asn1.pkcs.PrivateKeyInfo;
import org.bouncycastle.jce.provider.BouncyCastleProvider;
import org.bouncycastle.openssl.PEMParser;
import org.bouncycastle.openssl.jcajce.JcaPEMKeyConverter;
import org.bouncycastle.openssl.jcajce.JceOpenSSLPKCS8DecryptorProviderBuilder;
import org.bouncycastle.operator.InputDecryptorProvider;
import org.bouncycastle.pkcs.PKCS8EncryptedPrivateKeyInfo;

import java.io.File;
import java.io.FileReader;
import java.io.IOException;
import java.net.URI;
import java.net.URISyntaxException;
import java.net.URL;
import java.nio.file.Files;
import java.security.PrivateKey;
import java.security.Security;
import java.sql.Connection;
import java.sql.DriverManager;
import java.util.Properties;

public class ConnectionHelper {

    public static final String ACCOUNT_NAME = "<<ACCOUNT_NAME>>";

    public static final String REGION = "<<REGION>>";

    public static final String USER_NAME = "<<USERNAME>>";

    private static final String PRIVATE_KEY_FILE = "ssh_keys/rsa_key.p8";

    public static final String KAFKA_TOPIC = "streaming-demo";

    public static final String KAFKA_BOOTSTRAP_SERVERS = "127.0.0.1:9092";;


    public static Connection getConnection() throws Exception {
        Properties props = getProperties();
        return DriverManager.getConnection(props.getProperty("connect_string"), props);
    }

    public static Properties getKafkaConsumerProperties(String groupName) {
        Properties props = new Properties();
        props.put(ConsumerConfig.BOOTSTRAP_SERVERS_CONFIG, KAFKA_BOOTSTRAP_SERVERS);
        props.put(ConsumerConfig.KEY_DESERIALIZER_CLASS_CONFIG, StringDeserializer.class.getName());
        props.put(ConsumerConfig.VALUE_DESERIALIZER_CLASS_CONFIG, StringDeserializer.class.getName());
        props.put(ConsumerConfig.GROUP_ID_CONFIG, groupName);
        props.put(ConsumerConfig.AUTO_OFFSET_RESET_CONFIG, "earliest");
        return props;
    }

    public static Properties getKafkaProducerProperties() {
        Properties props = new Properties();
        props.setProperty(ProducerConfig.BOOTSTRAP_SERVERS_CONFIG, KAFKA_BOOTSTRAP_SERVERS);
        props.setProperty(ProducerConfig.KEY_SERIALIZER_CLASS_CONFIG, StringSerializer.class.getName());
        props.setProperty(ProducerConfig.VALUE_SERIALIZER_CLASS_CONFIG, StringSerializer.class.getName());
        return props;
    }

    public static Properties getProperties() throws Exception {

        Properties props = new Properties();

        // Snowflake connection properties
        props.put("user", USER_NAME);
        //props.put("url", "https://account_name.snowflakecomputing.com:443");
        props.put("account", ACCOUNT_NAME);

        // JDBC needs the PrivateKey object
        props.put("privateKey", PrivateKeyReader.getPrivateKey(PRIVATE_KEY_FILE));

        // SnowPipe needs the private key as string to parse it internally
        props.put("private_key", PrivateKeyReader.getPrivateKeyAsString(PRIVATE_KEY_FILE));

        props.put("port", "443");
        props.put("host", ACCOUNT_NAME + "."+REGION+".snowflakecomputing.com");
        props.put("schema", "public");
        props.put("scheme", "https");
        props.put("database", "streaming_demo");
        props.put("connect_string", "jdbc:snowflake://" + ACCOUNT_NAME + "."+REGION+".snowflakecomputing.com");
        props.put("ssl", "on");
        props.put("warehouse", "compute_wh");
        props.put("role", "accountadmin");
        return props;
    }

    // https://docs.snowflake.com/en/developer-guide/jdbc/jdbc-configure
    public static class PrivateKeyReader {

        // If you generated an encrypted private key, implement this method to return
        // the passphrase for decrypting your private key.
        private static String getPrivateKeyPassphrase() {
            return "";
        }

        public static PrivateKey getPrivateKey(String filename) throws Exception {
            PrivateKeyInfo privateKeyInfo = null;
            Security.addProvider(new BouncyCastleProvider());
            // Read an object from the private key file.
            File privateKeyFile = loadFileFromClasspath(filename);
            PEMParser pemParser = new PEMParser(new FileReader(privateKeyFile));
            Object pemObject = pemParser.readObject();
            if (pemObject instanceof PKCS8EncryptedPrivateKeyInfo encryptedPrivateKeyInfo) {
                // Handle the case where the private key is encrypted.
                String passphrase = getPrivateKeyPassphrase();
                InputDecryptorProvider pkcs8Prov = new JceOpenSSLPKCS8DecryptorProviderBuilder().build(passphrase.toCharArray());
                privateKeyInfo = encryptedPrivateKeyInfo.decryptPrivateKeyInfo(pkcs8Prov);
            } else if (pemObject instanceof PrivateKeyInfo) {
                // Handle the case where the private key is unencrypted.
                privateKeyInfo = (PrivateKeyInfo) pemObject;
            }
            pemParser.close();
            JcaPEMKeyConverter converter = new JcaPEMKeyConverter().setProvider(BouncyCastleProvider.PROVIDER_NAME);
            return converter.getPrivateKey(privateKeyInfo);
        }

        static File loadFileFromClasspath(String filePath) {
            // Use the class loader to load the file from the classpath.
            ClassLoader classLoader = ConnectionHelper.class.getClassLoader();

            // Get the file as a URL.
            URL url = classLoader.getResource(filePath);

            if (url == null) {
                throw new IllegalArgumentException("File not found on classpath");
            }

            try {
                // Convert the URL to a URI, then to a File.
                URI uri = url.toURI();
                return new File(uri);
            } catch (URISyntaxException e) {
                throw new IllegalArgumentException("URL could not be converted to a URI", e);
            }
        }

        public static String getPrivateKeyAsString(String filePath) throws IOException {
            File privateKeyFile = loadFileFromClasspath(filePath);
            return new String(Files.readAllBytes(privateKeyFile.toPath()));
        }

    }
}
Test Key Authentication With a JDBC Connection
After you set up key authentication in Snowflake, it is time to test the connection.
The TestJdbc.java class is available for testing the key authentication:
public static void main(String[] args)
          throws Exception {
      Connection conn = ConnectionHelper.getConnection();
      Statement stat = conn.createStatement();
      ResultSet res = stat.executeQuery("select 1");
      res.next();
      System.out.println(res.getString(1));
      conn.close();
  }
Ingesting Service With Snowpipe Streaming
The ingestion service uses the ConnectionHelper to connect to Snowflake.
The Snowpipe Streaming service is built with the Snowflake Ingest SDK:
// https://mvnrepository.com/artifact/net.snowflake/snowflake-ingest-sdk
implementation 'net.snowflake:snowflake-ingest-sdk:1.1.3'
First, you need to create a SnowflakeStreamingIngestClient:
// Create a streaming ingest client
try (SnowflakeStreamingIngestClient client =
               SnowflakeStreamingIngestClientFactory
               .builder("MY_CLIENT")
.setProperties(props).build()) {Second, create a channel to connect to a table:
// Create an open channel request on table MY_TABLE, note that the corresponding
// db/schema/table needs to be present
// Example: create or replace table MY_TABLE(c1 number);
OpenChannelRequest request1 =
        OpenChannelRequest.builder("MY_CHANNEL")
                .setDBName("STREAMING_DEMO")
                .setSchemaName("PUBLIC")
                .setTableName("EVENTS")
                .setOnErrorOption(
                        OpenChannelRequest.OnErrorOption.CONTINUE) // Another ON_ERROR option is ABORT
.build();Third, open the channel:
// Open a streaming ingest channel from the given client
SnowflakeStreamingIngestChannel channel1 = client.openChannel(request1);Fourth, read messages from Kafka and insert them in the channel:
// Kafka Consumer
KafkaConsumer<String, String> consumer = new KafkaConsumer<>(props);
consumer.subscribe(List.of(KAFKA_TOPIC));

ConsumerRecords<String, String> records = consumer.poll(Duration.ofMillis(500));

InsertValidationResponse response = channel1.insertRow(row, null);
The full code is found here.
Alerter Service With Kafka and JDBC
The alerter service reads from the same Kafka topic, looks for a pattern, and insert directly with JDBC. The Snowflake JDBC library is used:
// https://mvnrepository.com/artifact/net.snowflake/snowflake-jdbc
implementation 'net.snowflake:snowflake-jdbc:3.13.32'
The alerter works directly with the Kafka stream. Data is thus not ingested first before any pattern matching, filtering, or analytics are done.
The alerter is a simple Kafka Consumer and JDBC client:
package com.snowice23.streaming;

import java.sql.*;
import java.time.Duration;
import java.util.*;

import com.snowice23.ConnectionHelper;
import org.apache.kafka.clients.consumer.ConsumerRecord;
import org.apache.kafka.clients.consumer.ConsumerRecords;
import org.apache.kafka.clients.consumer.KafkaConsumer;

import static com.snowice23.ConnectionHelper.KAFKA_TOPIC;
import static java.lang.System.*;

public class Alerter {
    public static void main(String[] args) throws Exception {

        Connection conn = ConnectionHelper.getConnection();
        String insertAlert = "INSERT INTO alerts VALUES(?, ?, ?)";

        // create statement
        PreparedStatement statement = conn.prepareStatement(insertAlert);

        Properties props = new Properties();
        props.putAll(ConnectionHelper.getKafkaConsumerProperties("alerter-group"));
        props.putAll(ConnectionHelper.getProperties());

        // Kafka Consumer
        KafkaConsumer<String, String> consumer = new KafkaConsumer<>(props);
        consumer.subscribe(List.of(KAFKA_TOPIC));

        out.println("Subscribed to Kafka topic: " + consumer.subscription());

        // Insert alerts into the database with JDBC
        while (true) {
            ConsumerRecords<String, String> records = consumer.poll(Duration.ofMillis(500));
            //out.println("Listening...");
            for (ConsumerRecord<String, String> record : records) {

                int value = Integer.parseInt(record.value());

                // implement simple stream analyzer to simulate outlier detection
                if (value >= 8) {

                    Timestamp timestamp = new Timestamp(System.currentTimeMillis());

                    // insert a row
                    statement.setTimestamp(1, timestamp);
                    statement.setInt(2, value);
                    statement.setString(3, "alert raised");

                    statement.executeUpdate();

                    out.println("Alert:" + record.value());
                }
            }

        }

    }
}
The alerter service can be improved with, for example, Apache Flink and Pager Duty instead of a simple if .. else .. statement and a System.out call.
Run the Demo
Open ConnectionHelper and set: ACCOUNT_NAME, REGION, USERNAME
- Start the Kafka server:
./start_kafka.sh - Initialize the topic:
./init_topic.sh - Run the Ingester
- Run the Alerter
- Run the Producer
The data should now be available in the Snowflake tables. Go to Snowsight and run a select statement on the events and alerts tables.
select * from events;

select * from alerts;
Wrap Up
This demo covered the following topics:
- Snowflake key authentication with JDBC and Snowpipe streaming
- Snowflake JDBC
- Snowpipe Streaming with Kafka
- Confluent Kafka with Kraft
- Streaming analytics and alerting
Published at DZone with permission of Reinout Korbee. See the original article here.
Opinions expressed by DZone contributors are their own.
Comments