How to Use Swift Mailer for Sending Emails
Swift Mailer is easy to use with any PHP framework. Swift Mailer is compatible with many SMTP servers. It is utilized to create and send emails from the apps.
Join the DZone community and get the full member experience.
Join For FreeAbout Swift Mailer
Swift Mailer is easy to use with any PHP framework. To send messages, you can integrate Swift Mailer into popular sending providers like Sendgrid and similar as well as external SMTP servers.
Swift Mailer is used as the main mail option in frameworks like Yii2 and CMS like Drupal, Laravael’s email API is built on top of the Swift Mailer library as well.
To install Swift Mailer, we need to use Composer:
$ composer require "swiftmailer/swiftmailer:^6.0
Correspondingly, to create transport, we need hostname, port, username, and password. In the case of using Mailtrap, it will look like this:
xxxxxxxxxx
$transport = (new Swift_SmtpTransport('smtp.mailtrap.io', 2525))
->setUsername('1a2b3c4d5e6f7g') // generated by Mailtrap
->setPassword('1a2b3c4d5e6f7g') // generated by Mailtrap
;
$mailer = new Swift_Mailer($transport);
How to Create an Email
In Swift Mailer, messages are composed with the help of Swift_Message class.
Let’s start by creating a message from top to bottom, likely to an email client: set recipient, sender, and a subject. Usually, we will make it with setSubject(), setTo(), and setFrom() methods. To include several recipients, use an array and to add recipients in copy, use setCc() or setBcc(). Also, you can set name headers with associative arrays:
xxxxxxxxxx
// Create the message
$message = (new Swift_Message())
// Add subject
->setSubject('Here should be a subject')
//Put the From address
->setFrom(['support@example.com'])
// Include several To addresses
->setTo(['newuser@example.com' => 'New Mailtrap user'])
->setCc([
'support@example.com',
‘product@example.com’ => ‘Product manager’
]);
For more details and alternatives, refer to the corresponding section in the Swift Mailer documentation.
Adding Content
Also, we can add different types of HTML content into our messages.
In Swift Mailer, you need to define which type of content you are going to add to your message body. It can be text/html, text/plain, or both.
Wherever possible, include a plain text version for the HTML content. If for some reason the HTML part won’t be rendered, your recipient will still be able to understand the content of your message.
For this purpose, use setBody() method and addPart() for the alternative. For example:
$message->setBody(<p>'Welcome to Maitrap!</p>
Now your test emails will be <i>safe</i>', 'text/html');
$message->addPart('Welcome to Mailtrap, now your test emails will be safe', 'text/plain');
Embedding Images
Swift Mailer lets you embed your image directly, without any additional manipulations. Use Swift_EmbeddedFile::fromPath(). method for this purpose. It is very similar to inserting an image to the body of your message in many email clients.
So, you should have an image file saved locally on your computer or you can even add an image hosted on some website. For the latter, allow_url_fopen should be enabled in your PHP installation (read more about it in the PHP manual).
From your computer:
xxxxxxxxxx
// Create the message, you can add the subject right here if you like
$message = new Swift_Message('The subject should be here');
// Set the body
$message->setBody(
'<html>' .
' <body>' .
'Here is our new logo <img data-fr-src="’ .
$message->embed(Swift_Image::fromPath('newlogo.png')) .
‘" alt="new logo" />' .
' Let us know how you like it'.
' </body>' .
'</html>',
'text/html' // don’t forget to mark the content type
);
From URL:
xxxxxxxxxx
$message->setBody(
'<html>' .
' <body>' .
' Here is our new logo <img data-fr-src="' .
$message->embed(Swift_Image::fromPath('https://mailtrap.io/newlogo.png')) .
'" alt="Image" />' .
' Let us know how you like it' .
' </body>' .
'</html>',
'text/html'
);
Including Attachments
You can attach files saved locally, from URLs, or add dynamic content. The difference is that you use Swift_Attachment class here and Swift_Message's attach() method.
xxxxxxxxxx
// For the regular file types like docs, spreadsheets, or images, you can go without the content type
$message->attach(Swift_Attachment::fromPath('/path/to/image.jpg'));
// attach a file from a URL
$message->attach(Swift_Attachment::fromPath('https://mailtrap.io/newlogo.jpg'));
// Create the attachment and rename it
$message->attach(
Swift_Attachment::fromPath('/path/to/newlogo.jpg')->setFilename('logofinal.jpg')
);
// now let’s add a pdf file created via GD and set its content type
$data = create_confirmation_pdf_data();
$attachment = new Swift_Attachment($data, 'confirmation.pdf', 'application/pdf');
$message->attach($attachment);
How to Send an Email
Before sending, you have to ensure that all the required transport data is set. For example, if you are going to test emails prior to sending, you should use the Mailer class to send the message with all the credentials of your testing tool. In our case, it is Mailtrap.
$mailer->send($message);
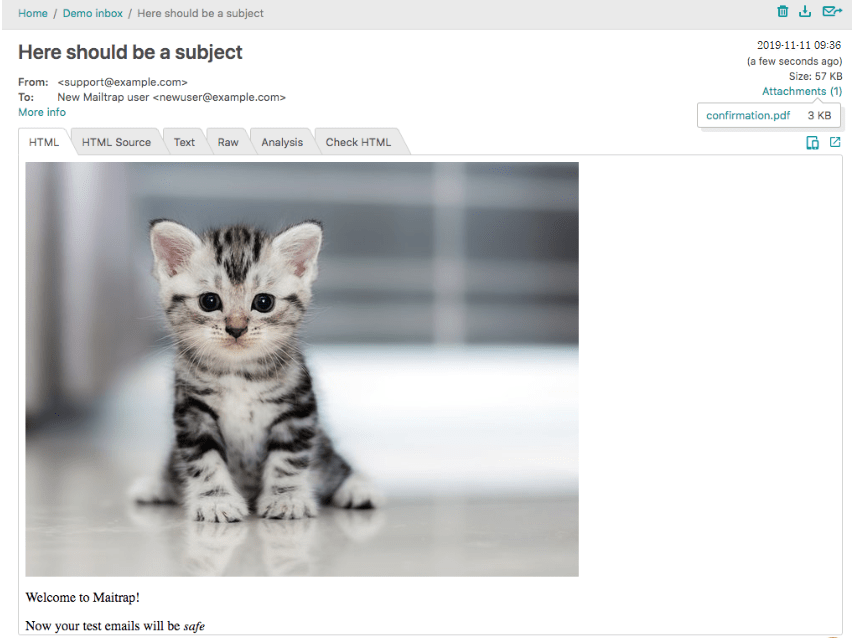
As an illustration, this is a code for an email with HTML/plain text, image, and attachment:
xxxxxxxxxx
require_once 'path/to/vendor/autoload.php';
{try
$transport = (new Swift_SmtpTransport('smtp.mailtrap.io', 2525))
->setUsername('1a2b3c4d5e6f7g')
->setPassword('1a2b3c4d5e6f7g');
$mailer = new Swift_Mailer($transport);
public function index($name, \Swift_Mailer $mailer)
{
$message = (new Swift_Message())
->setSubject('Here should be a subject')
->setFrom(['support@example.com'])
->setTo(['newuser@example.com' => 'New Mailtrap user'])
->setCc([
'product@example.com' => 'Product manager'
]);
$message->setBody(
'<html>' .
' <body>' .
' <img data-fr-src="' .
$message->embed(Swift_Image::fromPath('image.png')) .
'" alt="Image" />' .
' <p>Welcome to Mailtrap!</p>’.
‘Now your test emails will be <i>safe</i>’ .
' </body>' .
'</html>',
'text/html'
);
$message->addPart('Welcome to Mailtrap, now your test emails will be safe', 'text/plain');
$message->attach(Swift_Attachment::fromPath('/path/to/confirmation.pdf'));
$mailer->send($message);
If we did everything right, the message will look like this:

Swift Mailer and SMTP Server
To use Swift Mailer with an external SMTP server does not require much effort. The only critical point to remember is to set the correct transport (as we did with Mailtrap in the example above).
Swift Mailer is one of the most popular PHP libraries so it will be easy to find examples of integration with various services. However, to ensure effective integration, it's better to review the documentation of your provider.
Published at DZone with permission of Dmytro Zaichenko. See the original article here.
Opinions expressed by DZone contributors are their own.

Comments