Teach yourself Web Sockets in 5 minutes
Web Sockets is one of the most complex subjects that exists in software development. In this article I try to dumb it down as much as possible.
Join the DZone community and get the full member experience.
Join For FreeIn this article we will go through the following concepts.
- The pub/sub design pattern, also known as “the Hollywood design pattern”
- Basic web socket theory, and how to publish and subscribe to socket messages
- Authorisation to prevent malicious users from intercepting our messages
- How Magic automatically solves a lot of your socket related problems
- Finally we’ll show and tell with a video how Magic’s web socket implementation is tied together
Web Sockets allows for a bidirectional communication channel, through which your server can “push” data to the client, triggering events on the client when something occurs on the server. This has huge advantages for some types of web apps, such as for instance trading systems, chat clients, and apps where you need to see live updates in your client as changes occurs on the server. However, wiring up a web socket module manually is also ridiculously complex, making sockets effectively unavailable for most developers. For these reasons dozens of helper libraries and modules have been created to simplify the subject. For PHP there’s Laravel Sockets. In this article I will walk you through how to use web sockets in Magic using SignalR, and I will be focusing on the server side parts mostly, since this is the most difficult part. However, once you understand how sockets works in Magic on the server side, you can easily implement the client side of the equation using SignalR’s Angular implementation, ReactJS implementation, etc.
The Hollywood Design Pattern
Sockets are typically based upon the pub/sub design pattern. This pattern is often referred to as “The Hollywood Design Pattern”, because in Hollywood it’s common to be told “don’t call us, we’ll call you”. The pub/sub design pattern also reverses the responsibility, such that instead of your code invoking another function, you provide a “callback” to the other party that the other party can use when it needs to call you.
Don't call us, we'll call you!
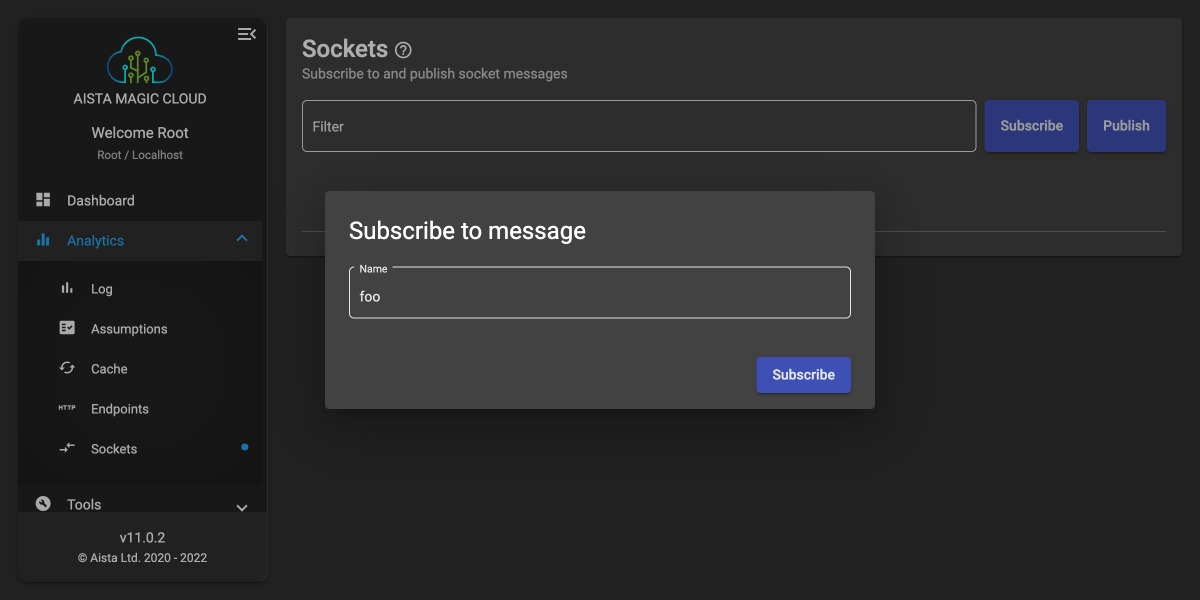
In Magic and most other sane web socket libraries, this is typically implemented such that you inform the backend what “type” of messages you want to subscribe to. This “type” is typically just a simple name such as illustrated below. Open up the “Analytics/Sockets” dashboard menu item in Magic, then click the “Subscribe” button, at which point you’ll see something resembling the following.

When you click the above subscribe button, Magic negotiates a socket “channel” with the server, informing the server of that it’s interested in messages of type “foo”, resulting in that every time a “foo” message is published in your backend, your code will be called. This is the equivalent of leaving your phone number with a Hollywood movie director, hoping for a role to pop up, having the director call you and offer you the role when the role is available.
Publishing a message
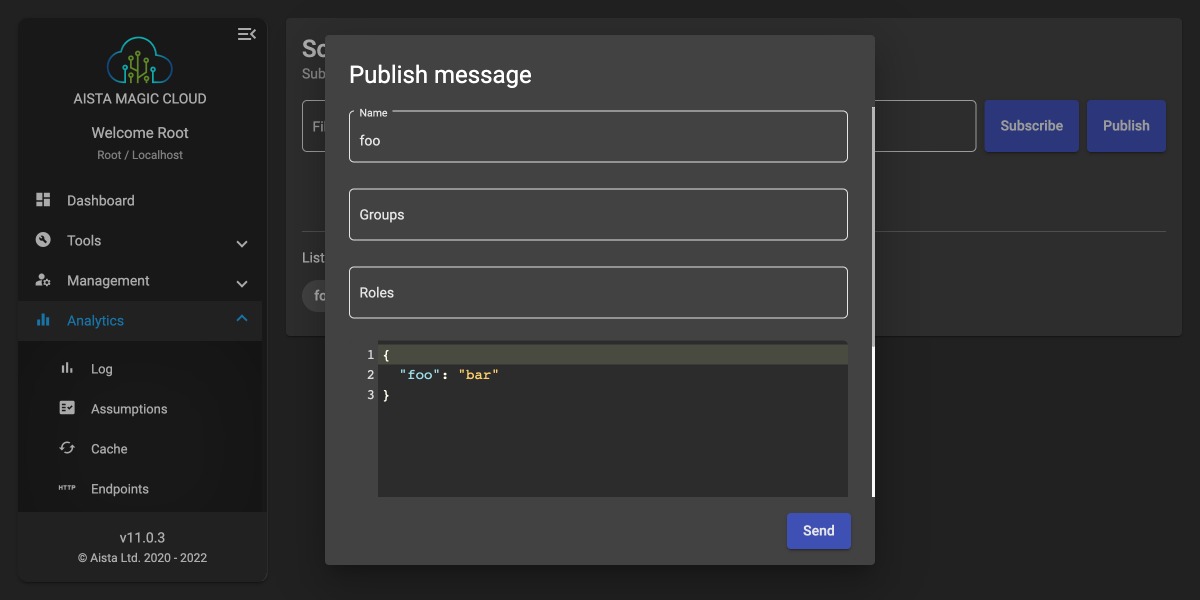
The screenshot below illustrates how to publish a socket message from your Magic dashboard. Click the “Publish” button to reproduce what I’m doing below.

When you click “Send” in the above dialog, you will instantly see a message popping up on your page afterwards. This message was “pushed” from the server, over the bidirectional communication channel established between your client and your server as the socket connection was negotiated, because your client was subscribing to “foo” messages. If you had sent a “bar” message, you would not see the message, because you’re only subscribing to “foo” messages. In the video below I am demonstrating the whole process.
Authorisation
The above creates a dilemma for us, since anyone knowing which messages a server might in theory publish, can just subscribe to the message type, and such see all data sent between clients. This is obviously not a good thing, and unless your socket library has some sort of mechanism to allow for only authorised clients to be notified you should switch library. To use an analogy for this dilemma, imagine a Hollywood actor having an opening for a role, for then to call 200 people having auditioned for the role, letting everybody know they got the role. The way Magic solves this is to add support for authorisation as the backend is publishing socket messages. There are 3 types of such authorisation schemes in Magic.
- [roles] - Only notifying users belonging to the specified roles
- [groups] - Only notifying users belonging to the specified groups
- [users] - Only notifying the specified users
Below is an example of how this would look like in Hyperlambda.
sockets.signal:foo
   roles:root, admin
   args
      greeting:You got the role mate! Congratulations!
In the above Hyperlambda you can see how the publishing of the message is making sure only users belonging to either the “admin” role or the “root” role is notified. If you subscribe to “foo” messages like we started out with at the top of this article, and execute the above Hyperlambda, you will see the message popping up on your dashboard. Hint, you can do this by opening up two browser windows at the same time, and have one of them executing the above Hyperlambda through your “Evaluator” component, and the other subscribing to “foo” messages through your “Sockets” component. If you change the above authorisation requirements to only contain the value of “admin” and you invoke your Hyperlambda again, you’ll notice how your client does not get notified, unless your root user also belongs to the “admin” role too of course.
To subscribe to SignalR messages using Angular, you can read the following article, however the code required to subscribe to socket messages from Angular is literally as easy as the following.
  ngOnInit() {

    let builder = new HubConnectionBuilder();
    this.hubConnection = builder.withUrl('http://localhost:4444/sockets', {
      skipNegotiation: true,
      transport: HttpTransportType.WebSockets,
    }).build();

    this.hubConnection.start();
    this.hubConnection.on('foo', (args) => {
      console.log(args);
    });

  }

  ngOnDestroy() {
    this.hubConnection.stop();
  }
If you create a new Angular component implementing OnInit and OnDestroy, for then to paste the above code into it, you’ll see console log invocations every time you publish a socket message from your backend of type “foo”. Notice, you’ll need to install the Angular SignalR package before you can use SignalR from Angular. You can achieve this using the following code from a terminal within your project’s folder.
npm install @aspnet/signalrNotice also that the above Angular code assumes you’re using the Docker images of Magic. If you’re using the source code download you’ll have to change the 4444 port to 5000.
Published at DZone with permission of Thomas Hansen. See the original article here.
Opinions expressed by DZone contributors are their own.

Comments