How to Test POST Requests With Playwright Java for API Testing
This tutorial teaches how to send POST requests using the Playwright Java framework for API testing, with examples for order creation and handling errors.
Join the DZone community and get the full member experience.
Join For FreePlaywright is a test automation framework developed by Microsoft. It is available across multiple programming languages like Java, NodeJS, Python, and .Net. It supports both web and API test automation.
With 67.2k stars and 3.7k forks on GitHub, the framework has gained a lot of popularity. It has rich features that allow testing web applications using major browsers and performing API testing.
In this tutorial blog, we will learn how to set up Playwright with Java and test POST API requests in API automation testing.
Getting Started
Before we begin writing the test scripts to perform API automation testing using Playwright Java, let’s first discuss the prerequisites, project creation, and setup.
Prerequisites
The following are the prerequisites that need to be installed on the machine to start with smooth setup and installation.
- Java JDK 17
- IntelliJ IDE or any other IDE to create projects and write automated tests
- Maven
Creating a New Project
We will create a Maven project using IntelliJ IDE. The following steps will help you create a new Maven project.
1. Open IntelliJ, then navigate to File >> New >> Project.
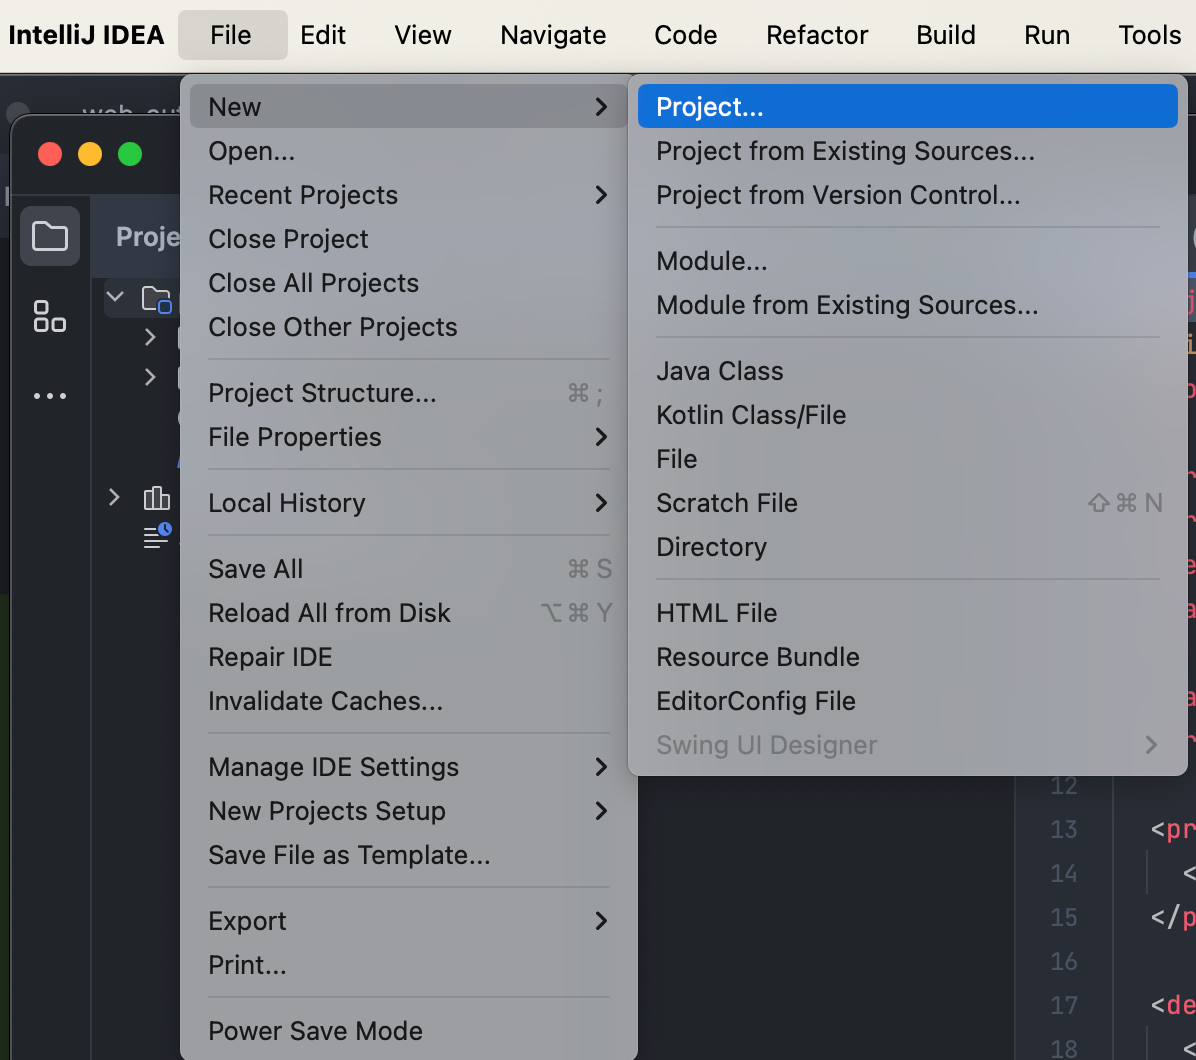
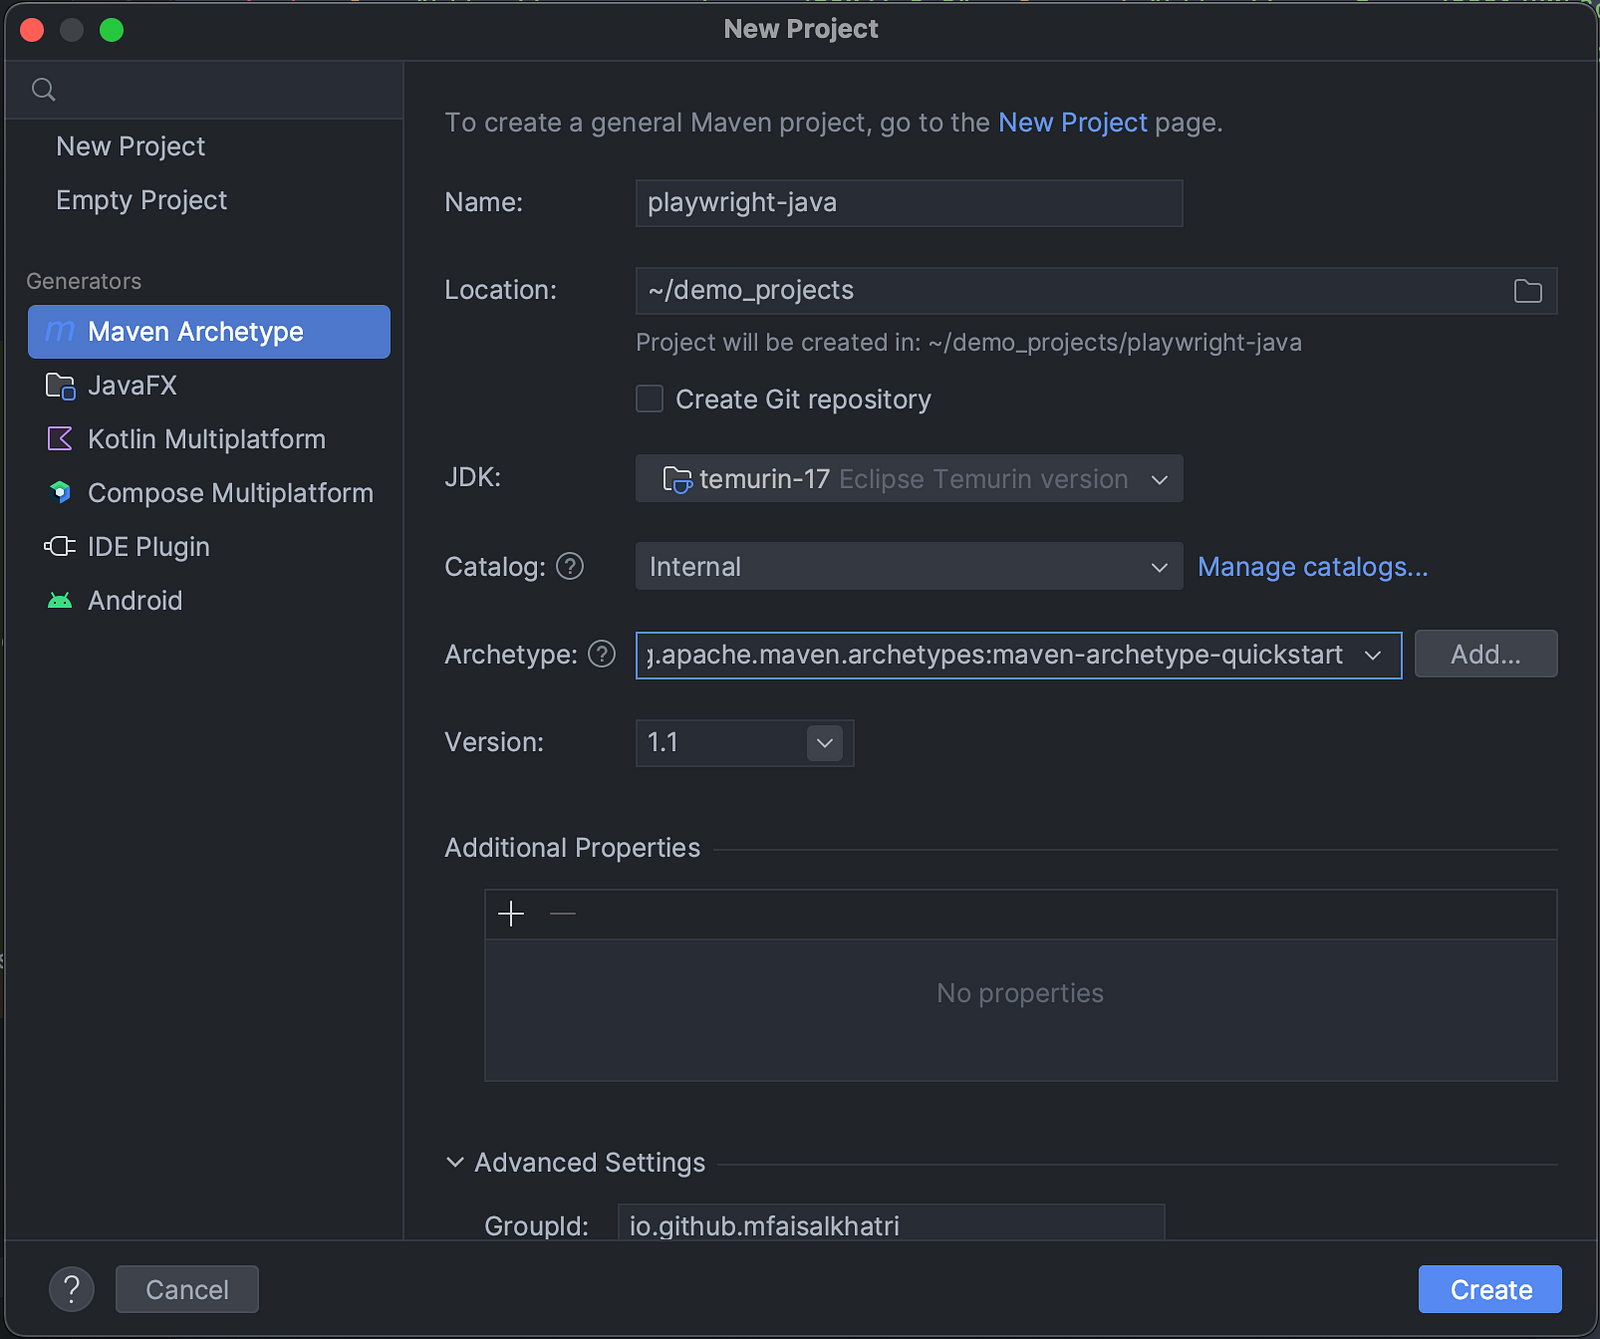
2. In the "New Project" window, enter the following details:
- Name of the Project
- Location/path where the project needs to be saved
- Select JDK version ( I am using JDK 17)
- Archetype (Search for "quickstart" and select
maven-archetype-quickstartfrom the result)
Then, click on the "Create" button to create the project.
With this, the Maven project has been successfully created in IntelliJ IDE.
Updating the Dependencies
After the project is created successfully, we need to add the dependencies and plugins for the following in the pom.xml:
- Playwright ( Java)
- TestNG
- Lombok ( For using builder pattern and generating POJO on runtime)
- Gson (For serialization)
- Datafaker (For generating test data on runtime)
- Maven Surefire plugin
- Maven Compiler plugin

FileName: pom.xml
<project xmlns="http://maven.apache.org/POM/4.0.0" xmlns:xsi="http://www.w3.org/2001/XMLSchema-instance"
         xsi:schemaLocation="http://maven.apache.org/POM/4.0.0 http://maven.apache.org/xsd/maven-4.0.0.xsd">
    <modelVersion>4.0.0</modelVersion>

    <groupId>io.github.mfaisalkhatri</groupId>
    <artifactId>api-testing-playwright</artifactId>
    <version>1.0-SNAPSHOT</version>
    <packaging>jar</packaging>

    <name>api-testing-playwright</name>
    <url>http://maven.apache.org</url>

    <properties>
        <project.build.sourceEncoding>UTF-8</project.build.sourceEncoding>
        <playwright-version>1.47.0</playwright-version>
        <testng-version>7.10.2</testng-version>
        <lombok-version>1.18.34</lombok-version>
        <datafaker-version>2.3.1</datafaker-version>
        <gson-version>2.11.0</gson-version>
        <maven-compiler-plugin-version>3.13.0</maven-compiler-plugin-version>
        <maven-surefire-plugin-version>3.3.1</maven-surefire-plugin-version>
        <java-release-version>17</java-release-version>
        <suite-xml>test-suite/testng.xml</suite-xml>
    </properties>
    <dependencies>
        <dependency>
            <groupId>com.microsoft.playwright</groupId>
            <artifactId>playwright</artifactId>
            <version>${playwright-version}</version>
        </dependency>
        <dependency>
            <groupId>org.testng</groupId>
            <artifactId>testng</artifactId>
            <version>${testng-version}</version>
        </dependency>
        <dependency>
            <groupId>org.projectlombok</groupId>
            <artifactId>lombok</artifactId>
            <version>${lombok-version}</version>
            <scope>provided</scope>
        </dependency>
        <dependency>
            <groupId>net.datafaker</groupId>
            <artifactId>datafaker</artifactId>
            <version>${datafaker-version}</version>
        </dependency>
        <dependency>
            <groupId>com.google.code.gson</groupId>
            <artifactId>gson</artifactId>
            <version>${gson-version}</version>
        </dependency>
    </dependencies>
    <build>
        <pluginManagement>
            <plugins>
                <plugin>
                    <groupId>org.apache.maven.plugins</groupId>
                    <artifactId>maven-compiler-plugin</artifactId>
                    <version>${maven-compiler-plugin-version}</version>
                    <configuration>
                        <release>${java-release-version}</release>
                        <encoding>UTF-8</encoding>
                        <forceJavacCompilerUse>true</forceJavacCompilerUse>
                    </configuration>
                </plugin>
                <plugin>
                    <groupId>org.apache.maven.plugins</groupId>
                    <artifactId>maven-surefire-plugin</artifactId>
                    <version>${maven-surefire-plugin-version}</version>
                    <executions>
                        <execution>
                            <goals>
                                <goal>test</goal>
                            </goals>
                        </execution>
                    </executions>
                    <configuration>
                        <suiteXmlFiles>
                            <suiteXmlFile>${suite-xml}</suiteXmlFile>
                        </suiteXmlFiles>
                        <argLine>-Dfile.encoding=UTF-8 -Xdebug -Xnoagent</argLine>
                    </configuration>
                </plugin>
                <plugin>
                    <groupId>org.apache.maven.plugins</groupId>
                    <artifactId>maven-enforcer-plugin</artifactId>
                    <version>${maven-enforcer-version}</version>
                    <executions>
                        <execution>
                            <id>enforce-maven</id>
                            <goals>
                                <goal>enforce</goal>
                            </goals>
                            <configuration>
                                <rules>
                                    <requireMavenVersion>
                                        <version>3.0</version>
                                    </requireMavenVersion>
                                </rules>
                            </configuration>
                        </execution>
                    </executions>
                </plugin>
            </plugins>
        </pluginManagement>
    </build>
</project>
Updating the dependency versions in the "Properties" block is a best practice that helps you easily check and update the maven versions in the project.
After creating the Maven project and updating the dependencies in pom.xml, the project is successfully configured to begin API automation testing using Playwright Java.
Application Under Test
We will be using the free-to-use RESTful e-commerce APIs. It provides a list of e-commerce-related Order Management APIs to create, fetch, update, and delete orders. It also has an API that provides a JWT token that can be used as a security measure for updating and deleting order records.
This project can be installed on the local machine using NodeJS or Docker.
What Is a POST Request?
Before we delve into API automation testing, let’s quickly refresh some knowledge about the POST HTTP method.
The POST request is used to send data to the server to create a new record in the system. The POST request ideally needs some data to be supplied along with the request. The body of this data is based on the Content-Type header. JSON is most commonly used to supply data in the body of a POST request for REST APIs.
However, depending on the Content-Type XML and other types can also be used to pass on the data in the POST request. POST requests generally return a Status Code 201 in the response.
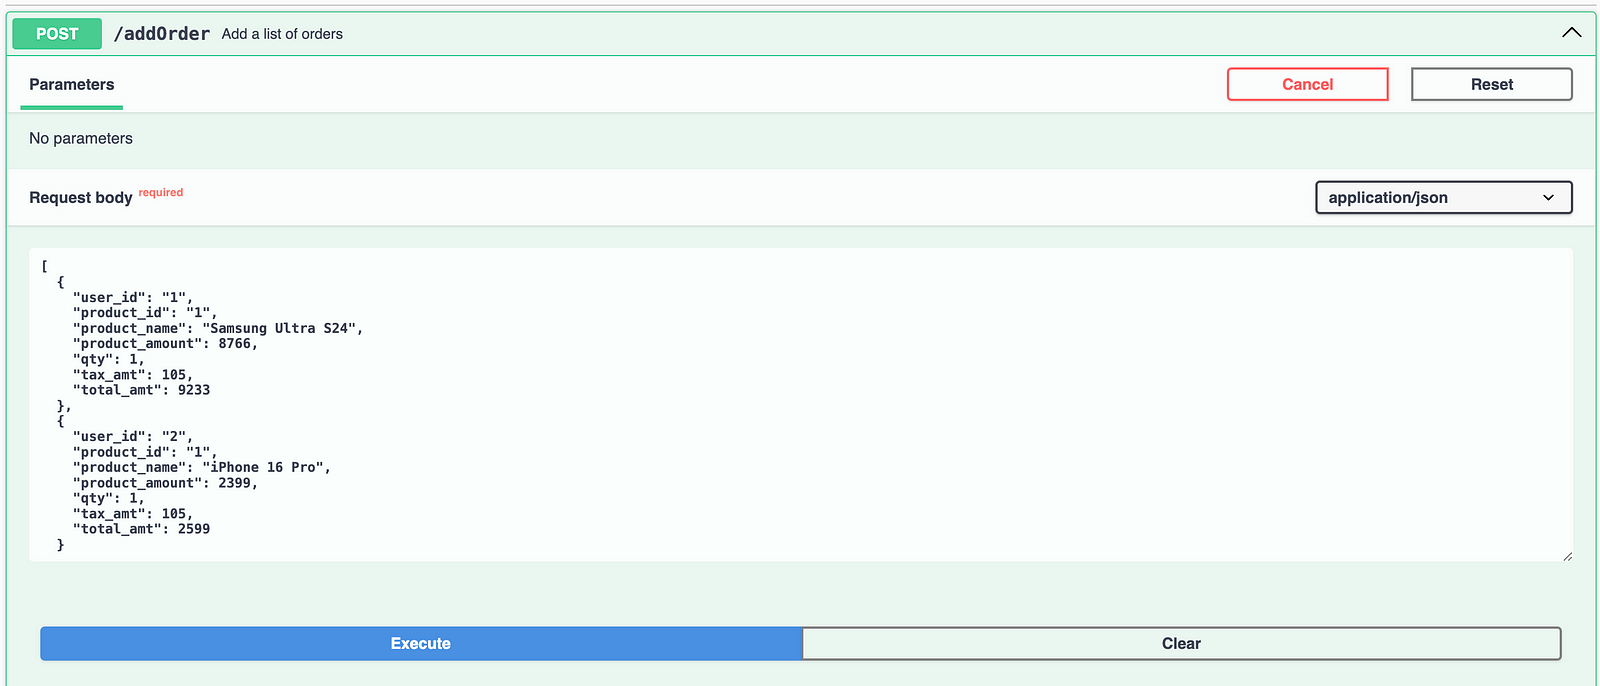
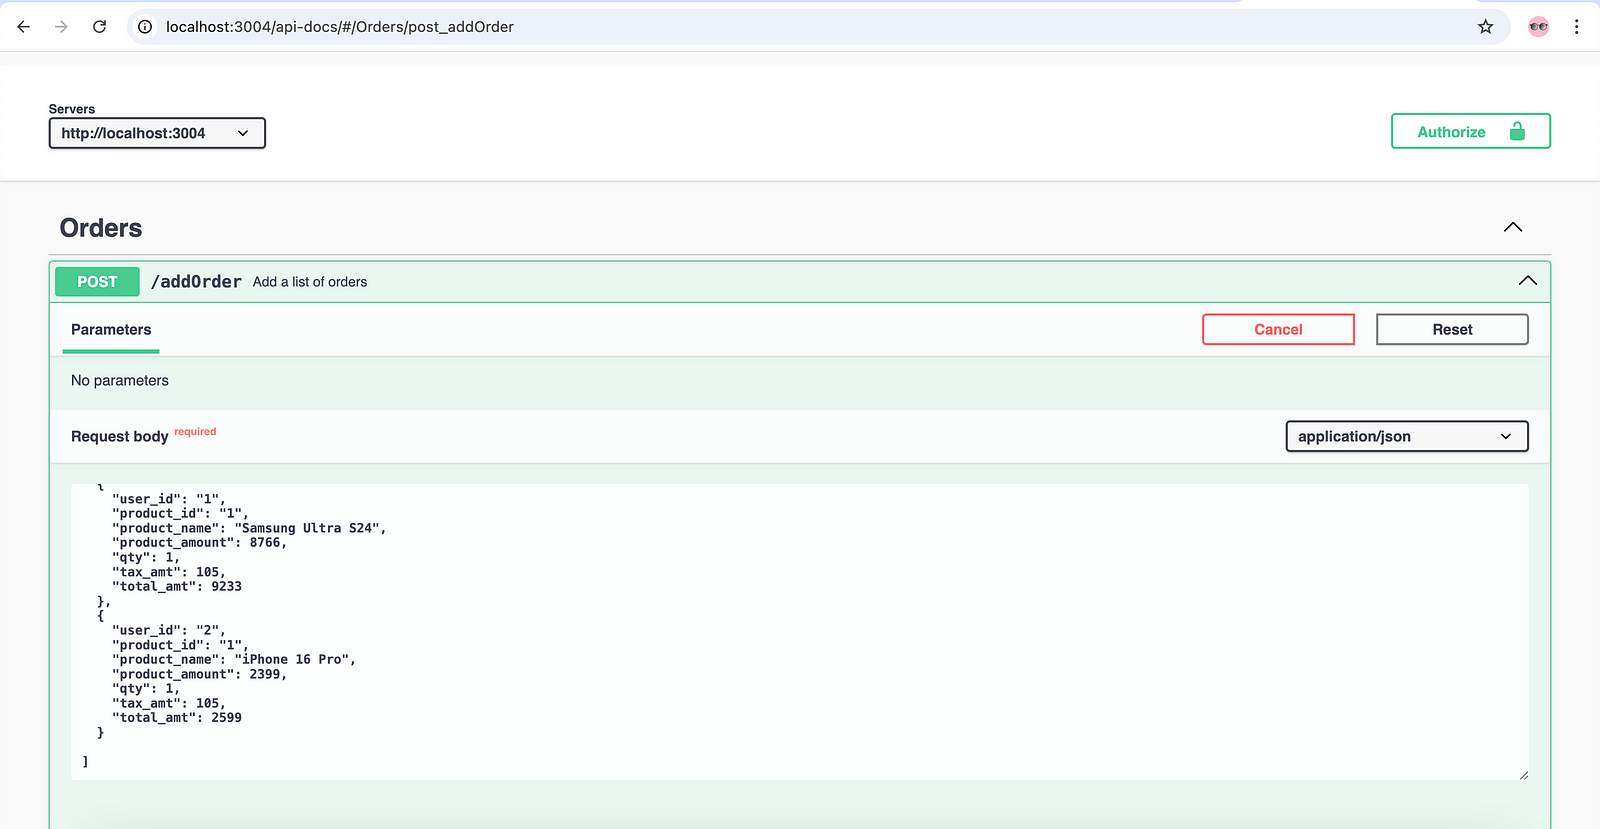
In the following example of RESTful e-commerce APIs, the POST request /addOrder sends the data to the server to create new orders.
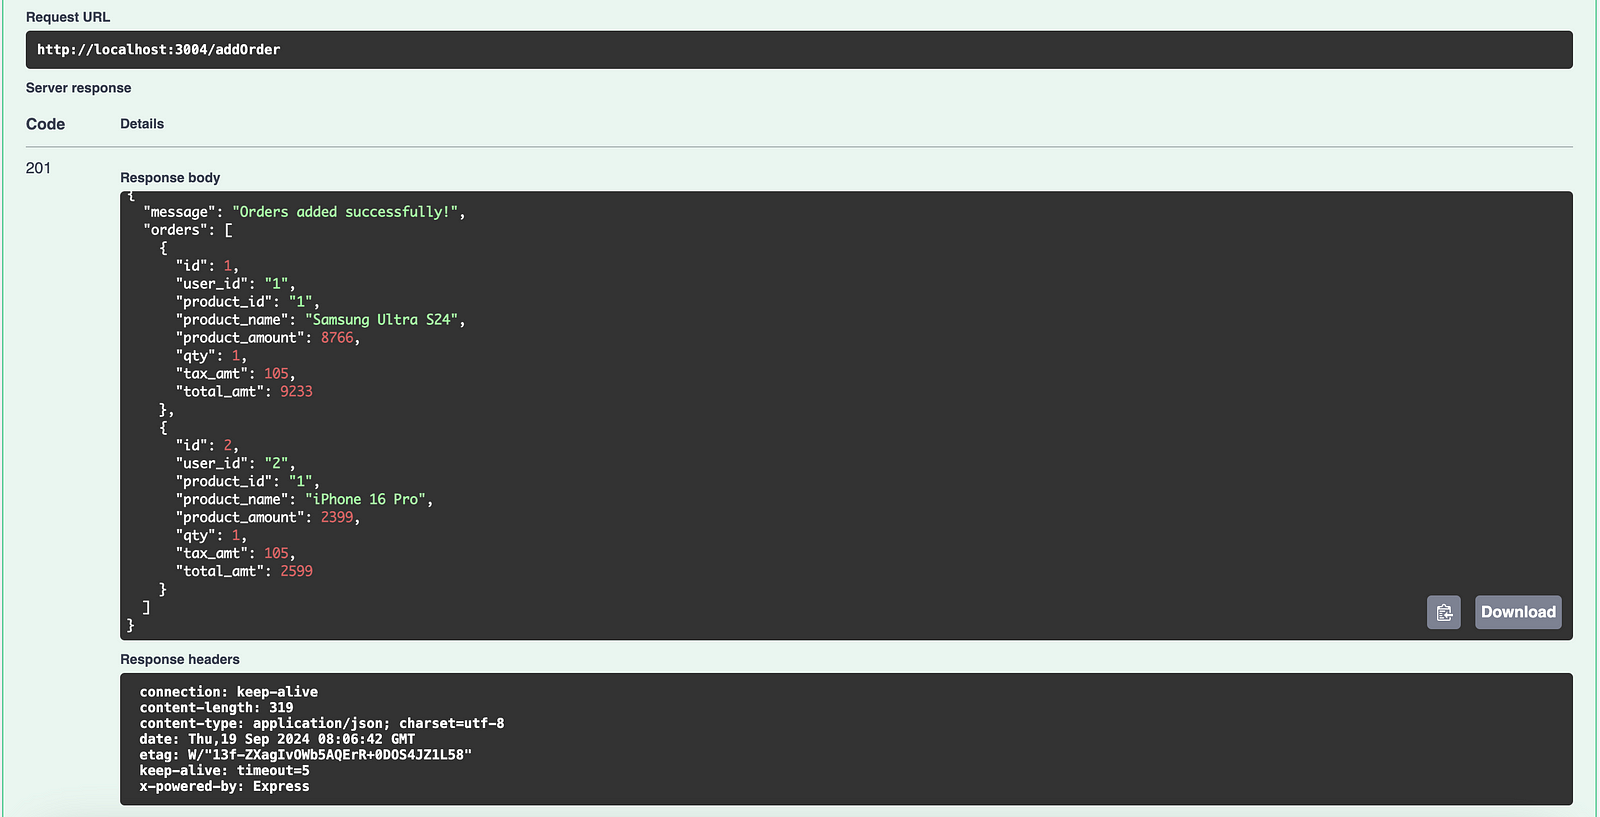
Once the POST request is successful, the required data is created in the system. In the response, Status Code 201 is returned along with the message and the details of the order created in the system.
How to Test POST APIs Using Playwright Java
Writing the test scripts for testing POST requests using Playwright Java is simple and easy. We need to be familiar with some of the interfaces and classes that Playwright offers that could be used for performing API automation testing.
We will use the RESTful e-commerce APIs to write the API tests, considering the happy and sad scenarios. The test scripts will be covered scenario-wise one by one, walking through the code and then the test execution details, making sure that everything is understood smoothly.
Test Scenario 1: Adding the Orders
- Start the RESTful e-commerce service.
- Generate the test data on runtime using Lombok and DataFaker.
- Generate four different orders in the system using POST
/addOrderAPI request supplying the required data set in JSON format. - Assert that the Status Code 201 is received in response.
- Verify that the order data is correctly generated as supplied in the POST payload.
Test Implementation
In order to implement the test scenario, we will create a new package in the src/test/ folder and name it restfulecommerce. We will then use this package to create test classes and manage test data.
The first step towards implementation is to write the BaseTest class that will handle the setup and configuration for Playwright. This BaseTest class will be reused further in the test classes to avoid code duplication and simplify the maintenance of the test scripts.
1. Writing the BaseTest
Let’s create a new Java class named BaseTest inside the restfulecommerce package. The Playwright and APIRequestContext interfaces will be declared at the class level as we need to call these interfaces in multiple methods, i.e., the setup() and tearDown() methods in the same class.
public class BaseTest {

    protected Playwright playwright;
    protected APIRequestContext request;
    private static final String BASE_URL = "http://localhost:3004";

    //...
}
The BASE_URL variable will be declared static final globally as it will remain constant throughout the test execution lifecycle. The RESTful e-commerce application will be run locally. Hence, we have the BASE_URL pointing to localhost and the tests will be executed on the respective APIs.
Two new methods, createPlaywright() and createAPIRequestContext(), are created with the private access modifier, as they will be used only in this BaseTest class.
private void createPlaywright() {
    playwright = Playwright.create();
}private void createAPIRequestContext() {
Map<String, String> headers = new HashMap<>();
headers.put("Content-Type", "application/json");
request = playwright.request().newContext(new APIRequest.NewContextOptions()
.setBaseURL(BASE_URL)
.setExtraHTTPHeaders(headers));
}The createPlaywright() method will create a new instance of Playwright. The createAPIRequestContext() method will set the API request configurations, such as setting the common request headers and the base URL. It will also create a new instance of APIRequestContext that will be used in the tests.
A new method setup() is created that has @BeforeTest annotation of TestNG and will run before any of the tests run. It will call the createPlaywright() and createAPIRequestContext() methods that will eventually set the stage for running the API tests.
@BeforeClass
public void setup() {
    createPlaywright();
    createAPIRequestContext();
}
Another two methods created are, closePlaywright() that will close the Playwright session and disposeAPIRequestContext() that will discard all the responses returned by the APIRequestContext.get() and other similar methods that are stored in the memory.
These methods have private access modifiers as they are scoped for this BaseTest class only.
private void closePlaywright() {
    if (playwright != null) {
        playwright.close();
        playwright = null;
    }
}

private void disposeAPIRequestContext() {
    if (request != null) {
        request.dispose();
        request = null;
    }
}
These two methods will be called in the tearDown() method that has the @AfterClass annotation of TestNG over it. This method calls the closePlaywright() and disposeAPIRequestContext() methods and will be executed after the test is executed allowing graceful closing of the Playwright session.
2. Writing the Test
Let’s create a new Java class, HappyPathTests, inside the existing restfulecommerce package. This HappyPathTests class will extend the BaseTest class, allowing us to reuse the public methods and variables defined in the BaseTest class.
public class HappyPathTests extends BaseTest{

    private List<OrderData> orderList;

    //..

}

    @BeforeClass
    public void testSetup() {
        this.orderList = new ArrayList<>();
    }
The testSetup() method will instantiate the List<OrderData> to create an array of the order data (the POST request needs the body to be supplied in JSON Array format), it is kept at class level as we will use it in different test methods in the same test class to verify the orders.
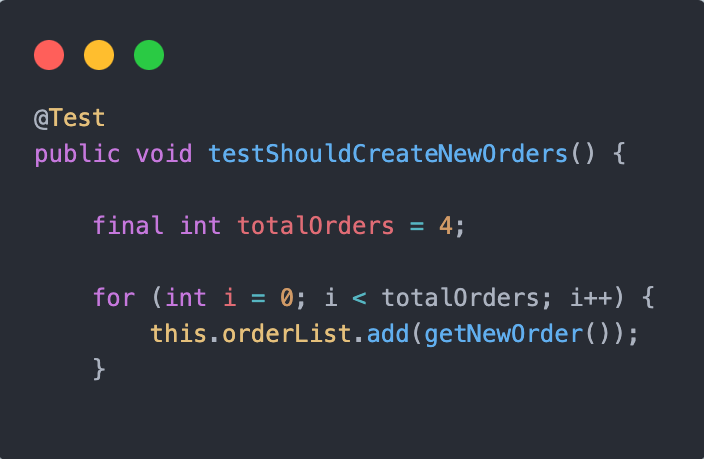
We will now create a new test method testShouldCreateNewOrders() for testing the POST request to create new orders.
@Test
public void testShouldCreateNewOrders() {

    final int totalOrders = 4;

    for (int i = 0; i < totalOrders; i++) {
        this.orderList.add(getNewOrder());
    }

    final APIResponse response = this.request.post("/addOrder", RequestOptions.create()
            .setData(this.orderList));

    final JSONObject responseObject = new JSONObject(response.text());
    final JSONArray ordersArray = responseObject.getJSONArray("orders");

    assertEquals(response.status(), 201);
    assertEquals(responseObject.get("message"), "Orders added successfully!");
    assertNotNull(ordersArray.getJSONObject(0).get("id"));
    assertEquals(this.orderList.get(0).getUserId(), ordersArray.getJSONObject(0).get("user_id"));
    assertEquals(this.orderList.get(0).getProductId(), ordersArray.getJSONObject(0).get("product_id"));
    assertEquals(this.orderList.get(0).getTotalAmt(), ordersArray.getJSONObject(0).get("total_amt"));
}
We will be adding a total of four orders to the order list. These orders will be supplied as a body to the /addOrder POST request method.
The following is the request body that needs to be supplied in the request for generating orders:
[{
    "user_id": "1",
    "product_id": "1",
    "product_name": "iPhone",
    "product_amount": 500.00,
    "qty": 1,
    "tax_amt": 5.99,
    "total_amt": 505.99
},
{
    "user_id": "1",
    "product_id": "2",
    "product_name": "iPad",
    "product_amount": 699.00,
    "qty": 1,
    "tax_amt": 7.99,
    "total_amt": 706.99
}]
To generate the data for the order, we need to create a POJO class with the exact names of the fields as required for the order Object. The OrderData class will help us in creating the POJO.
@Getter
@Builder
public class OrderData {

    @SerializedName("user_id")
    private String userId;
    @SerializedName("product_id")
    private String productId;
    @SerializedName("product_name")
    private String productName;
    @SerializedName("product_amount")
    private int productAmount;
    private int qty;
    @SerializedName("tax_amt")
    private int taxAmt;
    @SerializedName("total_amt")
    private int totalAmt;

}
As the JSON field names have a _ in between them, the @SerializedName annotation from Gson library is used, it will attach the variable name created in the POJO with the serialized name.
Notice that we are not creating any Getter and Setter methods in this class since we are using Lombok dependency. It will auto-create the required Getter methods as we have used the @Getter annotation from Lombok. Similarly, @Builder annotation is also used, which will allow using the class as a builder design pattern removing the need to add the parameters to the constructors of the class.
The order data will be generated using the getNewOrder() static method. This getNewOrder() method comes from the OrderDataBuilder class that is available in the restfulecommerce/testdata package.
public class OrderDataBuilder {

    private static final Faker FAKER = new Faker();

    public static OrderData getNewOrder() {
        int userId = FAKER.number().numberBetween(2, 4);
        int productId = FAKER.number().numberBetween(331,333);
        int productAmount = FAKER.number().numberBetween(400, 903);
        int quantity = FAKER.number().numberBetween(1, 5);
        int taxAmount = FAKER.number().numberBetween(10,50);
        int totalAmount = (productAmount*quantity)+taxAmount;

        return OrderData.builder()
                .userId(String.valueOf(userId))
                .productId(String.valueOf(productId))
                .productName(FAKER.commerce().productName())
                .productAmount(productAmount)
                .qty(quantity)
                .taxAmt(taxAmount)
                .totalAmt(totalAmount)
                .build();
    }

}
The test data required for the orders will be generated on runtime using the Datafaker library, for which the dependency has already been added to the pom.xml file.
The process is pretty simple: create an object of the Faker class provided by DataFaker, use it to call the required data method, and generate the data at runtime.
We will add four orders to the POST request; hence, we need to call the getNewOrder() method four times in the test. To do so, we will use a For Loop in the test method.
Next, to execute the POST request will be executed using the following lines of code.

The response is a variable defined for the type APIResponse that will store the result of the API request. The this.request.post("/addOrder", ..) will send a POST request to the endpoint "/addOrder" that will be handling the addition of the order.
RequestOptions.create() will create an object that will hold the different options for the request, such as request headers, body, etc. The .setData(this.orderList) contains the list of orders stored in the orderList variable, a total of four orders added as per the loop we provided. This data is sent as a body to the POST API request call.
The next part is to perform the assertions to verify that the POST request sent has successfully created the orders in the system. It is also necessary to check the data integrity of the orders that were created using the Datafaker library.
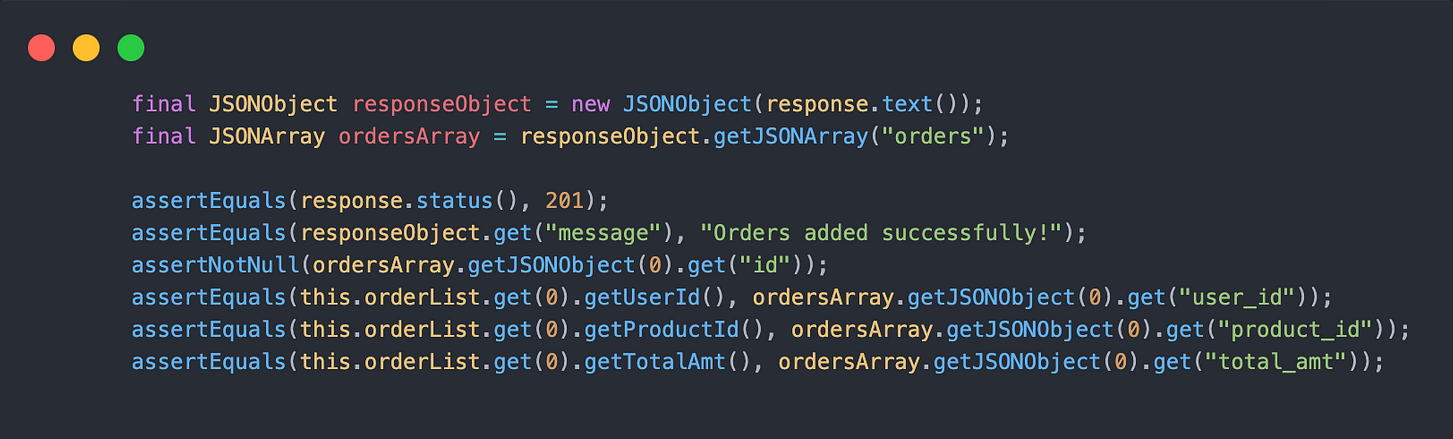
The first assertion is to check that the correct status code, i.e., 201, is received in the response.
In the next assertion, we are checking that the “message” field in the response object has the text “Orders added successfully!” An important assertion is to also check that the order id is generated successfully for each order. As we are unsure about the id, i.e., order number generated, we would be checking that the id is not a null value.
We need to parse the response and get the JSON arrays and JSON objects so as to get the fields for asserting it with the respective values.
The JSONObject class from the org.json library is used to parse the response text, and similarly, the JSONArray class from the same library is used to parse the JSON Arrays from the response. These objects are further used to fetch the required data from the response to perform assertions.
Finally, checks are performed to check for data integrity, ensuring that the order details like user_id, product_id, total_amt, etc., are filled in correctly and appear as they are sent in the request.
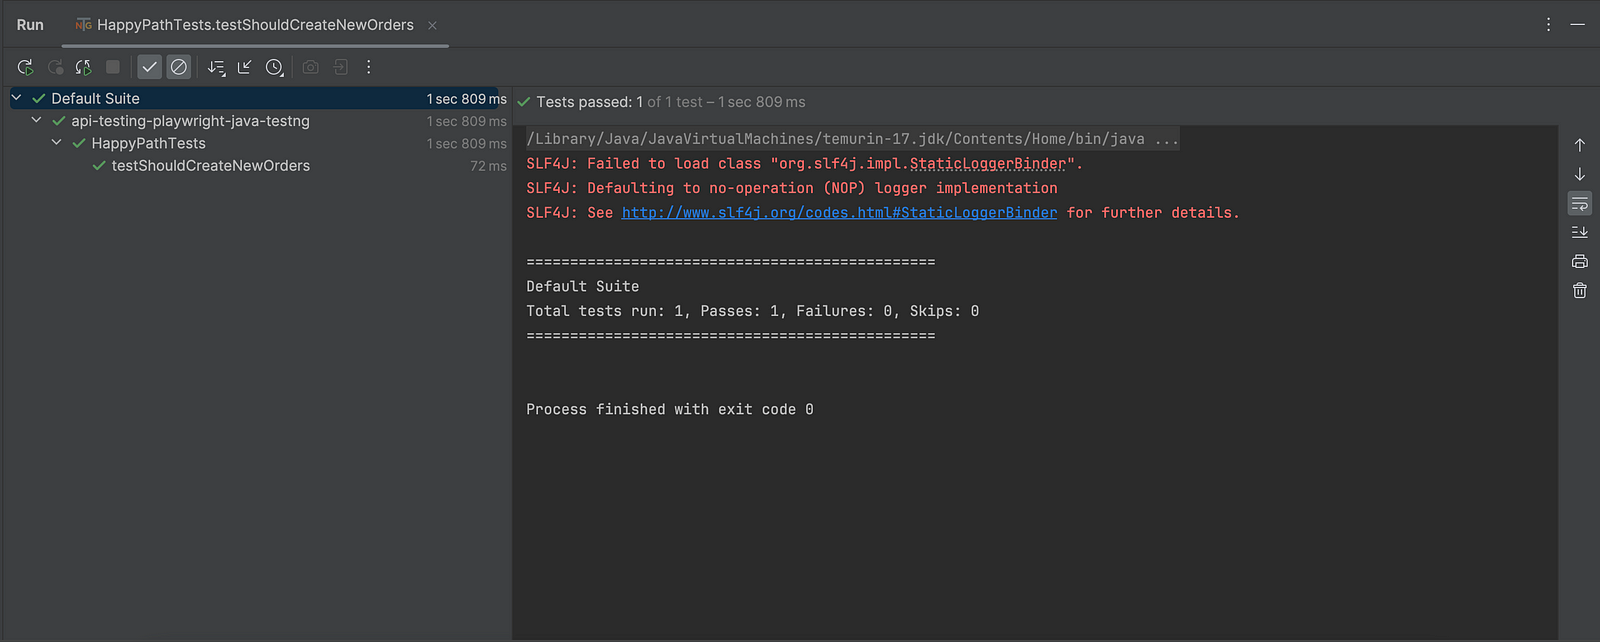
Test Execution
Before executing the tests, we need to ensure that the RESTful e-commerce application is up and working. To start the app, follow the steps here.
The following screenshot from IntelliJ IDE shows that the test execution was successful, and orders were created as desired using the POST request:
Test Scenario 2: Incorrect Request Payload
- Start the RESTful e-commerce service.
- Hit the POST request with incorrect request payload when
product_idfield is missing the order body. - Assert that status code 400 is received in the response.
- Verify that the message
“Each order must have user_id, product_id, product_name, product_amount, qty, tax_amt, and total_amt!”is received in the response and that no order is created in the system.
Test Implementation
Let’s create a new Java class SadPathTests in the existing package restfulecommerce. This class will implement all the test scenarios related to the sad paths of the RESTful e-commerce APIs.
Sad Paths ideally refers to the test scenarios where it is expected to throw an error message to provide a good user experience to the end user.
For example, the test scenario we just discussed will send Status Code 400 in response when the incorrect payload is sent in the request. This enables the end user to understand that he made a mistake while sending the POST request and allows him to correct his mistake accordingly.
A new test method testShouldNotCreateOrder_WhenProductIdFieldIsMissing() is created in the SadPathTests test class.
@Test
    public void testShouldNotCreateOrder_WhenProductIdFieldIsMissing() {

        List<OrderData> orderList = new ArrayList<>();
        orderList.add(getOrderDataWithMissingProductId());

        final APIResponse response = this.request.post("/addOrder",
                RequestOptions.create().setData(orderList));

        final JSONObject responseObject = new JSONObject(response.text());
        assertEquals(response.status(), 400);
        assertEquals(responseObject.get("message"), "Each order must have user_id, product_id, product_name, product_amount, qty, tax_amt, and total_amt!");
    }
The implementation of the test scenario is pretty simple; it will create a new ArrayList of orders to ensure that we supply the request body in Array format.
A new method getOrderDataWithMissingProductId() is created in the OrderDataBuilder class to handle the request body, we need to send in the POST request.
public static OrderData getOrderDataWithMissingProductId() {
        int userId = FAKER.number().numberBetween(2, 4);
        int productAmount = FAKER.number().numberBetween(400, 903);
        int quantity = FAKER.number().numberBetween(1, 5);
        int taxAmount = FAKER.number().numberBetween(10,50);
        int totalAmount = (productAmount*quantity)+taxAmount;

        return OrderData.builder()
                .userId(String.valueOf(userId))
                .productName(FAKER.commerce().productName())
                .productAmount(productAmount)
                .qty(quantity)
                .taxAmt(taxAmount)
                .totalAmt(totalAmount)
                .build();

    }
It should be noted that we have not supplied the product_id field in the above method.
The POST request is executed by adding the order with the missing product_id and finally, the assertions are performed to check that Status Code 400 along with the message “Each order must have user_id, product_id, product_name, product_amount, qty, tax_amt, and total_amt!” is received in the response.
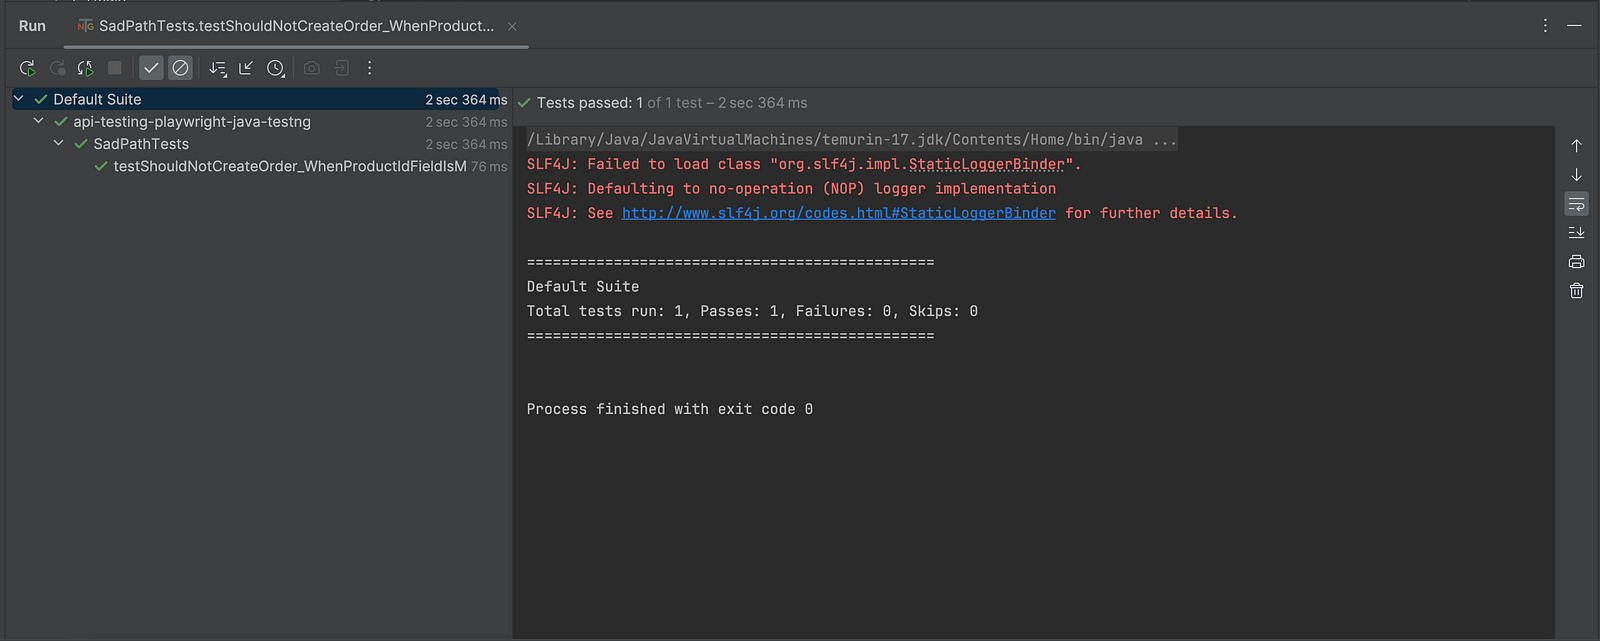
Test Execution
The following screenshot of the test execution performed using the IntelliJ IDE shows that the test was executed successfully:
Summary
Playwright is a popular test automation framework that allows performing web and API automation at your fingertips. API testing is performed mainly by many software teams to check the application's functionality and test the end-to-end journeys, as it provides quick feedback in minimal time.
In this article, we learned how to perform API testing for POST requests using Playwright with Java. POST requests create a new resource in the system and ideally return Status Code 201 in the response. The important part of POST request is the request body that needs to be supplied in the required format per the Content-Type header. Properly structuring the request body ensures the API can accurately process the data and return the expected results.
Published at DZone with permission of Faisal Khatri. See the original article here.
Opinions expressed by DZone contributors are their own.
Comments