The New HTTP/2 Plugin for JMeter - The Complete Guide
Learn the steps of the most complete and easiest way to load test HTTP/2 using the new HTTP/2 plugin for JMeter in this quick tutorial.
Join the DZone community and get the full member experience.
Join For FreeHTTP/2 is the future of browser communication. But until now, Apache JMeter™ was unable to support load testing this method of browser communication. Now, a new HTTP/2 plugin has been developed with the support of BlazeMeter. This blog post will cover everything you need to know about how to use it.
What Is HTTP/2?
Based on Google’s SPDY, HTTP/2 is the latest HTTP version. Since HTTP/1.1, the previous HTTP version, was designed more than 20 years ago, it is unable to handle today’s growing data, resources, and evolving technologies. HTTP/2 answers these disparities and improves webpage load time, latency and web security. This browser performance improvement is done by implementing methodologies such as multiplexing, server push and file prioritization. Currently, most major browsers already support HTTP/2, including Chrome, Chrome for Android, Firefox, Safari and Edge, as well as some well-known servers such as Apache Server or Tomcat.
Read a comprehensive guide to HTTP/2 here.
The New HTTP/2 Plugin for JMeter
The HTTP/2 Sampler looks quite similar to the HTTP/1.1 Sampler, with some minor adjustments. The differences are in the logic that is running in the background, which simulates the protocol.
To create your test:
- Install the HTTP/2 plugin from the plugins manager
- Create a Thread Group.
- Add the HTTP Sampler Add->Sampler->HTTP2 Sampler
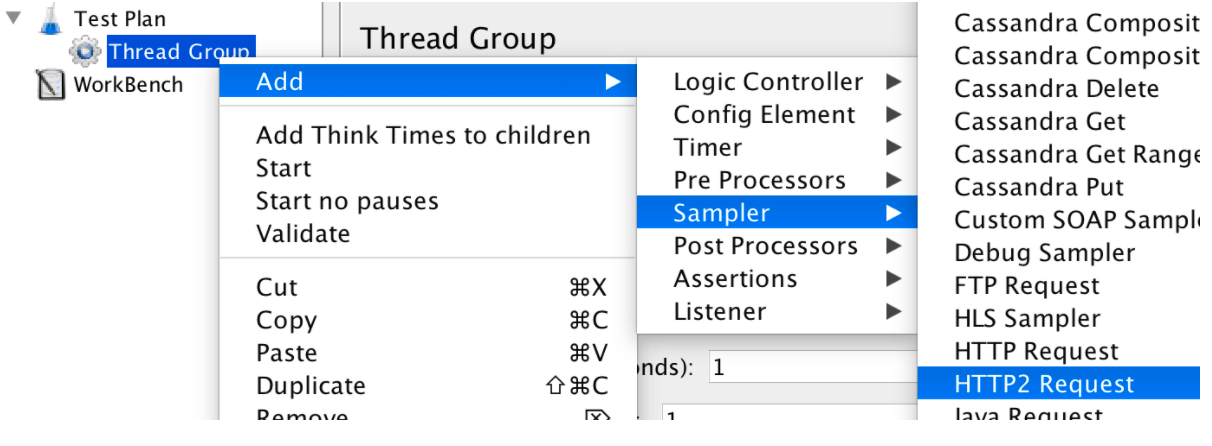
After that, you can add timers, assertions, listeners, etc.
Configuring the HTTP2 Sampler
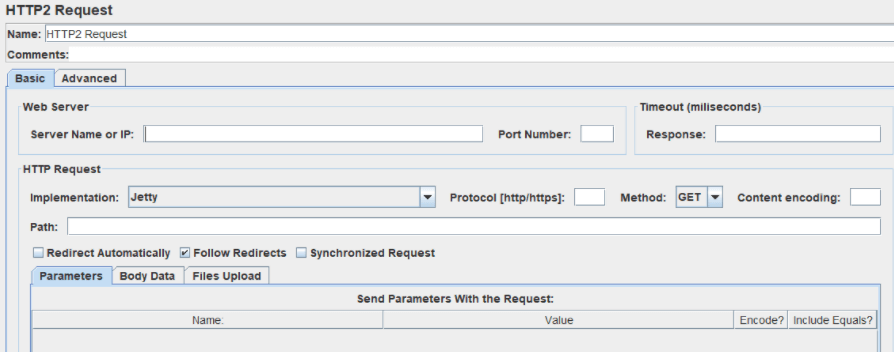
Let’s explain the HTTP2 Sampler fields:
- Name - Add a descriptive name for this HTTP/2 sampler to be shown in the tree.
- Server Name or IP - The domain name or IP address of the web server, e.g. www.sprint.com. [Do not include the http:// prefix.]
- Port Number - The port the web server is listening to. Default: 443
- Response - The number of milliseconds to wait for a response. Note that in this sample we don’t include the field for the connection timeout since HTTP/2 has an automatic initial connection setting in JMeter, and all samplers use this same connection. This is one of the cool features of HTTP/2.
- Implementation - Choose Jetty or Java. The default implementation is Jetty since it is the only one implemented at the moment. The Java implementation will be added in a future release.
- Protocol - Choose HTTP or HTTPS. Default: HTTPS
- Method - GET and POST are the ones supported at the moment.
- Content Encoding - The content encoding to be used (for POST). This is the character encoding to be used, and is not related to the Content-Encoding HTTP header.
- Path - The path to the resource (For example: /servlets/myServlet)
- Redirect Automatically - Sets the underlying HTTP protocol handler to automatically follow redirects, so they are not seen by JMeter, and therefore will not appear as samples.
- Follow Redirects - If set, the JMeter sampler will check if the response is a redirect and will follow it. The initial redirect and further responses will appear as additional samples.
- Synchronized Request - If set, JMeter will wait until receiving the response before sending more requests.
- Send Parameters With the Request - All the fields are equivalent to the HTTP/1.1 fields.
Synchronous and Asynchronous Requests
HTTP/2 is an asynchronous protocol, meaning we don’t have to wait for the response of the server to continue the communication. But the JMeter model executes synchronously. Therefore, if we want to add assertions or post processors to our HTTP/2 Requests, i. e. process the response, we need to select the checkbox Synchronized Request to indicate that JMeter needs to wait until receiving the response before sending more requests.
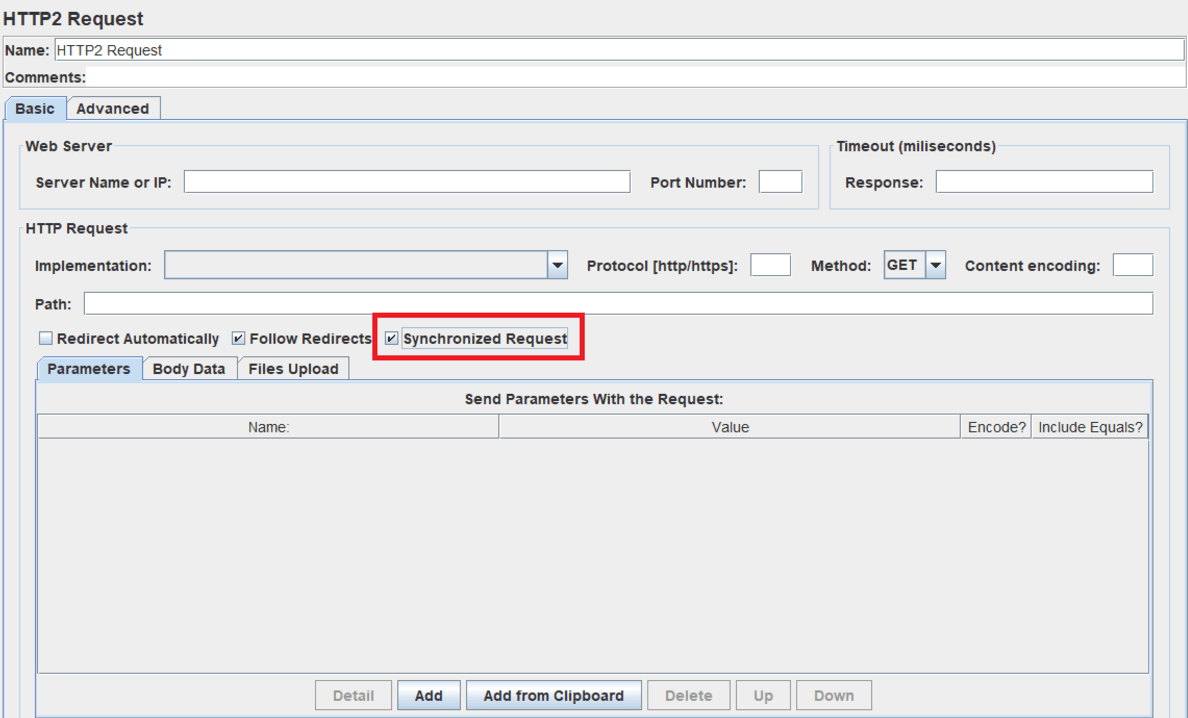
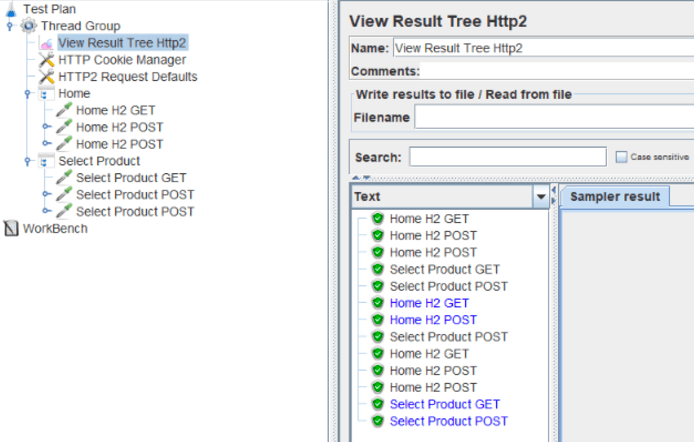
In the screenshot below, you can take a look at a HTTP/2 Script, where two requests have been set as a Synchronized Request. So, when these synchronized requests are sent, JMeter will block the execution of the thread until all previous responses have arrived.
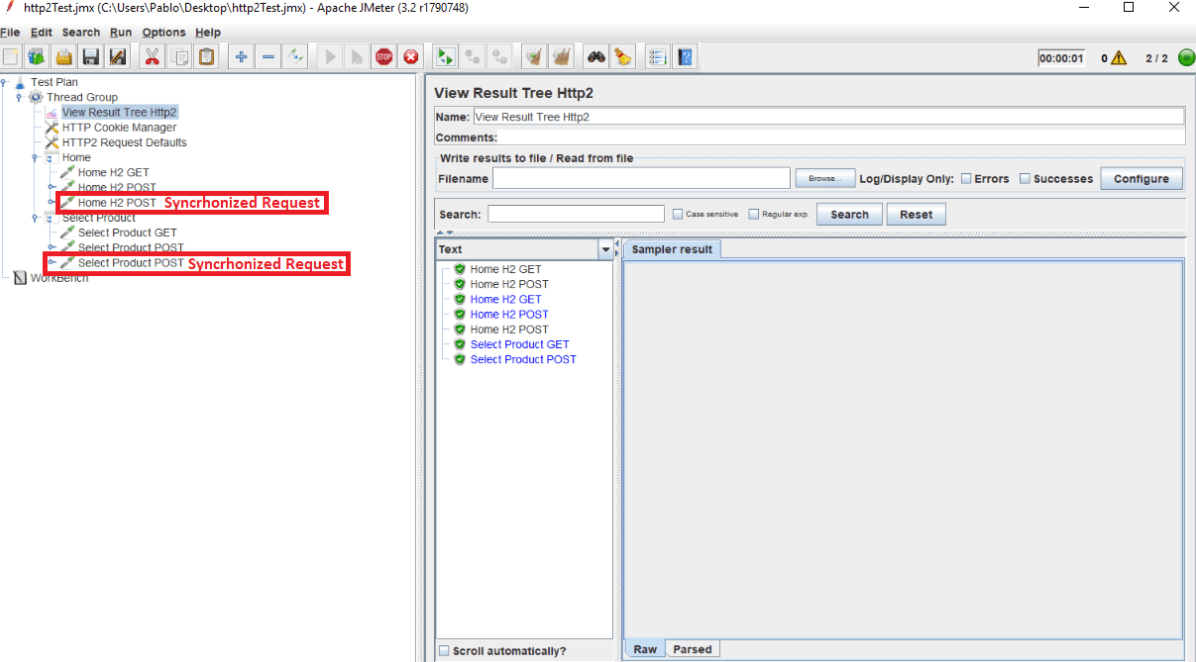
View Result Tree Http2
During Test Plan debugging and validation, we need the View Results Tree Listener. But if we use a regular View Results Tree in our HTTP/2 script, requests will be shown incorrectly: as a HTTP/1.1 request that has already received its response correctly. If we look in the response data, we will see it is empty, because the response hasn’t been received yet. The responses won’t be fixed once they arrive because JMeter works in a synchronous way and the regular View Result Tree will not update itself.
Therefore, the View Results Tree Listener isn’t fit for HTTP/2, which can send more than one request at the same time without waiting for a response. Using the regular listener means we won’t be able to see the responses of all asynchronous requests.
To solve this problem, you can use the View Result Tree Http2, which we also developed. This specialized listener provides a way to visualize a request that has not received a response yet. These requests will be written in blue, as you can see in the image below. When the response is received, the writing will turn immediately to black, and you will be able to see the response message.
That’s it! Now, you know the most complete and easiest way to load test HTTP/2 using JMeter.
To learn more JMeter, sign up to our free JMeter academy.
Published at DZone with permission of Pablo Barcelo, DZone MVB. See the original article here.
Opinions expressed by DZone contributors are their own.

Comments