Transforming multipart/form-data Into XML Using MuleSoft and JavaScript
Curious about how to take a data set and transform it into XML format? We discuss how to do so in MuleSoft using JavaScript.
Join the DZone community and get the full member experience.
Join For FreeIn this article, I'll discuss how to transform multipart/form-data in MuleSoft using JavaScript.
I have been going through MuleSoft for a while and haven't seen any docs or references on how to parse non-XML or multipart data. I believe this article will give some basic information on it.
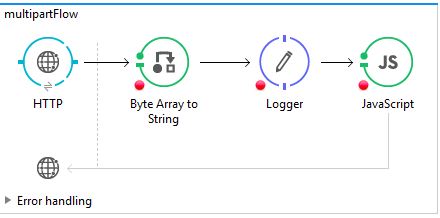
I tried to solve this using MuleSoft and JavaScript. Below is the sample flow that I used.
Create a MuleProject and add an HTTP connector (set HTTP_Listner_Configuration).
Make sure to unselect the Parse Request in the advanced properties of the HTTP connector (this will make the multipart/form-data payload into a byte array).
Connect
ByteArraytoStringto the HTTP connector.Use logger to see how the input payload is getting converted from byte to String format in the debugger.
Connect JavaScript and use the below code to transform the string to an XML format.
Remember, while setting up the HTTP connector config in the Basic Settings path, use "/multipart" and allowed methods to "POST." This will allow us to send POST requests for the URI /multipart (or you can use your own custom URI).
In the below JavaScript, I did the following few things:
First, I read the payload using
log.info.And if I am able to read it, I then convert it to string format and, to that string, I apply a few string operations.
The variables
documentValue,requestIdValue,echoBack, andKeepALivewill contain the values that are coming from the input after the string operations are run.Build an XML file using the variable
respand print the response in the console.
log.info(payload);
if(payload){
var str = payload.toString();
print("Input Payload is:" +payload);
var docstart = str.indexOf('name="document"') + 16;
var documentValue = str.substr(docstart, str.indexOf('---', docstart)
 - docstart);
    documentValue=documentValue.trim();
var idstart = str.indexOf('name="requestId"') + 16;
var requestIdValue = str.substr(idstart, str.indexOf('---', idstart)
 - idstart);
requestIdValue=requestIdValue.trim();
var echoBack = str.indexOf('name="echoBack"') + 16;
var echoBackValue = str.substr(echoBack, str.indexOf('---', echoBack)
 - echoBack);
echoBackValue=echoBackValue.trim();
var keepAlive = str.indexOf('name="keepAlive"') + 16;
var keepAliveValue = str.substr(keepAlive, str.indexOf('---', keepAlive)
 - keepAlive);
keepAliveValue=keepAliveValue.trim();
var documentId = str.indexOf('name="thedocumentID"') + 21;
var documentIdValue = str.substr(documentId, str.indexOf('---', documentId)
 - documentId);
documentIdValue=documentIdValue.trim();


        var resp = '<request><document>';
resp = resp.concat(documentValue);
resp = resp.concat('</document><requestID>');
resp = resp.concat(requestIdValue);
resp = resp.concat('</requestID><echoBack>');
resp = resp.concat(echoBackValue);
resp = resp.concat('</echoBack><keepAlive>');
resp = resp.concat(keepAliveValue);
        resp = resp.concat('</keepAlive><thedocumentID>')
        resp = resp.concat(documentIdValue);
        resp = resp.concat('</thedocumentID></request>');
        message.setPayload(resp);
        result=message;
     print("Output Payload is:" +resp);
}
The below image depicts how to send an HTTP Request with multipart/form-data and get the response back as an XML file using SoapUI:
For sending a request in SoapUI:
Select Media Type as multipart/form-data and Method as POST.
Make sure the resource is the URI path,
/multipart.As Mule Runtime is on my localhost, the endpoint is http://localhost:8081.
Once you hit the green button, it will trigger a request to our HTTP connector in Mule Runtime and parse it using our JavaScript and send the response back to SoapUI (which is an XML payload).

Thank you!
Opinions expressed by DZone contributors are their own.
Comments