Trust No Agent: How to Secure Autonomous Tools on Your Machine
Most developers run autonomous agents with zero isolation. This guide teaches you how to build defense in depth to contain the blast radius.
Join the DZone community and get the full member experience.
Join For FreeTwo weeks ago, one of my friends called me and asked if it was a good idea to install OpenClaw on a personal machine. The immediate thought that crossed my mind was how about security and how to reduce the blast radius if the OpenClaw is compromised. Autonomous agent tools are reshaping how we work. Tools like OpenClaw and Picoclaw can write code, make API calls, read files, and interact with external services on your behalf. They're incredibly useful. But they're also a significant security risk if you don't know what you're doing.
Over the past few weeks, I have been working with these tools on my Mac and Linux workstations. I have friends running agents with full access to their home directory. They have stored API keys in plaintext environment files. They have connected agent machines to their main network with no isolation. Each time we interact, I realize how quickly things could go wrong.
The reality is this: an agent that can take actions on your behalf across the internet becomes a dangerous liability if something goes wrong. If the agent software is compromised, if a library it depends on is malicious, or if a supply chain attack injects hostile code, that agent becomes an attacker's tool. It has your API keys, your network access, and your trust.
I've learned through hands-on experience that the only way to safely run these tools is to treat them as potentially hostile from day one. Design your environment as if the agent will be compromised. Because it might be. And when it is, good boundaries mean the damage is limited instead of catastrophic.
This article shares what I've discovered about designing those boundaries not only for AI agents but also for securing your local network while using a personal machine. It's based on actual deployments, real security tools, and practical setups that work without requiring a Ph.D. in security engineering.
Understanding the Threat Landscape
The Real Risks You're Facing
Before you start building defenses, understand what you're actually defending against.
When an agent has your API keys, it has direct access to every service you authenticate with. If that agent gets compromised through a malicious dependency or a compromised package, an attacker gains the same permissions as your account. A compromised agent can read files on your machine, copy sensitive data from your home directory, and steal it over the network. If your agent has unrestricted network access, it can scan your local network, move to other machines, or spread beyond the agent itself.
Many developers store secrets in plaintext environment files in their home directories. An agent can find these in seconds. Even worse, developers often give agents access to their entire home directory or filesystem without thinking about the consequences.
For a deeper dive into the cryptographic foundations of security and why trust matters, see my article on Chain of Trust: Decoding SSL Certificate Security Architecture. Understanding how certificate chains work helps you understand why layered security is essential.
Key principle: Assume the agent software might be compromised. Assume the libraries it depends on might be hostile. Assume a malicious package could be installed. Then design your environment so that even if all of that happens, the damage is contained.
Network Isolation Strategies
Why Network Boundaries Matter First
Start by controlling what an agent can reach on the network. This is your first line of defense. Even if everything else fails, a properly configured network boundary stops your agent from reaching external systems or scanning your internal network.
Local Firewall Rules: The Foundation
On macOS, use the built-in firewall or pf (the system's packet filter). On Linux, use iptables, nftables, or ufw. The goal is simple: allow only the specific destinations your agent actually needs. If your agent talks to OpenAI, GitHub, and one internal API, block everything else.
On Linux, you can set up firewall rules to block outgoing traffic by default, then allow only what you need:
# Set default policy to block all outgoing traffic
sudo ufw default deny outgoing

# Allow DNS queries (needed to look up domain names)
sudo ufw allow out 53/udp

# Allow HTTPS traffic
sudo ufw allow out 443

# Allow HTTP traffic (if your agent needs it)
sudo ufw allow out 80
On macOS, enable pf logging so you can see what your agent is trying to do on the network. Review those logs weekly. You'll be surprised by what you find.
DNS Filtering: The Overlooked Boundary
DNS is often overlooked, but it's critical. An agent can steal data through DNS queries or receive commands through DNS responses. Use a DNS filter like Pi-hole, Nextdns, or Quad9 to block known malicious domains and log all queries. This single change has caught suspicious behavior in my environment more than once.
Network Segmentation With a Travel Router
If you want strong isolation without complex infrastructure, use a travel router. Plug a travel router into your main network and connect your agent machine to it only. The travel router becomes a barrier. Your agent can reach the internet but cannot reach your main network, printers, NAS, or other devices. This is simple, effective, and something I use in my lab.
Running Behind a Proxy
A forward proxy forces all traffic through a single point where you can inspect it. Tools like Squid or mitmproxy can log and filter traffic. This requires configuring your agent's environment to use the proxy, but in containers or with proper environment variables, it's straightforward.
Recommended for most: Start with local firewall rules and DNS filtering. Add a travel router if you need more isolation.
System Isolation Techniques
Beyond Network Boundaries
Network boundaries are necessary but not enough. You also need to isolate the agent from your files and operating system. A compromised agent should not be able to access your home directory, read your documents, or modify your system files.
For a practical understanding of how file permissions work in Linux, read Understanding Linux Permissions, which covers the foundational concepts for system isolation.
Dedicated User Accounts: Simple but Effective
Create a separate user account on your Mac just for running agents. This user has no access to your home directory, Documents, or sensitive files. Use macOS's built-in user permissions to enforce this strictly. The agent runs as a low-privilege user that owns only its own files. It's a simple defense, but it works.
Containers: The Sweet Spot for Most Developers
I've tested every isolation approach, and for most developers, Docker or Podman is the sweet spot. The container sees only its own files, a limited set of network connections, and resource limits. It cannot directly access your host files unless you explicitly allow it.
Use Podman on Linux if you want to run containers without needing a separate background service running all the time. The isolation is real, the overhead is low, and the usability is high.
Lightweight VMs: When You Need Stronger Protection
For stronger isolation, I use Colima or Lima on macOS. These tools run Firecracker, which is a lightweight virtualization tool designed to be very fast. A Firecracker VM boots much faster than traditional virtual machines, uses minimal resources, and provides real hardware isolation while remaining practical for daily work.
If you're willing to accept more overhead and want maximum security, use UTM or VMware Fusion. These provide full virtual machines with separate disks, separate networks, and the ability to save and restore the machine state.
Quick Comparison: Which Isolation Method Should You Choose?
| Approach | Isolation Strength | Startup Time | Resource Use | Ease of Use | Link |
|---|---|---|---|---|---|
| Dedicated User | Low | Immediate | None | Very Easy | macOS built-in |
| Docker | Medium | Seconds | Low | Easy | docker.com |
| Podman | Medium | Seconds | Low | Easy | podman.io |
| Colima | Medium-High | Seconds | Low-Medium | Medium | github.com/abiosoft/colima |
| Lightweight VM (Lima) | Medium-High | Seconds | Low-Medium | Medium | github.com/lima-vm/lima |
| UTM | High | Seconds | Medium-High | Easy | mac.getutm.app |
| VMware Fusion | High | Seconds | Medium-High | Easy | vmware.com/products/fusion |
- For most developers: Docker or Podman provides the best balance of security and usability.
- For sensitive workloads: Colima or a lightweight VM adds stronger isolation with minimal overhead.
- For maximum safety: A full virtual machine on separate hardware ensures complete isolation but requires more resources.
Note: All of these options are infinitely better than running an agent directly on your main user account with full filesystem access.
Managing Secrets and Credentials
The Secret Management Problem
Never store API keys in environment files in your home directory. I learned this the hard way. A developer I know had a compromised pip package that copied all environment variables from their shell. Their API keys were gone in minutes.
Better Approaches to Secret Management
Instead, use 1Password CLI, Bitwarden CLI, or your cloud provider's credential helper. These keep secrets in an encrypted vault and require authentication to retrieve them. Your agent requests a secret when it starts; the CLI handles authentication and returns only what's needed.
For macOS, the native Keychain works beautifully. Store secrets in Keychain and retrieve them through code. This keeps secrets away from the filesystem entirely.
Use short-lived tokens whenever possible. Request tokens with a short lifespan. When we say "short lifespan," we mean the token's time-to-live, or TTL, should be minimal. If a token leaks, the window of exposure is small. Use OAuth flows or temporary credentials from AWS STS, Azure Managed Identity, or similar services.
For maximum tracking and control, run HashiCorp Vault on your network. Your agent authenticates to Vault to retrieve secrets. Vault logs all access and can revoke credentials if you suspect a breach. This requires network latency but gives you full control and tracking of who accessed what and when.
Quick wins: Use 1Password CLI or your cloud provider's credential service. Never store raw API keys in your environment or home directory.
Monitoring and Detection
Isolation Stops Many Attacks, But Detection Lets You Know When Something Goes Wrong
Tools like Little Snitch (macOS) and LuLu (macOS) intercept all outbound connections and let you approve or deny them. OpenSnitch does the same on Linux. These tools show you in real time what your agent is trying to do on the network. I run Little Snitch constantly and review unexpected connection attempts weekly.
Enable pf logging on macOS or iptables logging on Linux. Send logs to a central location like a syslog server or cloud logging service. Analyze them for unexpected outbound attempts or port scans.
Suricata is a free tool that can detect suspicious traffic patterns on your network. If you use Tailscale for a private network, Tailscale's logs show you every connection attempt between machines.
Monitoring Tools Comparison
| Tool | Platform | Real-Time Alerts | What It Catches | Link |
|---|---|---|---|---|
| Little Snitch | macOS | Yes | Outbound connection attempts | obdev.at/littlesnitch |
| LuLu | macOS | Yes | Network access by any process | github.com/objective-see/LuLu |
| OpenSnitch | Linux | Yes | Outbound connections | github.com/evilsocket/opensnitch |
| pf logging | macOS/BSD | Yes | All packet-level activity | macOS built-in |
| iptables logging | Linux | Yes | Firewall-level activity | Linux built-in |
| Suricata | Linux | No | Suspicious traffic patterns | suricata.io |
| Tailscale | Network | Yes | All connections between machines | https://github.com/tailscale/tailscale |
Essential: At minimum, run a process monitor like Little Snitch or LuLu. It will catch things you didn't expect.
Real-World Setups
Setup 1: Single Mac Mini for Agent Workloads
Here's the setup I use for running agents on a Mac mini, which works well for smaller environments:
- Network Layer: Connect the Mac mini to a travel router isolated from your main network. Configure the macOS firewall to deny all outbound traffic except specific destinations: OpenAI API, GitHub, and your internal service. Use Little Snitch to monitor and log any unexpected outbound attempts.
- System Layer: Create a dedicated user account called
agent_runnerfor agent workloads. Run Docker containers as theagent_runneruser. Mount only necessary directories into containers as read-only where possible. - Secret Layer: Store API keys in 1Password vault. Your agent retrieves secrets at startup using 1Password CLI. Use short-lived tokens with a time-to-live of 1 hour or less.
- Monitoring Layer: Enable pf logging to syslog. Configure Little Snitch to log all blocked connections. Review logs weekly for suspicious activity.
Setup 2: Visual Architecture
Here's what a naive, unsafe setup looks like:
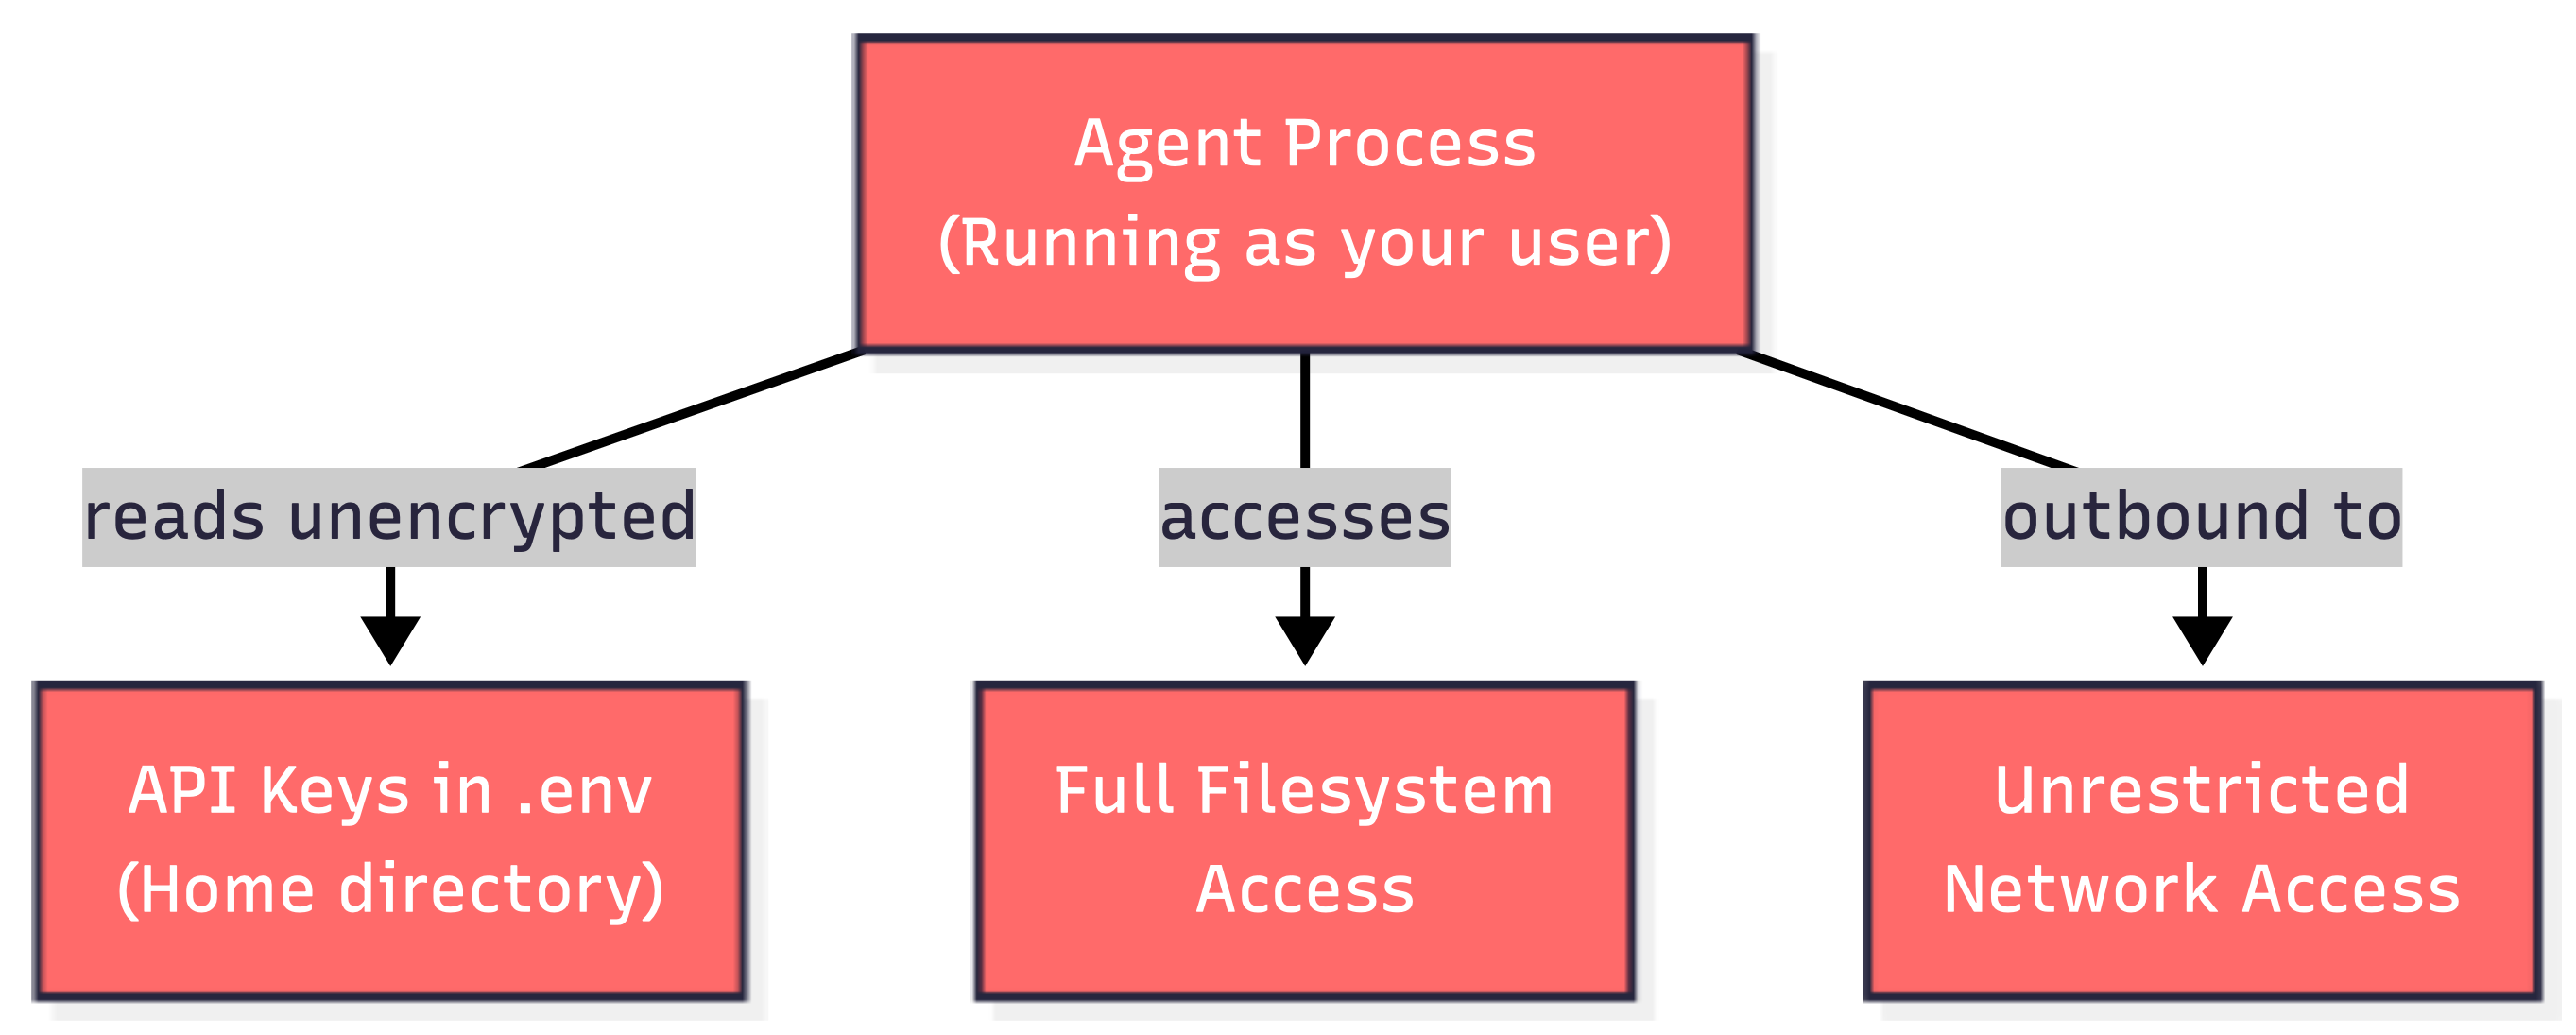
And here's what a hardened, segmented setup looks like:

Setup 3: Dedicated Lab Network
If you have multiple machines and want maximum network isolation, here's a setup I've deployed:
- Add a managed Ethernet switch with VLAN support to your network.
- Create a separate VLAN for agent workloads.
- Place a Raspberry Pi running Pi-hole on that VLAN for DNS filtering.
- Put your agent machine on the same VLAN.
- Configure the switch to prevent the agent VLAN from reaching your main network.
- Use an internal proxy on another Raspberry Pi to filter web traffic.
This creates a completely isolated network segment. Your agent can reach the internet but cannot access anything on your main network. It's straightforward to set up and provides strong boundaries.
For more details on setting up isolated network infrastructure, see my article on Automate session recording on RHEL with Ansible, which covers VPC design, bastion hosts, and network segmentation best practices.
Setup 4: Containerized Setup with Network Restrictions
Here's a Docker command I use to run agents with minimal privileges:
docker run \
  --user agent_runner \
  --network restricted \
  --read-only \
  --tmpfs /tmp \
  --cap-drop=ALL \
  myagent:latest
I create a custom Docker network called restricted that only allows outbound connections to specific destinations. This combines process isolation with network isolation.
Adjusting Your Approach Based on Risk
Different Threat Models, Different Solutions
- For trusted agents from well-known developers: Use Docker or Podman with a firewall allowlist and Little Snitch monitoring. This provides reasonable security without excessive complexity. Time investment: 1-2 hours.
- For experimental or closed-source agents: Use Colima or a lightweight VM with network isolation via a travel router or separate VLAN. Add 1Password CLI for secret management. Time investment: 3-4 hours.
- For research or testing of potentially hostile code: Use a dedicated hardware lab with no access to your main network. Use Firecracker or a full virtual machine on isolated hardware. Treat the machine as if it will be compromised. Time investment: 4-6 hours plus hardware cost.
Related Resources and Further Reading
My Previous Articles on Related Topics
For a deeper understanding of the concepts in this article, I recommend these related pieces:
- Automate session recording on RHEL with Ansible – Learn how to set up a secure VPC network, bastion hosts, and session recording using Terraform and Ansible. This shows infrastructure isolation at scale.
- Transfer contents and files through a secure shell tunnel – Practical guide to secure file transfer via SSH tunnels and bastion hosts.
- Understanding Linux Permissions – Foundation knowledge for user account isolation and filesystem permissions.
- Chain of Trust: Decoding SSL Certificate Security Architecture – Understand the cryptographic foundations of trust and certificate security.
- Securely Connect to Redis and Utilize Benchmark Tools – Example of using tools like Stunnel for encrypted tunnels, applicable to agent security.
External Security Resources
- OWASP - Supply Chain Security
- NIST Cybersecurity Framework
- Center for Internet Security (CIS) Controls
Conclusion: Getting Started Today
You don't need to implement every technique in this article to be significantly more secure. You need to start somewhere and build from there.
Your First Steps
Immediate actions (this week):
- If you're running agents, move your API keys from plaintext files to 1Password or your cloud provider's secret service.
- Install Little Snitch or LuLu to see what your agent is actually doing on the network.
- Enable firewall logging on your machine and review it once.
Short-term improvements (next 2 weeks):
- Run your agents in Docker or Podman instead of directly on your machine.
- Set up a firewall allowlist for specific destinations your agent needs.
- Create a dedicated low-privilege user account for agent work.
Medium-term hardening (next month):
- Add a travel router to isolate agent machines from your main network.
- Set up DNS filtering with Pi-hole or Quad9.
- Configure container network restrictions to limit outbound access.
Recommendations for Your Situation
If you're just starting out with agent tools: Start with Docker or Podman. Create a dedicated low-privilege user account. Use Little Snitch to monitor what's happening. Use 1Password CLI for secrets. This gets you 80% of the way there with minimal complexity.
If you're running multiple agents or have sensitive data: Add a travel router to isolate your agent machine from your main network. Enable firewall rules to allow only necessary destinations. Set up DNS filtering with Pi-hole or Quad9. These additions take a few hours but provide strong boundaries.
If you're testing untrusted or experimental code: Use Colima or a lightweight VM. Combine it with the network isolation approaches above. Treat the machine as completely separate from your main environment.
The Key Insight
Isolation and monitoring work together. A container by itself isn't enough. A firewall by itself isn't enough. A good secrets manager by itself isn't enough. But layered together, they create real defense in depth.
Start with what makes sense for your environment. Document what you've set up so you can maintain it. Review your logs weekly. As your threat model changes or as you run more agents, add more layers.
The goal is not perfection. The goal is to be harder to compromise than the alternative, and to detect problems quickly when they do happen.
Security is a practice, not a destination. Build your practice, stay consistent, and adjust as needed. Your future self will thank you when an agent goes sideways, and the damage is contained instead of catastrophic.
Opinions expressed by DZone contributors are their own.
Comments