

User Authentication With Amazon Cognito
This article explains step by step guide that how quickly you can develop an angularJs Web/Mobile application and connect it to Amazon Cognito service to enable user management in your application and you can focus on writing application features.
Join the DZone community and get the full member experience.
Join For FreeIntroduction
In this article, I will walk you through that what is Amazon Cognito service and how you can use this for your user management, authentication, and authorization. I will create a simple web application using AngularJS with login/sign-up functionality, and I will showcase how easy it is to make it full fledge application with all user management functions handled using Amazon Cognito.
Prerequisites
This article assumes that you have a basic understanding of web application development. This article doesn’t require you to have advanced skills in using Angular or AWS, but having familiarity with these technologies will help you to get the most out of this. Here is a list of tools technologies I have used in this article.
- NodeJs CLI.
- Angular JS.
- Visual Studio code.
- Amazon AWS console.
- Amazon Amplify CLI.
What Is Amazon Cognito?
Amazon Cognito is an AWS directory service provided by amazon for easy and fast web/mobile application development. This service helps you manage your authentication, authorization and user management functions so that you can focus on your application management rather than managing users and authentication.
Cognito service offers an auto-scaled sign on/sign up using your own user pool and provide easy integration with social identity providers like Google, Facebook, Amazon or you can integrate with your own identity provider using SAML 2.0.
Why Use Cognito?
Cognito offers sign in and sign-up to you as a platform service so that you can focus more on building your application features. Below are some of the features
- Cognito provides S3 benefits: Simple, Secure, and Scalable.
- Low-cost directory service.
- Easy-open id and SAML 2.0 based connectivity.
- Federated access management.
- Hosted UI to focus on application development.
- Built-in integration with AWS resources for access control.
- Encryption and multifactor authentication support.
- All user management functions at ease, including, creation deletion, activation, deactivation, forget password flows, verification, etc.
Development Tools
To get started with the development of this application, we will need a code editor, I am using Visual Studio Code, as it is free, supports TypeScript syntax highlighting, and is easy to use, but you can use any source code editor to follow this article. We also need the node package manager to be available in your development environment and up to date.
We will be using AWS Amplify CLI to configuring AWS Cognito in our application, AWS Amplify is a utility provided by amazon to easily integrate javascript based applications and also provides utilities to automatically provision AWS backend using simple commands.
Functionality
In this application, I will be creating a login page that will be having a link to the user sign-up page. The user sign-up page will collect user information and allow users to register with our backend Cognito service. We will be utilizing Cognito user pools for authentication, with configuration to trigger emails to the user for their verification, once the user verifies him/herself then, he/she should be able to login to the application using our login page and then he will be redirected to our Home page displaying a sample message.
Getting Started
Now let’s start writing our application, open a terminal window, I assume at this point you already have node package manager installed on your machine and it is up to date.
Install Angular CLI
Type below command to install angular CLI:
npm install -g @angular/cli
Create a new angular application
Angular CLI allows you to create a new application by just typing a command and create a template web application, which you can modify and customize to serve your needs.
ng new cognito-demo-app
Once you type the above command it will ask you a few questions to customize your application.
Would you like to add Angular routing? Yes
Which stylesheet format would you like to use?
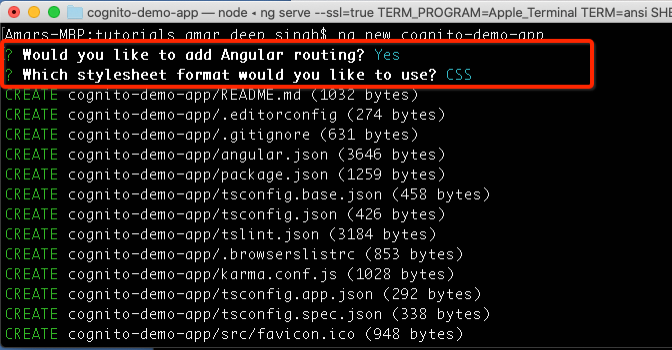
Answer these questions, as shown in the above image. Here, we are enabling routing in our application and using CSS to beautify our application. Once you hit enter this will create your application and add all angular and node dependencies, what you need to start the application.
Start the Angular Web Application
Now we have our application created so let's go-to the application directory using the below command and start the node server.
cd cognito-demo-app/
To start the node application type the below command and hit enter, here we are staring our server in SSL mode, which ensures that our communication to backend services is happening through a secure channel.
ng serve --ssl=true
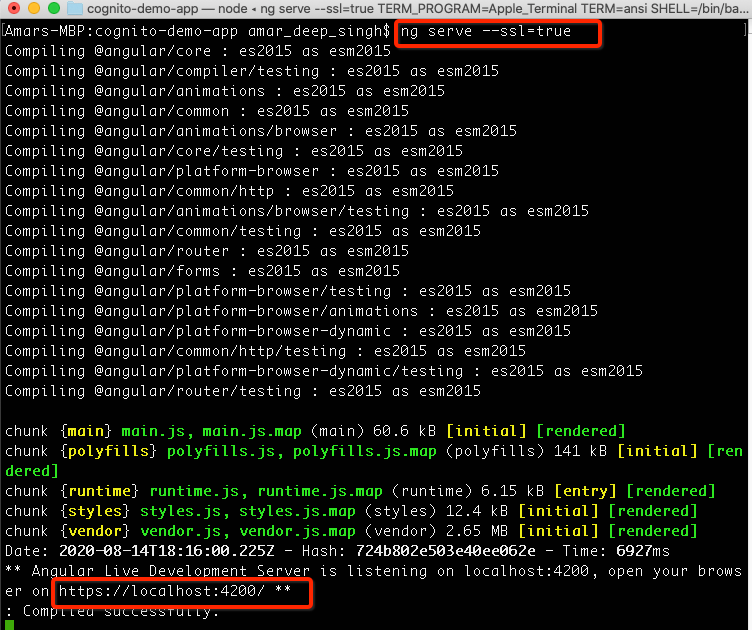
Now since the application is started, so let’s type below address in your browser and see our sample application.
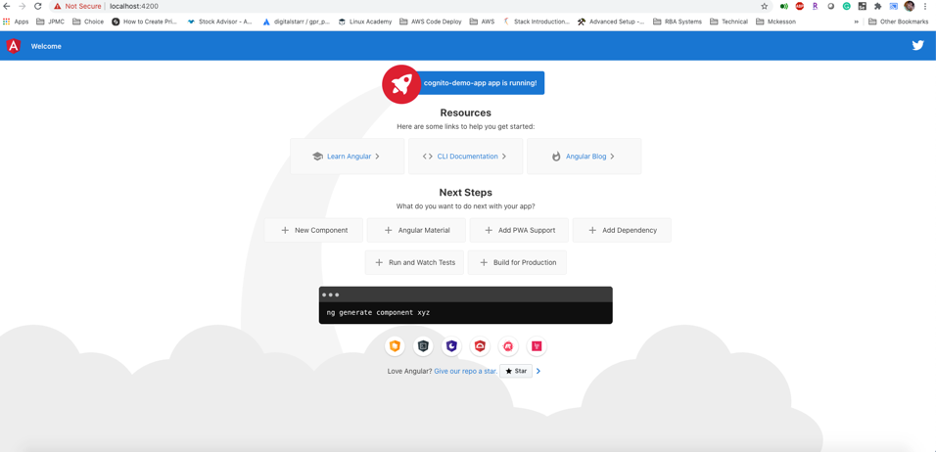
You can see that angular CLI has created the basic skeleton for application, now we will be customizing it to serve our need.
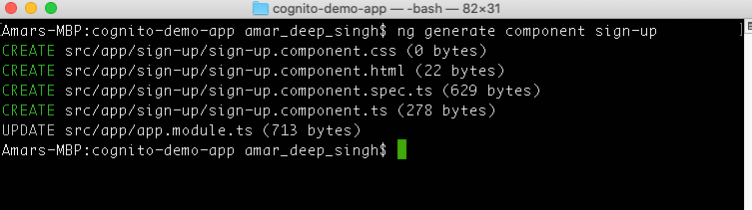
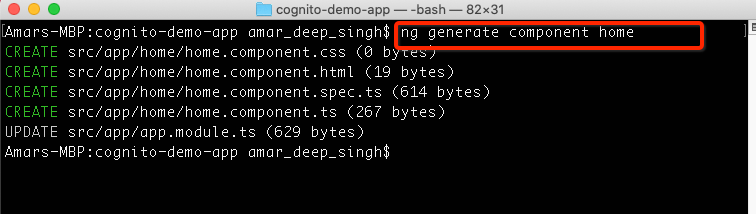
Let’s press ctrl/cmd + c on the console to stop ng server and type below command to generate few components which we will use. Angular CLI provides utility to generate new components.
ng generate component login
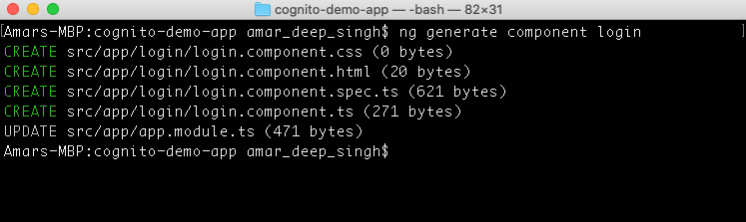
ng generate component sign-up
ng generate component home
Code Structure
Now, open your project with some code editor (here, I am using Visual Studio Code), which is lightweight and provides code syntax correction for typescript. The following screen shows the file structure of your application.
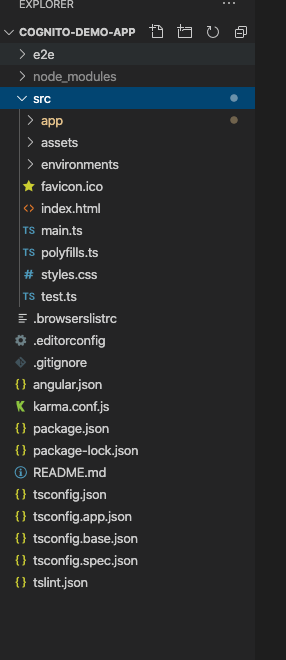
The src directory contains your source code, here are some of the import files/directories which we need to understand, this will be helpful for people who have limited knowledge or no prior experience with angularJS projects.
- package.json: This JSON file describes all your application dependencies.
- Index.html: This HTML file serves as the basis of your application and defines your single page application.
- styles.css: This is the application's main style sheet file and contains your application-level CSS classes.
- app-routing.module.ts: this file is located in src/app/app-routing.module.ts and contains your application flow and how a user navigates through your application.
- polyfills.ts: Polyfills in angular are few lines of code that make your application compatible for different browsers.
- app.module.ts: This file is located under src/app/app.module.ts and defines different angular modules and components and also used to configure aws-amplify in your application.
- app.component.html: This file contains the application structure, you can define headers/footer and a routing outlet in this file whose contents will be replaced based on the page you navigate to.
- Login component: This component has login related files, we will be using src/app/login/login.component.html to write HTML code and src/app/login/login.component.ts to write our logic to connect to Cognito service for authentication.
- Sign-up component: This component has user registration-related files, we will be using src/app/sign-up/sign-up.component.html to write HTML code and collect user information while src/app/sign-up/sign-up.component.ts to write code to connect to Cognito service for creating new users.
- Home-component: This component we will be keeping simple and wouldn’t be making changes to but we will navigate the user to this page on successful authentication.
User Interface
Now, we are familiar with our code structure so let’s get started and start making changes to our project. First, let's edit the file app-routing.module.ts and we will modify the empty routes array to a list of the paths so that the angular router can forward our request to correct components.
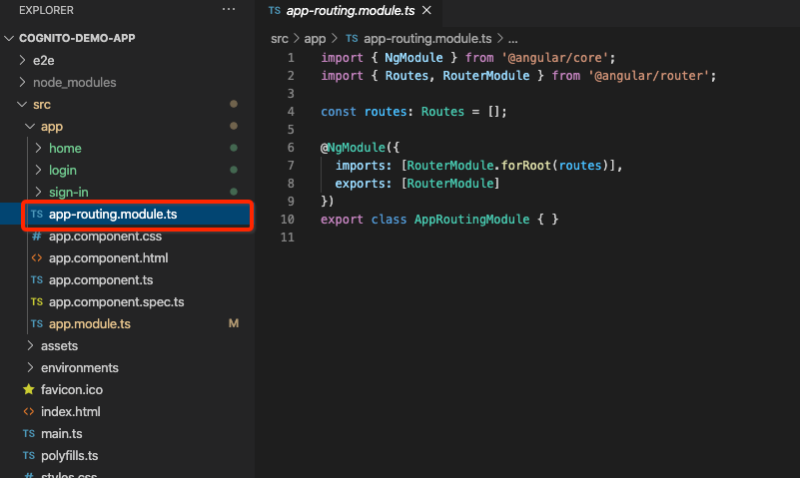
Open the file and change the routes array and define all paths in your application. You can copy and paste the below code:
import { NgModule } from '@angular/core';
import { Routes, RouterModule } from '@angular/router';
import { LoginComponent } from './login/login.component';
import { SignUpComponent } from './sign-up/sign-up.component';
import { HomeComponent } from './home/home.component';
const routes: Routes = [
{ path: '', pathMatch: 'full', redirectTo: 'login' },
{ path: 'login', component: LoginComponent },
{ path: 'sign-up', component: SignUpComponent },
{path:'home',component:HomeComponent}
];
@NgModule({
imports: [RouterModule.forRoot(routes)],
exports: [RouterModule]
})
export class AppRoutingModule { }
In this file now we have modified our routes array and defined login as our default route and if the user clicks on sign-up then angular will route the request to SignUpComponent.
Now open the styles.json file and copy below CSS code to the file. Here we are taking the default angular CSS for template and separating it in the application-level CSS file and also adding some custom styles.
xxxxxxxxxx
:host {
font-family: system, BlinkMacSystemFont, "Segoe UI", Roboto, Helvetica, Arial, sans-serif, "Apple Color Emoji", "Segoe UI Emoji", "Segoe UI Symbol";
font-size: 14px;
color: #333;
box-sizing: border-box;
font-smoothing: antialiased;
osx-font-smoothing: grayscale;
}
input{
width: 100%;
line-height: 2em;
}
label{
line-height: 2em;
font-weight: bold;
}
button{
background-color: #1976d2;
border: none;
color: white;
padding: 15px 32px;
text-align: center;
text-decoration: none;
display: inline-block;
font-size: 16px;
margin: 4px 2px;
cursor: pointer;
border-radius:0.5em;
}
h1,
h2,
h3,
h4,
h5,
h6 {
margin: 8px 0;
}
p {
margin: 0;
}
.spacer {
flex: 1;
}
.toolbar {
position: absolute;
top: 0;
left: 0;
right: 0;
height: 60px;
display: flex;
align-items: center;
background-color: #1976d2;
color: white;
font-weight: 600;
}
.toolbar img {
margin: 0 16px;
}
.toolbar #twitter-logo {
height: 40px;
margin: 0 16px;
}
.toolbar #twitter-logo:hover {
opacity: 0.8;
}
.content {
display: flex;
margin: 82px auto 32px;
padding: 0 16px;
max-width: 960px;
flex-direction: column;
align-items: center;
}
svg.material-icons {
height: 24px;
width: auto;
}
svg.material-icons:not(:last-child) {
margin-right: 8px;
}
.card svg.material-icons path {
fill: #888;
}
.card-container {
display: flex;
flex-wrap: wrap;
justify-content: center;
margin-top: 16px;
}
.card {
border-radius: 4px;
border: 1px solid #eee;
background-color: #fafafa;
height: 40px;
width: 200px;
margin: 0 8px 16px;
padding: 16px;
display: flex;
flex-direction: row;
justify-content: center;
align-items: center;
transition: all 0.2s ease-in-out;
line-height: 24px;
}
.card-container .card:not(:last-child) {
margin-right: 0;
}
.card.card-small {
height: 16px;
width: 168px;
}
.card-container .card:not(.highlight-card) {
cursor: pointer;
}
.card-container .card:not(.highlight-card):hover {
transform: translateY(-3px);
box-shadow: 0 4px 17px rgba(0, 0, 0, 0.35);
}
.card-container .card:not(.highlight-card):hover .material-icons path {
fill: rgb(105, 103, 103);
}
.card.highlight-card {
background-color: #1976d2;
color: white;
font-weight: 600;
border: none;
width: auto;
min-width: 30%;
position: relative;
}
.card.card.highlight-card span {
margin-left: 60px;
}
svg#rocket {
width: 80px;
position: absolute;
left: -10px;
top: -24px;
}
svg#rocket-smoke {
height: calc(100vh - 95px);
position: absolute;
top: 10px;
right: 180px;
z-index: -10;
}
a,
a:visited,
a:hover {
color: #1976d2;
text-decoration: none;
}
a:hover {
color: #125699;
}
.terminal {
position: relative;
width: 80%;
max-width: 600px;
border-radius: 6px;
padding-top: 45px;
margin-top: 8px;
overflow: hidden;
background-color: rgb(15, 15, 16);
}
.terminal::before {
content: "\2022 \2022 \2022";
position: absolute;
top: 0;
left: 0;
height: 4px;
background: rgb(58, 58, 58);
color: #c2c3c4;
width: 100%;
font-size: 2rem;
line-height: 0;
padding: 14px 0;
text-indent: 4px;
}
.terminal pre {
font-family: SFMono-Regular,Consolas,Liberation Mono,Menlo,monospace;
color: white;
padding: 0 1rem 1rem;
margin: 0;
}
.circle-link {
height: 40px;
width: 40px;
border-radius: 40px;
margin: 8px;
background-color: white;
border: 1px solid #eeeeee;
display: flex;
justify-content: center;
align-items: center;
cursor: pointer;
box-shadow: 0 1px 3px rgba(0, 0, 0, 0.12), 0 1px 2px rgba(0, 0, 0, 0.24);
transition: 1s ease-out;
}
.circle-link:hover {
transform: translateY(-0.25rem);
box-shadow: 0px 3px 15px rgba(0, 0, 0, 0.2);
}
footer {
margin-top: 8px;
display: flex;
align-items: center;
line-height: 20px;
}
footer a {
display: flex;
align-items: center;
}
.github-star-badge {
color: #24292e;
display: flex;
align-items: center;
font-size: 12px;
padding: 3px 10px;
border: 1px solid rgba(27,31,35,.2);
border-radius: 3px;
background-image: linear-gradient(-180deg,#fafbfc,#eff3f6 90%);
margin-left: 4px;
font-weight: 600;
font-family: system,BlinkMacSystemFont,Segoe UI,Helvetica,Arial,sans-serif,Apple Color Emoji,Segoe UI Emoji,Segoe UI Symbol;
}
.github-star-badge:hover {
background-image: linear-gradient(-180deg,#f0f3f6,#e6ebf1 90%);
border-color: rgba(27,31,35,.35);
background-position: -.5em;
}
.github-star-badge .material-icons {
height: 16px;
width: 16px;
margin-right: 4px;
}
svg#clouds {
position: fixed;
bottom: -160px;
left: -230px;
z-index: -10;
width: 1920px;
}
/* Responsive Styles */
@media screen and (max-width: 767px) {
.card-container > *:not(.circle-link) ,
.terminal {
width: 100%;
}
.card:not(.highlight-card) {
height: 16px;
margin: 8px 0;
}
.card.highlight-card span {
margin-left: 72px;
}
svg#rocket-smoke {
right: 120px;
transform: rotate(-5deg);
}
}
@media screen and (max-width: 575px) {
svg#rocket-smoke {
display: none;
visibility: hidden;
}
}
Now, replace the contents of app.component.html with the following code. In this, we are just deleting the default code that has been generated by angular for us. We are just keeping the header, but if you need to make any changes to this feel free to make that change.
xxxxxxxxxx
<div class="toolbar" role="banner">
<img width="40" alt="Angular Logo"
src="data:image/svg+xml;base64,PHN2ZyB4bWxucz0iaHR0cDovL3d3dy53My5vcmcvMjAwMC9zdmciIHZpZXdCb3g9IjAgMCAyNTAgMjUwIj4KICAgIDxwYXRoIGZpbGw9IiNERDAwMzEiIGQ9Ik0xMjUgMzBMMzEuOSA2My4ybDE0LjIgMTIzLjFMMTI1IDIzMGw3OC45LTQzLjcgMTQuMi0xMjMuMXoiIC8+CiAgICA8cGF0aCBmaWxsPSIjQzMwMDJGIiBkPSJNMTI1IDMwdjIyLjItLjFWMjMwbDc4LjktNDMuNyAxNC4yLTEyMy4xTDEyNSAzMHoiIC8+CiAgICA8cGF0aCAgZmlsbD0iI0ZGRkZGRiIgZD0iTTEyNSA1Mi4xTDY2LjggMTgyLjZoMjEuN2wxMS43LTI5LjJoNDkuNGwxMS43IDI5LjJIMTgzTDEyNSA1Mi4xem0xNyA4My4zaC0zNGwxNy00MC45IDE3IDQwLjl6IiAvPgogIDwvc3ZnPg==" />
<span>Cognito Demo App</span>
<div class="spacer"></div>
<a aria-label="Angular on twitter" target="_blank" rel="noopener" href="https://twitter.com/teach_me_more"
title="Twitter">
<svg id="twitter-logo" height="24" data-name="Logo" xmlns="http://www.w3.org/2000/svg" viewBox="0 0 400 400">
<rect width="400" height="400" fill="none" ></rect>
<path
d="M153.62,301.59c94.34,0,145.94-78.16,145.94-145.94,0-2.22,0-4.43-.15-6.63A104.36,104.36,0,0,0,325,122.47a102.38,102.38,0,0,1-29.46,8.07,51.47,51.47,0,0,0,22.55-28.37,102.79,102.79,0,0,1-32.57,12.45,51.34,51.34,0,0,0-87.41,46.78A145.62,145.62,0,0,1,92.4,107.81a51.33,51.33,0,0,0,15.88,68.47A50.91,50.91,0,0,1,85,169.86c0,.21,0,.43,0,.65a51.31,51.31,0,0,0,41.15,50.28,51.21,51.21,0,0,1-23.16.88,51.35,51.35,0,0,0,47.92,35.62,102.92,102.92,0,0,1-63.7,22A104.41,104.41,0,0,1,75,278.55a145.21,145.21,0,0,0,78.62,23"
fill="#fff" ></path>
</svg>
</a>
</div>
<div class="content" role="main">
<router-outlet></router-outlet>
</div>
If you see here there is one angular tag <router-outlet></router-outlet>, Angular uses this tag to dynamically replace the content with whatever page you are on, other things defined here will remain the same.
Now let’s bring up the node server and see that our application is still functioning and we have removed unnecessary angular documentation and other links from the application and our application page is looking much simpler.
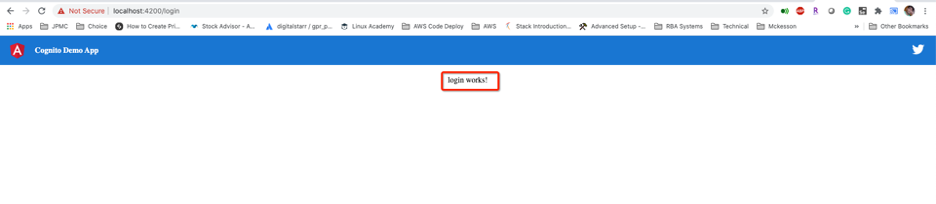
Now we will make changes to our login component and add HTML code to accept email address and password inputs from the user, we will also provide a link to the end-user to signup if he is not already registered with the application.
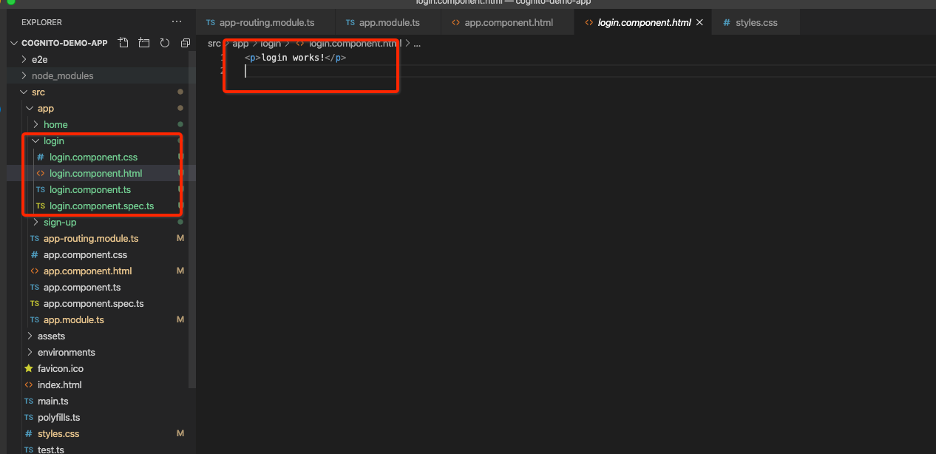
Open login.component.html and replace the content of the login page with the below HTML code.
xxxxxxxxxx
<form>
<div>
<label for="email">Email address</label>
<input type="email" name="email" [(ngModel)]="email" required placeholder="Enter your email">
</div>
<div>
<label for="password">Password</label>
<input type="password" name="password" [(ngModel)]="password" required id="password"
placeholder="Enter your password">
</div>
<div>
<br />
<button (click)="loginWithCognito()" class="btn btn-primary btn-block" type="button"> Log In </button>
</div>
</form>
<p class="text-dark mb-0">Not a member?<a href="/sign-up" class="text-primary ml-1">Sign Up now</a></p>
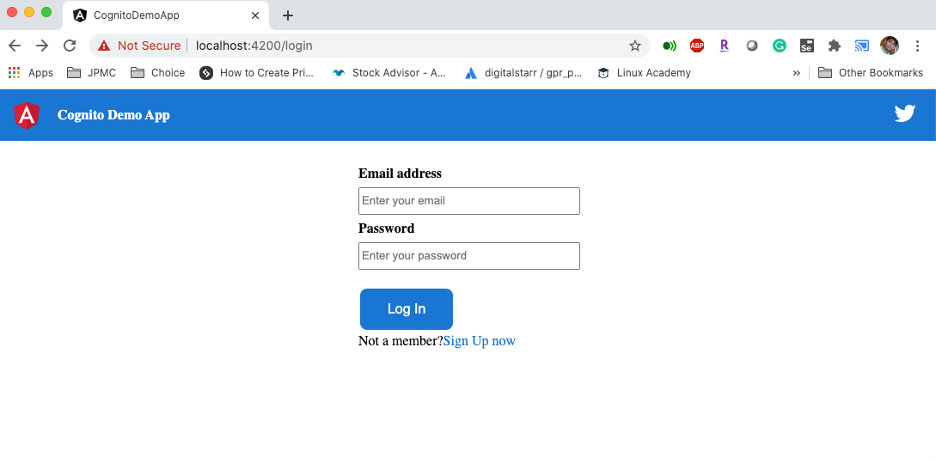
If you noticed we have an HTML form and added one submit button and 2 input fields with some angular code. Using [(ngModel)] directive we are binding these fields to our component properties, which we will be defining later. Similar way we have defined a click event on the Login button which will invoke a loginWithCognito function within our Login component which we still have to define.
Now we have our login form ready and you can see that in the browser, it is looking like a perfect login page with a link to the signup page.
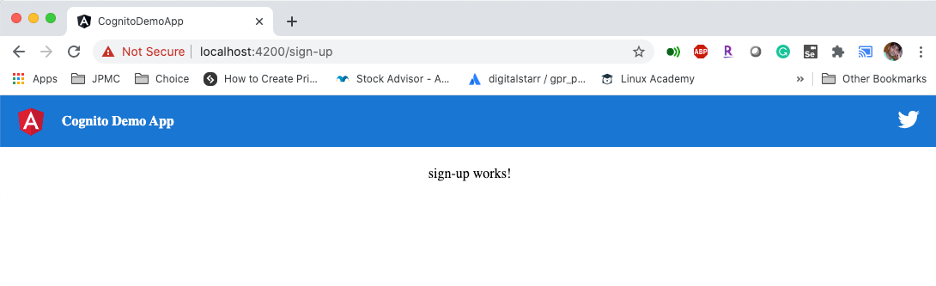
When you click on the sign-up page, it takes you to the sign-up component which is blank at this moment.
Now, let’s make changes to the sign-up page, and let's allow users to input their information to register with the application.
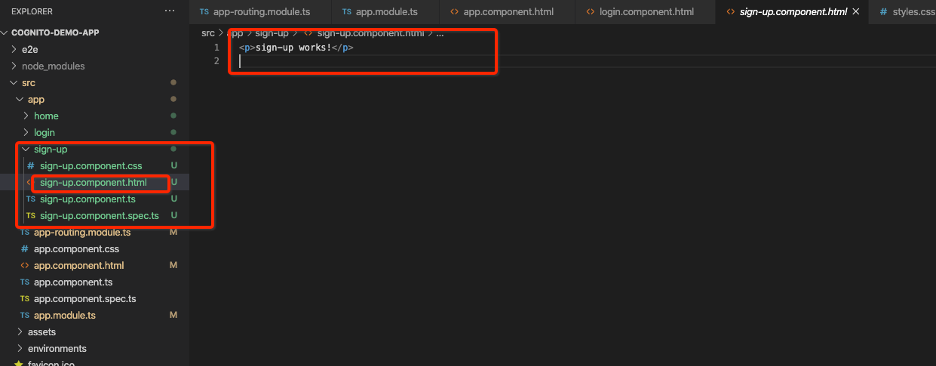
Copy and paste the below code to your sign-up.component.html page:
xxxxxxxxxx
<form>
<div>
<h1 >Register with My APP</h1>
</div>
<div>
<label for="givenName">First Name</label>
<input type="text" name="givenName" [(ngModel)]="givenName" required placeholder="Enter your first name">
</div>
<div>
<label for="familyName">Last Name</label>
<input type="text" name="familyName" [(ngModel)]="familyName" required placeholder="Enter your last name">
</div>
<div>
<label for="email">Email address</label>
<input type="email" name="email" [(ngModel)]="email" required placeholder="Enter your email">
</div>
<div>
<label for="password">Password</label>
<input type="password" [(ngModel)]="password" name="password" required placeholder="Enter your password">
</div>
<div>
<br />
<button (click)="register()" class="btn btn-primary btn-block" type="button"> Register </button>
</div>
</form>
<p class="text-dark mb-0">Already a member?<a href="/login" class="text-primary ml-1">Login</a></p>
This page is also plain HTML code where we are collecting user’s First Name, Last Name, email, and password information. We will be using the email address as a username in our application. These fields we will be binding to string properties in SignUpComponent and on click event of register button, we will be calling an angular function register, which will submit information to Cognito backend for user creation. If you refresh the webpage and click on the sign-up link you will see that now you have your sign-up page ready.
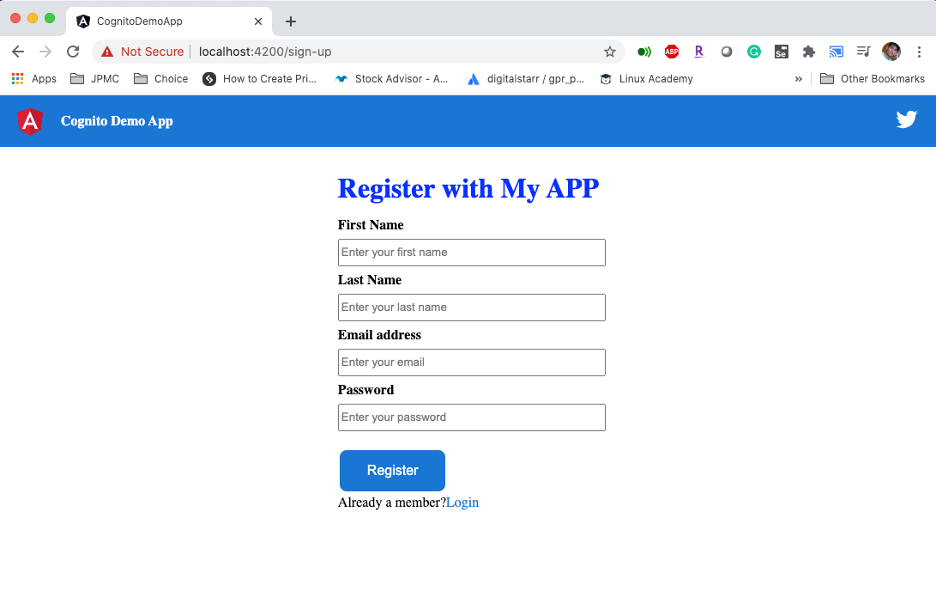
Now, our application user interface is ready and we are good to make changes to the application logic to make this page functional.
AWS Amplify Installation
Now before we make more changes to the page we need to install AWS amplify dependency. Let’s switch to terminal and install AWS amplify by typing the below command. AWS amplify is a javascript CLI that provides capabilities to connect to AWS services and provide required services for you to use in this article and it also allows provides utility methods to integrate with Cognito.
npm install aws-amplify
Now since you have installed AWS amplify, let's go and initialize amplify using the below command.
amplify init
This will ask you some questions to configure the project to utilize AWS amplify answer these question as shown below:
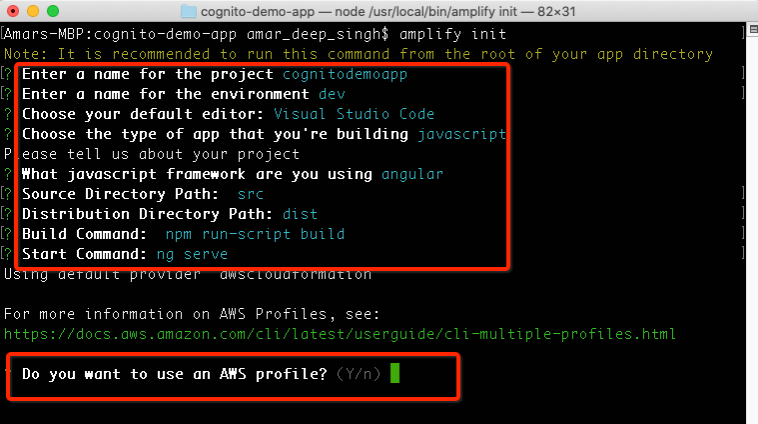
Enter a name for the project cognitodemoapp
Enter a name for the environment dev
Choose your default editor: Visual Studio Code
Choose the type of app that you are building : javascript
What javascript framework are you using: angular
Source Directory Path: src
Distribution Directory Path : dist
Build Command: npm run-script build
Start Command : ng serve
Do you want to use an AWS profile? (Y/n) n
Now, CLI will ask you for your AWS user access key and secret key to connect to your AWS account to provision your AWS resources, if you don’t have one, you can go ahead and log in to your AWS management console, navigate to IAM and create a new AWS user with administrator privilege and generate access/secret key for programmatic access. This step is only required if you want to provision your Cognito user pool using CLI, if you want to create these pools using AWS management console then you can ignore the following configuration, for this tutorial I am using CLI to configure the user pool.
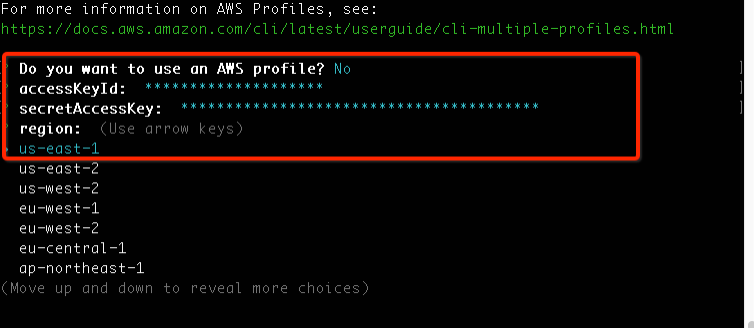
Once you provided your access key and secrete key and selected your preferred AWS region, AWS amplify will run the cloud formation template in the background and will create the required role it needed to interact.
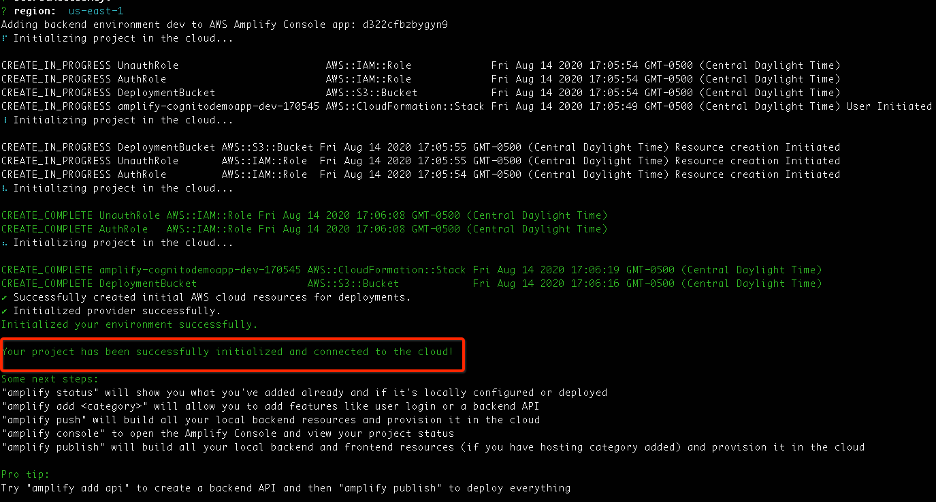
Now, we have our AWS amplify installed and configured, now let’s add the authentication module to enable Cognito in our project and create our user pool. Type below command to the console
amplify add auth
Once you enter the above command, amplify will ask you to configure your user pools and provide you options to select the configuration, I am using manual configuration here to walk you through different steps involved, later on, we will review this information.
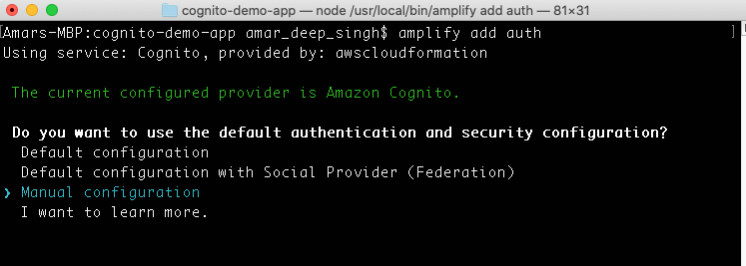
CLI will ask you bunch of questions to you, please answer as described below. Please be careful with this information, we will be able to modify some information later, but some of the information like user attributes, etc. Cognito doesn’t allow to modify later.
Do you want to use the default authentication and security configuration? Manual configuration
Select the authentication/authorization services that you want to use: User Sign
-Up & Sign-In only (Best used with a cloud API only)
Please provide a friendly name for your resource that will be used to label this
category in the project: cognitodemoapp
Please provide a name for your user pool: cognitodempapp-pool
Warning: you will not be able to edit these selections.
How do you want users to be able to sign in? Email
Do you want to add User Pool Groups? No
Do you want to add an admin queries API? No
Multifactor authentication (MFA) user login options: OFF
Email based user registration/forgot password: Enabled (Requires per-user email
entry at registration)
Please specify an email verification subject: Your verification code
Please specify an email verification message: Your verification code is {####}
Do you want to override the default password policy for this User Pool? No
Warning: you will not be able to edit these selections.
What attributes are required for signing up? (Press <space> to select, <a> to to
ggle all, <i> to invert selection)
❯◯ Address (This attribute is not supported by Facebook, Google, Login With Amazo
n.)
◯ Birthdate (This attribute is not supported by Login With Amazon.)
◉ Family Name (This attribute is not supported by Login With Amazon.)
◯ Middle Name (This attribute is not supported by Google, Login With Amazon.)
◯ Gender (This attribute is not supported by Login With Amazon.
Specify the app's refresh token expiration period (in days): 1
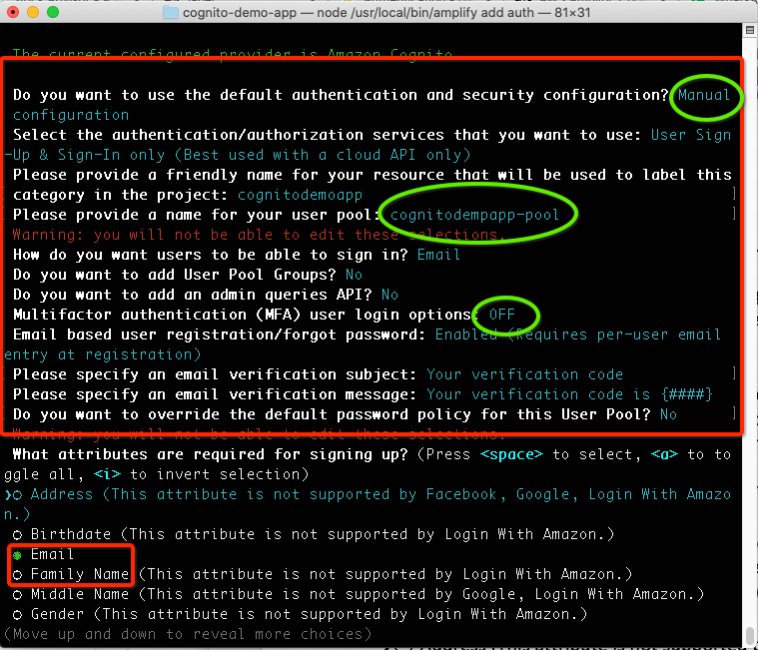
As shown above, be careful about the answers you choose for user sign-up required fields as you wouldn’t be able to change this information and your directory service wouldn’t allow you to create users without these attributes.

For this article, I am choosing Email, Family name, and Given name as a mandatory attribute for user sign-up where the email field is mapped to our user name and the First name maps to the given name attribute, and family names map to the last name on our user registration page. Be extra careful here as if you want to later integrate this information with open id providers all of these fields might not be supported by them.
The next section asks you information about what attribute you want your application to have access to read or write, select all attributes you think later you will be allowed to read or write.
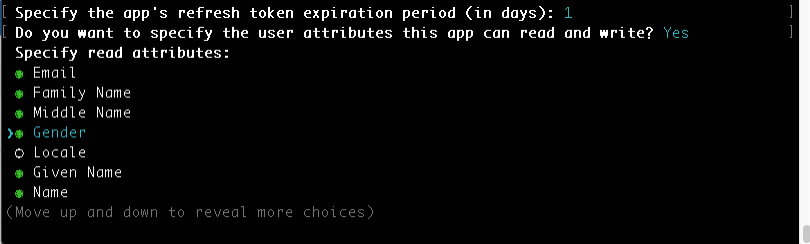
I have chosen Email, Family Name, Given Name, Gender, Name, Address birthdate, Email verified Phone verified etc. Look closely to below screen for a complete list. 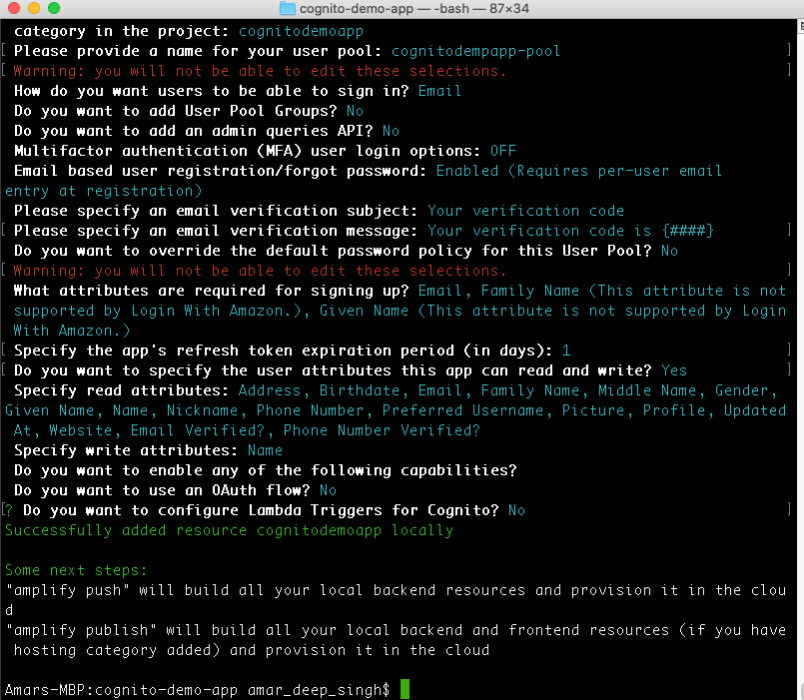
Answer the remaining questions as below:
Specify write attributes: Name
Do you want to enable any of the following capabilities?
Do you want to use an OAuth flow? No
Do you want to configure Lambda Triggers for Cognito? No
Now we have all of our configuration ready and completed, at this point nothing has been created in our AWS account, now let’s push this configuration and indicate amplify to provision our user pool. Enter the below command and hit enter.
amplify push
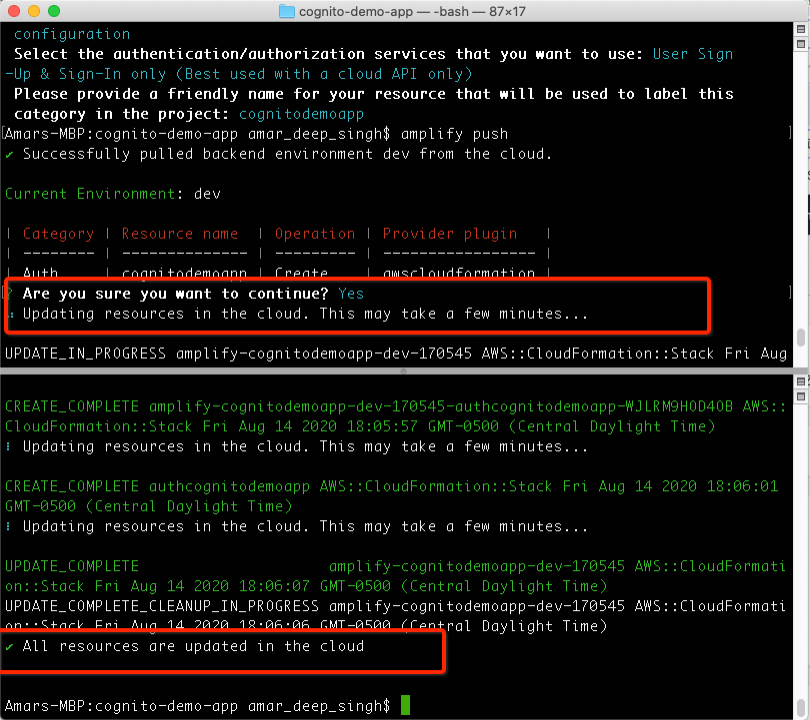
At this point, it will create the user pools in your AWS account. You can go ahead and log in to your AWS console and you will see that a new user pool got created.
Cognito User Pool Configuration
Login to AWS Console and Go to Cognito service, then select Create/Manage User pools, and then you will see your newly created user pool.
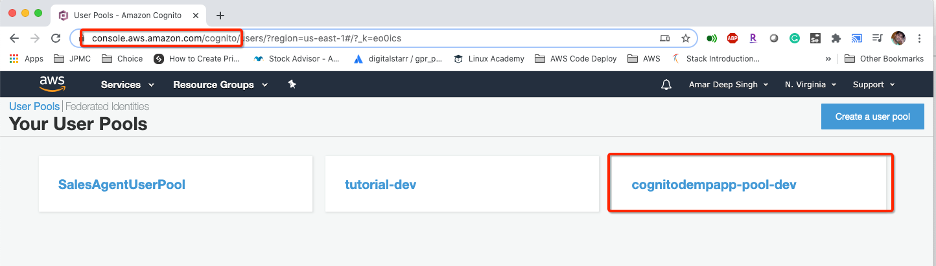
Now click on your user pool link and let's review the information in the AWS console. Notice that there is a create a user pool button at the top right corner, by using this you can alternatively create your user pools without using AWS amplify on the command line. Once you click the user pool link you will see the below information.
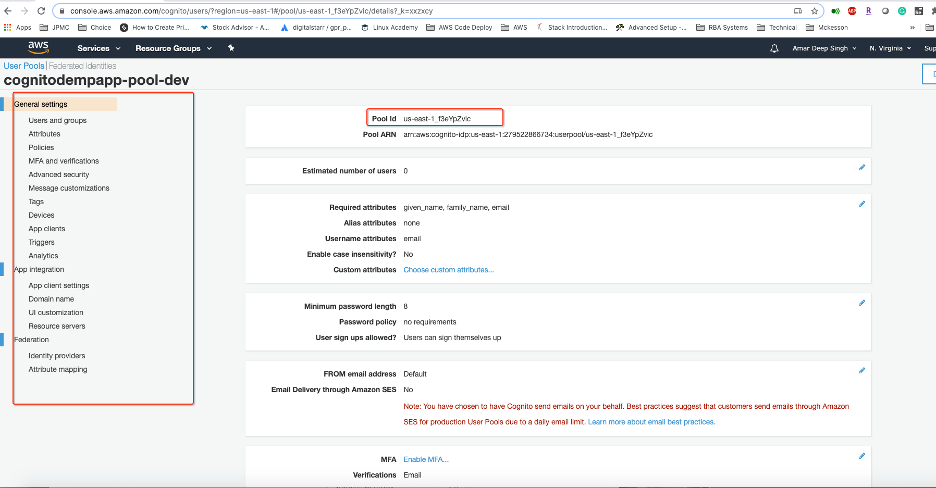
On the left side, you have different details related to user pools which you can customize, and on the right side you have your user pool details. Select and store your Pool Id.
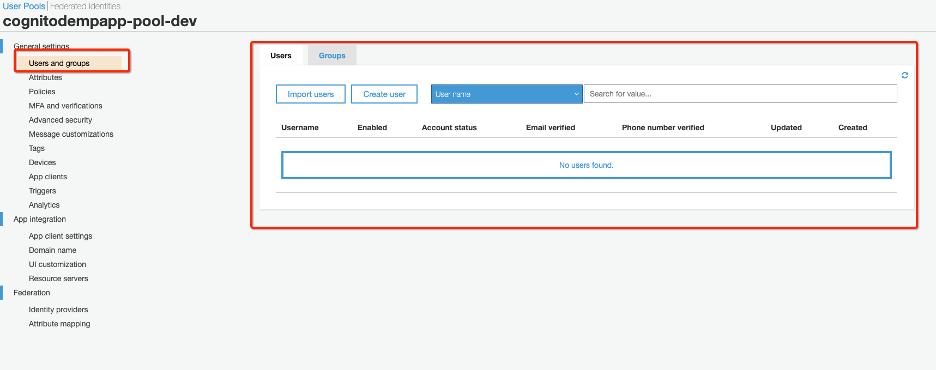
Click on users and groups and you will see a screen similar to below, which shows that there are no users yet in your user pool, but once we start registering users through our application you will see users listed here. If you want you can click the create user button below to manually create new users.
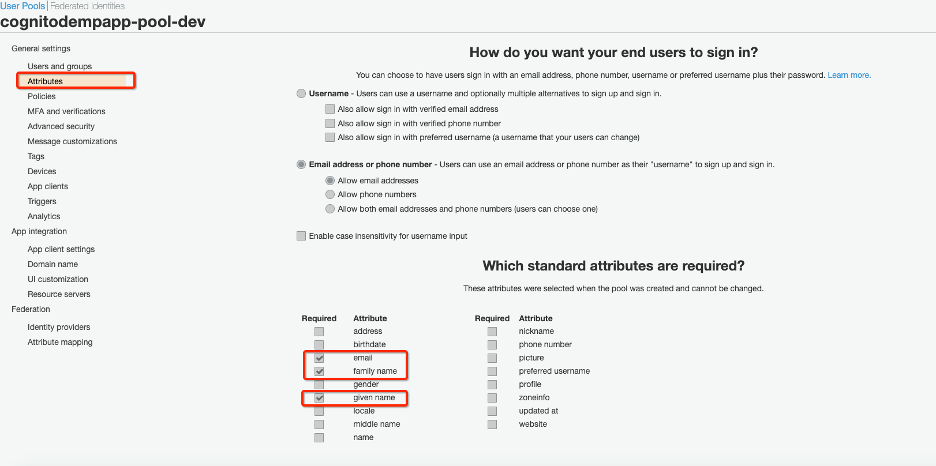
Now look at attributes, this is the section that shows details about attributes that we have chosen on amplify CLI and required for creating a user. If you notice here we have email, family name, and given name as required attributes while registering users, and also we have chosen to allow users to login using their email address. You can’t modify this information once the user pool is created.
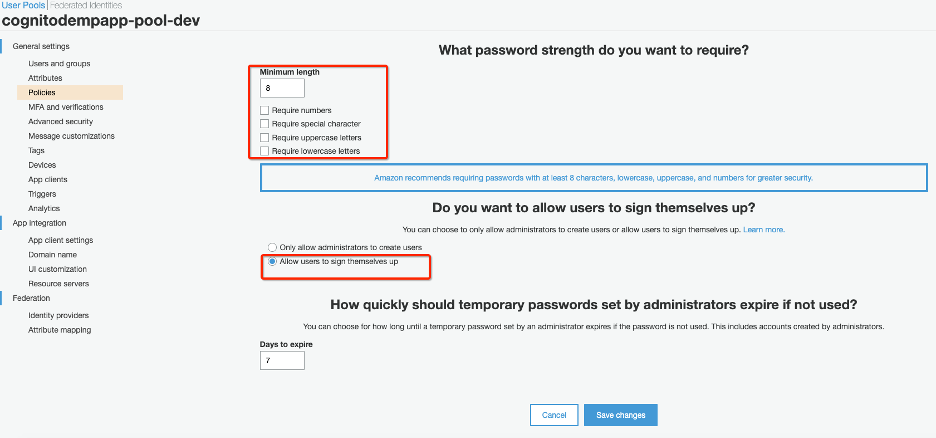
Policy section allows us to explain that what password strength is required to sign up and how users can sign-up to the application, this information can be modified at any point of time.
By default, I have not enabled MFA in our application, so I am skipping that configuration here and also ignoring the advanced setting, let's click on the message customization link on the left and review the information.
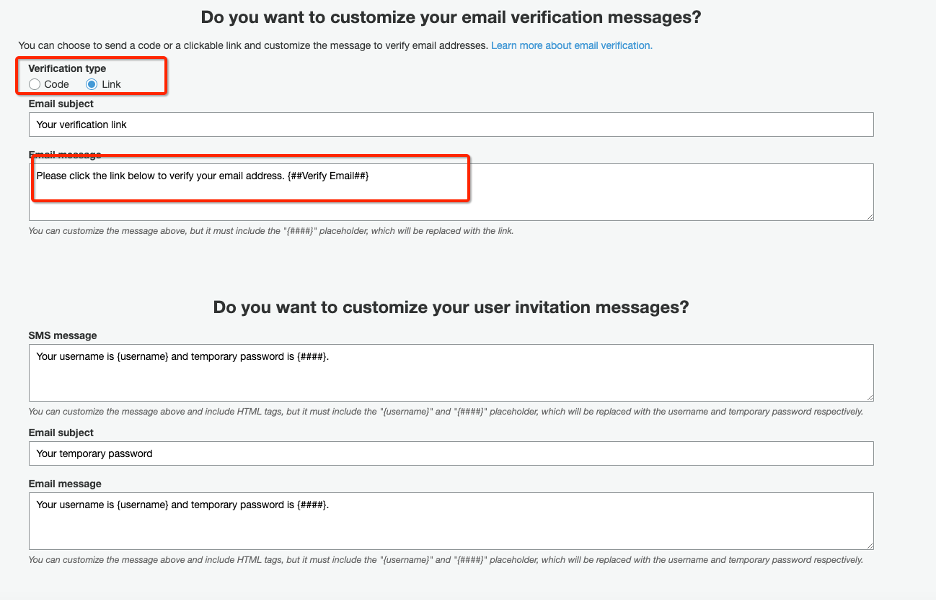
Change the verification type to link and customize the email message if you need to and click save. This configuration allows the Cognito service to send emails to the user on sign-up and the user should be able to click on verify the link and his/her account will get activated for login.
Now go to App Clients and note app client id and store it we will need it later in our application to connect to Cognito.
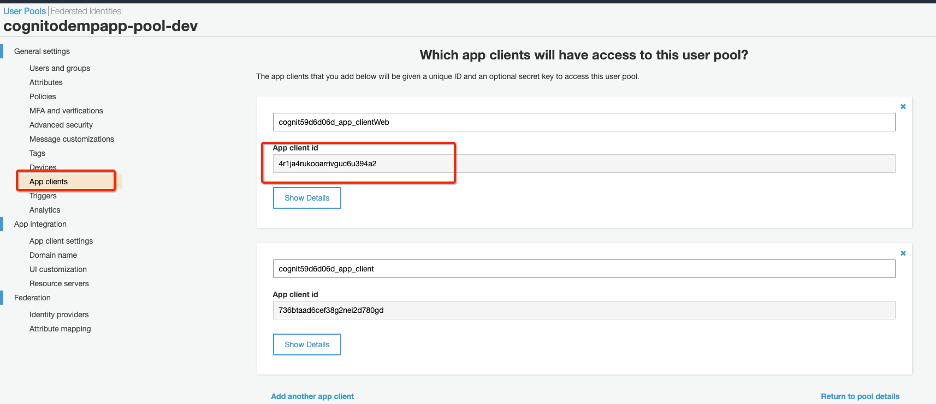
Now click on the Show Details button here and enable user name password authentication and click save app client changes as below.
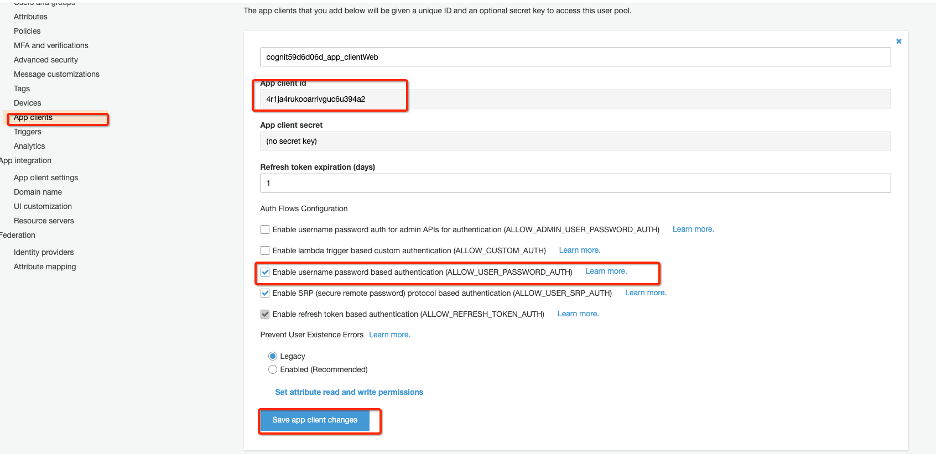
This setting is allowing us to utilize our user name password-based authentication for login and utilizing our user pool as our directory service. There are other types of configurations here which you can enable to provide different ways of login.
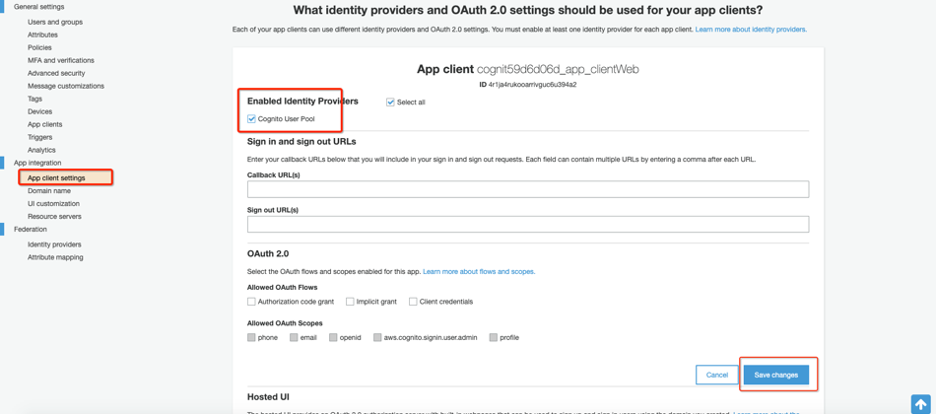
Now go to App client Settings and enable Cognito user pool. This setting allowing us to use our Cognito user pool for authentication, we can configure Cognito hosted UI as well here, but for this article, we are just using our own UI.
Now go to Domain name add your unique domain name and save the domain name.
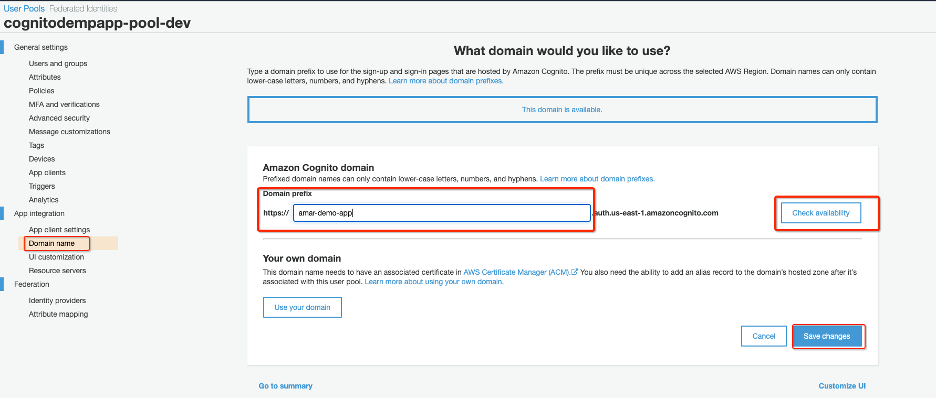
There are so many customizations you can do in Cognito user pool configuration, you can enable authentication with identity providers like Facebook, Google, Amazon, etc. Additionally, you can configure SAML based identity providers as well. You can configure to host UI directly by Cognito, but to keep this article simple we aren’t doing any additional changes here. We are just enabling the minimum required configuration.
Now we are done reviewing our user pool, let’s go back to our code editor and open the polyfills.ts file, this file has a single import line, paste the below code after that.
(window as any).global = window;
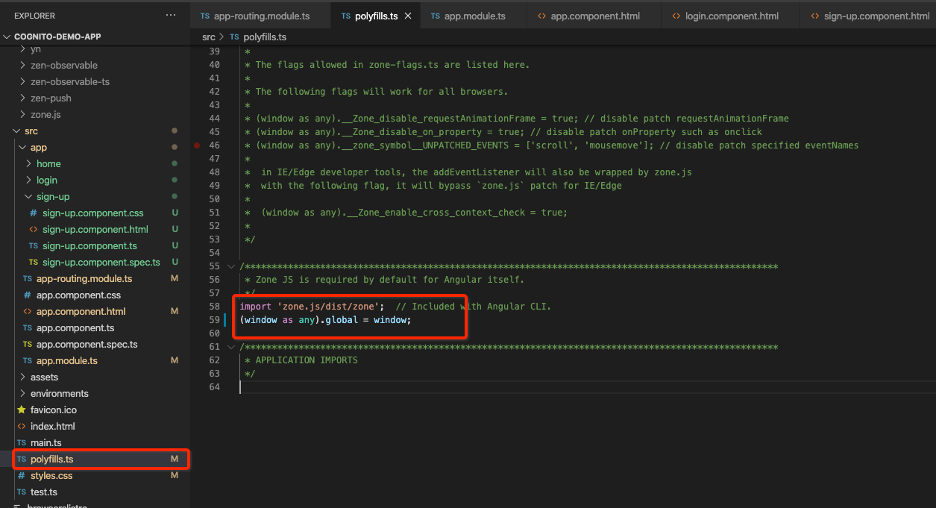
Now go the app.module.ts and copy-paste the below code, we are doing a couple of things here.
- We are importing the auth module from the AWS library here.
- We are configuring AWS amplify here so that it can communicate with the server-side. We need to use our userPoolId and userPoolWebClientId values what we noticed from our AWS console. This setting enables this client application to connect to the correct user pool and serve as the application id to the Cognito service.
- We are also importing FormModule so that we can use form binding in our angular forms.
xxxxxxxxxx
import { BrowserModule } from '@angular/platform-browser';
import { NgModule } from '@angular/core';
import Amplify, { Auth } from 'aws-amplify';
import { AppRoutingModule } from './app-routing.module';
import { AppComponent } from './app.component';
import { LoginComponent } from './login/login.component';
import { HomeComponent } from './home/home.component';
import { SignUpComponent } from './sign-up/sign-up.component';
import { FormsModule } from '@angular/forms';
Amplify.configure({
Auth:{
mandatorySignIn:true,
region: 'us-east-1',
userPoolId: 'YOUR_USER_POOL_ID',
userPoolWebClientId: 'YOUR_WEB_CLIENT_ID',
authenticationFlowType:'USER_PASSWORD_AUTH'
}
});
@NgModule({
declarations: [
AppComponent,
LoginComponent,
HomeComponent,
SignUpComponent
],
imports: [
BrowserModule,
AppRoutingModule,
FormsModule
],
providers: [],
bootstrap: [AppComponent]
})
export class AppModule { }
At this point we are done configuring AWS amplify Cognito, now let’s make a change to our login form to submit login information to the server and call the Cognito user pool for authentication.
Open login.component.ts file copy below copy paste below code. Notice a few things here
- We have imported Auth from aws-amplify to make a call to Cognito service for authentication
- We have added a method loginWithCognito to accept login requests from UI and then call cogito service.
- We have import Router from angular to enable us to navigate to the home page after successful login
- We are displaying an alert if there is any authentication error.
- We are asynchronously calling
Auth.signInmethod and passing email collected from the login form as username and password for authentication. This method will call the AWS Cognito service and authenticate the user against our user pool that we have configured.
xxxxxxxxxx
import { Component, OnInit, Input, inject, Inject } from '@angular/core';
import { Auth } from 'aws-amplify';
import { Router } from '@angular/router';
import { FormsModule } from '@angular/forms';
@Component({
selector: 'app-login',
templateUrl: './login.component.html',
styleUrls: ['./login.component.css'],
})
export class LoginComponent implements OnInit {
email: string = '';
password: string = '';
constructor(private router: Router) { }
ngOnInit(): void {
}
async loginWithCognito() {
try {
var user = await Auth.signIn(this.email.toString(), this.password.toString());
console.log('Authentication performed for user=' + this.email + 'password=' + this.password + ' login result==' + user);
var tokens = user.signInUserSession;
if (tokens != null) {
console.log('User authenticated');
this.router.navigate(['home']);
alert('You are logged in successfully !');
}
} catch (error) {
console.log(error);
alert('User Authentication failed');
}
}
}
No go to sign-up.component.ts and make a change to application to collect data from the sign-up form and submit it to Cognito. Copy-paste the below code and notice few things here.
- Similar to the login form, here we have imported the Auth module from AWS amplify.
- We have defined a few properties within this component to bind to our form elements and collect user-provided value, like First Name, Last Name, email, and password.
- We have defined a method register that will be triggered by the UI button when a user submits information.
- In the register method, we are making a call to AWS Cognito Auth.signUp method and passing our attribute, which is similar to what we have defined in our user pool. Here we are mapping email address to username
- On successful execution of the register method, it will create a user in our Cognito user pool and navigate UI to the login page, we can use the same credentials to log in to the application.
xxxxxxxxxx
import { Component, OnInit } from '@angular/core';
import {Auth} from 'aws-amplify';
import { FormsModule } from '@angular/forms';
import { Router } from '@angular/router';
import { THIS_EXPR } from '@angular/compiler/src/output/output_ast';
@Component({
selector: 'app-sign-up',
templateUrl: './sign-up.component.html',
styleUrls: ['./sign-up.component.css']
})
export class SignUpComponent implements OnInit {
email:string;
password:string;
givenName:string;
familyName:string;
constructor(private router:Router) { }
ngOnInit(): void {
}
register(){
try {
const user = Auth.signUp({
username: this.email,
password: this.password,
attributes: {
email: this.email,
given_name: this.givenName,
family_name: this.familyName
}
});
console.log({ user });
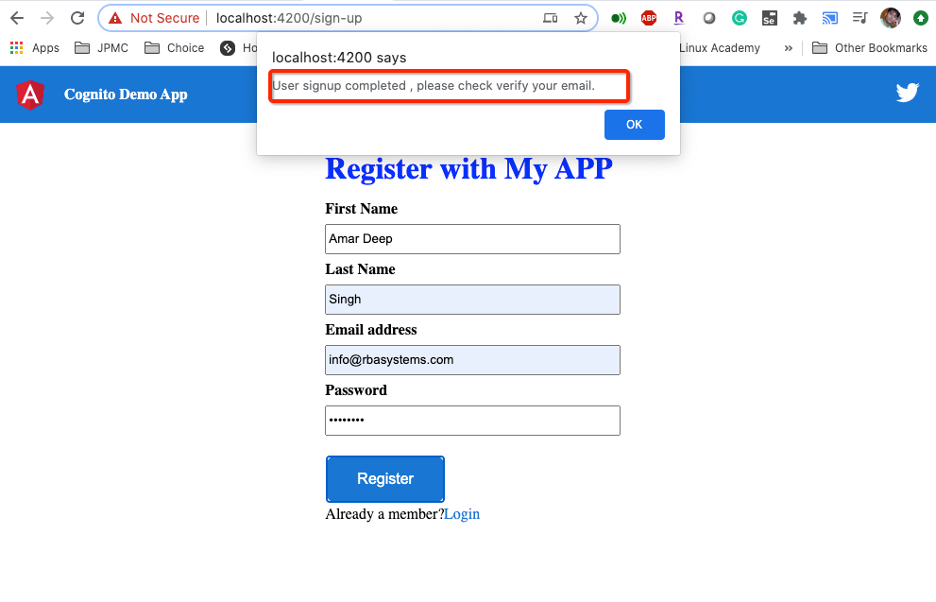
alert('User signup completed , please check verify your email.');
this.router.navigate(['login']);
} catch (error) {
console.log('error signing up:', error);
}
}
}
Work in Action
We are done writing our application, now it is time to see things in action. Let’s start the application using the below command.
ng serve --ssl=true
Now let’s load the application in the browser and click on the sign-up link and fill in user information and click the Register button. Please note that all of these fields are mandatory in our user pool and if we didn’t pass any one of them our user pool will throw an error.
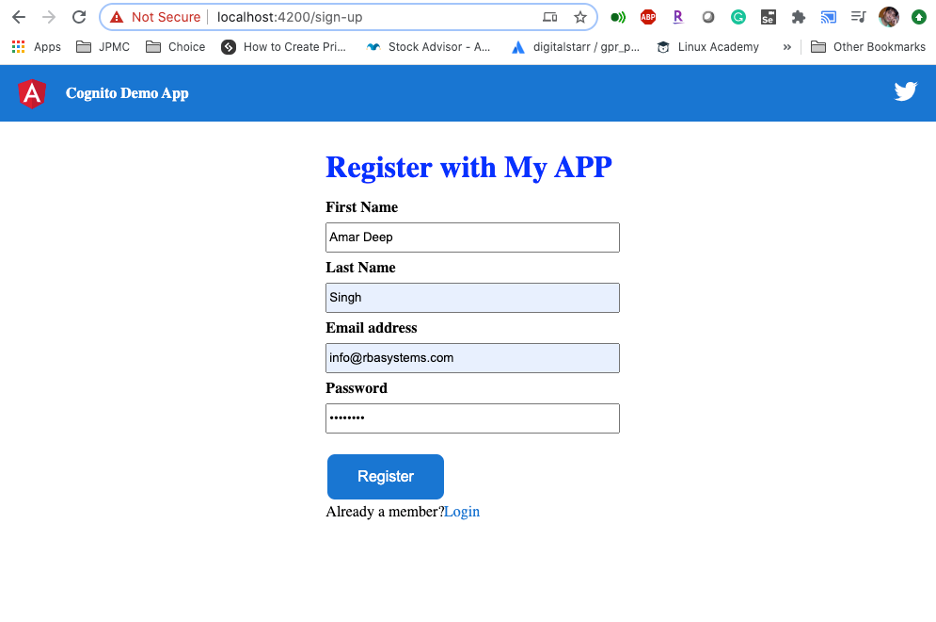
Once you click register, it will call Cognito User pool service and it will save data to the user pool. Our application is showing confirmation that the user is created successfully.
Now let’s login to the AWS console back and see if the user got created or not. You can see that the user got created in our user pool, but the status is unconfirmed. 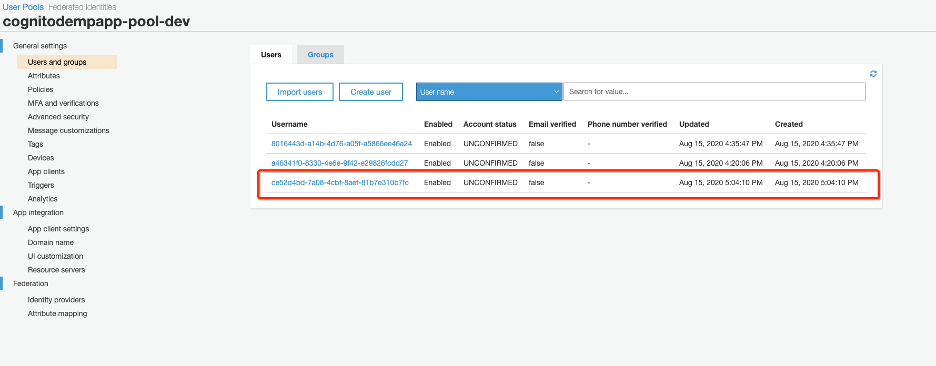
If you click on user details you will see that it is the same information that we entered on the screen. 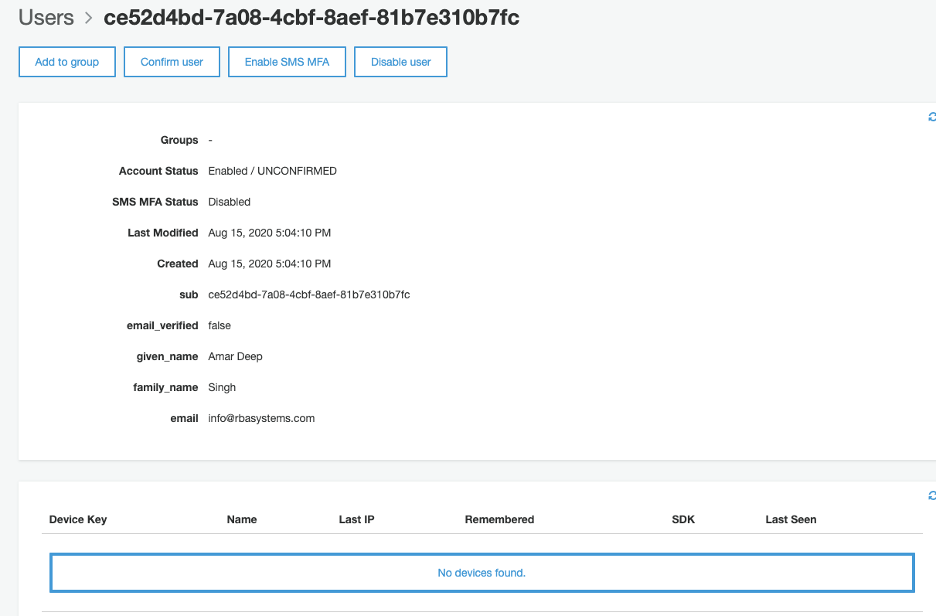
Since the user is created in the user pool, but still this user is not active and you need to go to your email and check for an email from Cognito service to verify the user's email address before he/she can log in to your application. Below is the sample email I got in my account, remember using the user pool setting in AWS, you can customize these emails.
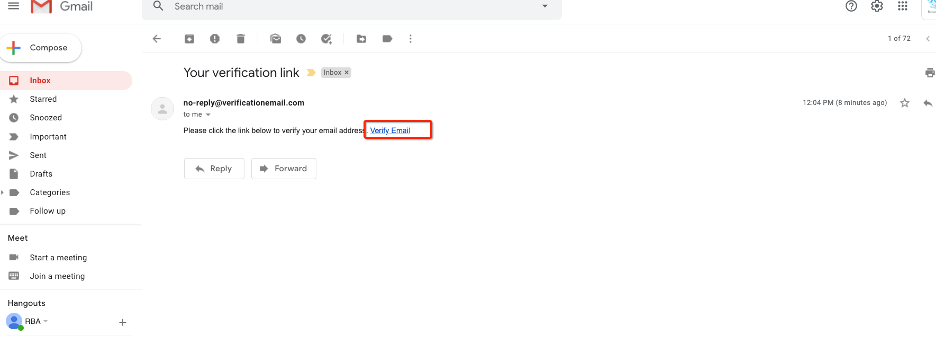
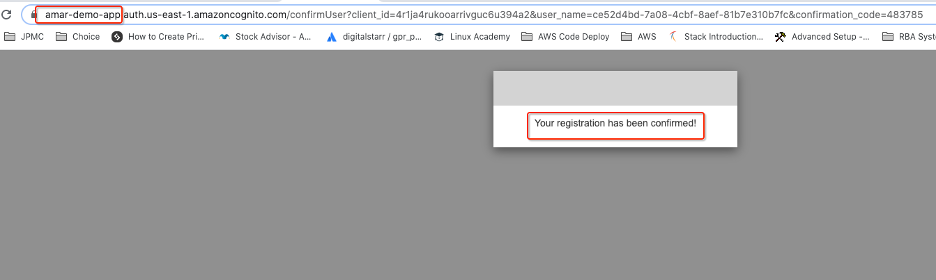
Now click verify email to verify your identity. Once you click on the link, you will see a verification page similar to below, you can customize this verification screen and redirect the URL using the user pool setting, but we are keeping things simple here.
Now since you verified the email, so let’s go and check user status in the user pool again.
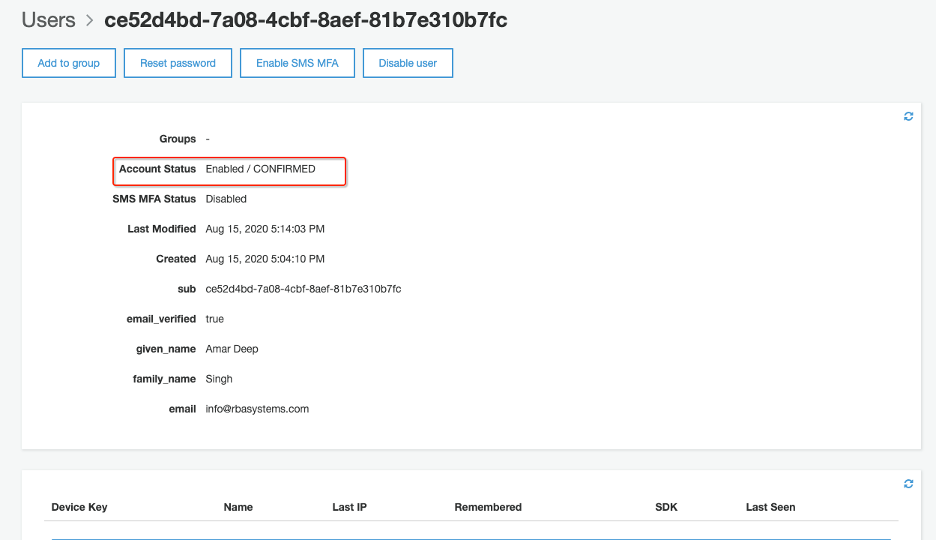
Now you can see that user status is confirmed and now we can try logging in to the application using the user name password we used.
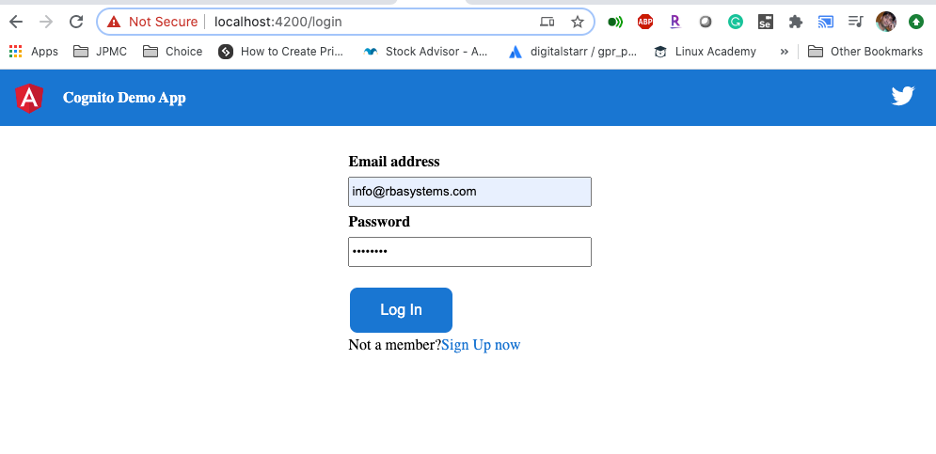
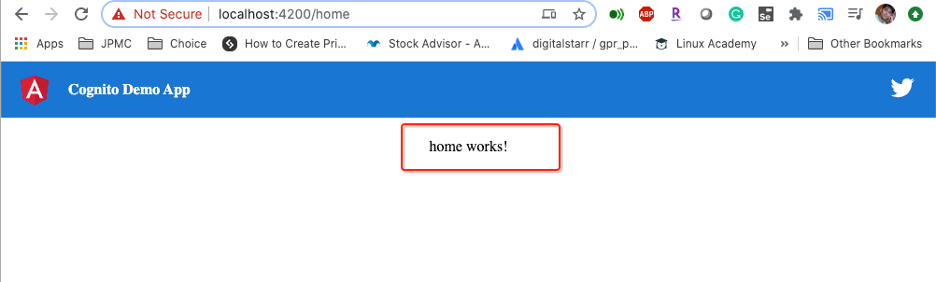
Once you clicked login, you can see that our username password authentication worked and we are redirected to our home page.
Conclusion
Now we are done creating our application and you can see how easy it was using AWS Cognito to enable user management in our application without writing code or provisioning directory service to save user information. We were able to register new users, trigger the notification to the user, verify user email address, authenticate users against directory service. All of this works great without writing too much code or provisioning a lot of infrastructures.
Cognito service provides 50,000 MAUS’s free for users who use user pools and after that, you have to pay a small fee based on your usage.
You can enable multifactor authentication very quickly in your applications, which can take a lot of effort if you have to do it by yourself. So this service allows developers or organizations to quickly focus on what they want to build by taking all user management and authentication heavy lifting.
Source Code
You can download source code from the Github repository https://github.com/teach-me-more/cognito-tutorial
References
AWS Amplify:: https://docs.amplify.aws/lib/auth/getting-started/q/platform/js
AWS Cognito:: https://aws.amazon.com/cognito/
AngularJs:: https://angular.io/guide/setup-local
Opinions expressed by DZone contributors are their own.
Comments