Using Azure AD With ASP.NET Core
You can use cloud tools to spice up your ASP.NET Core app. Azure Active Directories can help with user authentication and to customize usernames for a nicer appearance.
Join the DZone community and get the full member experience.
Join For Freeazure active directory is a cloud-based directory service that allows users to use their personal or corporate accounts to log into different applications. local active directories can sync data to their cloud counterparts, and external users are supported. this blog post shows how to make an asp.net core application using azure ad and how to read data that azure ad provides about user accounts.
to use azure ad, a valid microsoft azure subscription is needed. that also goes for azure ad services used by office 365.
using the wizard for azure ad authentication
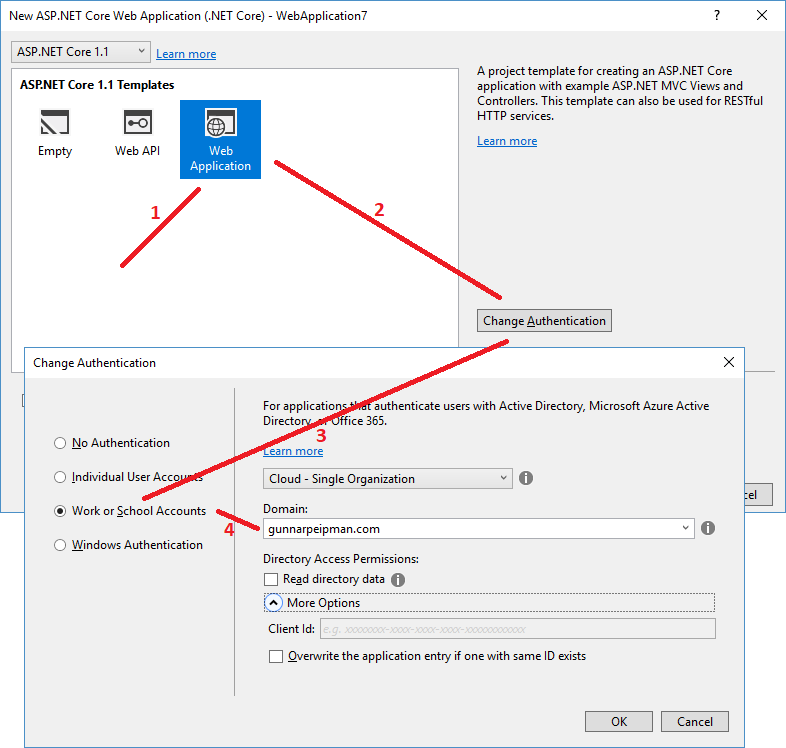
the simplest way to go about all this is adding azure ad support to your application using visual studio. visual studio 2017 allows you to add azure ad authentication for new applications. hopefully, there will soon be support for adding azure ads to existing applications. as this is a how-to style post, i will start with a new default application.
the steps are simple:
- create a new asp.net core application
- choose the template
- click on “change authentication”
- select “work or school accounts”
- choose the azure ad you want to use
- click “ok”
visual studio automatically adds a new configuration file with all the required configuration parameters, updates the startup class of the web application, and adds an account controller that coordinates the authentication processes. if everything went well, then we have an application that supports azure ad authentication and we can stop here.
manually connecting your application to an azure active directory
if we can’t use the nice wizard for some reason, then we can enable azure ad support manually. this section is a short guide on to how to do it. even if the visual studio wizard works, i suggest you go through the following sections of this blog post, as it gives you a better idea of how azure ad support is actually implemented.
add the following nuget packages to a web application:
- microsoft.aspnetcore.authentication.cookies
- microsoft.aspnetcore.authentication.openidconnect
add these settings to appsettings.json (this data can be found on the azure portal).
"authentication": {
  "azuread": {
    "aadinstance": "https://login.microsoftonline.com/",
    "callbackpath": "/signin-oidc",
    "clientid": "your client id",
    "domain": "your-domain.com",
    "tenantid": "your tenant id"
  }
}
we need to make a couple of changes to the startup class, too. we'll start with the configureservices() method. we add a call to addauthentication(), and then, to the configure() method, add the call to useopenidconnectauthentication.
public void configureservices(iservicecollection services)
{
    // add framework services.
    services.addmvc();       services.addauthentication(
        sharedoptions => sharedoptions.signinscheme =
                            cookieauthenticationdefaults.authenticationscheme
    );
}

public void configure(iapplicationbuilder app, ihostingenvironment env, iloggerfactory loggerfactory)
{
    loggerfactory.addconsole(configuration.getsection("logging"));
    loggerfactory.adddebug();// ...

    app.useopenidconnectauthentication(new openidconnectoptions
    {
        clientid = configuration["authentication:azuread:clientid"],
        authority = configuration["authentication:azuread:aadinstance"] + configuration["authentication:azuread:tenantid"],
        callbackpath = configuration["authentication:azuread:callbackpath"]
    });       app.usemvc(routes =>
    {
        routes.maproute(
            name: "default",
            template: "{controller=home}/{action=index}/{id?}");
    });
}
we need an additional controller to coordinate authentication operations. the tooling – when it works – adds automatically a new account controller. here is the code.
public class accountcontroller : controller
{
    [httpget]
    public iactionresult signin()
    {
        return challenge(
            new authenticationproperties { redirecturi = "/" }, openidconnectdefaults.authenticationscheme);
    }       [httpget]
    public iactionresult signout()
    {
        var callbackurl = url.action(nameof(signedout), "account", values: null, protocol: request.scheme);
        return signout(new authenticationproperties { redirecturi = callbackurl },
            cookieauthenticationdefaults.authenticationscheme, openidconnectdefaults.authenticationscheme);
    }       [httpget]
    public iactionresult signedout()
    {
        if (httpcontext.user.identity.isauthenticated)
        {
            return redirecttoaction(nameof(homecontroller.index), "home");
        }return view();
    }       [httpget]
    public iactionresult accessdenied()
    {
        return view();
    }
}
it’s easy to see from code that there are two views we need to add. here is the view for signedout action.
@{
    viewdata["title"] = "sign out";
}
<h2>@viewdata["title"].</h2>
<p class="text-success">you have successfully signed out.</p>
this is the view for the accessdenied action.
@{
    viewdata["title"] = "access denied";
}

<header>
    <h1 class="text-danger">access denied.</h1>
    <p class="text-danger">you do not have access to this resource.</p>
</header>
now we are done with coding. it’s time to try out azure ad authentication.
trying out azure ad authentication
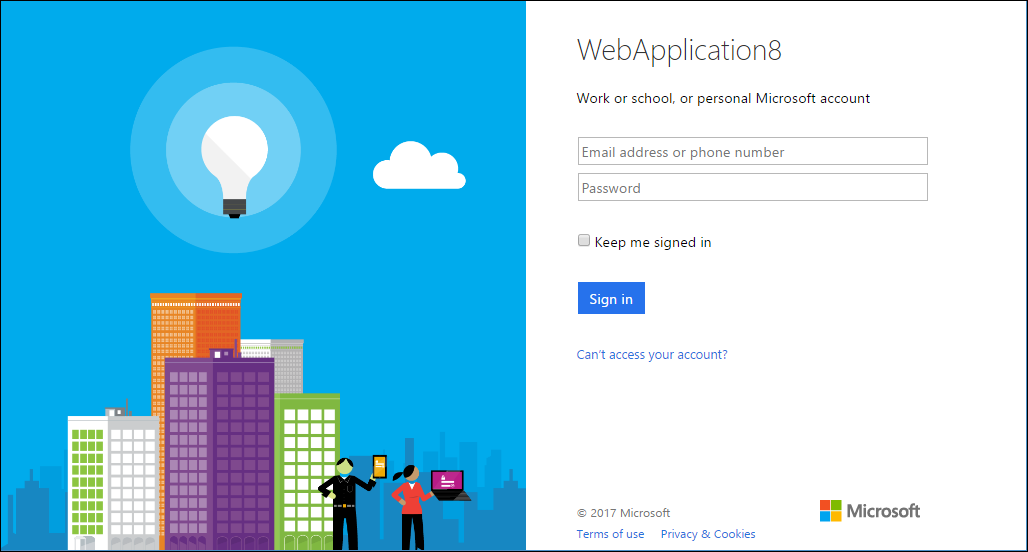
when we run our application, we are redirected to the identity provider login page. in my case, it is the microsoft account login page. take a look at the page title and notice my laziness.
after successful authentication, we are returned back to our application. notice that my username is not an e-mail address or guid or some long sequence of letters and numbers. it has a special format: <authentication provider>#<e-mail address>.
this username format is good for one thing – it is unique, and we can also use it when multiple active directories are available for application users.
what data do we get from azure ad?
the default username is not in a very user-friendly format, and the question is: what we can do to get something better there? well, it’s a claim-based authentication identity, and we should look at the claims collection of the user. as claims contain sensitive information, i don’t show a screenshot here, but i show the code that displays claims.
to display the claims that the current claim identity has, we have to send claims from controller to view. here is the index action of my home controller.
public iactionresult index()
{
    var claims = ((claimsidentity)user.identity).claims;
    return view(claims);
}
this code works only if we have identities of type claimsidentity. with other authentication mechanisms, we may have other identity types. to support different identitites in same code base, we need a more common way to detect user attributes.
to show claims on the front page, we use the following table.
@model ienumerable<system.security.claims.claim>
@{
    viewdata["title"] = "home page";
}

<div class="row">
    <div class="col-md-12">
        <table>
            <thead>
                <tr>
                    <th>claim</th>
                    <th>value</th>
                </tr>
            </thead>
            <tbody>
                @foreach(var claim in model)
                {
                    <tr>
                        <td>@claim.type</td>
                        <td>@claim.value</td>
                    </tr>
                }
            </tbody>
        </table>
    </div>
</div>
run the application, log in, and take a look at the table of claims. there is basic information about the user, like first name, last name, and e-mail address.
displaying a nice username
we usually don't have the best default names to display to users when they are logged into our site. let's look at the _loginpartial view under the shared views folder.
@using system.security.principal   @if (user.identity.isauthenticated)
{
    <ul class="nav navbar-nav navbar-right">
        <li class="navbar-text">hello @user.identity.name!</li>
        <li><a asp-area="" asp-controller="account" asp-action="signout">sign out</a></li>
    </ul>
}
else
{
    <ul class="nav navbar-nav navbar-right">
        <li><a asp-area="" asp-controller="account" asp-action="signin">sign in</a></li>
    </ul>
}
we add some additional code here to make this view display the full name of user. as we saw from the claims table, there is a claim called
name
. this is the claim we will use.
@using system.security.principal
@using system.security.claims
@{
    var claims = ((claimsidentity)user.identity).claims;
    var name = claims.firstordefault(c => c.type == "name")?.value;
} @if (user.identity.isauthenticated)
{
    <ul class="nav navbar-nav navbar-right">
        <li class="navbar-text">hello @name</li>
        <li><a asp-area="" asp-controller="account" asp-action="signout">sign out</a></li>
    </ul>
}
else
{
    <ul class="nav navbar-nav navbar-right">
        <li><a asp-area="" asp-controller="account" asp-action="signin">sign in</a></li>
    </ul>
}
instead of writing code to a partial view, we should use the view component and move this mark-up to some view of the view component. here, i just wanted to show how to get the full name of current user.
wrapping up
adding azure ad support to asp.net core applications is easy. it can be done using visual studio, but it also can be done manually. we needed a few additional configuration parameters, some lines of code, and a small change to login view. although asp.net core's default username doesn’t look nice, we were able to get user emails and full names from the claims collection from azure ad.
Published at DZone with permission of Gunnar Peipman, DZone MVB. See the original article here.
Opinions expressed by DZone contributors are their own.


Comments