Using Jenkins and Java for Continuous Integration
Join the DZone community and get the full member experience.
Join For FreeThis tutorial will teach you about:
- Pipeline configuration using a Jenkinsfile
- Managing third-party credentials
- Jenkins test reports integration
- Poll and hook build triggers
- Building pull requests
But first, let’s talk about Continuous Integration (CI). CI is a popular development practice that works as you validate—making sure software is high quality and deployable, as soon as you check in changes to the SCM.
There are a few key pieces that need to be in place in order to adopt CI:
- SCM system like Git and a shared repository
- A CI server (like Jenkins)
- Automated tests
- Teamwork CI practices that allow you to keep build times short, fix broken builds immediately, make frequent commits, and keep changes small
Required tools:
Running Jenkins

Jenkins is an open-source automation server developers can use for Continuous Integration, Continuous Delivery and Continuous Deployment. It is a fork from Hudson, a CI server written in Java at Sun Microsystems in 2004.
The Jenkins Pipeline is a suite of plugins you can use to automate builds, tests, and deployment. You can define the pipeline with specific syntax in a Jenkinsfile, which you can commit to a project’s repository and version, in a Pipeline-as-code model.
For a quick start, pull the Jenkins image from Docker HYub:
xxxxxxxxxx
docker pull jenkins/jenkins:lts
Then start a Jenkins container:
xxxxxxxxxx
docker run \
-p 8081:8080 \
-p 50000:50000 \
--name my-jenkins \
-v jenkins_data:/var/jenkins_home
jenkins/jenkins:lts
In the command above, we mapped Jenkins port 8080 to the host port 8081 and Jenkins port 50000 to the host port 50000. We also defined a volume for the Jenkins home, in the host folder jenkins_data.
When the container starts, the initial installation will run, and Jenkins will log the admin password:
xxxxxxxxxx
Jenkins initial setup is required. An admin user has been created and a password generated.
Please use the following password to proceed to installation:
b518968d266d41d3beb0abef50834fa7
This may also be found at: /var/jenkins_home/secrets/initialAdminPassword
Copy the password and go to http://localhost:8081 to do the initial setup.
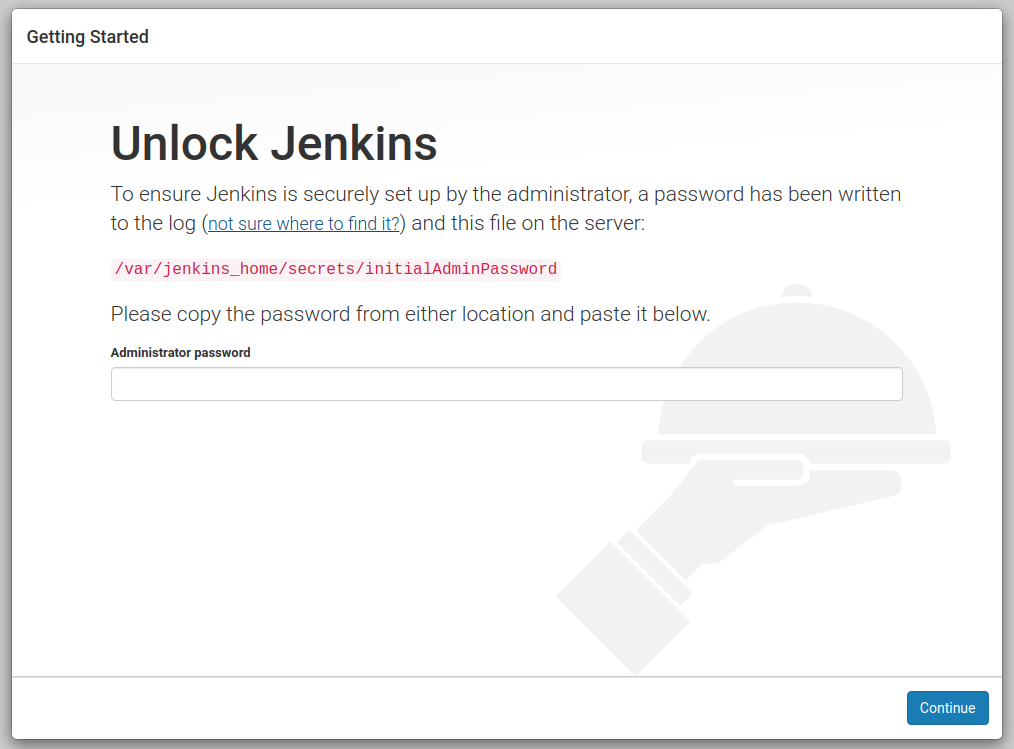
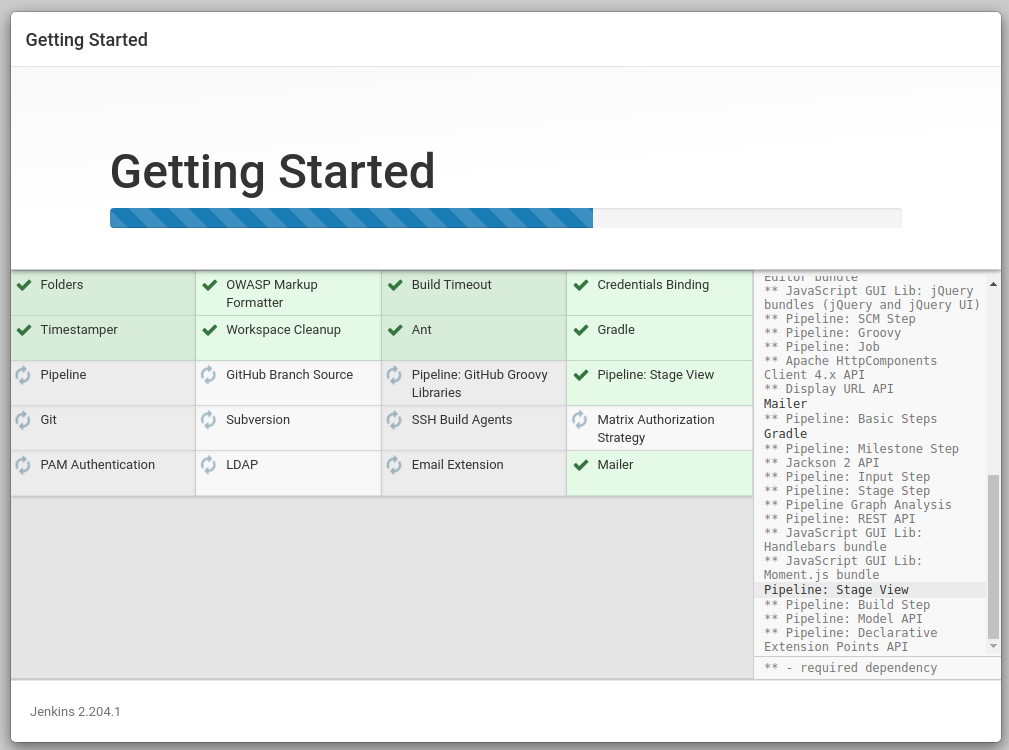
Paste the administrator password and continue. The setup process will give you the choice to customize the plugins you want to add. Choose Install Suggested Plugins and continue. Wait for the installation to complete.
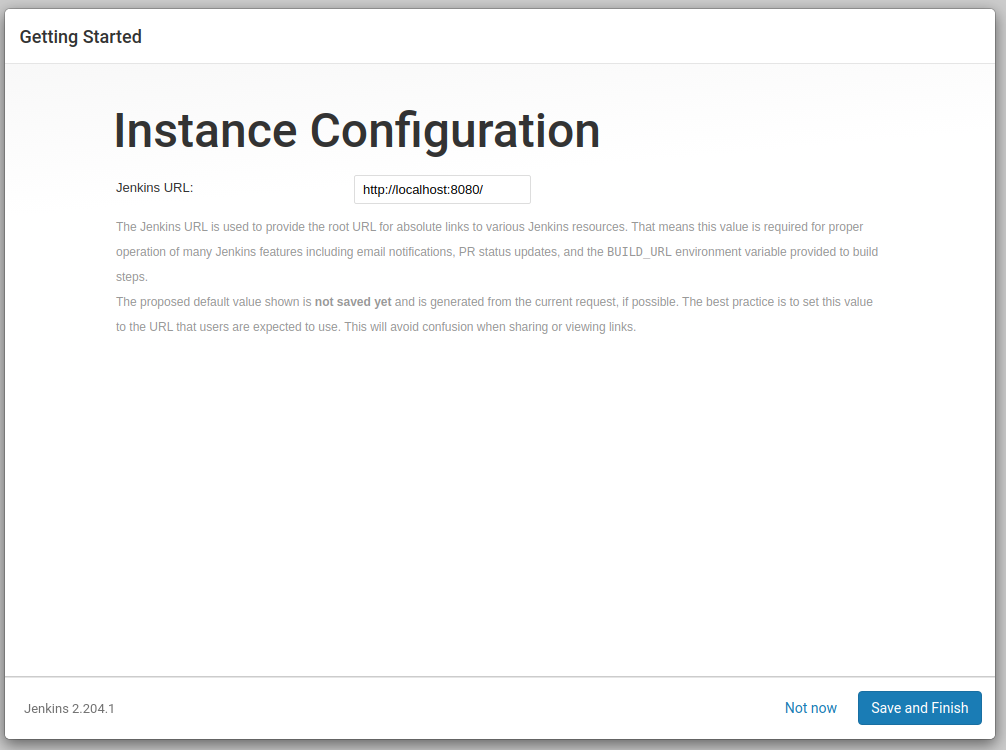
Set the admin user data and continue. As this is a test, leave the default Jenkins URL (http://localhost:8081/) and finish it.
We are ready to create the first Jenkins Pipeline.
Simple Application with Okta OIDC Authentication
We are going to use Jenkins to automate the build of a simple Java application with Okta OIDC authentication, so let’s first create the app with Spring Intializr:
xxxxxxxxxx
curl https://start.spring.io/starter.zip -d dependencies=web,okta \
-d language=java \
-d type=maven-project \
-d groupId=com.okta.developer \
-d artifactId=simpleapp \
-d name="Simple Application" \
-d description="Demo project for Jenkins CI test" \
-d packageName=com.okta.developer.simpleapp \
-o simple-app.zip
Unzip the file:
xxxxxxxxxx
unzip simple-app.zip -d simple-app
cd simple-app
If you don’t have an Okta developer account already, execute the Okta Maven Plugin to create one (for free!) and configure the authentication in the app:
xxxxxxxxxx
./mvnw com.okta:okta-maven-plugin:setup
You should see the following output:
xxxxxxxxxx
First name: Jimena
Last name: Garbarino
Email address: ***
Company: ***
Creating new Okta Organization, this may take a minute:
OrgUrl: ***
Check your email address to verify your account.
Writing Okta SDK config to: /home/indiepopart/.okta/okta.yaml
Configuring a new OIDC, almost done:
Created OIDC application, client-id: ***
Check your email and follow the instructions to activate your Okta account.
The Maven plugin will generate the OIDC client ID, secret, and issuer URL in src/main/resources/application.properties. As we are going to use a public GitHub repository for the CI test, copy the credentials somewhere else, and delete them from the properties file.
If you already have an Okta Developer account, sign in and create a new application: - From the Applications page, choose Add Application. - On the Create New Application page, select Web. - Give your app a memorable name, and add http://localhost:8080/login/oauth2/code/okta as Login redirect URIs.
Copy the issuer (you can find it under API > Authorization Servers), client ID, and client secret for later.
Add A REST Controller
Create a GreetingController class to greet the user on login.
xxxxxxxxxx
package com.okta.developer.simpleapp;
import org.springframework.security.core.annotation.AuthenticationPrincipal;
import org.springframework.security.oauth2.core.oidc.user.OidcUser;
import org.springframework.web.bind.annotation.GetMapping;
import org.springframework.web.bind.annotation.RestController;
public class GreetingController {
("/greeting")
public String greet( OidcUser user){
return "Hello " + user.getEmail();
}
}
Test the application with the Maven Spring Boot plugin:
xxxxxxxxxx
OKTA_OAUTH2_CLIENT_ID={youtOktaClientId} \
OKTA_OAUTH2_CLIENT_SECRET={yourOktaClientSecret} \
OKTA_OAUTH2_ISSUER={yourOktaDomain}/oauth2/default \
mvn spring-boot:run
Go to http://localhost:8080/greeting. The app should redirect to Okta for the login:
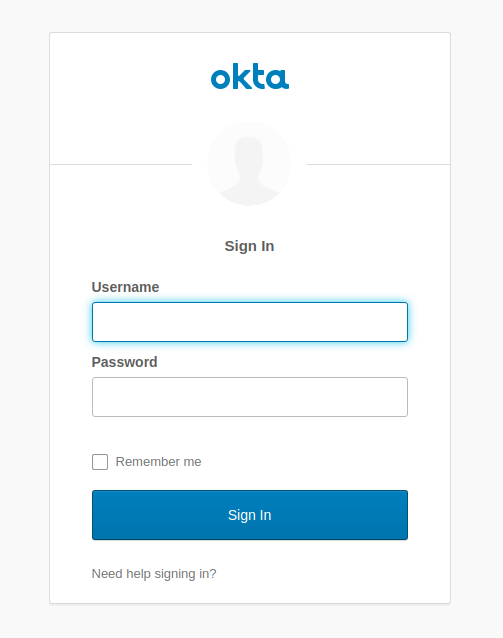
After the login, the app should display the greeting response:
xxxxxxxxxx
Hello jimena***.com
Create a GitHub public repository for the simple-app and follow the instructions to push your existing code.
xxxxxxxxxx
git init
git add .
git commit -m "initial commit"
git remote add origin https://github.com/<your-username>/simple-app.git
git push -u origin master
Jenkins Pipeline and the Jenkinsfile
In the Jenkins dashboard, select Create New Jobs, set simple-app as the item name, and select Pipeline as the project type.
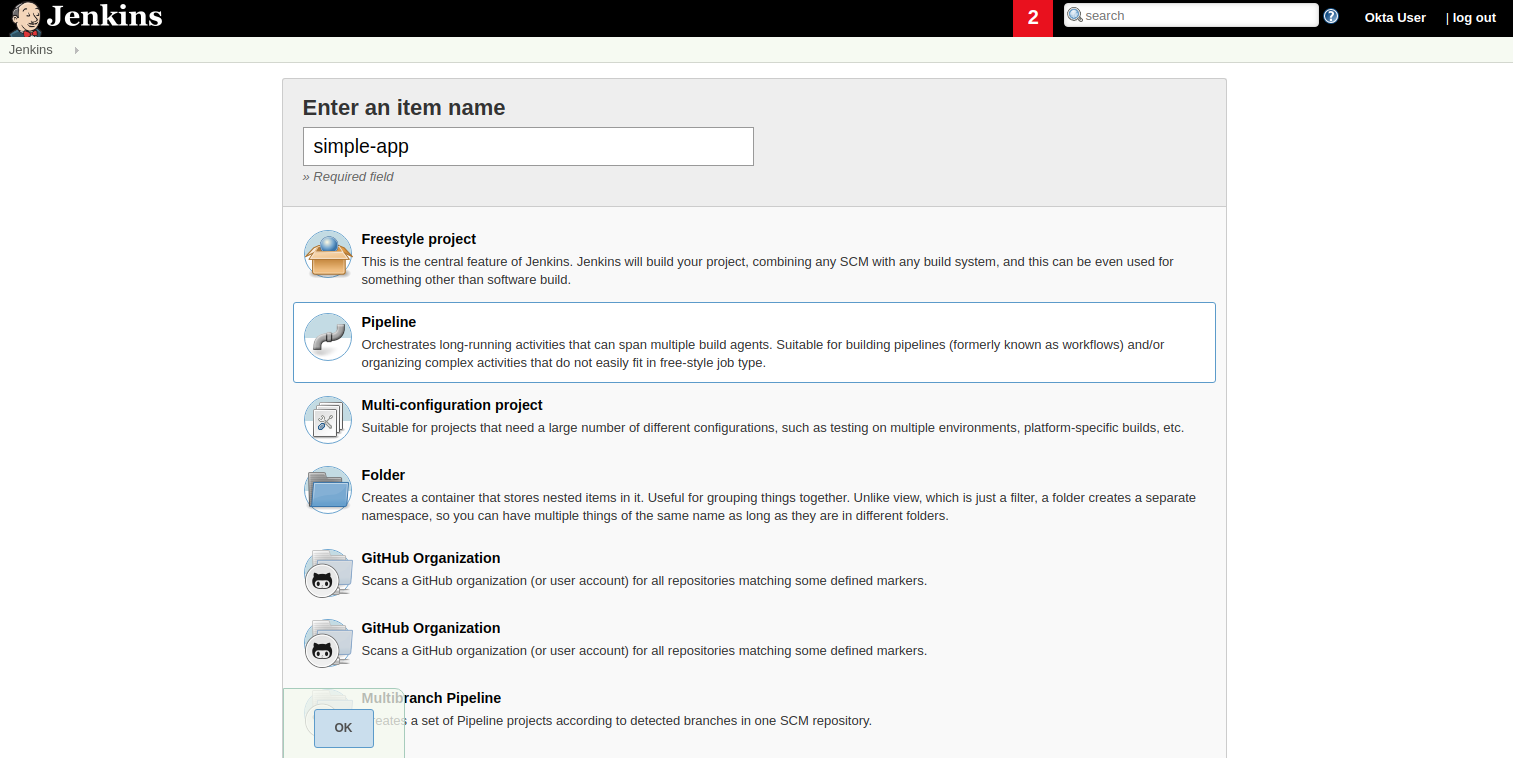
In the next screen, select the tab Advanced Project Options. From the drop-down menu on the right, select GitHub + Maven to get the Jenkinsfile template we are going to customize.
Copy the pipeline script to a file in the root of the simple-app project named Jenkinsfile. Update the GitHub repository URL and set up the Okta credentials for the build. Also change the Maven command to use the wrapped Maven in the project.
xxxxxxxxxx
pipeline {
agent any
environment {
// use your actual issuer URL here and NOT the placeholder {yourOktaDomain}
OKTA_OAUTH2_ISSUER = '{yourOktaDomain}/oauth2/default'
OKTA_OAUTH2_CLIENT_ID = credentials('OKTA_OAUTH2_CLIENT_ID')
OKTA_OAUTH2_CLIENT_SECRET = credentials('OKTA_OAUTH2_CLIENT_SECRET')
}
stages {
stage('Build') {
steps {
// Get some code from a GitHub repository
git 'https://github.com/<your-username>/simple-app.git'
// Run Maven on a Unix agent.
sh "./mvnw -Dmaven.test.failure.ignore=true clean package"
// To run Maven on a Windows agent, use
// bat "mvn -Dmaven.test.failure.ignore=true clean package"
}
post {
// If Maven was able to run the tests, even if some of the test
// failed, record the test results and archive the jar file.
success {
junit '**/target/surefire-reports/TEST-*.xml'
archiveArtifacts 'target/*.jar'
}
}
}
}
}
We are using the environment directive of the pipeline syntax to define the OKTA_* variables the build requires. The directive supports a credentials() helper to retrieve the values from the Jenkins environment.
Then, before requesting a project build, we need to set up the Okta managed credentials in Jenkins.
Push the Jenkinsfile to the public repository.
In the Advanced Project Options, for the Pipeline Definition, select Pipeline script from SCM and complete the repository information:
- SCM: GitHub
- Repository URL: https://github.com/<your-username>/simple-app.git
- Credentials: none
- Branch Specifier: \*/master
- Script Path: Jenkinsfile
Click Save to create the project.
Credential Management
Jenkins allows you to store credentials for third-party applications securely, allowing Pipeline projects to use them for the interactions with these third-party services. Let’s add the credentials for Okta authentication.
In the Jenkins Dashboard, go to Credentials on the left menu, then choose global.
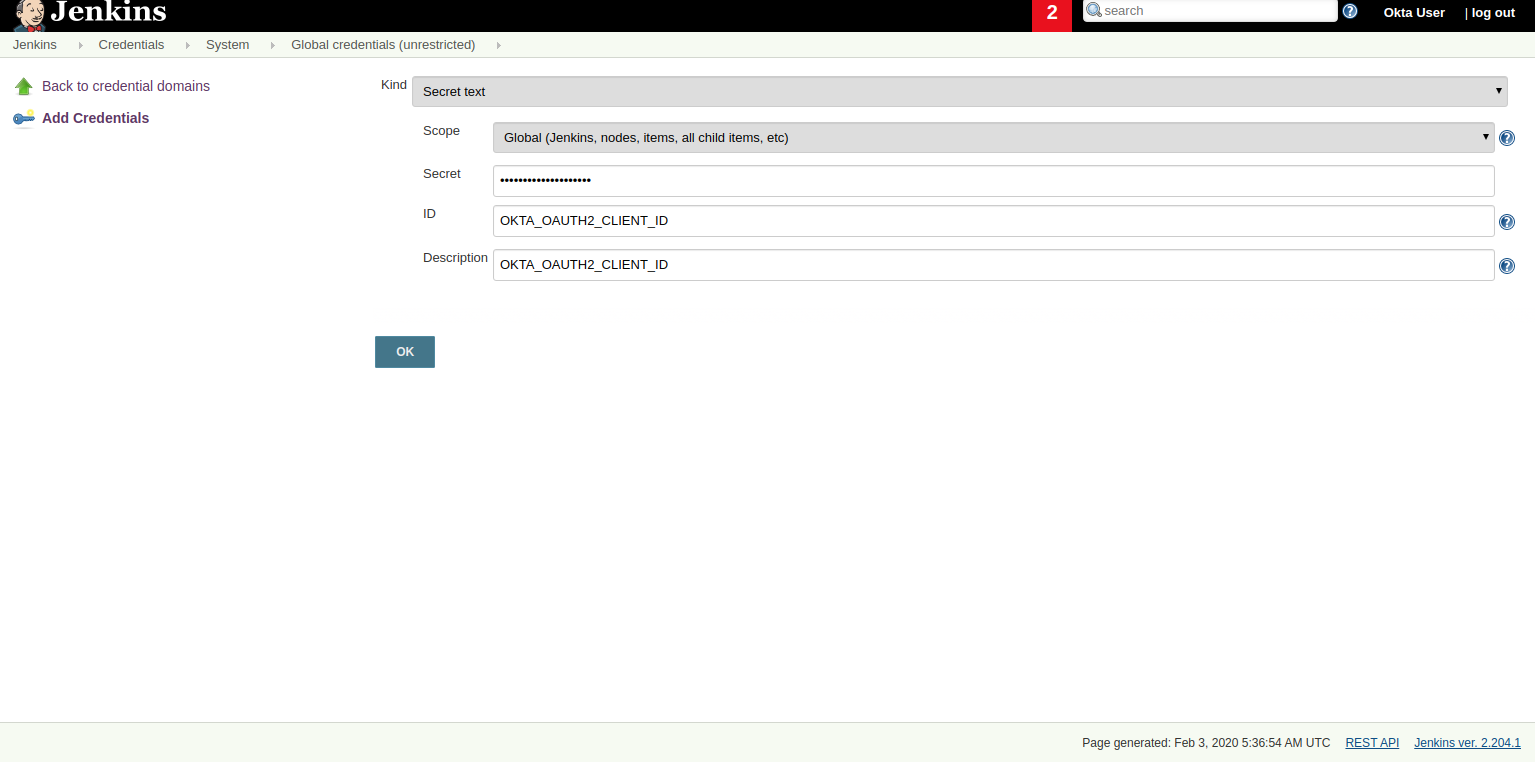
Create a "Secret text" credential for the OKTA_OAUTH2_CLIENT_ID, click Add Credentials, and select the following options:
- Kind: Secret text
- Scope: global
- Secret:
{yourOktaClientID} ID:
OKTA_OAUTH2_CLIENT_ID
Note: Replace {yourOktaClientID} with your actual Client ID.
Do the same for OKTA_OAUTH2_CLIENT_SECRET.
Note: Storing secrets in Jenkins and building pull-requests from forked repositories should not be used together. Building pull requests from outside of your organization is the same as executing arbitrary code, and needs to be done with great care and is outside the scope of this article.
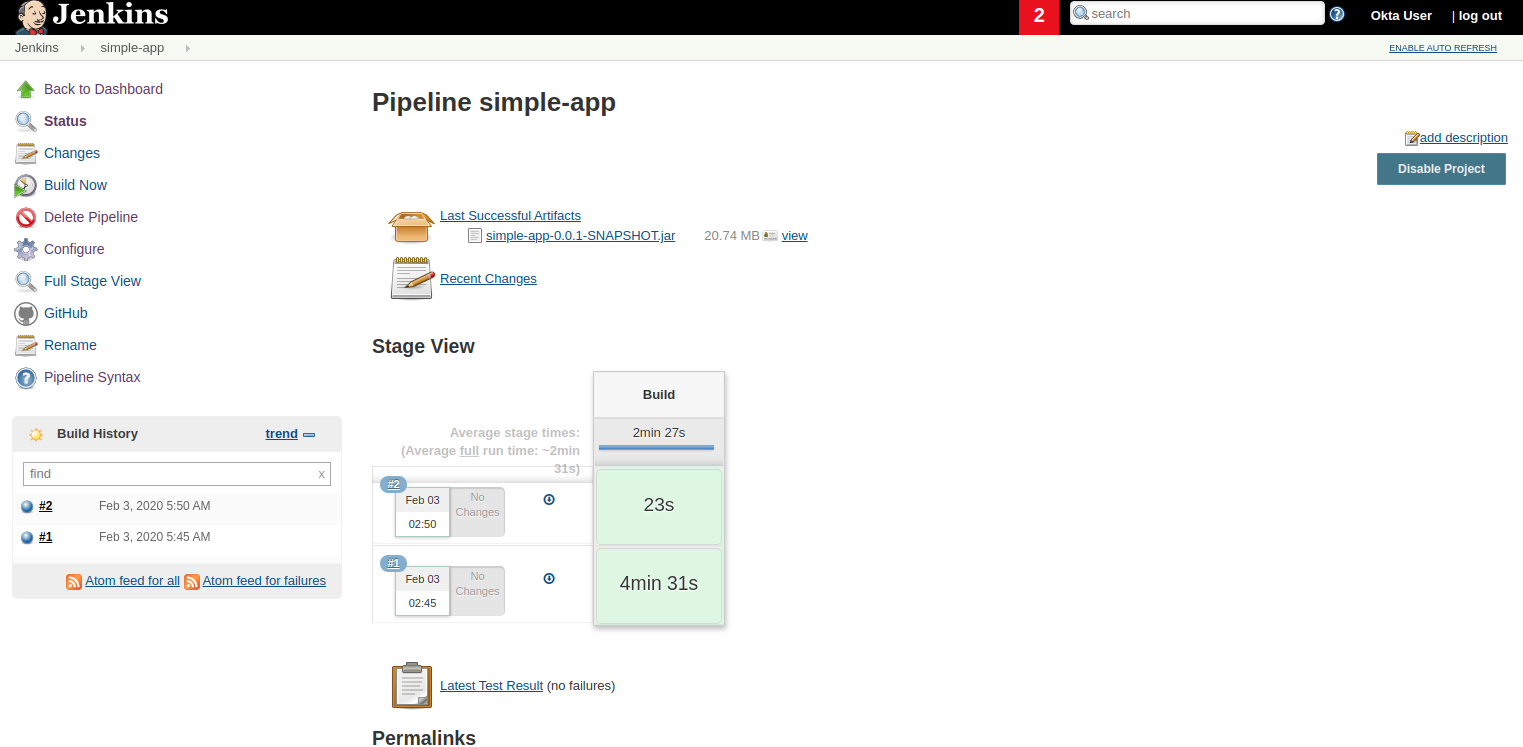
Now we are ready to build the project. Go to simple-app and select Build Now. Go to the Build History and select the build #1. Then select the option Console Output to monitor the task.
Add a Controller Test
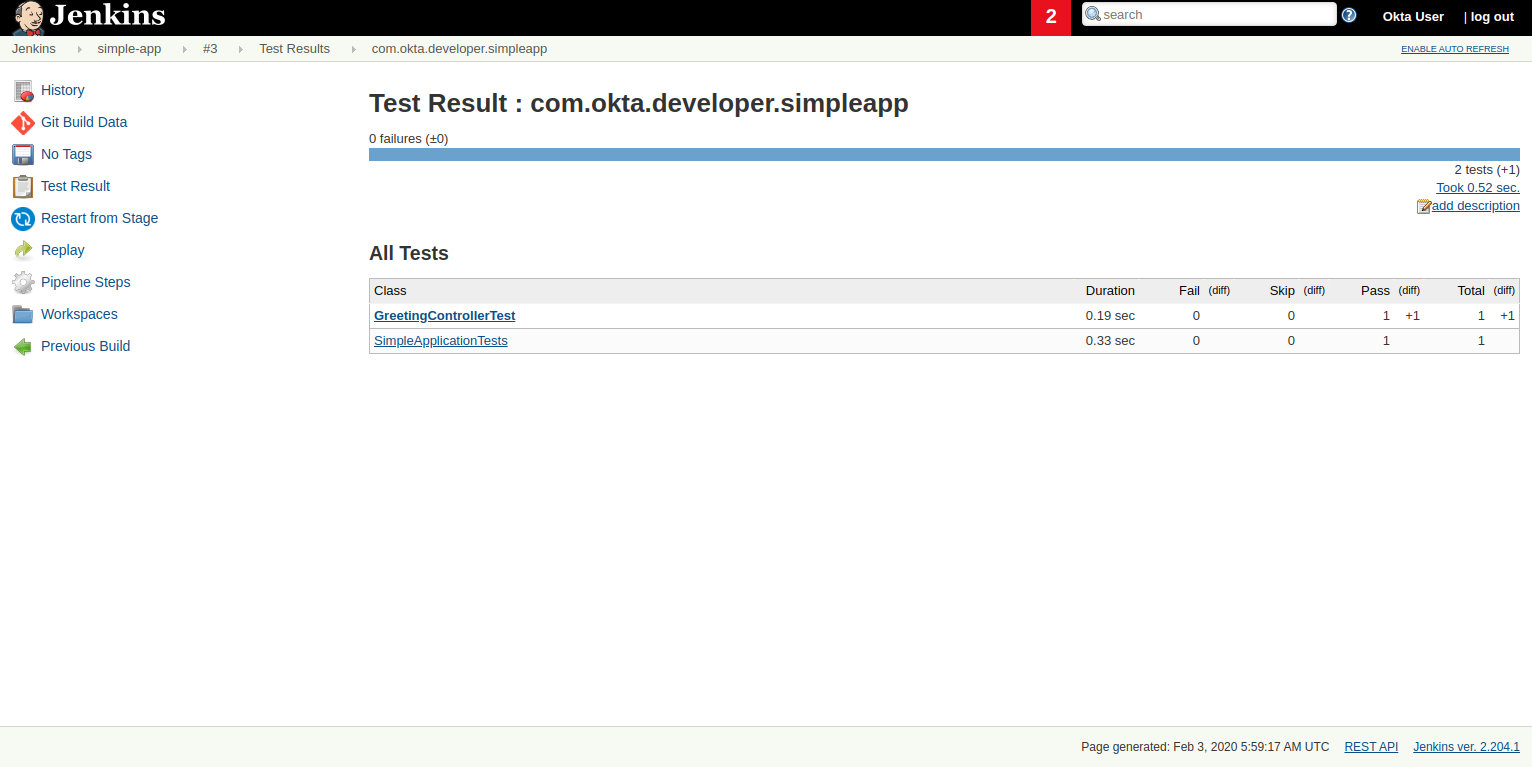
The Jenkinsfile template for GitHub and Maven already integrates test reports and makes them accessible from the build summary. Let’s add a controller test in the app to verify this feature.
Add spring-security-test dependency to the pom.xml:
xxxxxxxxxx
<dependency>
<groupId>org.springframework.security</groupId>
<artifactId>spring-security-test</artifactId>
<scope>test</scope>
</dependency>
Create a new class: src/test/java/com/okta/developer/simpleapp/GreetingControllerTest.java:
xxxxxxxxxx
package com.okta.developer.simpleapp;
import org.junit.jupiter.api.Test;
import org.springframework.beans.factory.annotation.Autowired;
import org.springframework.boot.test.autoconfigure.web.servlet.AutoConfigureMockMvc;
import org.springframework.boot.test.autoconfigure.web.servlet.WebMvcTest;
import org.springframework.security.core.GrantedAuthority;
import org.springframework.security.core.authority.SimpleGrantedAuthority;
import org.springframework.security.oauth2.client.authentication.OAuth2AuthenticationToken;
import org.springframework.security.oauth2.core.oidc.OidcIdToken;
import org.springframework.security.oauth2.core.oidc.user.DefaultOidcUser;
import org.springframework.security.oauth2.core.oidc.user.OidcUser;
import org.springframework.test.context.ContextConfiguration;
import org.springframework.test.web.servlet.MockMvc;
import org.springframework.test.web.servlet.result.MockMvcResultMatchers;
import java.time.Instant;
import java.util.ArrayList;
import java.util.Collection;
import java.util.HashMap;
import java.util.Map;
import static org.springframework.security.test.web.servlet.request.SecurityMockMvcRequestPostProcessors.authentication;
import static org.springframework.test.web.servlet.request.MockMvcRequestBuilders.get;
import static org.springframework.test.web.servlet.result.MockMvcResultMatchers.content;
(classes={GreetingController.class})
public class GreetingControllerTest {
private final static String ID_TOKEN = "eyJ0eXAiOiJKV1QiLCJhbGciOiJIUzI1NiJ9" +
".eyJzdWIiOiIxMjM0NTY3ODkwIiwibmFtZSI6IkpvaG4gRG9lIiwiYWRtaW4iOnRydWUsIm" +
"p0aSI6ImQzNWRmMTRkLTA5ZjYtNDhmZi04YTkzLTdjNmYwMzM5MzE1OSIsImlhdCI6MTU0M" +
"Tk3MTU4MywiZXhwIjoxNTQxOTc1MTgzfQ.QaQOarmV8xEUYV7yvWzX3cUE_4W1luMcWCwpr" +
"oqqUrg";
private MockMvc mvc;
void testGreet() throws Exception {
OidcIdToken idToken = createOidcToken();
this.mvc.perform(get("/greeting")
.with(authentication(createMockOAuth2AuthenticationToken(idToken))))
.andExpect(MockMvcResultMatchers.status().isOk())
.andExpect(content().string("Hello [email protected]"));
}
private OAuth2AuthenticationToken createMockOAuth2AuthenticationToken(OidcIdToken idToken) {
Collection<GrantedAuthority> authorities = new ArrayList<>();
authorities.add(new SimpleGrantedAuthority("ROLE_USER"));
OidcUser user = new DefaultOidcUser(authorities, idToken);
return new OAuth2AuthenticationToken(user, authorities, "oidc");
}
private OidcIdToken createOidcToken(){
Map<String, Object> claims = new HashMap<>();
claims.put("groups", "ROLE_USER");
claims.put("email", "[email protected]");
claims.put("sub", 123);
OidcIdToken idToken = new OidcIdToken(ID_TOKEN, Instant.now(),
Instant.now().plusSeconds(60), claims);
return idToken;
}
}
Push the changes to the repository and schedule a new build. Once it completes, you can see the Test Results at the global or package level:
Polling for Changes
Pipelines support several types of triggers to schedule the builds. One of them periodically polls the SCM System (GitHub) for changes. If a new change exists, it will re-trigger the Pipeline. The triggers directive in the Jenkinsfile configures the build triggers:
xxxxxxxxxx
pipeline {
agent any
triggers { pollSCM('H/15 * * * *
') } // poll every 15 minutes
environment {
...
The trigger type pollSCM has a cron expression that configures the pipeline to poll GitHub every 15 minutes.
Note: To install the trigger in Jenkins, you must first schedule a manual build from Jenkins, after pushing the updated Jenkinsfile.
Multibranch Pipelines
Multibranch Pipeline projects discover Pipelines for branches automatically and can be used to validate pull requests. The GitHub Branch Source plugin provides the validation functionality, and Cloudbees hosts its documentation. You installed these features with the suggested plugins, so let’s walk through the configuration.
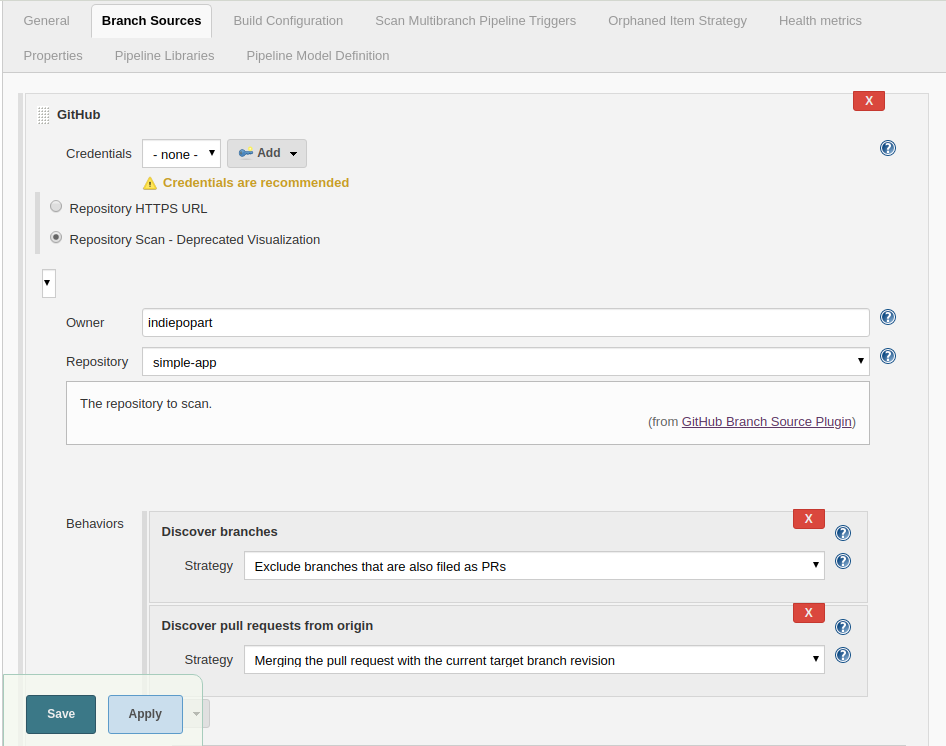
In the Jenkins dashboard, go to New Item, type an item name, and then choose Multibranch Pipeline. Then, in the configuration form, go to Branch Sources and choose GitHub. Select the option Repository Scan. In the Owner field, set your GitHub user, and select the repository to scan. To simplify this test, we already created a public repository, so we can skip the GitHub credentials setup.
Select the tab Scan Multibranch Pipeline Triggers, tick Periodically if not otherwise run, and set 5 minutes as the interval.
Click Save to add the new project.
Trigger a Build
Create a README.md file in the root folder of the simple-app project:
xxxxxxxxxx
# Simple Application with Okta OIDC Authentication
Clone the project and run the application with Maven:
```shell
git clone https://github.com/<your-username>/simple-app.git
cd simple-api
OKTA_OAUTH2_CLIENT_ID={youtOktaClientId} \
OKTA_OAUTH2_CLIENT_SECRET={yourOktaClientSecret} \
OKTA_OAUTH2_ISSUER={yourOktaDomain}/oauth2/default \
./mvnw spring-boot:run
```
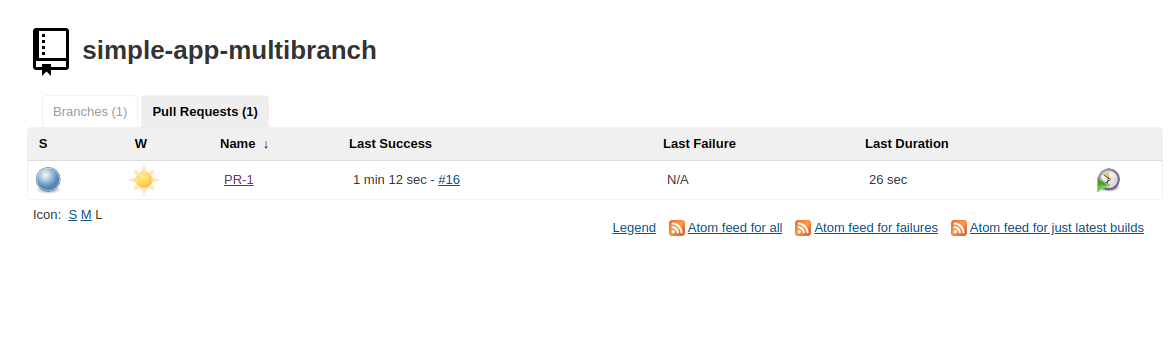
Create a branch for the change and a pull request. In the next periodic scan, Jenkins will create a job for the pull request.
git checkout -b add-readme
git add README.md
git commit -m "added readme"
git push origin add-readme
The GitHub Branch Source plugin allows you to create a project based on the repository structure of a GitHub organization as well, using the project type "GitHub Organization". For such projects, the plugin will scan and import all or a subset of repositories as jobs, according to a configured criteria.
GitHub Hook Trigger
Jenkins has a GitHub plugin to trigger builds after receiving notifications for push changes and pull requests. Through GitHub Webhooks, when the event is triggered, GitHub will send an HTTP POST payload to the Jenkins webhook’s configured URL. Upon receiving the POST, Jenkins will simply kick the internal polling to the SCM.
You can configure the Jenkins hook’s URL at GitHub manually or Jenkins itself can manage the hooks for the project based on the configuration. For the managed mode, you must also configure authentication to GitHub, and at the moment of writing this tutorial, Jenkins cannot authenticate if you have enabled two-factor authentication in GitHub.
The use of GitHub Webhooks requires that Jenkins must be reachable from the internet. The plugin documentation also mentions the hook URL is unique for all repositories but does not mention any kind of authentication required for the caller side. There are other security implications listed in the documentation that should be evaluated before using this feature.
Learn More
I hope you enjoyed this tutorial and could see the benefits of the Continuous Integration practice and the different options for validating changes as soon as you create them.
To learn more, check out these guides:
- Add CI/CD to Your Spring Boot App with Jenkins X and Kubernetes
- Testing Spring Security OAuth
- GitHub Branch Source Plugin
If you have questions, please leave a comment below. If you liked this tutorial, follow @oktadev on Twitter, follow us on LinkedIn, or subscribe to our YouTube channel.
Published at DZone with permission of Jimena Garbarino. See the original article here.
Opinions expressed by DZone contributors are their own.
Comments