Using NGINX to Serve .NET Core, Nodejs, or Static Contents
NGINX is a high-performance HTTP server as well as a reverse proxy. Unlike traditional servers, NGINX follows an event-driven, asynchronous architecture.
Join the DZone community and get the full member experience.
Join For FreeIntroduction
NGINX is a high-performance HTTP server as well as a reverse proxy. Unlike traditional servers, NGINX follows an event-driven, asynchronous architecture. As a result, the memory footprint is low and performance is high. If you’re running a Node.js-based web app or .NET Core Web Application, you should seriously consider using NGINX as a reverse proxy.
NGINX can be very efficient in serving static assets as well. For all other requests, it will talk to your Node.js back end or .NET Core Web Application and send the response to the client.
I have setup an Ubuntu VM on Azure. I will be using this VM for the demos in this post. However, you can use your local Ubuntu machine as well. For Bash commands, you can check my article on DZone on this link.
The post can be broken down in the following sections:
- Installing Node and NGINX on Ubuntu.
- Serving static website content from NGINX.
- Nginx as Reverse Proxy for NodeJS application.
- Nginx as Reverse Proxy for .NET Core Web Application.
Although the focus of this article is NGINX. But we will be dealing with a little bit of bash commands, NodeJS, and .NET Core. I have written about all of these topics on DZone, so you check my other articles for background information on these topics if needed.
Installing Node on Ubuntu
Executing the following bash commands will setup NodeJS and npm on your Ubuntu machine:
sudo apt-get updatesudo apt-get install nodejssudo apt-get install nodejs-legacysudo apt-get install npm
We can check the installation as shown below:

Installing NGINX on Ubuntu
Based on your requirement, you can check the official website for installation instructions. Here, I will be installing it on Ubuntu:
sudo apt-get updatesudo apt-get install nginx
We can query the version to confirm that the installation went through:

On Ubuntu, NGINX will start automatically once it’s installed.
Serving Static Contents
Let’s start simple and first, we will use NGINX to serve a static website in our first demo.
Configuring NGINX
Configuration files can be found on /etc/nginx/. NGINX comes with a default site config file and we can open it using nano:
sudo nano /etc/nginx/sites-available/defaultAs you scroll down, you’ll find a server block. It looks something like the following server block:
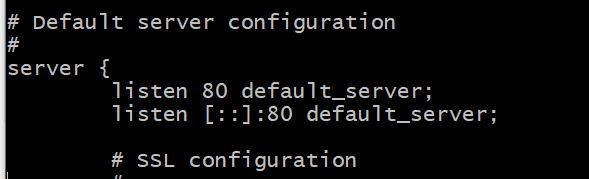
We leave it as it is and scroll a little bit down (note, the structure of the configuration file can be different for different versions):
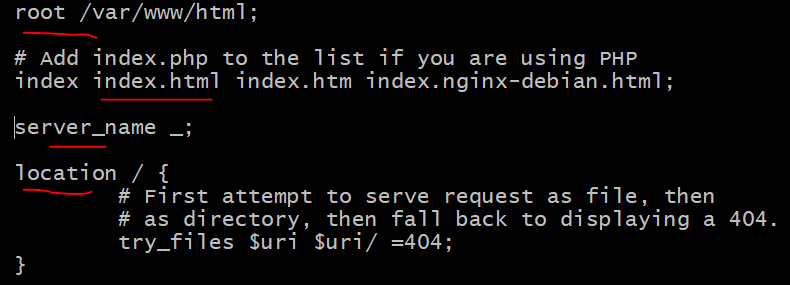
root: the root is set to /var/www/html, but you can choose a different directory if you like.
server_name: _ allows the use of any domain name (another option is localhost).
location /: this is an indication of the route and in this case, it is the very root level route.
As a result, whenever there’s a request on the default URL http://localhost/somepath/file.html, NGINX will serve the file from /var/www/html/somepath/file.html directly.
We will not change anything in this file yet but if we do, we have to restart the NGINX server afterward to make these changes take effect.
sudo service nginx restartAlso, we can check that there is some default HTML file on the root path:
for this demo, this file will be served. So there is a default configuration of NGINX which is pointing to the default HTML file. This is ok for our first test.
I created this Ubuntu VM on Azure cloud and it has a public IP address. I also created an inbound rule to allow traffic on port 80:

Now, if I enter the public IP address in the browser, the default website shows up confirming that NGINX is serving the HTML:
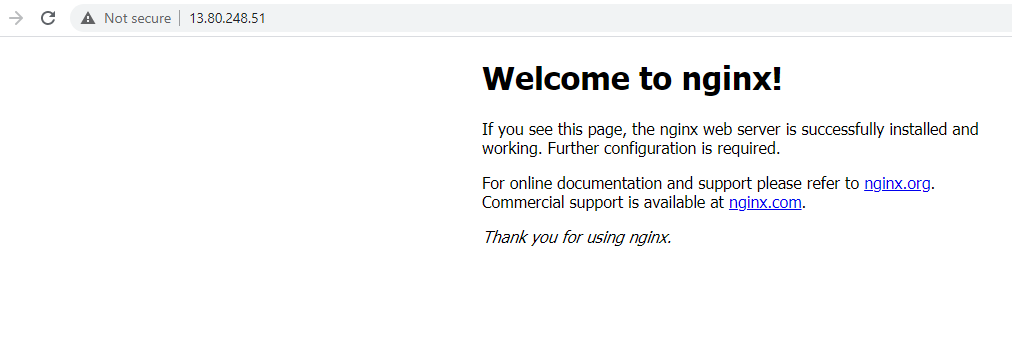
Of course, in reality, we want to serve our own content, but this is just to show you how to start and next, we will upload our own content using this learning.
SSH and SCP
Ok, I have another website, which I want to serve instead of the default NGINX HTML page. The Ubuntu server with NGINX installed is on the cloud and I now need to transfer my website contents files from my windows development machine to that particular HTML directory on the Ubuntu server. We can use git or ftp or something else, but for now, I will use scp for this.
For simply transferring files from one machine to another, Ubuntu comes with the scp command, which uses the SSH protocol to copy files between computers. We can use this tool to send our website configuration files and also website content files.
First, let's grant permissions to write to the HTML directory:

Next, open a bash shell on my development machine and copy the files from the source computer to the target Ubuntu machine:
scp -r ~/Documents/GitHubProjects/Public/c3jsdemo[email protected]:/var/www/html

Next, I cd to the c3jsdemo directory on Ubuntu VM run npm install.
I also updated the config file of NGINX for the following root:

Because the config file is updated, we need to restart NGINX.
And now we can access the website via a public IP address:

Once again, this is a very simple website but it has a little bit more contents than the default one we saw earlier. You can read more about the charting library used on this website at this link.
Setting Up a Node.js Server
For our next demo, I will be using an existing simple Node.js application. The application uses an in-memory array to store data and provide a basic API to perform CRUD operations. You can read about this application in this post on DZone.
Once again, I used scp tool to copy the source-code to Ubuntu VM as discussed earlier (Maybe I should set up a git client on VM to simplify this process).

I also run npm install to install packages.
I can now run node application as follows:

Next, I updated the config file by adding a location block for the node-express application:
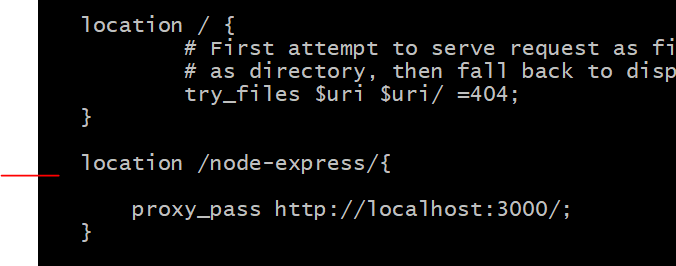
(Please note that the end of the location URL and the proxy_pass URL must be a forward slash when referring to directories rather than pages. If you don’t have those, you will get page-not-found error).
So, the server is listening on port 3000 and the location is setup for this server. Now, if I browse to this path I can see the response from the Node application:

Using ASP.NET Core With a Reverse Proxy (NGINX)
A reverse proxy server is a web server that accepts requests and sends them to another web server which actually creates the responses for those requests. The responses are sent back to the proxy server who forwards them to the clients who issued the corresponding requests.
Nginx is a web server that can act as a reverse proxy for ASP.NET Core applications and which is also very good at serving static content.
With Nginx acting as a reverse proxy it would look something like this:
Browser <----> Nginx <----> KestrelWe can breakdown the process in the following three steps:
- Build and Publish .NET Core Web Application.
- Copy published application to Ubuntu machine.
- Serve published application using NGINX.
Building and Publishing .NET Core Application
I have a very simple .NET Core application that is built using the default visual studio template and it has a simple WeatherController.

Now, a .NET Core Web application is capable of serving static content as well (e.g., you can serve an angular application from within your .NET Core web application) but to keep things simple, our application only exposes REST endpoints for web-API calls.
.NET Core is cross-platform and I published the web-application using the following command:
dotnet publish "Web.csproj" -c Release -r ubuntu.16.04-x64This will generate a published folder on our machine and now we can copy this published folder to our ubuntu machine as follows:
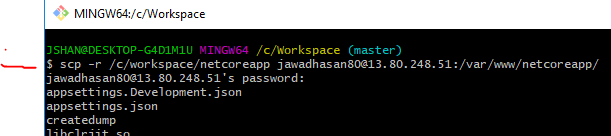
Copy Published Application to Ubuntu
I copied the published folder on a different directory on my windows machine, so it is easier to transfer it to the Ubuntu machine on the cloud.
scp -r /c/workspace/netcoreapp [email protected]:/var/www/netcoreapp/
Now open the Ubuntu machine terminal (CLI) and go to the project directory. Provide execute permissions and run the application as follows:
chmod 777 ./Web./Web

Cool, our .NET Core web application is running in Ubuntu.
Nginx Configurations
This process is similar to what we have already done for the Node.js application. Open the NGINX config file using nano and add a location entry for .NET Core Web API as shown below:
sudo nano /etc/nginx/sites-available/default
sudo service nginx restartNow, if we browse to 'weatherforecast' endpoint, we see our .NET Core application is returning the JSON data as expected:

Summary
In this post, we saw how to serve static, NodeJS, and .NET Core web applications using NGINX. If you like you can read more about bash commands, Linux, and .NET Core web applications deployments in my other articles. Let me know if you have any questions. Till next time, Happy Coding.
Published at DZone with permission of Jawad Hasan Shani. See the original article here.
Opinions expressed by DZone contributors are their own.
Comments