DZone
Thanks for visiting DZone today,
Edit Profile
  • Manage Email Subscriptions
  • How to Post to DZone
  • Article Submission Guidelines
Sign Out View Profile
  • Post an Article
  • Manage My Drafts
Over 2 million developers have joined DZone.
Log In / Join
Please enter at least three characters to search
Refcards Trend Reports
Events Video Library
Refcards
Trend Reports

Events

View Events Video Library

Zones

Culture and Methodologies Agile Career Development Methodologies Team Management
Data Engineering AI/ML Big Data Data Databases IoT
Software Design and Architecture Cloud Architecture Containers Integration Microservices Performance Security
Coding Frameworks Java JavaScript Languages Tools
Testing, Deployment, and Maintenance Deployment DevOps and CI/CD Maintenance Monitoring and Observability Testing, Tools, and Frameworks
Culture and Methodologies
Agile Career Development Methodologies Team Management
Data Engineering
AI/ML Big Data Data Databases IoT
Software Design and Architecture
Cloud Architecture Containers Integration Microservices Performance Security
Coding
Frameworks Java JavaScript Languages Tools
Testing, Deployment, and Maintenance
Deployment DevOps and CI/CD Maintenance Monitoring and Observability Testing, Tools, and Frameworks

Because the DevOps movement has redefined engineering responsibilities, SREs now have to become stewards of observability strategy.

Apache Cassandra combines the benefits of major NoSQL databases to support data management needs not covered by traditional RDBMS vendors.

The software you build is only as secure as the code that powers it. Learn how malicious code creeps into your software supply chain.

Generative AI has transformed nearly every industry. How can you leverage GenAI to improve your productivity and efficiency?

Related

  • Deploying MuleSoft Using Azure DevOps
  • Recipe To Implement the Jenkins Pipeline For MuleSoft Application [Videos]
  • Create Proxy Application for Mule APIs
  • Create Custom DataWeave Functions in Mule 4

Trending

  • Memory-Optimized Tables: Implementation Strategies for SQL Server
  • Strategies for Securing E-Commerce Applications
  • When Airflow Tasks Get Stuck in Queued: A Real-World Debugging Story
  • Designing AI Multi-Agent Systems in Java
  1. DZone
  2. Testing, Deployment, and Maintenance
  3. Deployment
  4. Using Travis CI for Deploying Mulesoft Applications to Cloudhub

Using Travis CI for Deploying Mulesoft Applications to Cloudhub

This tutorial explains what Travis CI is and how you can use it to deploy Mulesoft applications to Cloudhub. Read below to find out more!

By 
Kuldeep Rana user avatar
Kuldeep Rana
·
Feb. 16, 22 · Tutorial
Likes (2)
Comment
Save
Tweet
Share
10.5K Views

Join the DZone community and get the full member experience.

Join For Free

What Is Travis CI?

  • Travis CI is a hosted continuous integration service used to build and test software projects hosted at GitHub and Bitbucket. Travis CI provides various paid plans for private projects and a free plan for open source. 
  • Travis CI is available at  https://travis-ci.org/.
  • https://travis-ci.org/ supports only public repositories. To support GitHub private repositories, you can use https://travis-ci.com/.

Prerequisites

To start using Travis CI, make sure you have:

  • A GitHub or Bitbucket or GitLab account.
  • Owner permissions for a project hosted on GitHub or Bitbucket or GitLab.

To get started with Travis CI using GitHub, follow these steps:

  1. Go to Travis-ci.com and Sign up with GitHub.
  2. Accept the Authorization of Travis CI. You’ll be redirected to GitHub.
  3. Click on your profile picture in the top right of your Travis Dashboard, click Settings and then on the Left-hand side, Sync Account button. This will sync all your repositories in the GitHub with Travis CI.
  4. Add a .travis.yml file to the root of your repository to tell Travis CI what to do. Below is the example of a travis.yml file that I used to build the integration:

language: java
jdk:
- openjdk8
cache:
directories:
- "$HOME/.m2"

before_install:
- cp .travis.settings.xml $HOME/.m2/settings.xml

jobs:

- stage: Start
name: "Application is ready"
script:
- echo "$applicationName is ready to be deployed"
- stage: Test
name: "Run Tests"
script:
- mvn clean package

- stage: Deploy #stage type
name: "Deploy stage" #stage name
script:
- mvn deploy -DmuleDeploy -Danypoint.username=$username -Danypoint.password=$password -Danypoint.environment=$environment -Danypoint.workerType=$workerType -Danypoint.businessGroup=$businessGroup -Danypoint.workers=$workers -Danypoint.appName=$applicationName -Danypoint.objectStore=$objectStore

notifications:
email:
recipients:
- kuldeep.rana@gmail.com
on_success: always
        on_failure: always


  1. Add .travis.setting.xml  to the root of your repository. This will have the url to all the repositories from where all the dependencies will get downloaded to build the project. Below is the example of the file used in the integration :

<settings>
<servers>
<server>
<id>anypoint-exchange-v2</id>
<username>${username}</username>
<password>${password}</password>
</server>
</servers>
<pluginGroups>
<pluginGroup>org.mule.tools</pluginGroup>
</pluginGroups>
<profiles>
<profile>
<id>mule-extra-repos</id>
<activation>
<activeByDefault>true</activeByDefault>
</activation>
<repositories>
<repository>
<id>mule-public</id>
<url>https://repository.mulesoft.org/nexus/content/repositories/public</url>
</repository>
</repositories>
<pluginRepositories>
<pluginRepository>
<id>mule-public</id>
<url>https://repository.mulesoft.org/nexus/content/repositories/public</url>
</pluginRepository>
</pluginRepositories>
</profile>
<profile>
<id>Mule</id>
<activation>
<activeByDefault>true</activeByDefault>
</activation>
<repositories>
<repository>
<id>MuleRepository</id>
<name>MuleRepository</name>
<url>https://repository.mulesoft.org/nexus-ee/content/repositories/releases-ee/</url>
<layout>default</layout>
<releases>
<enabled>true</enabled>
</releases>
<snapshots>
<enabled>true</enabled>
</snapshots>
</repository>
</repositories>
</profile>
</profiles>
</settings>


Now, for deploying Mulesoft application to Cloudhub, you need to configure mule maven plugin in POM.xml:

<cloudHubDeployment>
<uri>https://anypoint.mulesoft.com</uri>
<muleVersion>${app.runtime}</muleVersion>
<username>${anypoint.username}</username>
<password>${anypoint.password}</password>
<environment>${anypoint.environment}</environment>
<applicationName>${anypoint.appName}</applicationName>
<workerType>${anypoint.workerType}</workerType>
<workers>${anypoint.workers}</workers>
<businessGroup>${anypoint.businessGroup}</businessGroup>
<objectStoreV2>${anypoint.objectStore}</objectStoreV2>
<properties>
<key>value</key>
</properties>
</cloudHubDeployment>


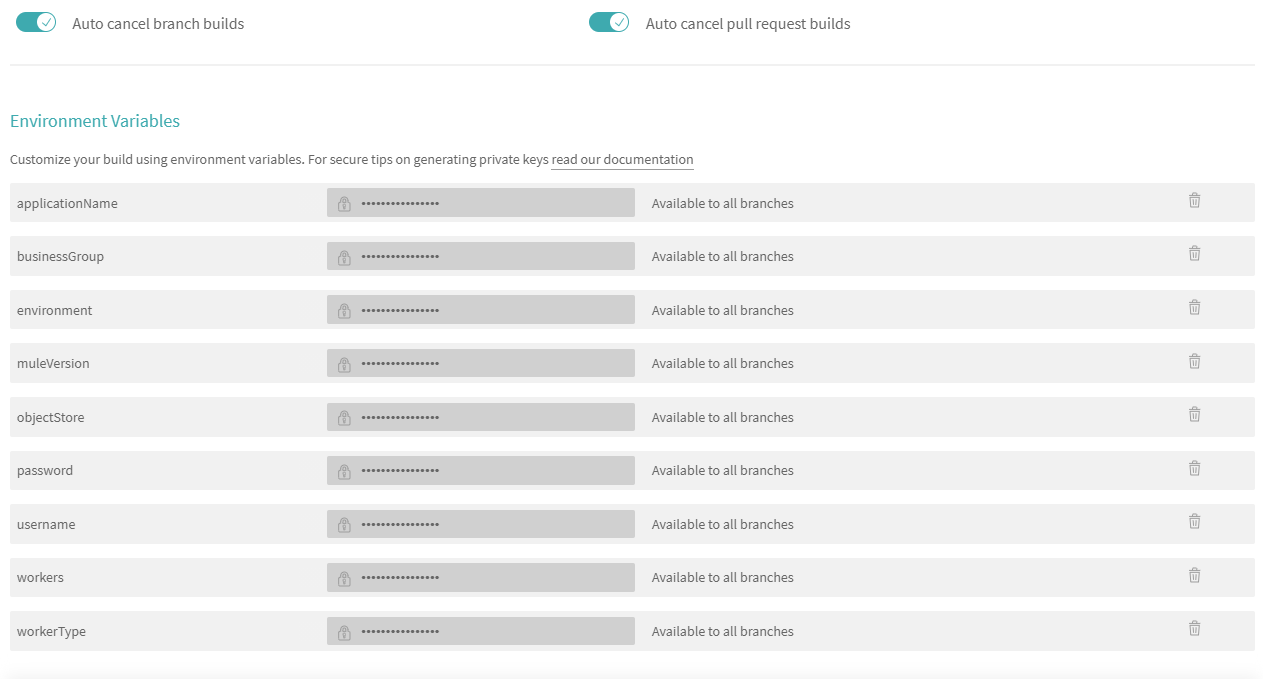
Declaring Environment Variables at Travis CI

For declaring the variable, you can activate the repository and click on settings. It will navigate to the build screen. Now click on More Options ⇒ Settings. Scroll down and it will show you the Environment Variables tab to declare your variables.

For the above code, all environment variables have been declared — required by Mule maven plugin like workers, workerType, Application Name, etc. and username and password required by .travis.settings.xml

Environment Variable screenshot.

Once all the changes are pushed to the git, and Travis CI is activated for that repository, the Continuous Integration, and Continuous Deployment process will take place. You can check the logs for further details.

Logs screenshot.

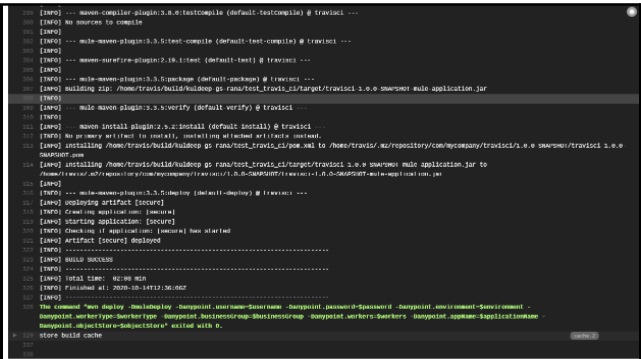
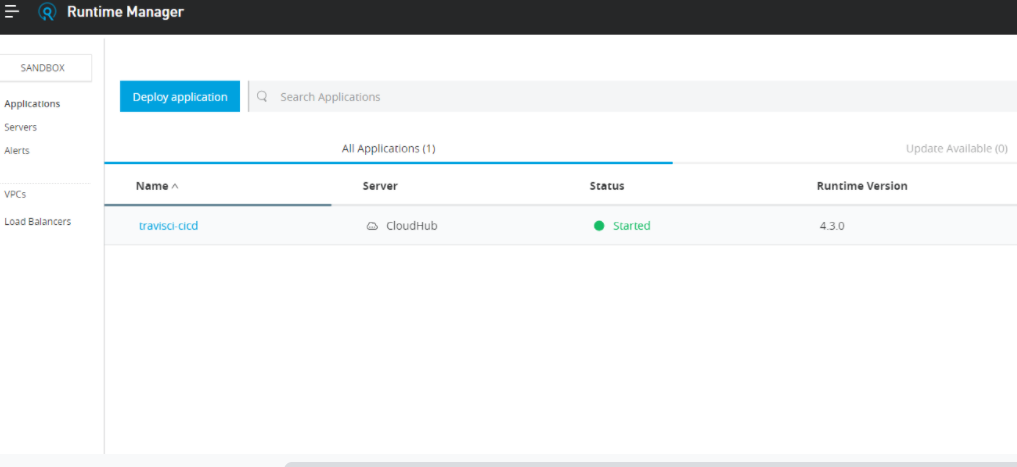
The application is successfully deployed to Cloudhub.

Successful message screenshot.

Reference Links

  • https://travis-ci.org/
  • https://travis-ci.com/
  • https://docs.mulesoft.com/mule-runtime/3.5/configuring-maven-pom-files-and-settings
Continuous Integration/Deployment application MuleSoft

Published at DZone with permission of Kuldeep Rana. See the original article here.

Opinions expressed by DZone contributors are their own.

Related

  • Deploying MuleSoft Using Azure DevOps
  • Recipe To Implement the Jenkins Pipeline For MuleSoft Application [Videos]
  • Create Proxy Application for Mule APIs
  • Create Custom DataWeave Functions in Mule 4

Partner Resources

×

Comments
Oops! Something Went Wrong

The likes didn't load as expected. Please refresh the page and try again.

ABOUT US

  • About DZone
  • Support and feedback
  • Community research
  • Sitemap

ADVERTISE

  • Advertise with DZone

CONTRIBUTE ON DZONE

  • Article Submission Guidelines
  • Become a Contributor
  • Core Program
  • Visit the Writers' Zone

LEGAL

  • Terms of Service
  • Privacy Policy

CONTACT US

  • 3343 Perimeter Hill Drive
  • Suite 100
  • Nashville, TN 37211
  • support@dzone.com

Let's be friends:

Likes
There are no likes...yet! 👀
Be the first to like this post!
It looks like you're not logged in.
Sign in to see who liked this post!