Visualizing H2O GBM and Random Forest MOJO Models Trees in Python
In this code-heavy tutorial, learn how to use the H2O machine library to build a decision tree model and save that model as MOJO.
Join the DZone community and get the full member experience.
Join For FreeIn this example, we will build a tree-based model using the H2O machine learning library and then save that model as MOJO. Using the GraphViz/Dot library, we will extract individual trees and cross-validated model trees from the MOJO and visualize them. If you are new to the H2O MOJO model, you can learn about it here.
You can also get full working IPython Notebook for this example from here.
Let's build the model first using the H2O GBM algorithm. You can also use the distributed random forest model for tree visualization.
Let’s first import key Python models:
import h2o
import subprocess
from IPython.display import Image
Now we will be building the GBM model using a public dataset:
h2o.init()
df = h2o.import_file('https://raw.githubusercontent.com/h2oai/sparkling-water/master/examples/smalldata/prostate.csv')
y = 'CAPSULE'
x = df.col_names
x.remove(y)
df[y] = df[y].asfactor()
train, valid, test = df.split_frame(ratios=[.8,.1])
from h2o.estimators.gbm import H2OGradientBoostingEstimator
gbm_cv3 = H2OGradientBoostingEstimator(nfolds=3)
gbm_cv3.train(x=x, y=y, training_frame=train)

## Getting all cross validated models
all_models = gbm_cv3.cross_validation_models()
print("Total cross validation models: " + str(len(all_models)))
Now, let's set all the default parameters to create the graph tree first and then tree images (in PNG format) on the local disk. Make sure you have a writable path where you can create and save these intermediate files. You also need to provide the path for the latest H2O (h2o.jar), which is used to generate the MOJO model.
mojo_file_name = "/Users/avkashchauhan/Downloads/my_gbm_mojo.zip"
h2o_jar_path= '/Users/avkashchauhan/tools/h2o-3/h2o-3.14.0.3/h2o.jar'
mojo_full_path = mojo_file_name
gv_file_path = "/Users/avkashchauhan/Downloads/my_gbm_graph.gv"
Now, let's define the image file name, which we will generate from the Tree ID. Based on the Tree ID, the image file will have my_gbm_tree_ID.png file name:
image_file_name = "/Users/avkashchauhan/Downloads/my_gbm_tree"Now, we will be downloading the GBM MOJO model by saving it to-disk:
gbm_cv3.download_mojo(mojo_file_name)Let's define the function to generate a GraphViz tree from the saved MOJO model:
def generateTree(h2o_jar_path, mojo_full_path, gv_file_path, image_file_path, tree_id = 0):
    image_file_path = image_file_path + "_" + str(tree_id) + ".png"
    result = subprocess.call(["java", "-cp", h2o_jar_path, "hex.genmodel.tools.PrintMojo", "--tree", str(tree_id), "-i", mojo_full_path , "-o", gv_file_path ], shell=False)
    result = subprocess.call(["ls",gv_file_path], shell = False)
    if result is 0:
        print("Success: Graphviz file " + gv_file_path + " is generated.")
    else:
        print("Error: Graphviz file " + gv_file_path + " could not be generated.")
Next, let's define the method to generate the tree image as PNG from the saved GraphViz tree:
def generateTreeImage(gv_file_path, image_file_path, tree_id):
    image_file_path = image_file_path + "_" + str(tree_id) + ".png"
    result = subprocess.call(["dot", "-Tpng", gv_file_path, "-o", image_file_path], shell=False)
    result = subprocess.call(["ls",image_file_path], shell = False)
    if result is 0:
        print("Success: Image File " + image_file_path + " is generated.")
        print("Now you can execute the follow line as-it-is to see the tree graph:")
        print("Image(filename='" + image_file_path + "\')")
    else:
print("Error: Image file " + image_file_path + " could not be generated.")Note: I had to write two steps for the process above because if I put it all in one step, the process hangs after GraphViz is created.
Let's generate a tree by passing all parameters defined above and the proper TREE ID as the last parameter:
#Just change the tree id in the function below to get which particular tree you want
generateTree(h2o_jar_path, mojo_full_path, gv_file_path, image_file_name, 3)
Now, we will be generating a PNG tree image from the saved GraphViz content:
generateTreeImage(gv_file_path, image_file_name, 3)
# Note: If this step hangs, you can look at "dot" active process in osx and try killing it
Let's visualize the main model tree:
# Just pass the Tree Image file name depending on your tree
Image(filename='/Users/avkashchauhan/Downloads/my_gbm_tree_0.png')
Let's visualize the first cross-validation tree (cross-validation ID - 1):
# Just pass the Tree Image file name depending on your tree
Image(filename='/Users/avkashchauhan/Downloads/my_gbm_tree_1.png')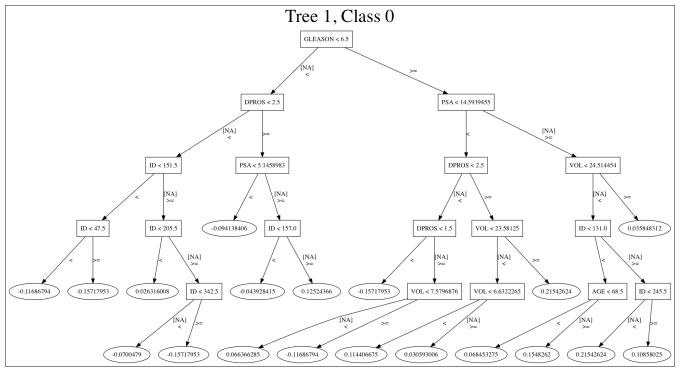
Let's visualize the first cross-validation tree (cross-validation ID - 2)
# Just pass the Tree Image file name depending on your tree
Image(filename='/Users/avkashchauhan/Downloads/my_gbm_tree_2.png')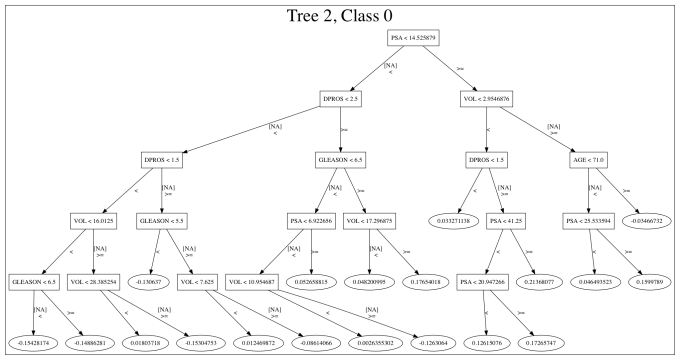
Let's visualize the first cross-validation tree (cross-validation ID - 3)
# Just pass the Tree Image file name depending on your tree
Image(filename=’/Users/avkashchauhan/Downloads/my_gbm_tree_3.png’)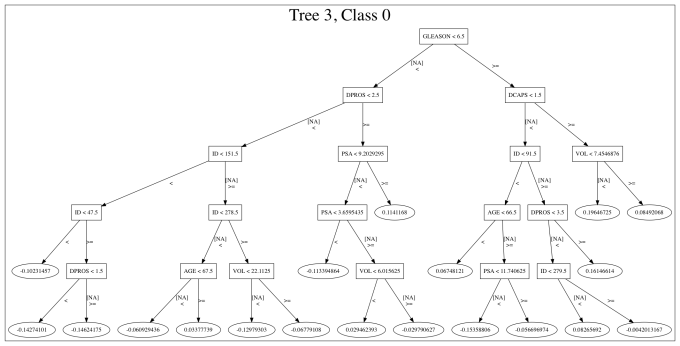
After looking at these trees, you can visualize how the decisions are made.
Helpful documentation:
That's it. Enjoy!
Published at DZone with permission of Avkash Chauhan. See the original article here.
Opinions expressed by DZone contributors are their own.
Comments