WebRTC Video Calls With Angular and Spring Boot
This in-depth tutorial demonstrates how to add video calls to an Angular/Spring Boot project with WebRTC in TypeScript.
Join the DZone community and get the full member experience.
Join For FreeWebRTC video calls have been added to the AngularPwaMessenger project. The back end supports WebSocket connections that are secured by JWT tokens to enable WebRTC signaling. The current browsers support video calls with WebRTC. The Angular front end supports the WebRTC calls and needs to access the camera and the microphone. The browsers need to be able to connect to each other directly and use the server backend to do that. That means that home/company networks that prevent incoming connections prevent the creation of a video call. Installing the PWA on a smartphone does work because no router/firewall stops the connections. For development, a setup with a self-signed certificate is used that enables testing inside a firewalled network.
WebRTC Documentation
The Mozilla Development Network has WebRTC documentation. The WebRTC protocol is documented here and the AngularPwaMessenger backend provides a STUN server implementation for the ICE protocol. The signaling and video calls are documented here. The diagrams/code show the creation of the connection for the video call.
Backend
The STUN implementation to support the ICE protocol is configured in the WebSocketConfig class.
@Configuration
@EnableWebSocket
public class WebSocketConfig implements WebSocketConfigurer{
	private SignalingHandler socketHandler;
	private Environment environment;

	public WebSocketConfig(SignalingHandler socketHandler,
           Environment environment) {
		this.socketHandler = socketHandler;
		this.environment = environment;
	}

	@Override
	public void registerWebSocketHandlers(WebSocketHandlerRegistry
           registry) {
	   WebSocketHandlerRegistration handlerRegistration =
              registry.addHandler(this.socketHandler, "/signalingsocket");
 	  if(List.of(this.environment.getActiveProfiles()).stream()
             .noneMatch(myProfile ->
             myProfile.toLowerCase().contains("prod"))) {
		handlerRegistration.setAllowedOrigins("*");
	  }
	}
}
Spring has WebSocket support that is used in this implementation and configured with the @Configuration annotation. The @EnableWebSocket annotation activates the Spring WebSocket support.
The SignalingHandler and the environment are injected into the constructor.
The method registerWebSocketHandlers(...) adds the SignalingHandler to the path /signalingsocket. The environment is used to check if the profiles contain the prod profile. For development, the allowedOrigins(...) check is disabled.
The SocketHandler is implemented in the SignalingHandler class. The messages are defined here:
...
private List<WebSocketSession> sessions = new CopyOnWriteArrayList<>();
...
@Override
public void handleTextMessage(WebSocketSession session, TextMessage message)
   throws InterruptedException, IOException {
   if (userRoleCheck(session)) {
      SenderReceiver senderReceiver = this.extractSenderReceiver(message);
      String sessionUsername = extractSessionUsername(session);
      for (WebSocketSession webSocketSession : this.sessions) {
         removeStaleSession(webSocketSession);
         String webSocketSessionUsername =
         this.extractSessionUsername(webSocketSession);
         if (webSocketSession.isOpen() &&
            (checkSenderReceiver(senderReceiver, sessionUsername,
            webSocketSessionUsername) ||
            checkSenderLocalhostToken(senderReceiver, sessionUsername,
            webSocketSessionUsername))) {
            LOGGER.debug("Msg send with params: Msg sender: {}, Msg receiver:
               {}, Session sender: {}, WebSocket receiver: {}",
               senderReceiver.sender, senderReceiver.receiver,
               sessionUsername, webSocketSessionUsername);
            webSocketSession.sendMessage(message);
         }
      }
   } else {
      if (this.isTokenExpired(session)) {
         session.close();
      }
   }
}

...

@Override
public void afterConnectionEstablished(WebSocketSession session)
   throws Exception {
   if (userRoleCheck(session)) {
      this.sessions.add(session);
   }
}

@Override
public void afterConnectionClosed(WebSocketSession session,
   CloseStatus status) throws Exception {
   this.sessions.remove(session);
}
The WebSocketSession list is a CopyOnWriteArrayList to make sure concurrent writes are supported if the sessions are added or removed in the methods afterConnectionEstablished(...) and afterConnectionClosed(...).
The handelTextMessage(...) method is used to process the messages of the WebSocket.
The JWT token of the logged-in user is added as a URL parameter to the WebSocket path (/signalingsocket?token=abc...). The JWT token is extracted from the session, the token is parsed, and the role in the token is checked.
The method extractSenderReceiver(...) extracts from the JSON message the sender/receiver record. That is done with String functions to avoid parsing the whole message.
The method extractSessionUsername(...) gets the username from the JWT token of the session.
The registered sessions are iterated:
- The method
removeStaleSession(...)closes sessions where the JWT token has timed out. - The method
extractSessionUsername(...)gets the JWT token username of the session. - It is checked if the session is open and the message sender/receiver matches the sender/receiver of the session. The matching session sends the message.
If the userRole of the JWT token is not User, the JWT token is checked if it has timed out to close such a session.
Front End
Main Component
The Angular front end uses WebRTC to provide video calls. The main.component.ts shows the voice.component.ts if a video call arrives. The method syncMsgs() is called in an interval after login.
...
private offerMsgSub: Subscription;
...
private async syncMsgs(): Promise<void> {
   if ( this.ownContact && this.netConnectionService.connetionStatus &&
      !this.jwttokenService.localLogin ) {
      ...
      const result = await
         this.voiceService.connect(this.jwttokenService.jwtToken);
      if(!!result) {
         this.webrtcService.addIncominMessageHandler();
         this.webrtcService.senderId = this.ownContact.name;
         this.webrtcService.receiverId = this?.selectedContact?.name;
         this.offerMsgSub = this.webrtcService.offerMsgSubject
           .pipe(filter(offerMsg => !!offerMsg.receiverId &&
              !!offerMsg.senderId)).subscribe(offerMsg => {
              this.selFeature = MyFeature.phone;
           });
      }
   }
}
The offerMsgSub subscription is unsubscribed in the ngOnDestroy() method.
The connect(...) method creates a new WebSocket connection with the JWT token, if none exists, and then returns true. A created connection is auto reconnected. After the initial connection, the result is false. The connection is created after a successful login because the token is used to secure the WebSocket connection.
After the check for the initial WebSocket connection, the WebRTCService is initialized.
The addIncominMessageHandler() adds the callbacks for the service to receive the WebRTC Messages.
The senderId and the receiverId are set to the names that are unique.
Then the WebRTCService offerMsgSubject is subscribed to show the voice.component.ts if an offer is received. It is filtered with a pipe for messages with set receiverId and senderId.
Voice Service
The voice.service.ts creates and maintains the WebSocket connection to the back end:
public async connect(jwtToken: string): Promise<boolean> {
   this.webSocketConnectionRequested = true;
   if (!this.socket$ || this.socket$.closed) {
      return Promise.resolve<WebSocketSubject<any>>
         (this.getNewWebSocket(jwtToken)).then<boolean>(mySocket => {
         this.socket$ = mySocket;
         // Called whenever there is a message from the server
         this.socket$.pipe(takeUntil(this.ngUnsubscribeMsg))
            .subscribe(msg => {
                   console.log('Received message of type: ' + msg.type);
                   this.messagesSubject.next(msg);
         });
         return true;
       });
    }
    return Promise.resolve(false);
  }

public disconnect(): void {
   this.webSocketConnectionRequested = false;
   this.ngUnsubscribeMsg.next();
   this.ngUnsubscribeMsg.unsubscribe();
}

public sendMessage(msg: VoiceMsg): void {
   console.log('sending message: ' + msg.type +
      ' sid: '+msg.senderId +' remoteId: '+msg.receiverId);
   this.socket$.next(msg);
}

private getNewWebSocket(jwtToken: string): WebSocketSubject<any> {
   return webSocket({
      url: `${this.wsEndpoint}?token=${encodeURI(jwtToken)}`,
      openObserver: {
        next: () => {
          console.log('[DataService]: connection ok');
        }
      },
      closeObserver: {
        next: () => {
          console.log('[DataService]: connection closed');
          this.socket$ = undefined;
          if(!!this.webSocketConnectionRequested) {
            this.connect(jwtToken);
          }
        }
      }
   });
}
The connect(...) method sets the webSocketConnectionRequested property to true to enable the auto-reconnect and checks whether the WebSocket is false or closed. Then, a new WebSocket connection is created.
The method getNewWebSocket(..) creates a new webSocket(...) . The parameters are the URL with the endpoint and the URI encoded JWT token. The openObserver to log the socket creation and the closeObserver to set the socket to undefined and check if reconnect is activated.
The connect(...) method continues to set the provided WebSocket to the socket$ property. The socket$ property gets a pipe with takeUntil to unsubscribe and subscribes to the socket to send the messages to the messagesSubject. Then true is returned.
The disconnect() method sets the property webSocketConnectionRequested to false to disable auto-reconnect. The ReplaySubject ngUnsubscribeMsg sends a signal to the takeUntil pipes to unsubscribe them, and then unsubscribes it.
The method sendMessage(...) sends and logs a message with the WebSocket.
Voice Component
The voice.component.ts uses the video/audio HTML tags to play the remote party video and audio, and shows the local video:
@Component({
  selector: 'app-voice',
  templateUrl: './voice.component.html',
  styleUrls: ['./voice.component.scss']
})
export class VoiceComponent implements OnInit, OnDestroy, AfterViewInit {
  @ViewChild('local_video') localVideo: ElementRef;
  @ViewChild('remote_video') remoteVideo: ElementRef;

  @Input()
  receiver: Contact;
  @Input()
  sender: Contact;

  localVideoActivated = false;
  remoteMuted = false;
  localMuted = false;
  onLocalhost: boolean;
  inCall = false;

  private localhostReceiver = '';
  private componentSubscribtions: Subscription[] = [];

  constructor(private voiceService: VoiceService,
     private webrtcService: WebrtcService) {
     this.onLocalhost = this.voiceService.localhostCheck();
   }

   public ngAfterViewInit(): void {
      this.componentSubscribtions.push(this.webrtcService.offerMsgSubject
	   .pipe(filter(offerMsg => !!offerMsg.senderId &&
              !!offerMsg.receiverId), debounceTime(500))
	   .subscribe(offerMsg => this.handleOfferMessage(offerMsg)));
      this.componentSubscribtions.push(this.webrtcService.hangupMsgSubject
         .pipe(debounceTime(500))
  	 .subscribe(hangupMsg => this.handleHangupMessage(hangupMsg)));
      this.componentSubscribtions.push(this.webrtcService
         .remoteStreamSubject.subscribe(remoteStream =>
         this.handleRemoteStream(remoteStream)));
   }

   public ngOnDestroy(): void {
      this.componentSubscribtions.forEach(mySub => mySub.unsubscribe());
   }

  public ngOnInit(): void {
     this.localhostReceiver = this.sender.name +
        this.voiceService.localHostToken;
     this.requestMediaDevices();
  }
The @ViewChild annotation creates a reference to the video HTML tags by id.
The component gets the receiver/sender object as an input parameter.
The property componentSubscribtions is an array of subscriptions that are unsubscribed in the ngOnDestroy() method.
The constructor gets the VoiceService for the WebSocket connection, and the WebRTCService for the WebRTC protocol injected.
The ngOnInit() method calls requestMediaDevices() to get access to the available Mediadevices and stop any current use.
The method ngAfterViewInit() uses an RxJS pipe to debounce the messages, subscribes to the offerMsgSubject, and processes the messages in the method handleOfferMessage(...). The hangup messages are handled like the offer message and are processed in the handleHangupMessage(...) method. The remoteStream messages are handled like the offer message without the pipe and are processed in the handleRemoteStream(...) method.
The voice.component.ts call handling is as follows:
public async call(): Promise<void> {
   const peerConnectionContainer = this.webrtcService.createPeerConnection();
   this.voiceService.peerConnections
      .set(peerConnectionContainer.senderId, peerConnectionContainer);

    if (!this.localVideoActivated) {
      this.startLocalVideo();
    }

    this.webrtcService.localStream.getTracks().forEach(myTrack =>
       peerConnectionContainer.rtcPeerConnection
       .addTrack(myTrack, this.webrtcService.localStream));

    try {
      const offer = await this.voiceService.peerConnections
         .get(peerConnectionContainer.senderId)
         .rtcPeerConnection.createOffer(offerOptions);
      // Establish the offer as the local peer's current description.
      await peerConnectionContainer.rtcPeerConnection
         .setLocalDescription(new RTCSessionDescription(offer));

      this.inCall = true;

      this.voiceService.sendMessage({type: VoiceMsgType.offer,
         senderId: peerConnectionContainer.senderId,
         receiverId: peerConnectionContainer.receiverId, data: offer});
    } catch (err) {
      this.handleGetUserMediaError(err, peerConnectionContainer.senderId);
    }
  }
}

private handleRemoteStream(remoteStream: MediaStream): void {
  console.log('remote mediastream handled: ' + remoteStream.id);
  if(!!this.remoteVideo.nativeElement.srcObject) {
    remoteStream.getTracks().forEach(myTrack =>
	  this.remoteVideo.nativeElement.srcObject.addTracks(myTrack));
  } else {
    this.remoteVideo.nativeElement.srcObject = remoteStream;
  }
  this.remoteMuted = false;
}

public hangUp(): void {
  this.voiceService.sendMessage({type: VoiceMsgType.hangup,
     senderId: this.sender.name, receiverId: this.onLocalhost ?
        this.localhostReceiver : this.receiver.name, data: ''});
  this.closeVideoCall();
}

private closeVideoCall(): void {
  console.log('Closing call');

  this.voiceService.peerConnections.forEach((container, sid) => {
    console.log('--> Closing the peer connection');

    container.rtcPeerConnection.ontrack = null;
    container.rtcPeerConnection.onicecandidate = null;
    container.rtcPeerConnection.oniceconnectionstatechange = null;
    container.rtcPeerConnection.onsignalingstatechange = null;

    // Stop all transceivers on the connection
    container.rtcPeerConnection.getTransceivers().forEach(transceiver => {
      transceiver.stop();
    });

    // Close the peer connection
    container.rtcPeerConnection.close();
  });
  this.voiceService.peerConnections.clear();
  this.voiceService.pendingCandidates.clear();
  this.stopLocalVideo();
  this.remoteMuted = true;
  this.remoteVideo.nativeElement.srcObject = null;
  this.inCall = false;
}
To start a video call, the call() method is used. It uses the WebRTCService to create a PeerConnectionContainer that is used to store all the information needed to create the call. The PeerConnectionContainer is added to the peerConnections of the VoiceService. The method startLocalVideo() initializes the local video. Then the tracks of the localStream are added to the peerConnectionContainer.
Then the offer is created with the RtcConnection and the LocalDescription is created/set in the connection. The offer is sent with the VoiceService via the WebSocket in a JSON, as in this example:
{
 type: VoiceMsgType.offer, //Messagetype
 senderId: peerConnectionContainer.senderId, //the userId of the current user
 receiverId: peerConnectionContainer.receiverId, //the userId of the receiver
 data: offer //the offer that has been created with the RtcPeerConnection
}
The handleRemoteStream(...) method is used to set the remoteStream of the Answer Message as source object of the remoteVideo object and unmute it.
The hangup() method sends the hangup message with the VoiceService and calls closeVideoCall() iterates the peerConnections and closes the transceivers/connections and removes the callbacks. Then the connections and the pendingCandidates are cleared and the local/remote video stopped.
Conclusion: STUN Service and Front End
Spring has good support to WebSocket connections that can offer the support for the WebRTC Signaling with a STUN server. This part of the Angular front end is the integration of the video calls and is due to the Angular Components/Services being well supported.
WebRTC Protocol With Signaling
Now the WebRTC/Signaling implementation of the AngularPwaMessenger project is discussed.
WebRTC Protocol
The signaling that needs to be supported by the application is described in the previously linked MDN article. Basically, it is this:
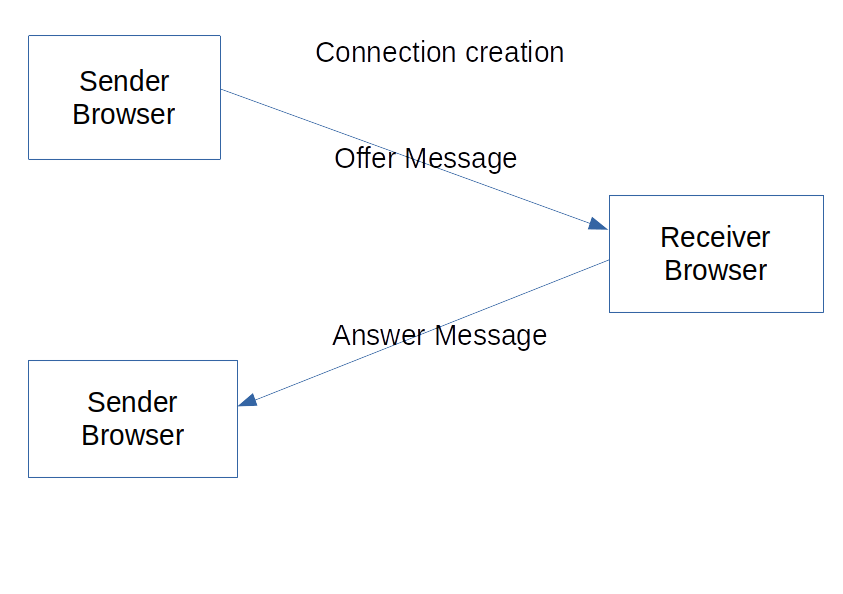
First, the sender needs to create an offer message and send it via the STUN server to the receiver. The receiver has to process the offer and create an answer for the offer and send it via the STUN server to the sender. Then the connection is established.
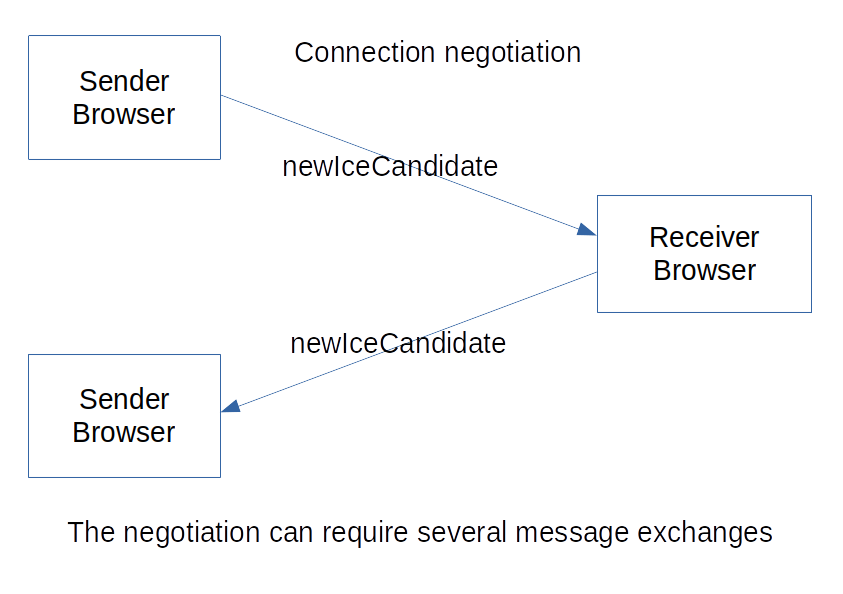
The sender needs to create an ICE candidate message for the protocol negotiation and send it via the STUN server. The receiver has to process the ICE candidate message and create a response message to send to the sender via the STUN server.
WebRTC Service
The webrtc.service.ts manages the messaging of sender and receiver. It creates connections and provides callbacks to process the messages.
Service Setup
To initialize the webrtc.service.ts the method addIncomingMessageHandler() needs to be called:
public async addIncomingMessageHandler(): Promise<void> {
	console.log('Message Handler added');
	await this.requestMediaDevices();
    this.voiceService.messages.subscribe(
      msg => {
        console.log('Received message: ' + msg.type);
        // console.log(msg);
        switch (msg.type) {
          case VoiceMsgType.offer:
            this.handleOfferMessage(msg);
            break;
          case VoiceMsgType.answer:
            this.handleAnswerMessage(msg);
            break;
          case VoiceMsgType.hangup:
            this.handleHangupMessage(msg);
            break;
          case VoiceMsgType.iceCandidate:
            this.handleICECandidateMessage(msg);
            break;
          default:
            console.log('unknown message of type ' + msg.type);
        }
      },
      error => console.log(error)
    );
  }
The method requestMediaDevices() initializes the localStream.
The messages of the VoiceService are subscribed to process the messages that are returned from the receiver via the WebSocket. The VoiceMsg has the type enum to show the message type. The switch calls the message handler to process the message type and log messages with an unknown type.
  public createPeerConnection(): RTCPeerConnectionContainer {
    console.log('creating PeerConnection...');
    const peerConnection = new RTCPeerConnection(environment.RTCPeerConfiguration);
    //const senderId = window.crypto.randomUUID();
    const senderId = this.senderId;
    const receiverId = this.onLocalhost ? this.localhostReceiver : this.receiverId;

    peerConnection.onicecandidate = this.handleICECandidateEvent;
    peerConnection.oniceconnectionstatechange =
       this.handleICEConnectionStateChangeEvent;
    peerConnection.onsignalingstatechange = this.handleSignalingStateChangeEvent;
    peerConnection.ontrack = this.handleTrackEvent;
    const container = new RTCPeerConnectionContainer(senderId,
       receiverId, peerConnection);
    return container;
  }
The method createPeerConnection() creates an RTCPeerConnectionContainer with the senderId, receiverId, and peerConnection. The peerConnection gets the callback functions set to process the connection events.
private handleOfferMessage(msg: VoiceMsg): void {
   console.log('handle incoming offer sid:: '+msg.senderId);
   const peerConnectionContainer = this.createPeerConnection();
   peerConnectionContainer.receiverId = msg.senderId;
   peerConnectionContainer.senderId = this.onLocalhost ? this.localhostReceiver :
      peerConnectionContainer.senderId;
   this.voiceService.peerConnections.set(peerConnectionContainer.senderId,
      peerConnectionContainer);

   this.localStream.getTracks().forEach(myTrack => !!peerConnectionContainer
      && peerConnectionContainer?.rtcPeerConnection?.addTrack(myTrack,
      this.localStream));

   this.voiceService.peerConnections.get(peerConnectionContainer.senderId)
      .rtcPeerConnection.setRemoteDescription(new RTCSessionDescription(msg.data))
      .then(() =>
         // Build SDP for answer message
         this.voiceService.peerConnections.get(peerConnectionContainer.senderId)
            .rtcPeerConnection.createAnswer()
      ).then((answer) =>
        // Set local SDP
         this.voiceService.peerConnections.get(peerConnectionContainer.senderId)
            .rtcPeerConnection.setLocalDescription(answer).then(() => answer)
      ).then(answer => {
        // Send local SDP to remote part
         this.voiceService.sendMessage({type: VoiceMsgType.answer, senderId:
            peerConnectionContainer.senderId,
            receiverId: peerConnectionContainer.receiverId, data: answer} as VoiceMsg);
         this.offerMsgSubject.next(msg);
      }).catch(e => this.reportError(e));
}
To handle the offer of the method handleOfferMessage(..), a new PeerConnetionContainer is created. It gets to set the receiverId and senderId to create a response. The PeerConnectionContainer is added to the VoiceService.peerConnections map.
Then the tracks of the localStream are added to the PeerConnectionContainer.rtcPeerConnection.
Then, use the following steps to create the answer message:
- The
PeerConnectionContainer.rtcPeerConnectionadds the remoteDescription of the offer message. - The
PeerConnectionContainer.rtcPeerConnectionis used to create an answer object. - The answer object is added as localDescription to the
PeerConnectionContainer.rtcPeerConnection. - The VoiceService is used to send the answer message via the WebSocket, and the offer message is added to the
offerMsgSubjectto enable the front end to react to the offer.
private handleAnswerMessage(msg: VoiceMsg): void {
   console.log('handle incoming answer sid: ' +msg.receiverId);
   if(this.voiceService.peerConnections.get(msg.receiverId).rtcPeerConnection
      .signalingState !== 'stable') {
   this.voiceService.peerConnections.get(msg.receiverId).rtcPeerConnection
      .setRemoteDescription(new RTCSessionDescription(msg.data))
      .then(() => console.log('answer handled'));
   }
}

private handleHangupMessage(msg: VoiceMsg): void {
   console.log(msg);
   this.hangupMsgSubject.next(msg);
}
The method handleAnswerMessage(...) gets the answer message and checks if the rtcPeerConnection.signalingState of the PeerConnectionContainer is not stable to ignore duplicates. Then the PeerConnectionContainer.rtcPeerConnection has the remoteDescription added based on the answer message.
The method handleHangupMessage(...) adds the message to the hangupMsgSubject to enable the front end to react.
private handleICECandidateMessage(msg: VoiceMsg): void {
   console.log('ICECandidateMessage sid: '+msg.senderId+' remoteId: '+msg.receiverId);
   if (!!this.voiceService.peerConnections.get(msg.receiverId).rtcPeerConnection
      ?.currentRemoteDescription) {
      this.voiceService.peerConnections.get(msg.receiverId).rtcPeerConnection
         .addIceCandidate(new RTCIceCandidate(msg.data)).catch(this.reportError);
    } else {
      if (!this.voiceService.pendingCandidates.get(msg.receiverId)) {
         this.voiceService.pendingCandidates.set(msg.receiverId,
            [] as RTCIceCandidateInit[]);
      }
      this.voiceService.pendingCandidates.get(msg.receiverId).push(msg.data);
   }
}
To handle the ICECandidate messages, the methods handleICECandidateMessage(...) and rtcPeerConnection are checked, and then a new ICECandidate is added to the rtcPeerConnection. If the check fails, the ICECandidate message is added to the array in the pendingCandidates map of the receiverId.
private handleICECandidateEvent = (event: RTCPeerConnectionIceEvent) => {
   if (event.candidate && this.voiceService.peerConnections
      .get(this.getEventSid(event))?.receiverId) {
      this.voiceService.sendMessage({
        type: VoiceMsgType.iceCandidate,
        senderId: this.getEventSid(event),
        receiverId: this.voiceService.peerConnections
           .get(this.getEventSid(event)).receiverId,
        data: event.candidate
      });
   }
This function handles RTCPeerConnectionIceEvents that are generated by the RtcPeerConnection.onicecandidate callback. The message is sent with the VoiceService via the WebSocket. The senderId and the receiverId are set based on the RtcConnection. The event.candidate is the message data generated by the RtcConnection.
The other callbacks are checking if the connection should be closed.
Local Testing
To test the voice calls with 2 devices on a local network, the Spring Boot application needs to be started with the ssl profile. That profile uses the SSL certificate in the 'resources/testCert/server.p12' file. The steps to create the certificate can be found in the addIngress.sh script. The DNS name of the server that runs the back end has to be put in the cert.conf and server.conf. The server.p12 has to be copied into the resources and the rootCa.pem has to be imported as the authority in the browsers used for testing.
Conclusion
The handling of the received WebSocket messages and the WebRTCConnection callbacks is encapsulated in this service. The message handling is using TypeScript to help with the properties and method parameters.
Published at DZone with permission of Sven Loesekann. See the original article here.
Opinions expressed by DZone contributors are their own.
Comments