What is Liquibase? How to Automate Your Database Script Deployment
Have you ever spent hours looking at who, why, and what was changed in the database? I'll show you how we automated our database change process using Liquibase and Git.
Join the DZone community and get the full member experience.
Join For FreeMany organizations have implemented DevOps in their applications, that’s true. But, at the same time, their database change process hasn’t realized any of these benefits and is still left in the dark ages. But what if you could automate that too? Yeah, you guessed right — it can be done using Liquibase. And here’s a Liquibase tutorial to show you how to do that.
Is This Liquibase Tutorial for You?
Are you manually executing scripts to your database? Or maybe you're wasting time validating database scripts received from your team?
After that, are you merging scripts into one file and executing them in every environment? How about deployment errors? Have you ever spent hours looking at who, why, and what was changed in the database?
But what if you can't have an entire CI/CD process right now or company policy doesn't allow you to run scripts on specific environments? That's not a problem for Liquibase.
By using Liquibase, you can:
- Automate your database deployment scripts,
- Consistently deploy the same way in every environment,
- Have rollbacks always prepared for every database change,
- Have all detailed info of deployments in one place.
What's more, thanks to this you will have:
- Fewer deployment errors,
- Happy and efficient developers coding together on the same databases,
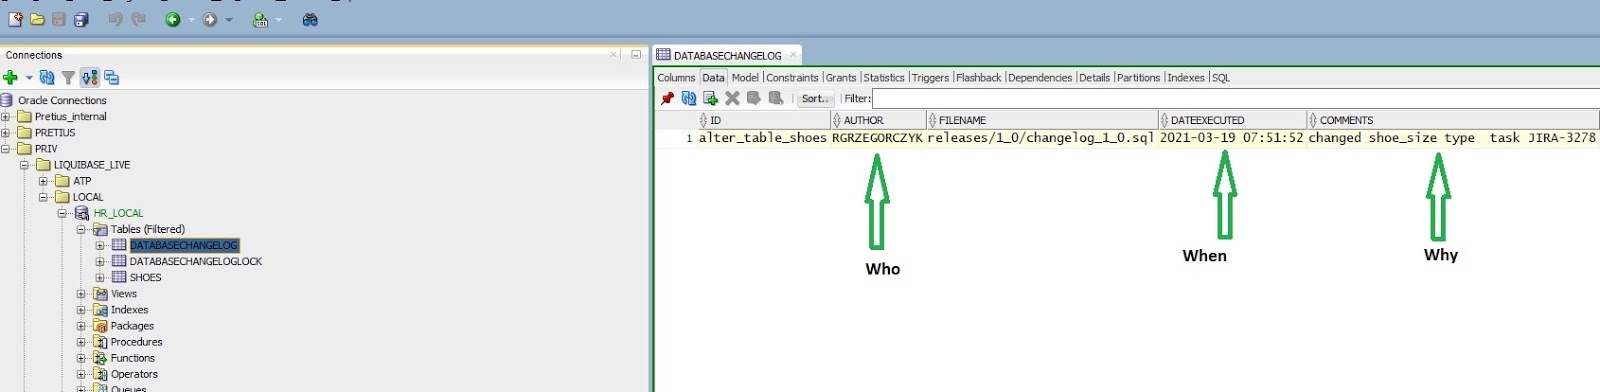
- Every change audited, e.g., who, when (and why) changed the column shoes.Shoe_size from a number data type to a varchar2,
- More coffee time.
In a series of articles, I'll show you how we automated our database change process at Pretius using Liquibase and Git — examples from limited-access environments included. Let's start with this basic Liquibase tutorial.
What is Liquibase Exactly?
Liquibase (LB) is an open-source tool written in Java. It makes defining database changes easy, in a format that's familiar and comfortable to each user. Then, it automatically generates database-specific SQL for you.
Database changes (every change is called changeset) are managed in files called changelogs.
Liquibase needs two tables at your DB schema (created automatically):
DATABASECHANGELOG— a table storing information about all changes made to your database,DATABASECHANGELOGLOCK— used to prevent users from doing changes to the database at the same time.
My examples will be based on changesets written in SQL — it's the easiest way to start automating your Oracle database change process.
Start With Installing Liquibase
Go to and download the latest version of Liquibase — choose "Just the files." In this article, I will use version 4.3.0. build 09.02.2021.
Extract the downloaded zip folder (e.g., to disk C:). After that, you must set a New Path System Variable to the liquibase-version#bin folder on your computer. For Liquibase to work properly, you must also have Java installed.
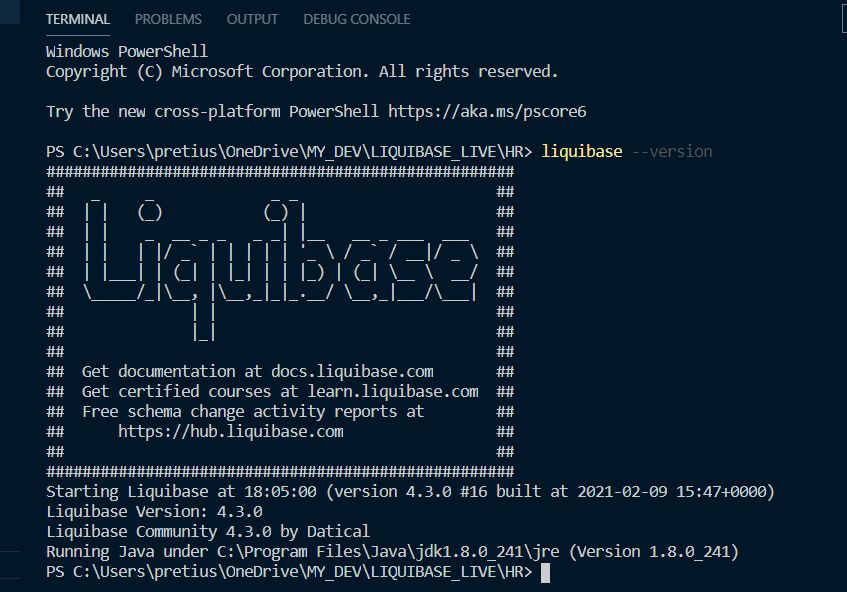
Go to your favorite CLI tool (I use Visual Studio Code) and type:
liquibase —versionIf everything's ok, you will see:
If you use UTF8 encoding in your files, remember to edit the liquibase.bat file by adding the line:
IF NOT DEFINED JAVA_OPTS set JAVA_OPTS=-Dfile.encoding=UTF–8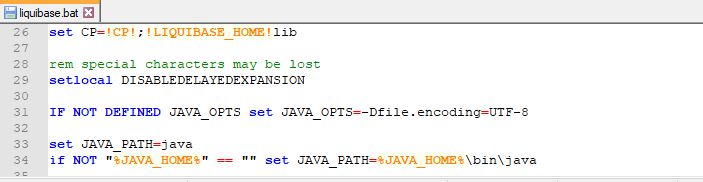
Configure Your Project and Liquibase
Ok, let's see how we can organize our files (folder HR is my GIT repository). In these folders, we will put files created during project development. If you had other types of objects (which are "create or replace" type), just create a folder with them, e.g., "synonyms."
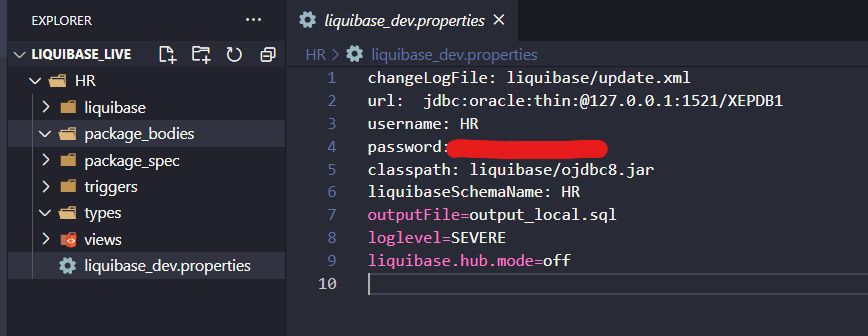
#path to our master changelog file
changeLogFile: liquibase/update.xml
#dbhost and credentials
url:  jdbc:oracle:thin:@127.0.0.1:1521/XEPDB1
username: HR
password: XXXXXX
#OJDBC driver localization
classpath: liquibase/ojdbc8.jar
#schema, where Liquibase will store it’s DATABASECHANGELOG and DATABASECHANGELOGLOCK table (if other than HR, remember to add grants to HR!)
liquibaseSchemaName: HR
#default  SQL file name generated by Liquibase
outputFile=output_local.sql
#debug mode
loglevel=SEVERE
#extra option from Liquibase, we don’t need it for now.
liquibase.hub.mode=off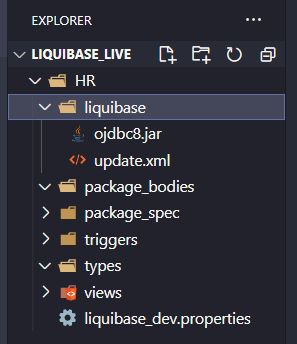
Now create an update.xml file (put it into new hr/liquibase folder with OJDBC file):
<?xml version="1.0″ encoding="UTF-8″?><databaseChangeLog
xmlns="http://www.liquibase.org/xml/ns/dbchangelog"
xmlns:xsi="http://www.w3.org/2001/XMLSchema-instance"
xsi:schemaLocation="http://www.liquibase.org/xml/ns/dbchangelog
http://www.liquibase.org/xml/ns/dbchangelog/dbchangelog-4.3.xsd"></databaseChangeLog>
Use Oracle Wallet (Optional)
If your Oracle database is hosted on Oracle Autonomous Database, you need to use the wallet to connect to it through Liquibase. Therefore, download your wallet and remember the password for it.
Unpack your WALLET_NAME.ZIP to the previously created HR/liquibase folder. Also edit your HR/liquibase/wallet_name/ojdbc.properties file:
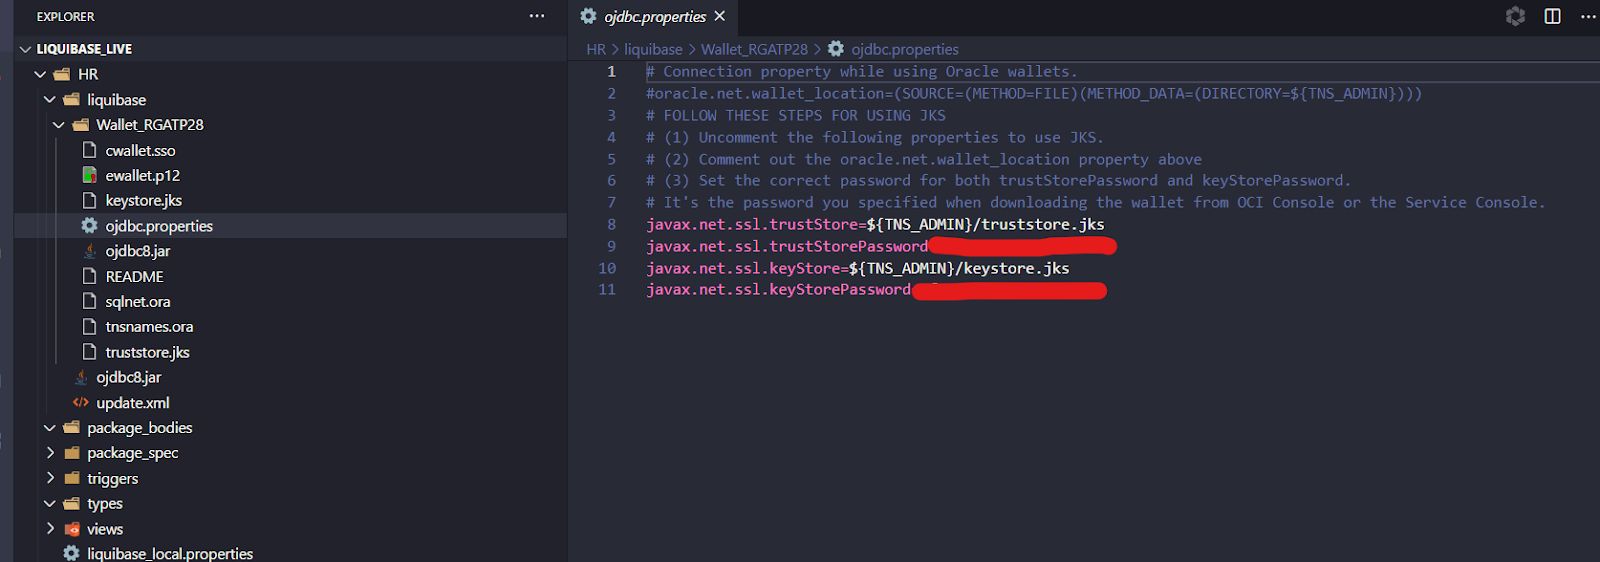
Your file should look like on the screen above. In the lines javax.net.ssl.trustStorePassword and javax.net.ssl.keyStorePassword, put your ATP wallet password.
Edit URL at your liquibase_local.properties file and set your connection name (from Wallet/tnsnames.ora and path to wallet):
url: jdbc:oracle:thin:@rgatp28_high?TNS_ADMIN=liquibase/Wallet_RGATP28Check your sqlnet.ora file, make sure there is "SSL_SERVER_DN_MATCH=yes". Don't change anything else.
Connect Liquibase With A Database
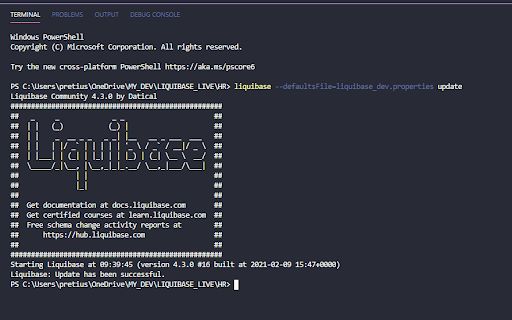
If everything is set properly, we can make the first connection to our DEV database. Start your favorite CLI from the HR folder (location of Liquibase properties file) — for this article, I use terminal directly from VS Code and connection to my local development database.
liquibase —defaultsFile=liquibase_dev.properties updateSQL
liquibase > invocation of LB (environment path).
defaultsFile > name and location of our properties file.
(If you name properties file to "liquibase.properties" then you may omit this command because it's Liquibase default. I prefer to have different names for every connection.)
updateSQL > Liquibase command, only generation of SQL script (it won't do anything on your database).
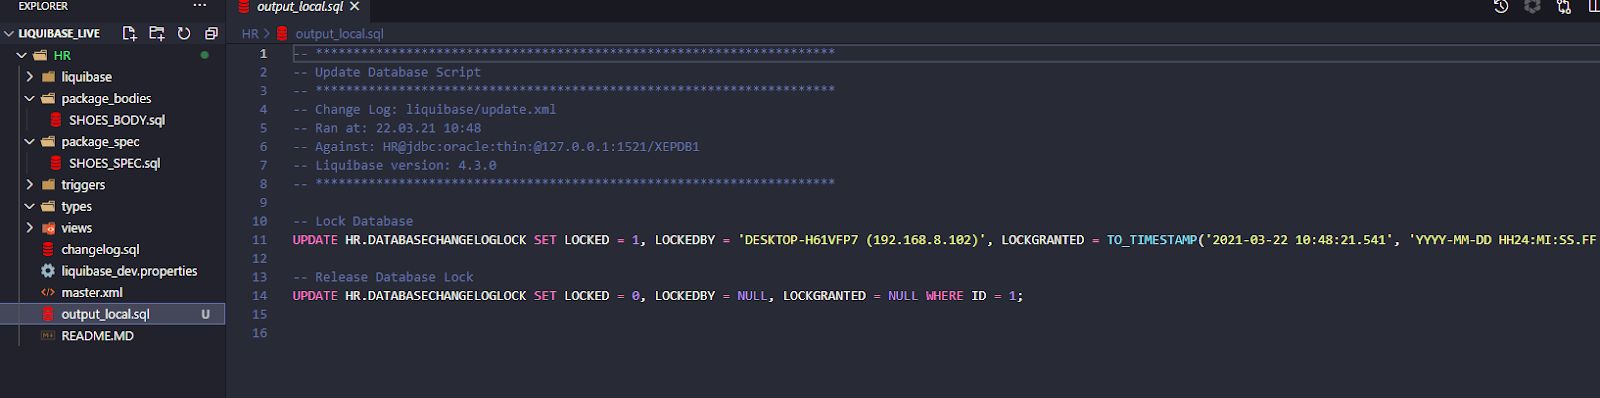
In a few seconds LB will generate output_file.sql:
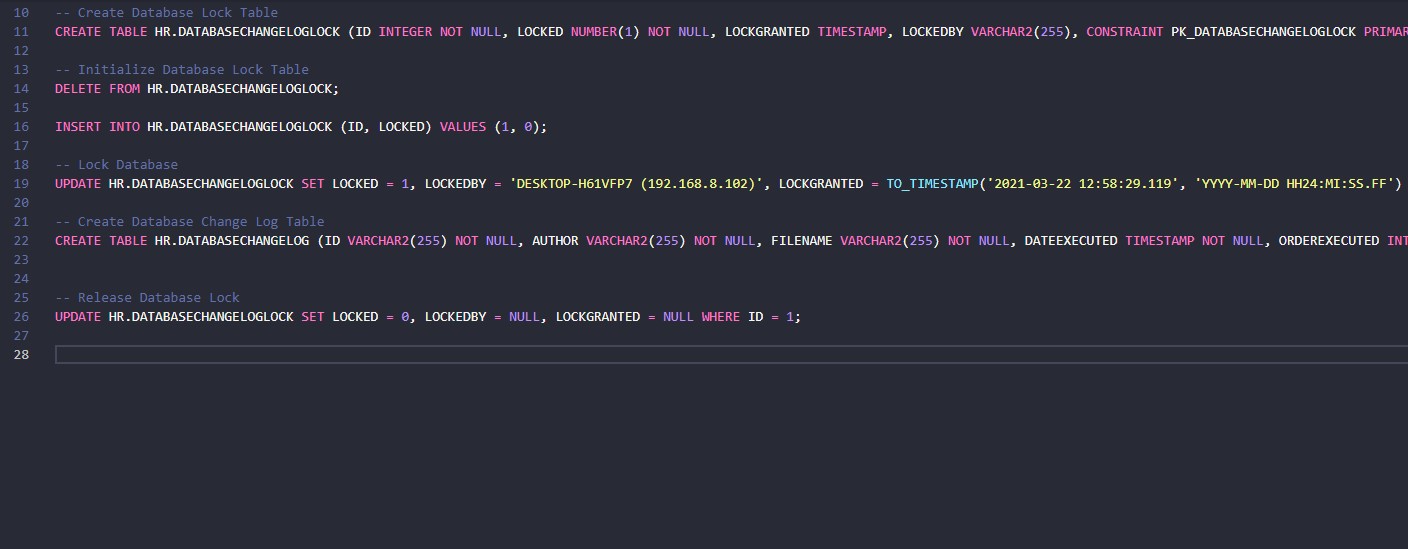
As you can see, if you'd run this script to your database, it would create two tables: DATABASECHANGELOG and DATABASECHANGELOGLOCK.
Ok, now let's create those tables:
liquibase —defaultsFile=liquibase_dev.properties updateThe update command will execute SQL to the database.
Tables are created:

We need to create a changelog file that will point to our folders with objects (those we can create/replace).
I created HR/master.xml file:
<?xml version="1.0″ encoding="UTF-8″?>
<databaseChangeLog
xmlns="http://www.liquibase.org/xml/ns/dbchangelog"
xmlns:xsi="http://www.w3.org/2001/XMLSchema-instance"
xsi:schemaLocation="http://www.liquibase.org/xml/ns/dbchangelog
http://www.liquibase.org/xml/ns/dbchangelog/dbchangelog-4.3.xsd">
<includeAll path="triggers" relativeToChangelogFile="true"/>
<includeAll path="views" relativeToChangelogFile="true"/>
<includeAll path="types" relativeToChangelogFile="true"/>
<includeAll path="package_spec" relativeToChangelogFile="true"/>
<includeAll path="package_bodies" relativeToChangelogFile="true"/>
</databaseChangeLog>
It points to my objects folders and all of its content.
In main changelog HR/liquibaseupdate.xml set path to your master.xml file, just add the line:
<include file="./master.xml"/>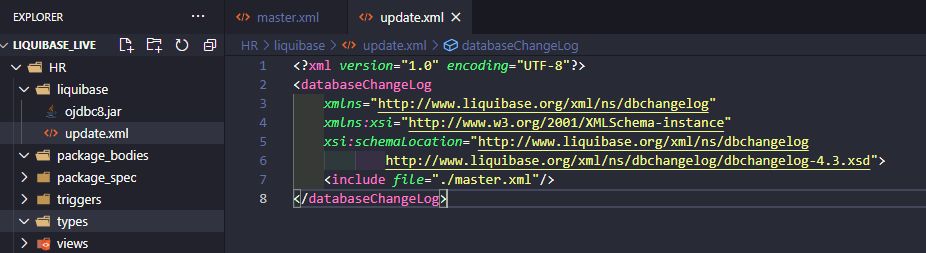
Track Your DML and DDL Database Changes
Ok, wait... but what about changes like DDL or DML? No problem.
We create a separate changelog file for that type of change and write our changesets inside of it.
Just create changelog.sql file and mark it as Liquibase SQL file by typing:
—liquibase formatted sql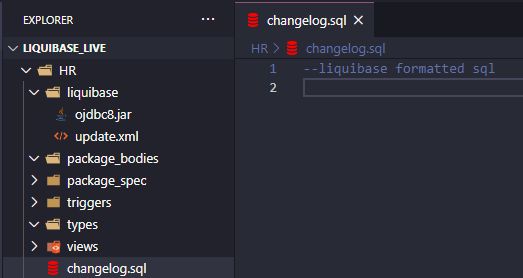
Point to our new changelog in master.xml file by adding:
<include file="changelog.sql" relativeToChangelogFile="true" />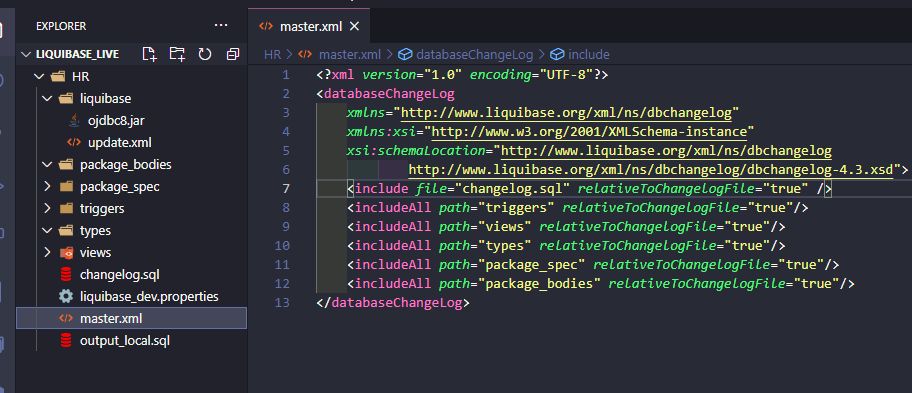
The order in which you point to your changelogs or folders is very important. It tells Liquibase in which order to run your SQL. It is better to run changelogs first (inside of which is "create table(…)") and after that compile package that uses this table.
Let's create the first project table in our changeset. Just write:
—changeset AUTHOR:CHANGESET_NAME
—comment OPTIONAL COMMENT
YOUR DDL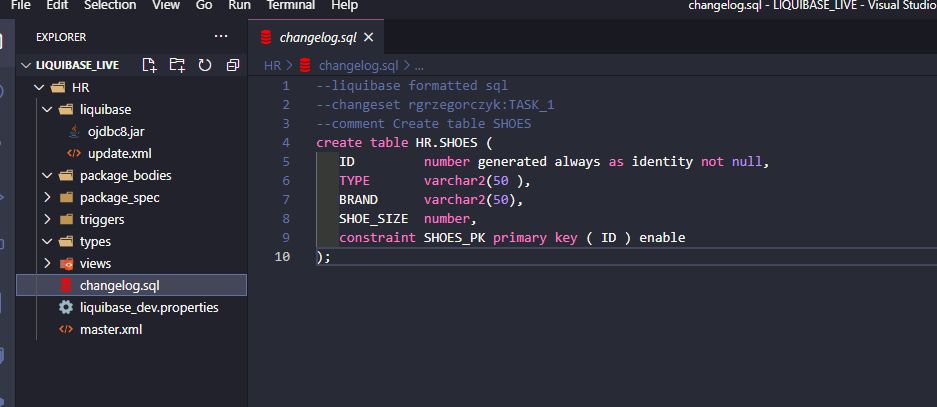
Let's ask LB to generate our SQL file (just to preview what changes are going to be made to our database).
liquibase —defaultsFile=liquibase_dev.properties updateSQL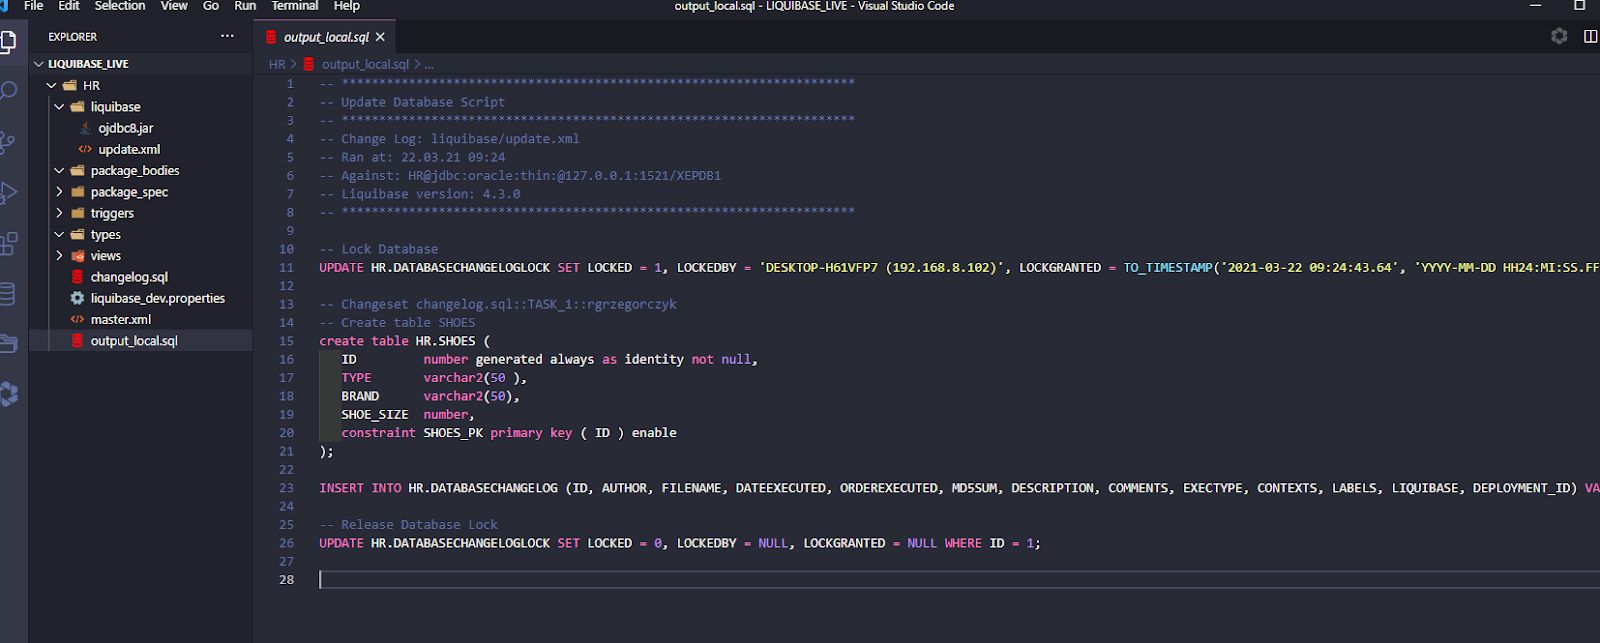
As you may notice, LB is going to lock our DATABASECHANGELOGLOCK table by setting LOCKED = 1 (while you are running your script to DB, column LOCKED is set to 1. When another user runs LB at the same time, Liquibase will wait until the lock is released), then it will create a SHOES table, insert log change into DATABASECHANGELOG, and release the lock from the DATABASECHANGELOGLOCK table.
If everything is fine, execute the following script to our database:
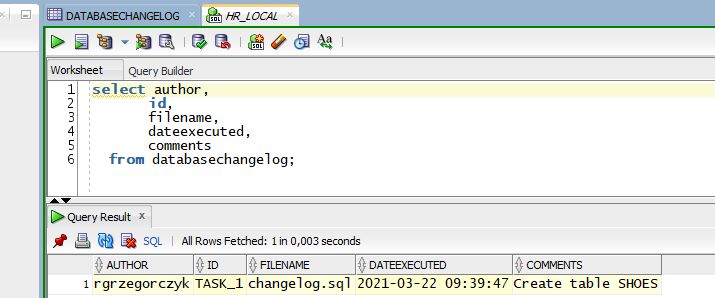
liquibase —defaultsFile=liquibase_dev.properties updateThe table SHOES has been created.
We can check who, why, and when created this table.
Finally, nothing is anonymous!
Track Other Database Changes (Packages, Views, etc.)
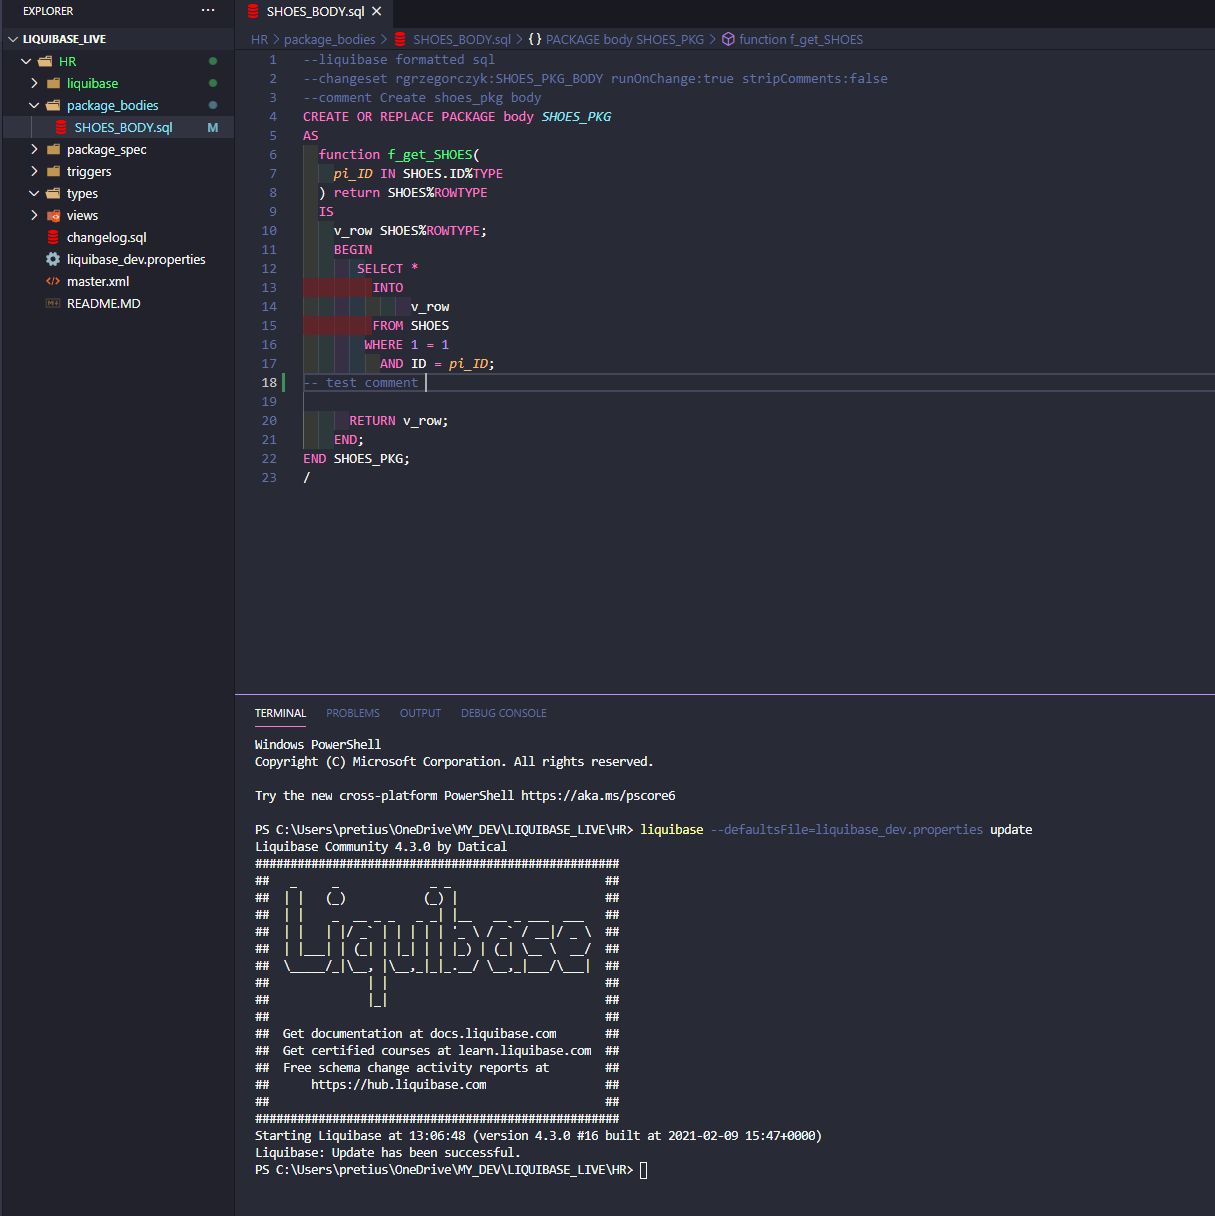
Now, we can do the same with some scripts. I created a package called SHOES_PKG in 2 separate files. Every file is a unique changeset and should be marked as a Liquibase formatted SQL file.
The SQL file is a unique changeset with additional parameters:
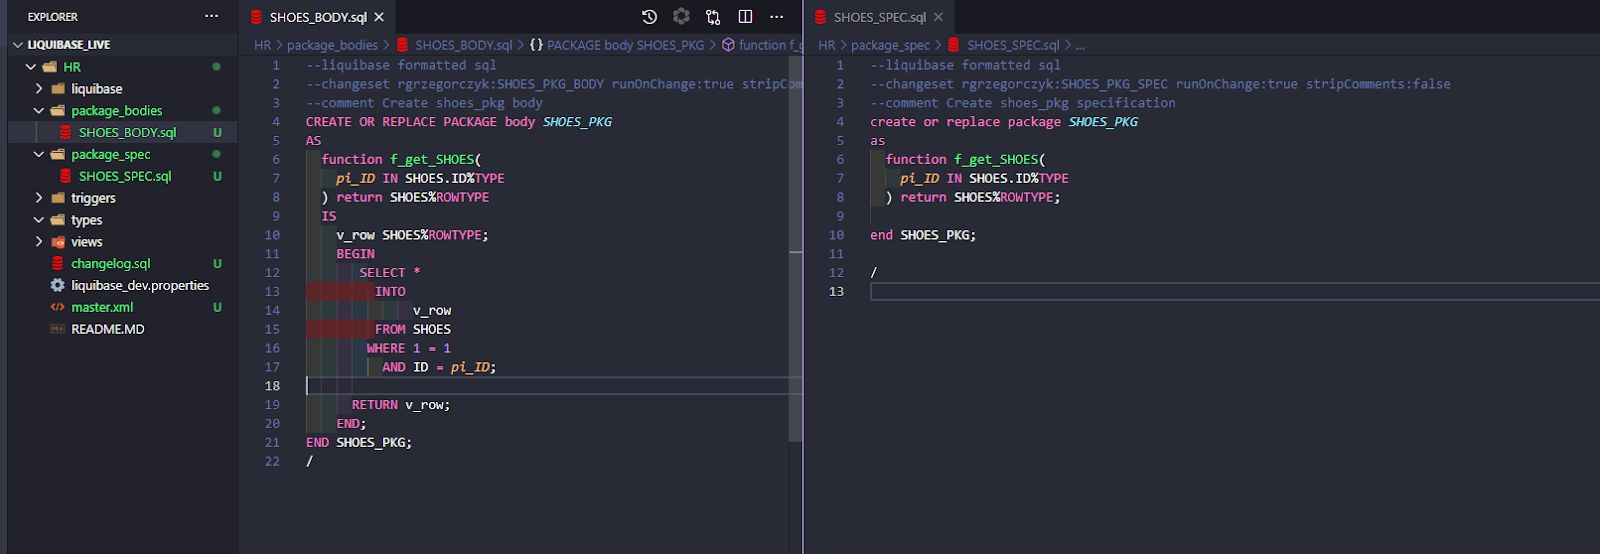
runOnChange:true — it means, every time we change our package, Liquibase will run this changeset against our database (compile this package).
stripComments:false — do not cut our code comments.
Now, if we check what SQL would LB run against database (updateSQL) — it would compile both package spec and package body.
Let's compile these package in our DB (update command).
Everything is logged, and packages are compiled.
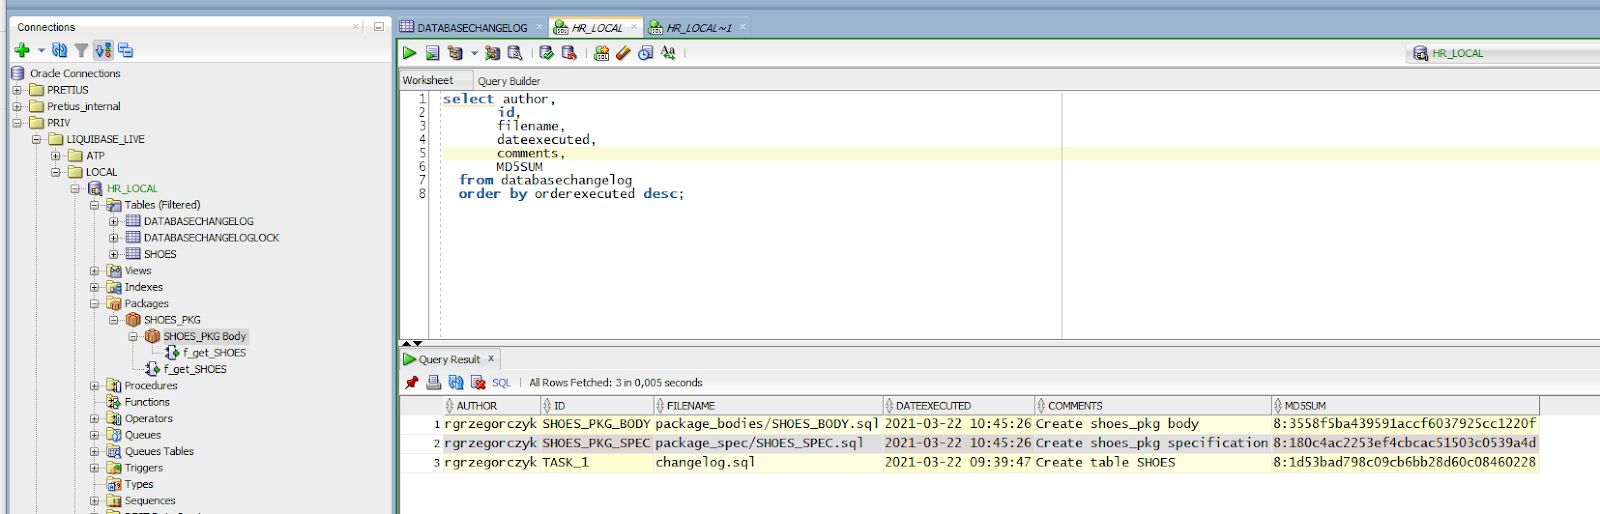
Have a look at the MD5SUM column value — it's the last checksum of your changeset.
For now, all pending changes are executed; LB will not generate anything in SQL (besides locking LB table) — check it by running updateSQL.
Now, let's change our SHOES_PKG body and save the file.

The checksum of the file has changed, and LB will compile this package again — let's run an update.
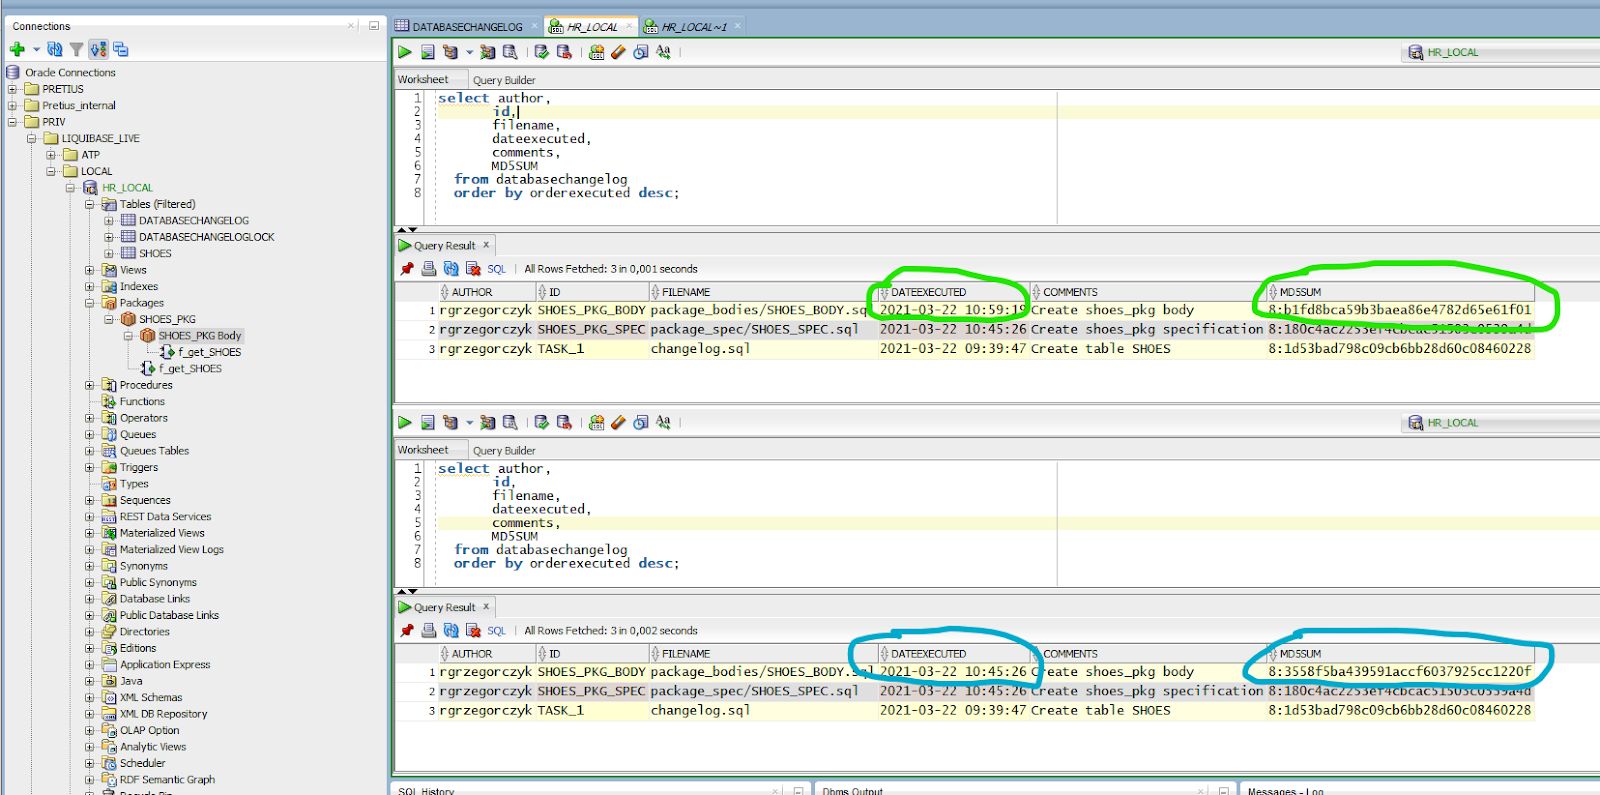
Liquibase compiled package body again and updated row with these changesets in DATABASECHANGELOG table — with actual DATEEXECUTED and new MD5SUM value.
How to Install Liquibase in An Existing Software Project?
In this part of the Liquibase tutorial, you will learn how to implement database automation in an existing software project.
Is it possible without hours of additional work? Yes!
There are a few ways to automate your existing database using Liquibase. I will show you two which I found most useful — and you can choose the one that suits your needs best.
In the examples below, I'll be using the project created in the previous steps of this Liquibase tutorial.
How to Install Liquibase When There Are Lots of Objects in Your Existing Project
Configure Liquibase in your project repository and leave all files as they are — just remember to add a path to them in your master.xml file.
So, I have created 2 procedures and 2 triggers before implementing Liquibase:
P_ADD_JOB_HISTORY
P_SECURE_DML
TRG_SECURE_EMPLOYEES
TRG_UPDATE_JOB_HISTORY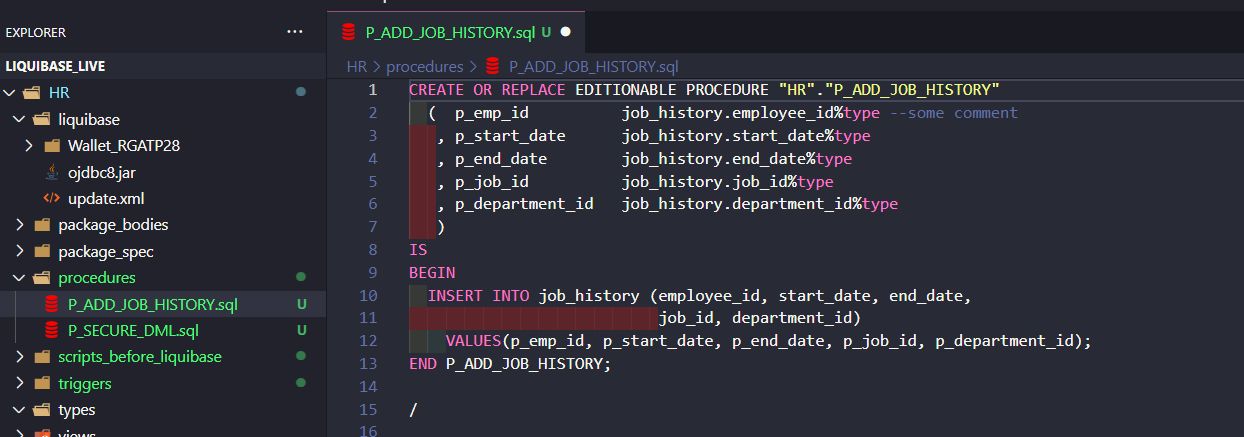
You DON'T need to add "changeset" or "–liquibase formatted sql" to your file right now.
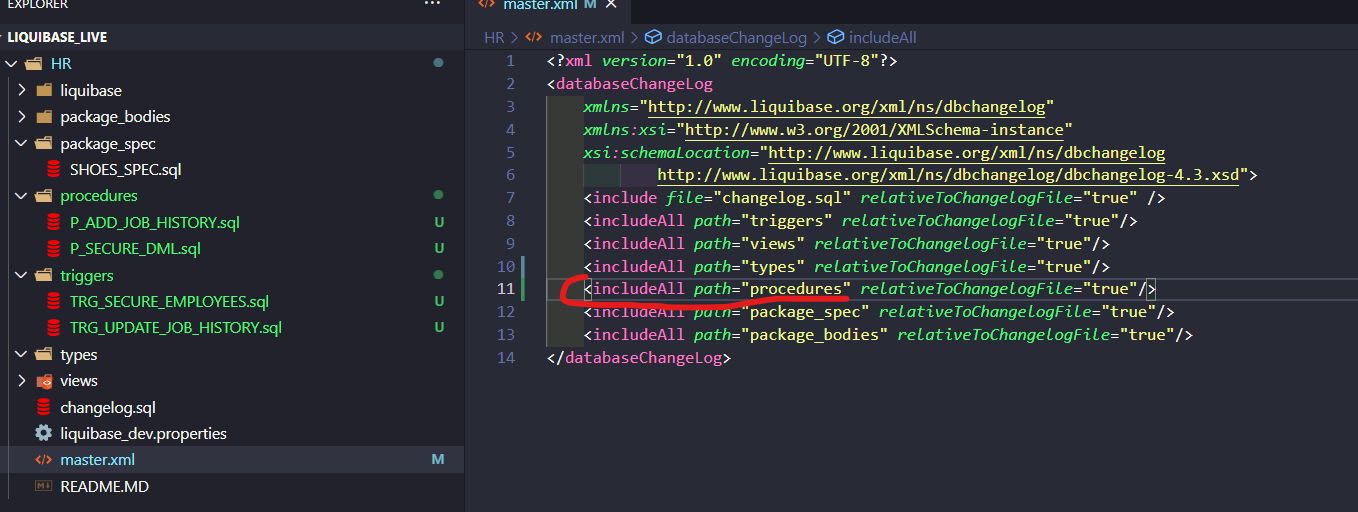
I also added a path to a PROCEDURES folder to my master.xml.
Now, let's run Liquibase updateSQL to see what SQL Liquibase would like to execute:
liquibase —defaultsFile=liquibase_dev.properties updateSQL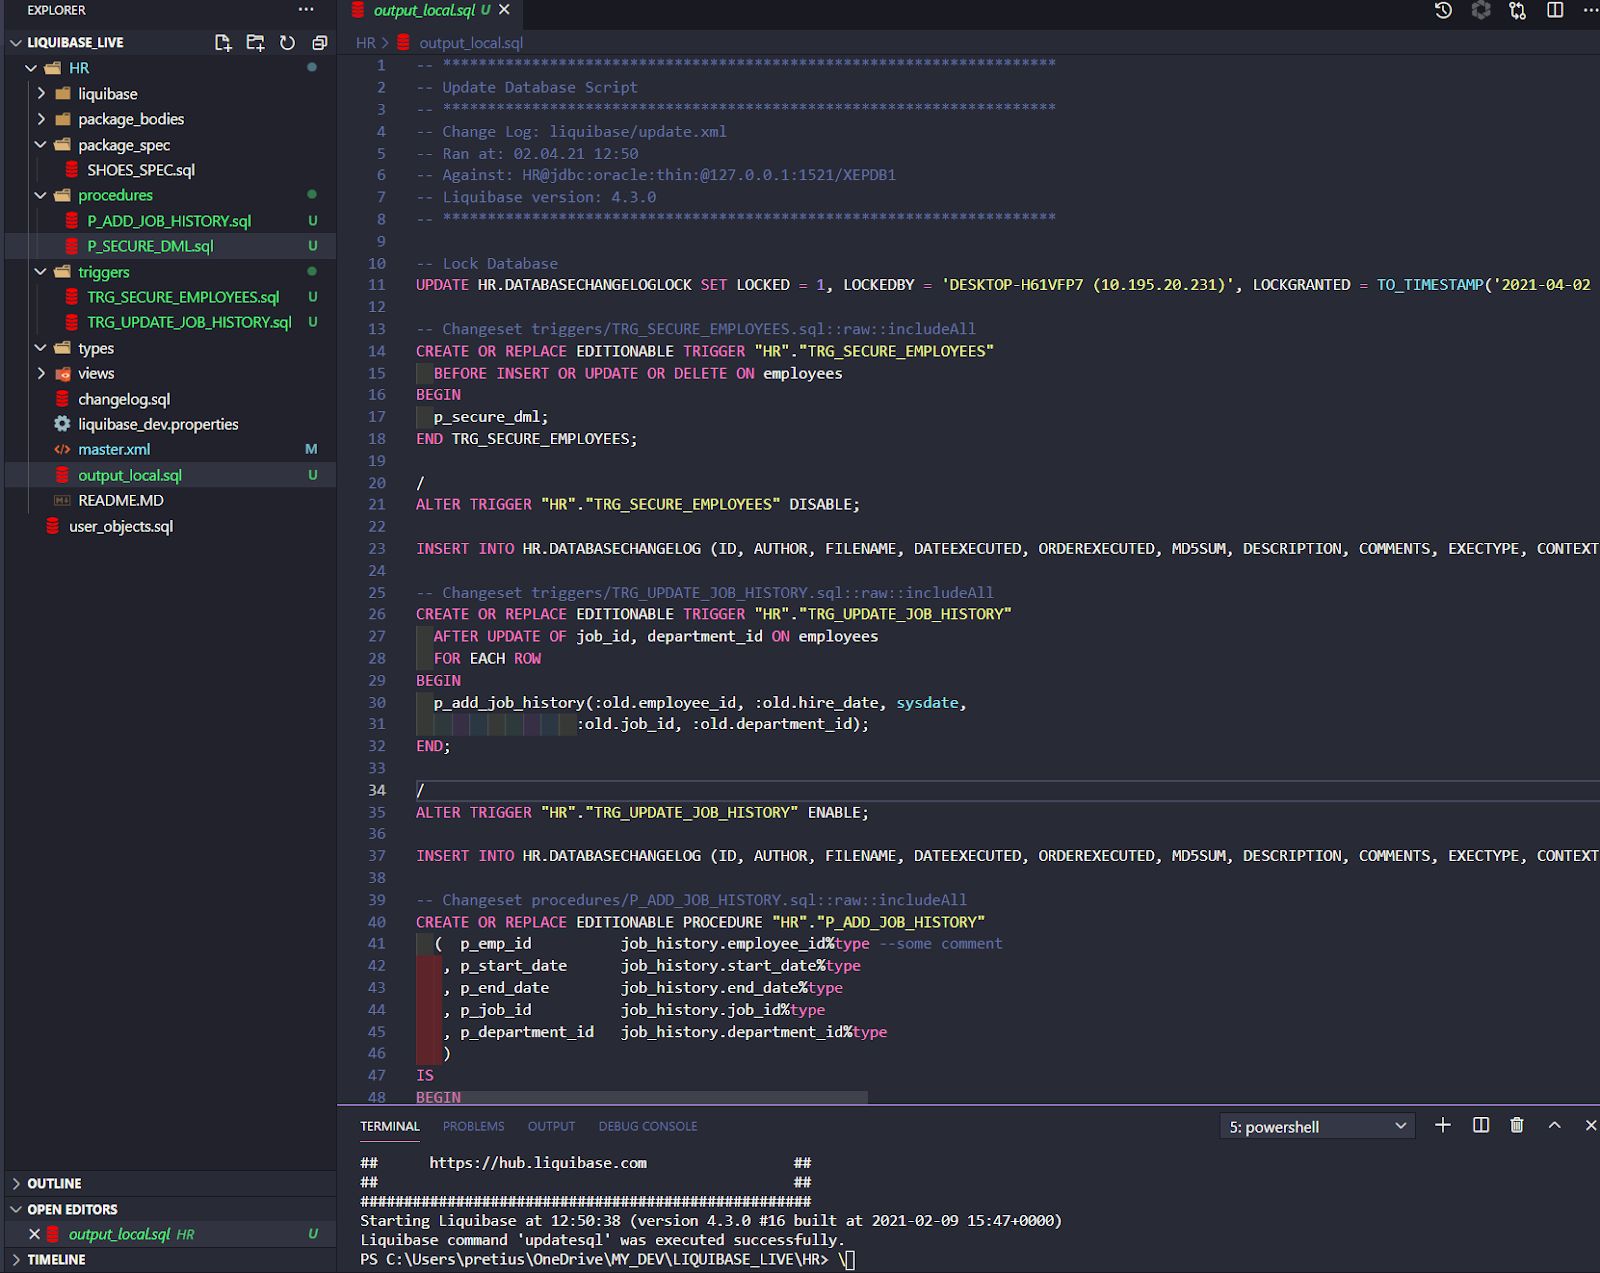
OK, bro. But this is not what we wanted! We already have these procedures and triggers in our database. We don't want to create these objects again.
That's where ChangelogSync and ChangelogSyncSQL commands come in!
Let's run ChangelogSyncSQL to see what's gonna happen:
liquibase —defaultsFile=liquibase_dev.properties ChangelogSyncSQLThe output SQL file is:
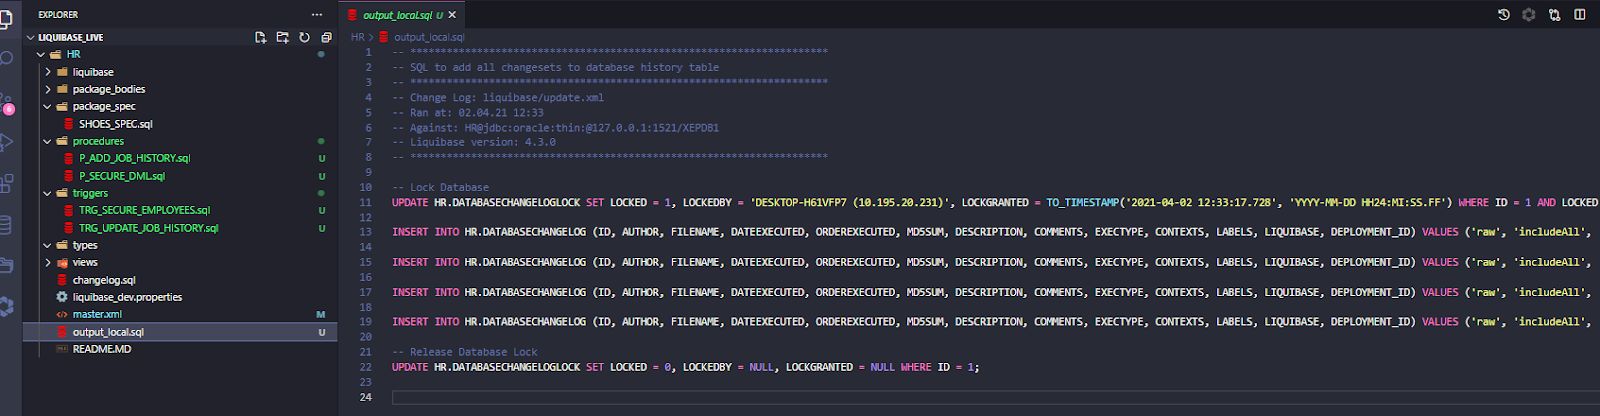
This is exactly what we wanted — just an SQL file with inserts in a DATABASECHANGELOG table. It will "tell" Liquibase that those objects were already created in the past, and there's no need to run them again.
Now, let's insert it into our Oracle database:
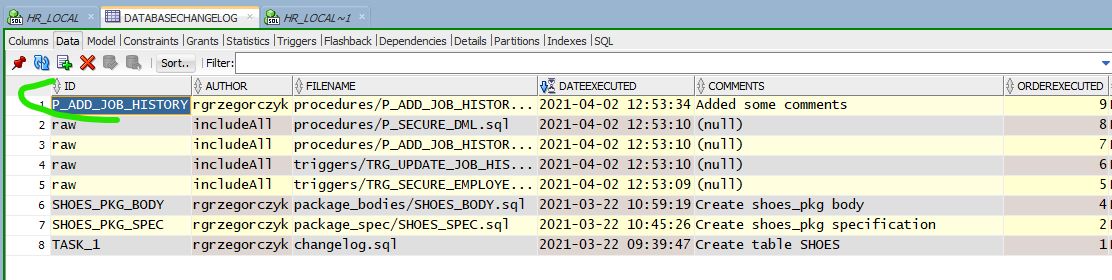
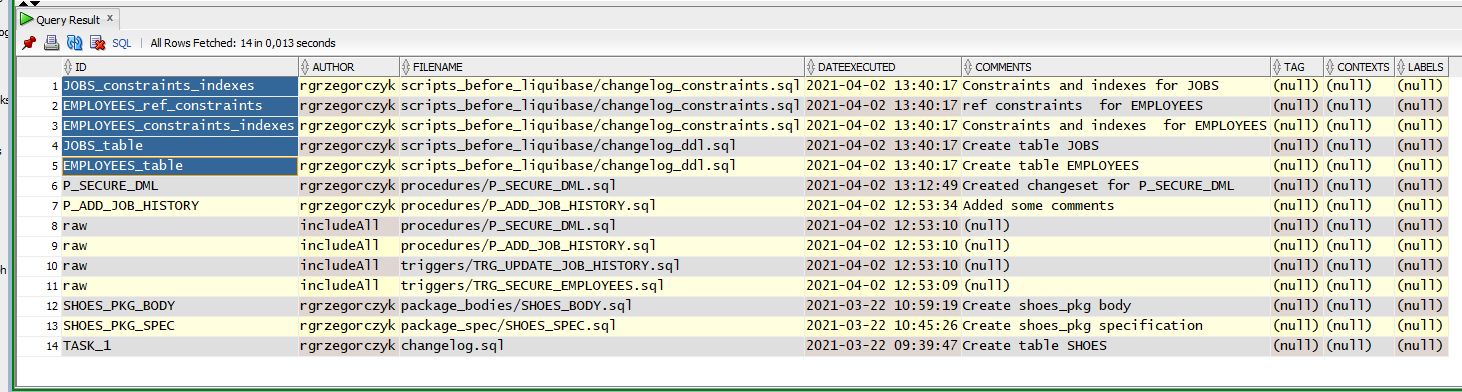
liquibase —defaultsFile=liquibase_dev.properties ChangelogSyncAnd we have 4 new changesets in the DATABASECHANGELOG table:
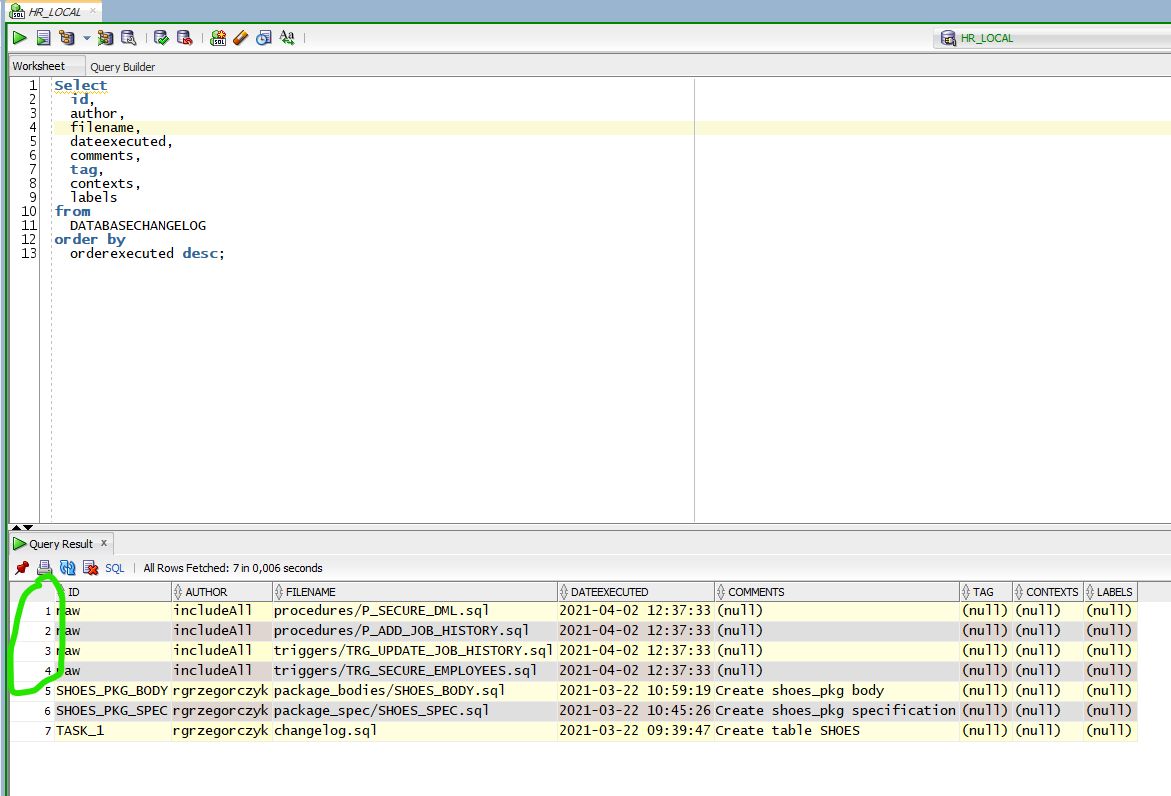
But what are these strange "raw" IDs? And why is the author called "includeAll"? Because this is the easiest and fastest way to move your existing project to Liquibase! And these changesets were created automatically.
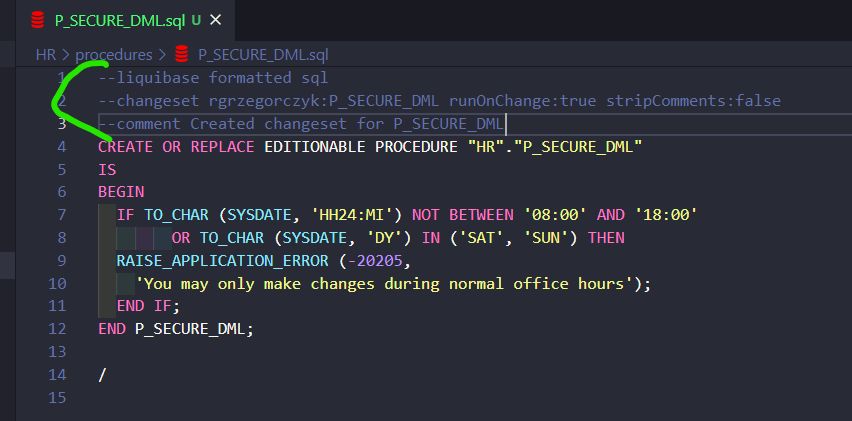
If you'd like to do some changes, e.g., in P_ADD_JOB_HISTORY, just add a changeset — as you'd normally do when creating a new database object:
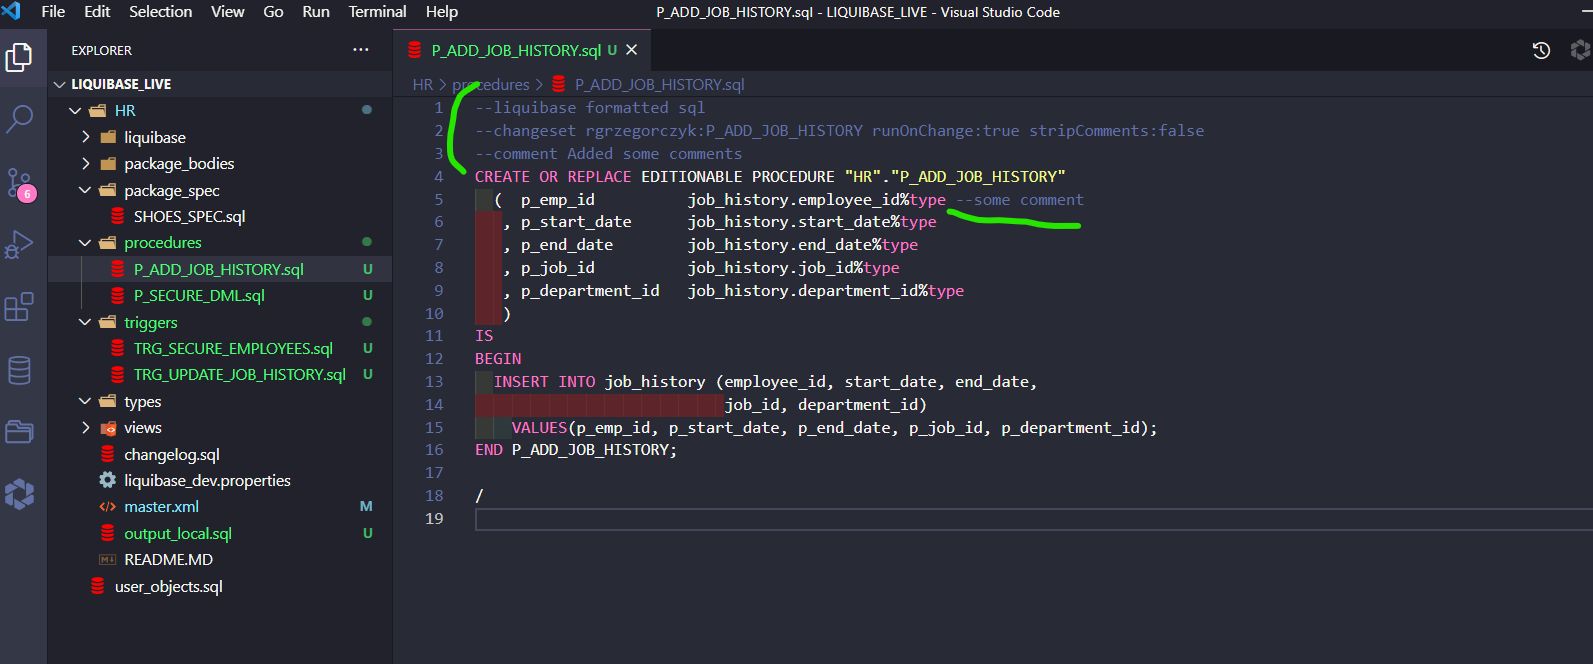
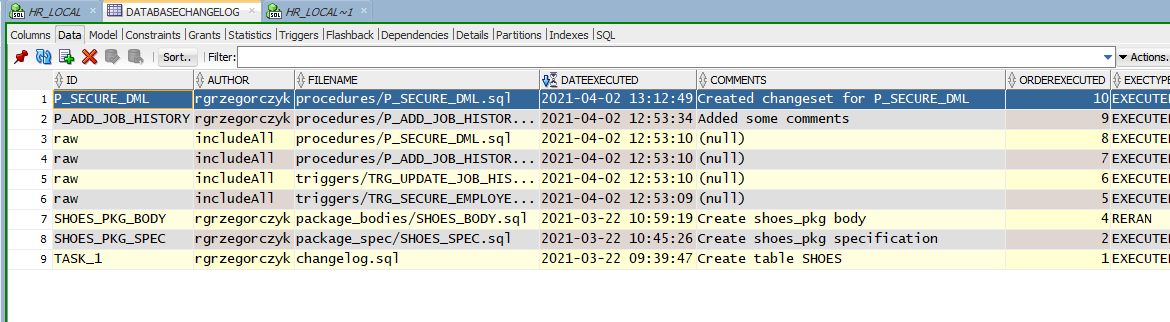
Then run the Liquibase Update command:
Changeset looks better now, right? With a proper author, ID, etc.
In the examples above, I showed you the easy way to add existing objects (which could be created or replaced) without creating changesets manually. In my opinion, it's the best way to install Liquibase if you have hundreds of objects in your existing database.
When it comes to objects which cannot be replaced, such as tables, we need to use a way described in the second scenario.
How to Install Liquibase if You Don't Have Lots of Objects in Your Existing Project
This option requires you to create changesets for objects and changes that were already executed to your database.
Objects Which You Create or Replace
Add objects and remember to have paths to folders in your master.xml file – just like described in the first scenario.
Run ChangelogSync and have Liquibase automatically create changesets raw / includeAll / filename.

Or, a better way, create a changeset for every file like this:
That's more work, sure, but you get better info in your logs:
Objects that Cannot Be Created or Replaced
What can you do with other objects like tables, indexes, etc.?
Once again, there are two ways:
- Don't do anything with these objects but remember to always create changesets for every change in them, and add it to your changelog.sql file (alter table, drop column, etc.)
- Create changesets and mark them as executed in the past.
Let's have a closer look at the second way.
I have a few tables that were created before implementing Liquibase:
EMPLOYEES
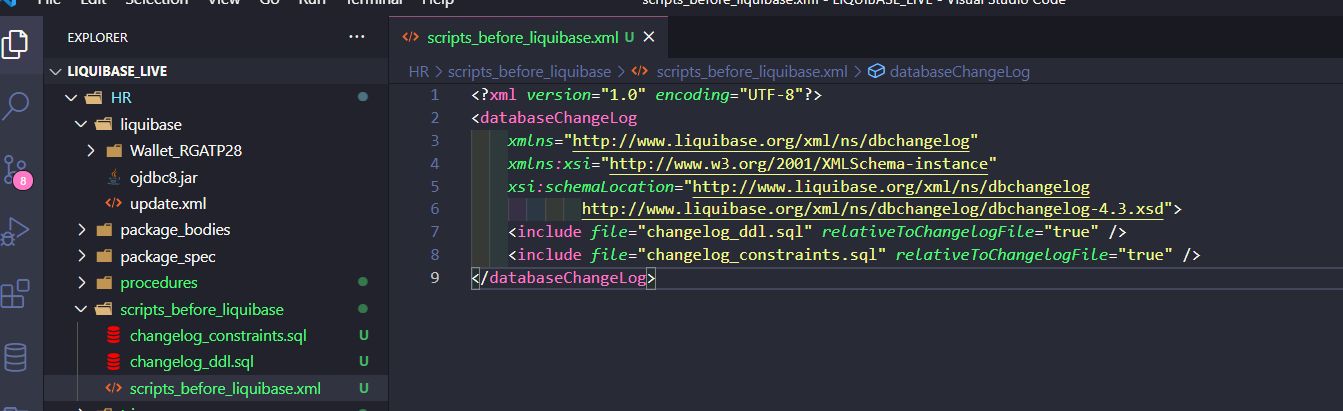
JOBSI create two changelog files in a new folder, HR/scripts_before_liquibase.
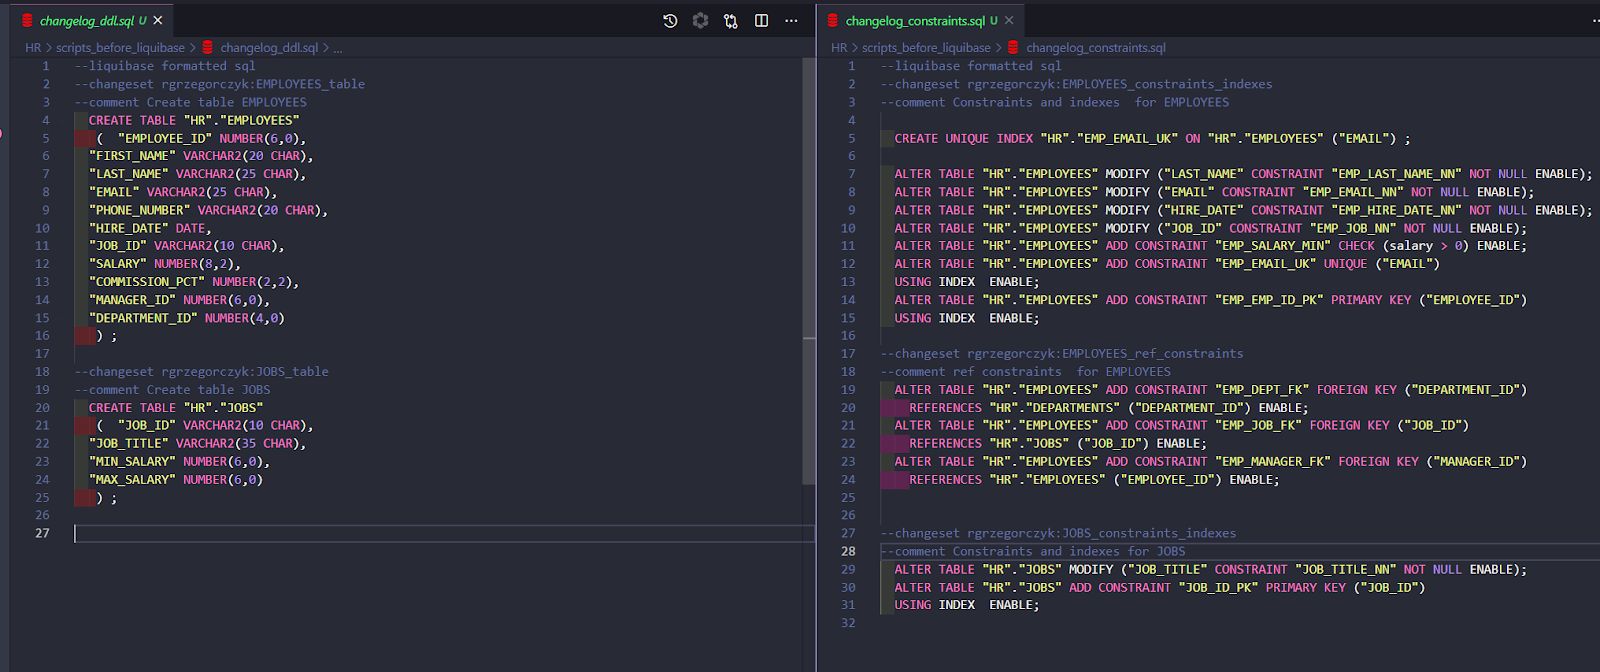
changelog_ddl.sql
changelog_constraints.sql
Also, I create an additional scripts_before_liquibase.xml file which will point to our changelogs.
The priority of "include file" is very important, as it tells Liquibase in which order to run scripts – first create tables, then create constraints and indexes.
It's good practice to have 2 files: one for creating tables, second for constraints. It will help you avoid conflicts when trying to create ref_constraint in a table that will be created a few seconds later.
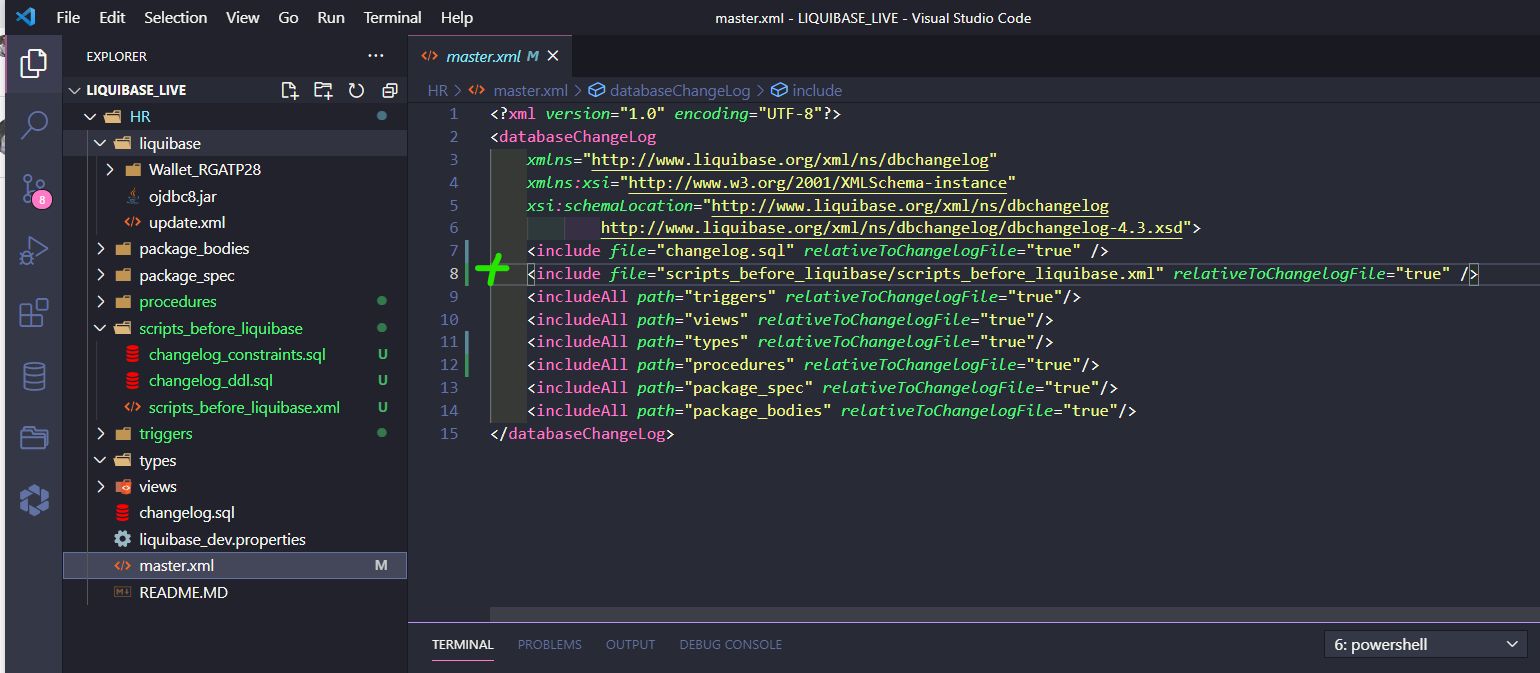
Remember to add a path in the master.xml file to your newly created XML file (HR/script_before_liquibase/scripts_before_liquibase.xml).
Now, create changesets for tables, constraints, etc.
OK, after adding all of our changesets, we will mark them as executed in the past.
Let's run ChangelogSyncSQL to preview, and then ChangelogSync to run SQL against the database.
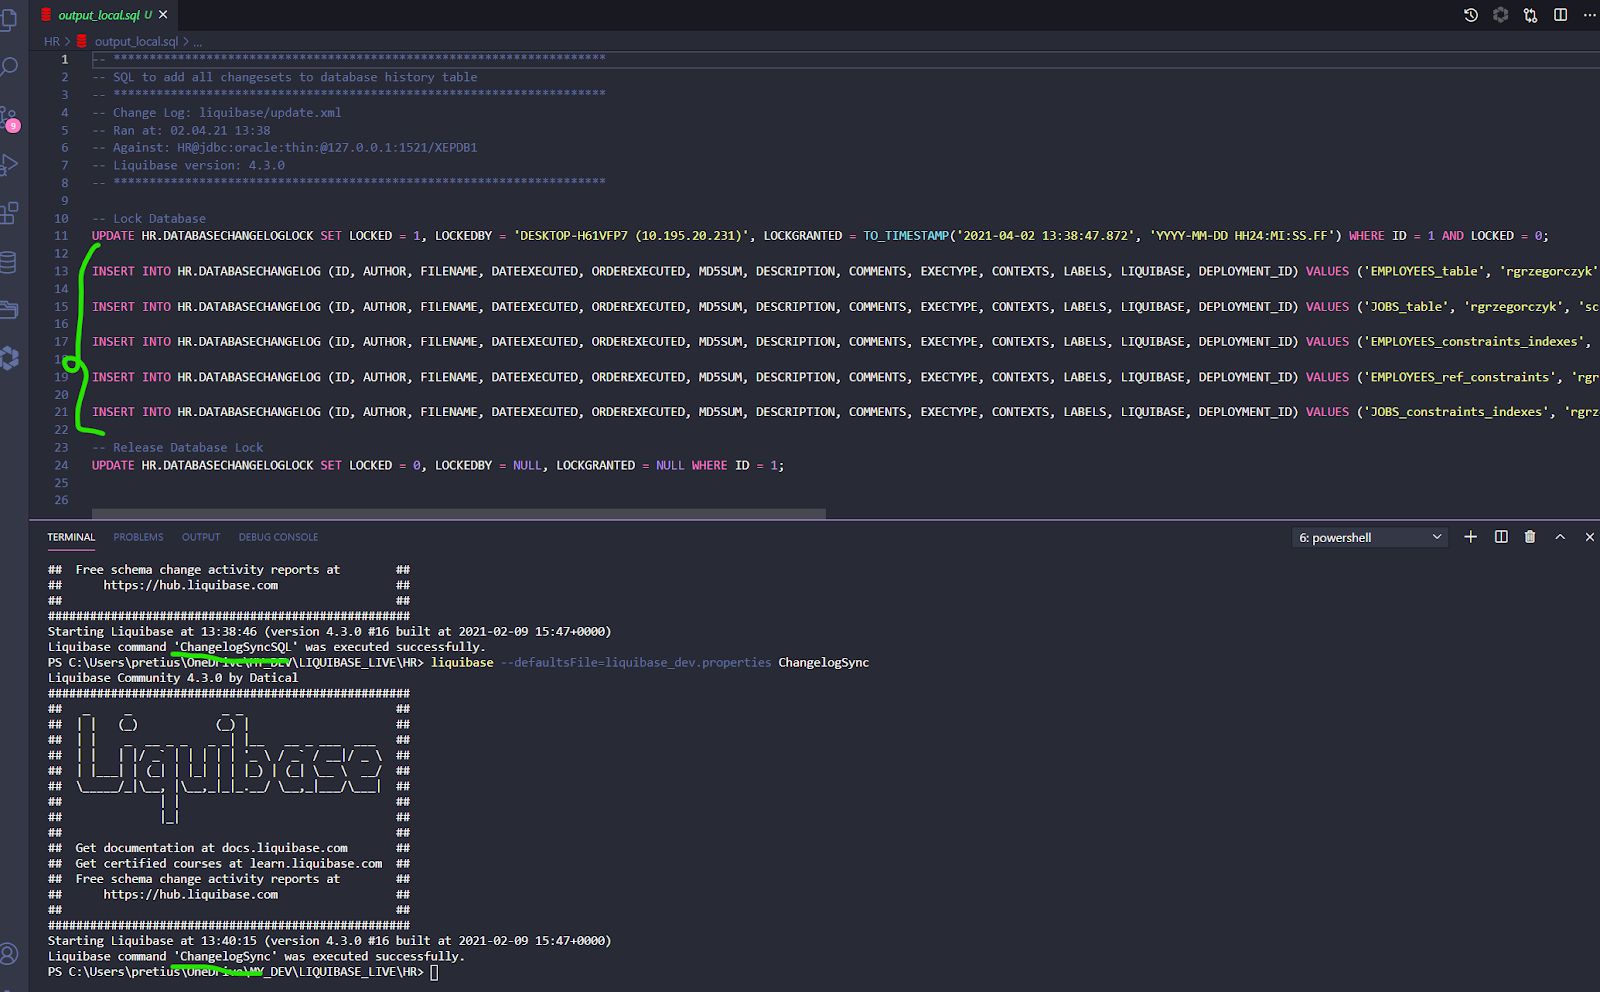
And voila! All done!
Now, choose the way you prefer and implement database automation using Liquibase right now.
Liquibase Tutorial: Summary
As you can see, by using Liquibase, you can track everything during your database change release process.
However, all developers should stick to this workflow:
- Always add your changesets to a changelog (don't change anything without Liquibase!) — the changeset should be unique, combining AUTHOR:ID(task) and filename (file with your changelog).
- Verify the SQL you will execute (always run
updateSQLbeforeupdatecommand). - Run database
updatecommand. - Verify that the changeset or changesets were executed (check your DB objects and
DATABASECHANGELOGtable).
Here we end the basic Liquibase tutorial. However, stay tuned for the next articles!
Published at DZone with permission of Rafal Grzegorczyk. See the original article here.
Opinions expressed by DZone contributors are their own.
Comments