How to Create a Service Bus With Windows Azure
Windows Azure Service Bus is a brokered, scalable, multi-featured messaging queuing system. It's a reliable message queuing and durable publish/subscribe system.
Join the DZone community and get the full member experience.
Join For FreeIn this article, we will walk through how to create a service bus the with Windows Azure portal.
Queue
The queue provides one-directional commmunication.
The queue processes the message in FIFO (first-in-first-out) order.
Messages in the queue can be consumed by one receiver.
Sender and receiver do not have to receive and send messages at the same time.
Topic
Like queues, topics also provide one-directional communication.
Topics can have subscriptions. One topic can have multiple subscriptions.
Subscriptions can optionally use a filter to only receive messages that match specific criteria.
How to Create a Service Bus With Windows Azure
Windows Azure Service Bus is a brokered, scalable, multi-featured messaging queueing system. It is a reliable message queuing and durable publish/subscribe system.
1. Create Service Bus Namespace
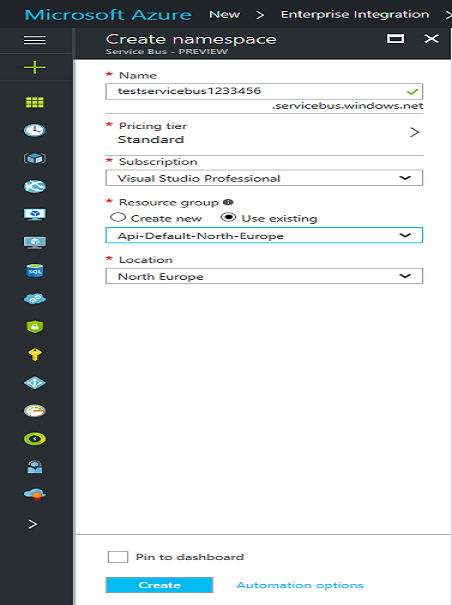
Log into the Azure Portal. In the left navigation pane, click New > Enterprise Integration > Service Bus.
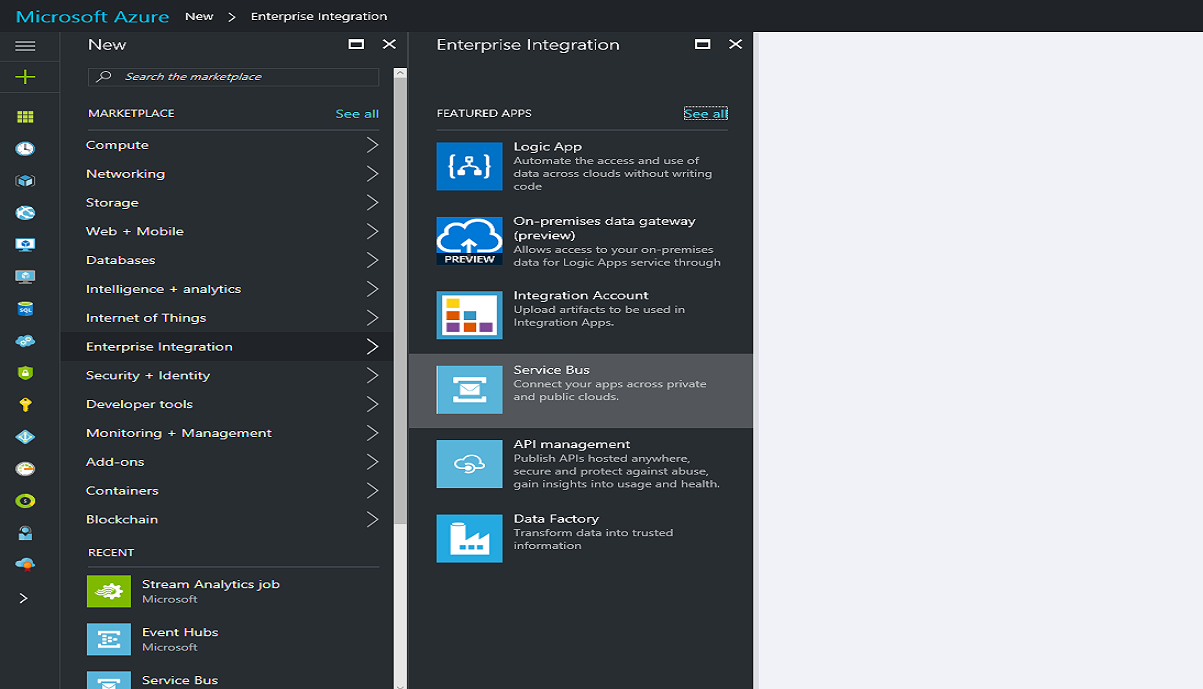
In the Create Namespace dialog, provide the namespace name and the system will immediately check for namespaces that are availaible.
Select the Pricing Tier (basic, premium, and standard) and Subscription in which you need to create the service bus.
Select the existing Resource Group where your service bus will live or create a new one. Select the Location where you need to host your Service Bus and click Create.
2. Management Credentials
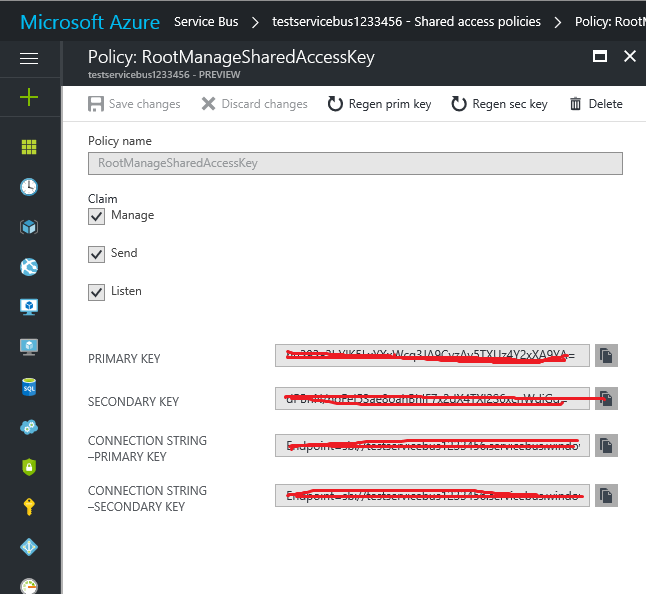
Click the newly created namespace from the list of service bus namespaces. Then, click Shared access policies > RootManageSharedAccessKey.

After clicking RootManageSharedAccessKey, you can see primary and secondary key and primary and secondary connection string. You can copy all these details for your future use.
3. Create Queue With Windows Azure
First, you need to ensure that the service bus namespace is already created. In the left pane of the portal, select the Service Bus in which you need to create a queue.
Select Queue and then click Add Queue.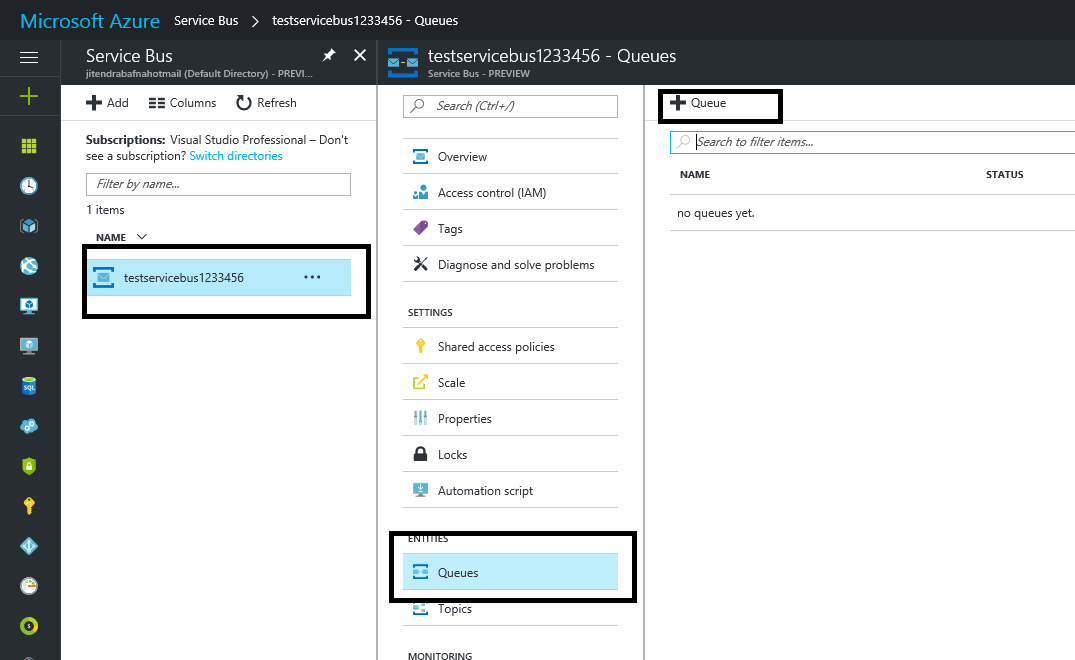
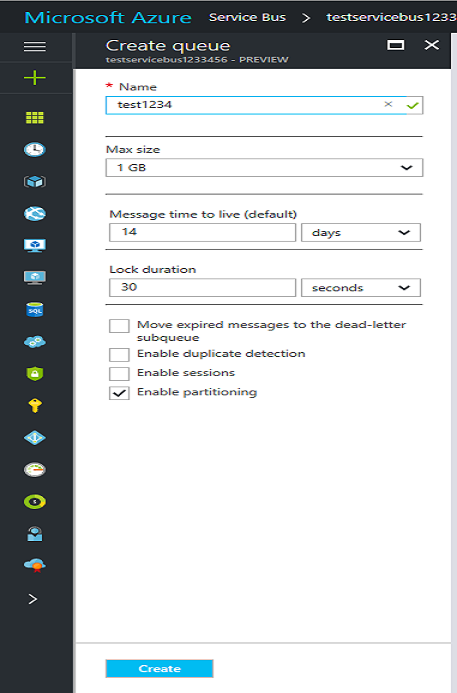
In the Create Queue Dialog, enter a queue name, select the max size and other properties depending on your requirements, and click Create.
4. Create Queue Using C# Code
// Store ConnectionString in web.config or app.config and copy connection string
// from service bus namespace
string connectionString =
 CloudConfigurationManager.GetSetting("Microsoft.ServiceBus.ConnectionString");

var namespaceManager =
 NamespaceManager.CreateFromConnectionString(connectionString);

if (!namespaceManager.QueueExists("testqueue")) {
 namespaceManager.CreateQueue("testqueue");
}
5. Send Message to Queue (C# Code)
First, you need to install the nuget package WindowsAzure.ServiceBus. Right-click on your application in Visual Studio and select Manage NuGet Packages. Look for the Windows Azure Service Bus nuget package and install it.
using System;
using Microsoft.ServiceBus.Messaging;

namespace ServiceBusQueueSend {
 class Program {
  static void Main(string[] args) {
   var connectionString = "<Service Bus Namespace Primary or Secondary Connection String>";
   var queueName = "<Your queue name>";

   var client = QueueClient.CreateFromConnectionString(connectionString, queueName);
   var message = new BrokeredMessage("Test Message");

   client.Send(message);
  }
 }
}
Receiving message from queue:
using System;
using Microsoft.ServiceBus.Messaging;

namespace ServiceBusQueueReceive {
 class Program {
  static void Main(string[] args) {
   var connectionString = "<Service Bus Namespace Primary or Secondary Connection String>";
   var queueName = "QueueName";

   var client = QueueClient.CreateFromConnectionString(connectionString, queueName);

   client.OnMessage(message => {
    Console.WriteLine(String.Format("Message body: {0}", message.GetBody < String > ()));
    Console.WriteLine(String.Format("Message id: {0}", message.MessageId));
   });

   Console.ReadLine();
  }
 }
}
6. Create Topic With Windows Azure
First, you need to ensure that the service bus namespace is already created. In the left pane of the portal, look for the service bus in which you need to create a topic.
Select Topic and then click Add Topic.
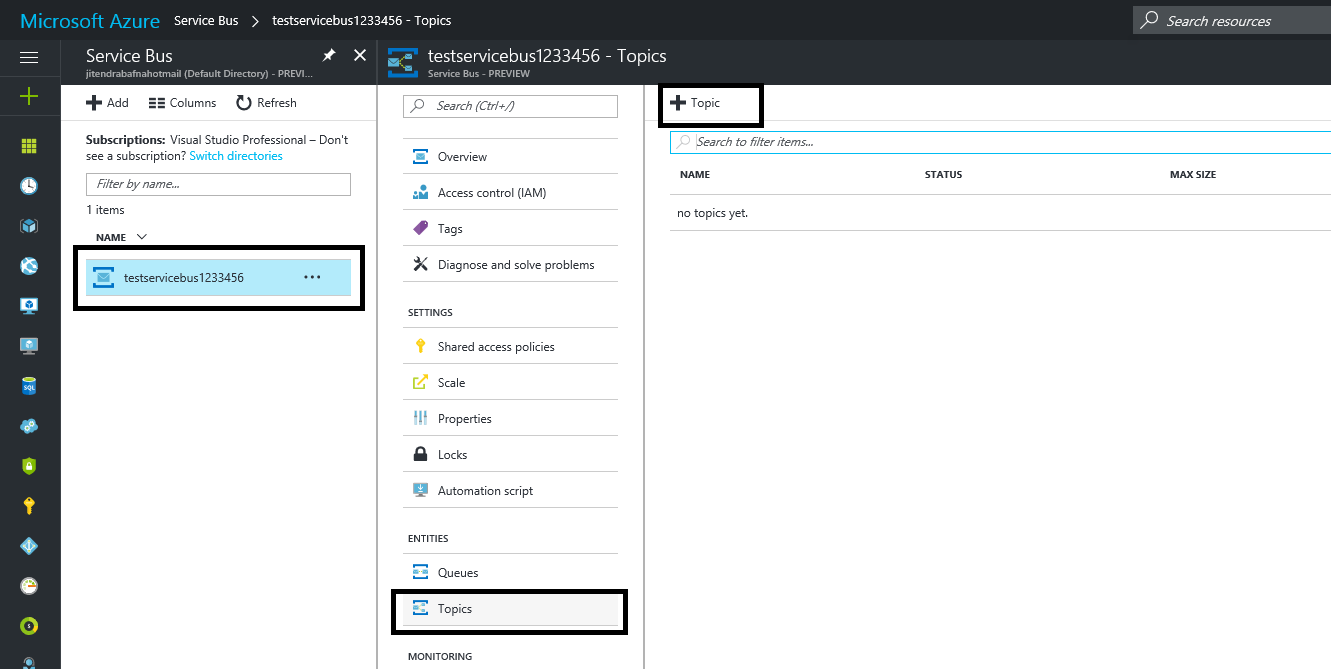
In Create Topic Dialog, enter the topic name, select the max size and other properties depending on your requirements, and click Create.
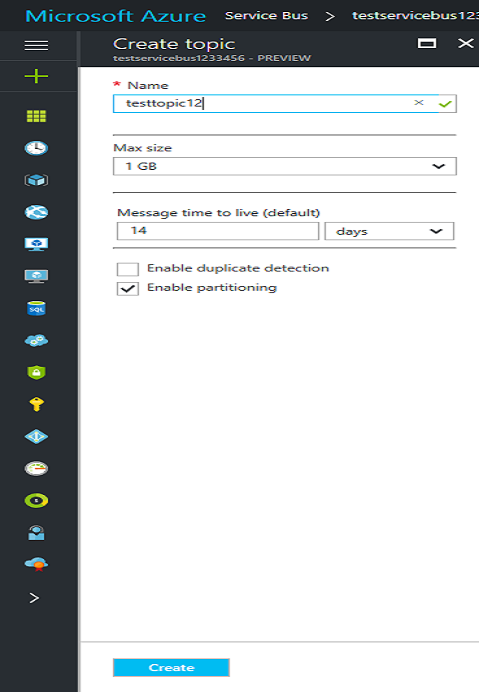
Create topic using C#:
TopicDescription td = new TopicDescription("jittopic");
td.MaxSizeInMegabytes = 5120;
td.DefaultMessageTimeToLive = new TimeSpan(0, 1, 0);

// Create a new Topic with custom settings.
// Store ConnectionString in web.config or app.config and copy connection string
// from service bus namespace
string connectionString =
 CloudConfigurationManager.GetSetting("Microsoft.ServiceBus.ConnectionString");

var namespaceManager =
 NamespaceManager.CreateFromConnectionString(connectionString);

if (!namespaceManager.TopicExists("jittopic")) {
 namespaceManager.CreateTopic(td);
}
Add subscription to topic:
string connectionString =
 CloudConfigurationManager.GetSetting("Microsoft.ServiceBus.ConnectionString");

var namespaceManager =
 NamespaceManager.CreateFromConnectionString(connectionString);

if (!namespaceManager.SubscriptionExists("jittopic", "testsub")) {
 namespaceManager.CreateSubscription("jittopic", "testsub");
}
Add subscription with filters:
SqlFilter highIncomeFilter =
 new SqlFilter("income > 30000");

namespaceManager.CreateSubscription("jittopic",
 "HighIncome",
 highIncomeFilter);

SqlFilter lowIncomeFilter =
 new SqlFilter("income <= 30000");

namespaceManager.CreateSubscription("jittopic",
 "LowIncome",
 lowIncomeFilter);
Send message to topic:
using System;
using Microsoft.ServiceBus.Messaging;

namespace ServiceBusTpicSend {
 class Program {
  static void Main(string[] args) {
   var connectionString = "<Service Bus Namespace Primary or Secondary Connection String>";
   var topicName = "jittopic";

   var client = TopicClient.CreateFromConnectionString(connectionString, queueName);
   var message = new BrokeredMessage("Test Message");

   client.Send(message);
  }
 }
}
Receiving message from topic:
string connectionString =
 CloudConfigurationManager.GetSetting("Microsoft.ServiceBus.ConnectionString");

SubscriptionClient Client =
 SubscriptionClient.CreateFromConnectionString(connectionString, "jittopic", "HighIncome");

// Configure the callback options.
OnMessageOptions options = new OnMessageOptions();
options.AutoComplete = false;
options.AutoRenewTimeout = TimeSpan.FromMinutes(1);

Client.OnMessage((message) => {
 try {
  // Process message from subscription.
  Console.WriteLine("\n*High Income");
  Console.WriteLine("Body: " + message.GetBody < string > ());
  Console.WriteLine("MessageID: " + message.MessageId);
  Console.WriteLine("Message Number: " +
   message.Properties["MessageNumber"]);

  message.Complete();
 } catch (Exception) {
  message.Abandon();
 }
}, options);
Now, you know how to create a service bus namespace, queue, and topic.
Opinions expressed by DZone contributors are their own.

Comments