Write Points From CSV to InfluxDB
See how to easily write points from CSV to InfluxDB.
Join the DZone community and get the full member experience.
Join For FreeTelegraf is InfluxData's plugin-driven server agent for collecting and reporting metrics. There are over 200 input plugins, which means there's a lot of ways to get data into InfluxDB. However, I frequently see new Influx users inquiring about how to write points from CSV to InfluxDB on InfluxData Community Site. Writing points from a CSV file is an easy way to insert familiar data into InfluxDB, which can make it easier to get acquainted with the platform.

Requirements and Setup for Importing Data From CSV to InfluxDB
In a previous article, I shared three easy methods to insert data to the database (including a Python script to convert CSV data to line protocol, InfluxDB's data ingest format). This article is a guide for how to write points from a CSV using the Telegraf File Input Plugin. The Telegraf File Input Plugin writes points faster than a Python script would, which can be extremely useful when you're performing a bulk import. With it, I hope to dispel any confusion that new users might have. I will assume that you are a MacOS user and have installed InfluxDB and Telegraf with Homebrew since it's the fastest way to get up and running locally (alternatively, you can download the binary from our Downloads page or spin up the sandbox).
The accompanying repo for this blog post can be found here. To write points from CSV, we will be using the File Input Plugin with the CSV Parser.
Requirements:
- Telegraf 1.8.0 or higher
- InfluxDB 1.7.0 or higher
After installation, make sure that InfluxDB is running and Telegraf has stopped by typing the following command in your terminal: brew services list.

If you don't see that InfluxDB is running, execute brew services start influxdb. Similarly, if Telegraf is running, you can use brew to stop that service with brew services stop telegraf.
First, I need to download a Telegraf config file with the appropriate Input and Output Plugins. As per the Getting Started with Telegraf documentation, I will use the following command in the terminal in the directory of my choosing.
telegraf -sample-config -input-filter file -output-filter influxdb > file.confThe -sample-config flag will generate the telegraf config file. The -input-filter and -output-filter flags specify the input and output sources of the data, respectively. The text following the > names the config file. I find it useful to name my telegraf config file after the Telegraf plugins I am using, so I can easily distinguish my config files in the future. After running the command, I open file.conf. My telegraf config has a total of 454 lines, complete with the File Input Plugin and the InfluxDB Output Plugin.
4 Steps to CSV Data Ingest to InfluxDB
Step One: The first change I make to the config file is in the Output Plugins section. I want to specify the target database for my CSV data. I will change line 97 from the default # database = "telegraf" to database = csv (or any database name of my choosing, so that I can easily find the csv data).
My csv data looks like:
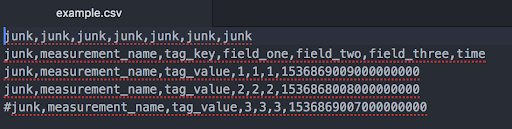
The first column and row are junk. I've also commented out the last row. My timestamp is in Unix time with nanosecond precision. In Step Two, I make sure not to include those rows and columns in my data ingest by adding some lines to my config file.
Step Two: Next, I want to work on the Input Plugins section of the config. First, I will specify the pwd of my csv file in line 455 of the telegraf config. Since my config file is in the same directory as my csv, line 455 is simply my file name: files = ["example"] (otherwise, make sure to include the full $pwd). I will also add the following lines to the bottom of my config under the Input Plugins section to ensure that I only ingest the data that I care about:
## Data format to consume. data_format = "csv" ## Indicates how many rows to treat as a header. By default, the parser assumes ## there is no header and will parse the first row as data. If set to anything more ## than 1, column names will be concatenated with the name listed in the next header row. ## If `csv_column_names` is specified, the column names in header will be overridden. csv_header_row_count = 1 ## Indicates the number of rows to skip before looking for header information. csv_skip_rows = 1 ## Indicates the number of columns to skip before looking for data to parse. ## These columns will be skipped in the header as well. csv_skip_columns = 1 ## The character reserved for marking a row as a comment row ## Commented rows are skipped and not parsed csv_comment = "#" ## The column to extract the name of the metric from csv_measurement_column = "measurement_name" ## Columns listed here will be added as tags. Any other columns ## will be added as fields. csv_tag_columns = ["tag_key"] ## The column to extract time information for the metric ## `csv_timestamp_format` must be specified if this is used csv_timestamp_column = "time" ## The format of time data extracted from `csv_timestamp_column` ## this must be specified if `csv_timestamp_column` is specified csv_timestamp_format = "unix_ns"Extra config options: It's worth taking a look at a couple of other variables in the config file.
Line 36 defaults to metric_batch_size = 1000. It controls the size of writes that Telegraf sends to InfluxDB. You might want to increase that value if you're performing a bulk data import. To determine the appropriate metric_batch_size, I recommend looking at these hardware sizing guidelines. Finally, if you're using the OSS version and trying to import several hundred thousand points, take a look at enabling TSI. Enabling TSI can help with series cardinality performance. Take a look at this link to learn about how to enable TSI in InfluxDB 1.7.
Line 69 defaults to debug = false. If you have trouble writing points to InfluxDB, set the debug variable to true to get debug log messages.
Step Three: Run Telegraf with the config file we just edited by copying and pasting the following line in your terminal:
telegraf --config $pwd/file.confYou should see this output if you have debug = true:

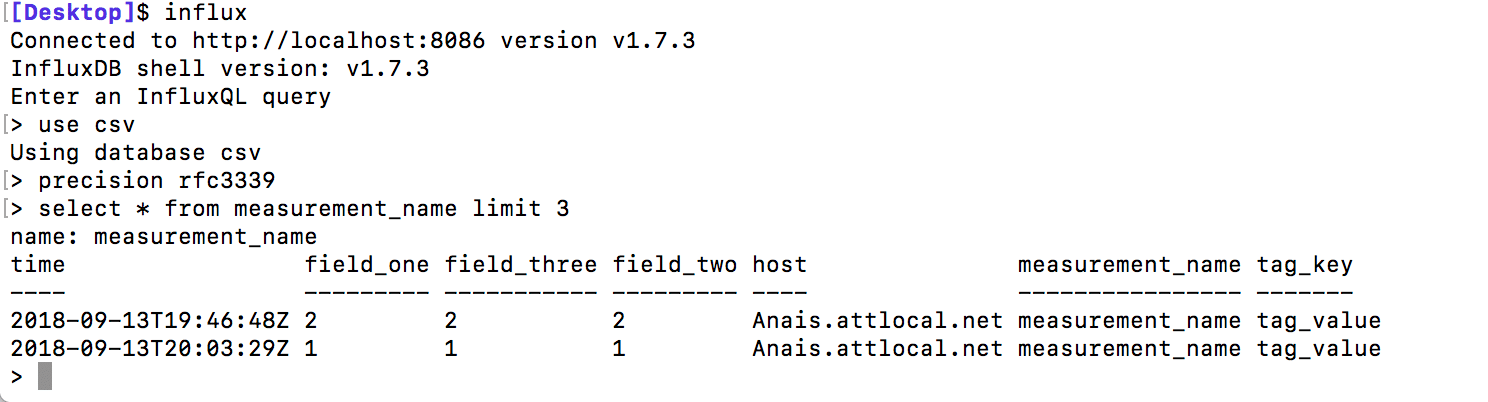
Step Four: Now we're ready to query our data. You can start the influx shell by running influx in your terminal.
Run use csv to select your database and verify that your inserts were successful with the following query: select * from measurement_name limit 3. Use precision rfc3339 to convert the timestamp into human-readable format.
That's all there is to configuring the File Input Plugin and writing data to InfluxDB from a CSV file. Please note that the File Input Plugin accepts many other data formats including: JSON, line protocol, and collectd, just to name a few. If you need more help using the CLI, please look at the documentation.
Conclusions About Importing CSV to InfluxDB
Finally, I highly recommend using a Telegraf plugin to write points to your InfluxDB database because Telegraf is written in Go. Go is much faster than Python, but if you have your heart set on using Python, I recommend checking out this csv-to-influxdb repo. One advantage to using the python script found in that repo is that it grants you higher column selection specification for your data ingest. By contrast, you can't cherry-pick which columns you want to include with the Telegraf File Input Plugin — you can't exclude invaluable columns sandwiched between valuable ones. This functionality might not be included in the Telegraf File Input Plugin because it would slow down the reads, which could be problematic for bulk data imports. However, Telegraf is completely open source. I encourage you to learn about how to write your own Telegraf plugin and contribute that functionality if you please!
I hope this tutorial helps get you started with Influx. If you have any questions, please post them on the community site or tweet us @InfluxDB.
Published at DZone with permission of Anais Dotis-Georgiou. See the original article here.
Opinions expressed by DZone contributors are their own.
Comments