Writing .NET Core Application’s Log Into ElasticSearch With NLog
Join the DZone community and get the full member experience.
Join For FreeWe could write all types of log into ElasticSearch by configuring our application.
As the first step, you need to create an empty web application(.NET Core) in Visual Studio.

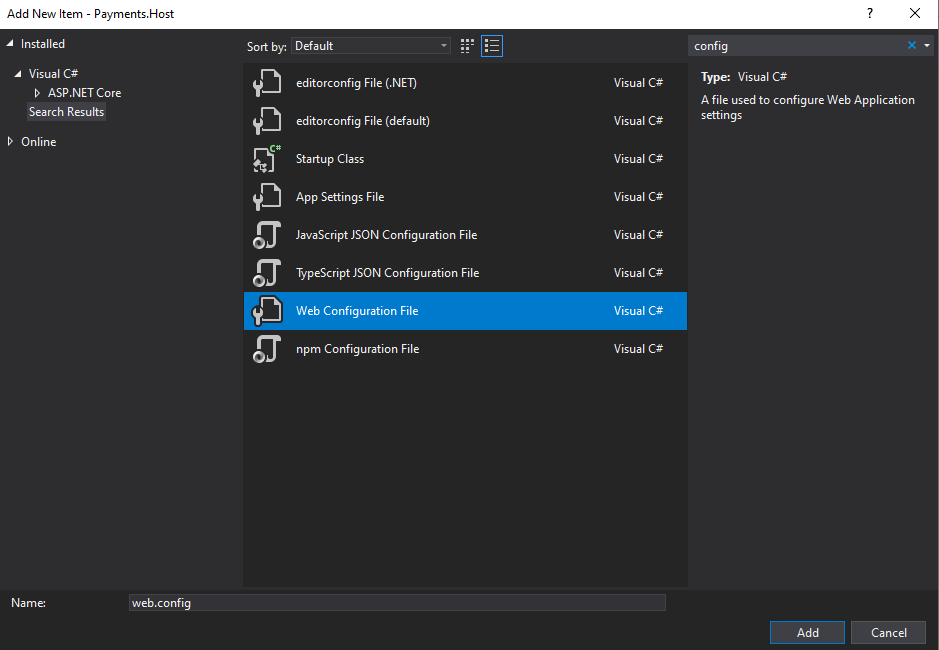
Now right click on the project and select Add new Item and search config to find Web Configuration File option. Set nlog.config as the file name.
Write the below code into the newly added config file.
xxxxxxxxxx
<nlog xmlns="http://www.nlog-project.org/schemas/NLog.xsd"
xmlns:xsi="http://www.w3.org/2001/XMLSchema-instance"
autoReload="true">
<extensions>
<add assembly="NLog.Targets.ElasticSearch"></add>
</extensions>
<targets async="true">
<target name="elastic"
xsi:type="ElasticSearch"
index="YourAppName" uri="http://192.168.50.60:9200"
layout ="API:SpecificName |${longdate}|${event-properties:item=EventId_Id}|${uppercase:${level}}|${logger}|${message} ${exception:format=tostring}|url: ${aspnet-request-url}|action: ${aspnet-mvc-action}" >
</target>
</targets>
<rules>
<!--All logs, including from Microsoft-->
<!--<logger name="*" minlevel="Trace" writeTo="allfile" ></logger>
<logger name="*" minlevel="Trace" writeTo="ownFile-web" ></logger>
<logger name="*" minlevel="Trace" writeTo="database" ></logger>-->
<logger name="*" minlevel="Trace" writeTo="elastic" ></logger>
</rules>
</nlog>
Before set the logging config, we should install some related packages, For this purpose, select NugetPackageManager from Tools menu and after that select PackageManagerConsole.
In the appeared console, to install necessary packages, use these commands:
Install-Package NLog
Install-Package NLog.Targets.ElasticSearch
Instal-Package Microsoft.Extensions.Logging
Instal-pacakge NLog.Web.AspNetCore
Now, as the next step, we need to configure Startup.cs. Open the Startup.cs file which located in the root of the project. add these code to the ConfigureServices and Configure sections:
xxxxxxxxxx
public void ConfigureServices(IServiceCollection services)
{
// other configs
services.AddLogging();
}
public void Configure(IApplicationBuilder app, IWebHostEnvironment env, ILoggerFactory LoggerFactory)
{
// add these lines after authorization and routing config
LoggerFactory.AddNLog();
LoggerFactory.ConfigureNLog("nlog.config");
}
Log Levels
Each log entry has a level. And each logger is configured to include or ignore certain levels. A common configuration is to specify the minimum level where that level and higher levels are included. For example, if the minimum level is Info, then Info, Warn, Error and Fatal are logged, but Debug and Trace are ignored.
The log levels, in descending order, are as follows:

Rules
The rules section maps loggers to targets and log levels.
A rule is a logger element with the following attributes:
name– logger name filter – may include wildcard characters (* and ?)minlevel– minimal level to logmaxlevel– maximum level to loglevel– single level to loglevels– comma separated list of levels to logwriteTo– comma separated list of targets to write tofinal– no rules are processed after a final rule matchesenabled– set tofalseto disable the rule without deleting itruleName– rule identifier to allow rule lookup withConfiguration.FindRuleByNameandConfiguration.RemoveRuleByName. Introduced in NLog 4.6.4
Everything is done. Now to write a log with NLog we just need a logger instance in our class or controller or whenever we need it. ILoggerFactory could create an instance of our class type.
xxxxxxxxxx
public class SampleClass
{
private readonly ILogger _logger;
public SampleClass(ILoggerFactory loggerFactory)
{
_logger = loggerFactory.CreateLogger<SampleClass>();
}
public Task TestMethod()
{
try
{
_logger.LogDebug("Debug Information");
_logger.LogInformation("Some Information");
_logger.LogWarning("Some Information");
}
catch (Exception ex)
{
_logger.LogError(ex,"my custom message");
}
return Task.CompletedTask;
}
}
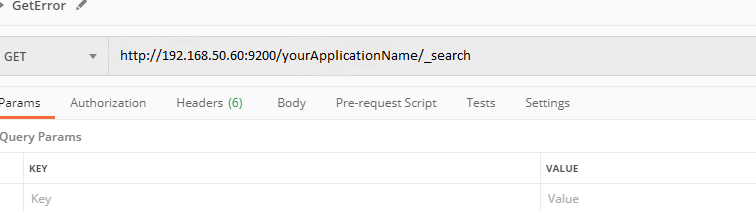
To check the logs in ElasticSearch you could use some tools, like PostMan, Kibana or some other tool which can retrieve data from ElasticSearch
Here, I’m using Postman to retrieve logs from ElasticSearch. Open PostMan Create an Empty Request.
Set the Type of the request to Get and enter the IP that you set in the nlog.config file. Remember that, you have to enter the exact name which you set in the config file (in this example we used YourApplicationName. you can replace it with whatever you want.
If you click on the Send button you will get the logs in Postman panel.
Follow me on Medium.
Opinions expressed by DZone contributors are their own.
Comments