wxPython: Getting Data From All Columns in a ListCtrl
The ListCtrl does not make it very obvious how to get the data from all or any certain column. Look at how we might accomplish this task.
Join the DZone community and get the full member experience.
Join For Free
every now and then, i see someone asking how to get the text for each item in a row of a
listctrl
in report mode. the
listctrl
does not make it very obvious how you would get the text in row one, column three, for example. in this article, we will look at how we might accomplish this task.
getting data from any column
let’s start by creating a simple
listctrl
and using a button to populate it. then we’ll add a second button for extracting the contents of the
listctrl
:
import wx
class myform(wx.frame):
def __init__(self):
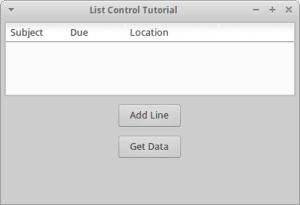
wx.frame.__init__(self, none, wx.id_any, "list control tutorial")
# add a panel so it looks the correct on all platforms
panel = wx.panel(self, wx.id_any)
self.index = 0
self.list_ctrl = wx.listctrl(panel, size=(-1,100),
style=wx.lc_report
|wx.border_sunken
)
self.list_ctrl.insertcolumn(0, 'subject')
self.list_ctrl.insertcolumn(1, 'due')
self.list_ctrl.insertcolumn(2, 'location', width=125)
btn = wx.button(panel, label="add line")
btn2 = wx.button(panel, label="get data")
btn.bind(wx.evt_button, self.add_line)
btn2.bind(wx.evt_button, self.get_data)
sizer = wx.boxsizer(wx.vertical)
sizer.add(self.list_ctrl, 0, wx.all|wx.expand, 5)
sizer.add(btn, 0, wx.all|wx.center, 5)
sizer.add(btn2, 0, wx.all|wx.center, 5)
panel.setsizer(sizer)
def add_line(self, event):
line = "line %s" % self.index
self.list_ctrl.insertstringitem(self.index, line)
self.list_ctrl.setstringitem(self.index, 1, "01/19/2010")
self.list_ctrl.setstringitem(self.index, 2, "usa")
self.index += 1
def get_data(self, event):
count = self.list_ctrl.getitemcount()
cols = self.list_ctrl.getcolumncount()
for row in range(count):
for col in range(cols):
item = self.list_ctrl.getitem(itemid=row, col=col)
print(item.gettext())
# run the program
if __name__ == "__main__":
app = wx.app(false)
frame = myform()
frame.show()
app.mainloop()
let’s take a moment to break this code down a bit. the first button’s event handler is the first piece of interesting code. it demonstrates how to insert data into the
listctrl
. as you can see, that’s pretty straightforward as all we need to do to add a row is call
insertstringitem
and then set each column’s text using
setstringitem
. there are other types of items that we can insert into a
listctrl
besides a string item, but that’s outside the scope of this article.
next, we should take a look at the
get_data
event handler. it grabs the row count using the listctrl’s
getitemcount
method. we also get the number of columns in the
listctrl
via
getcolumncount
. finally, we loop over the rows and extract each cell, which in listctrl parlance is known as an “item”. we use the listctrl’s
getitem
method of this task. now that we have the item, we can call the item’s
gettext
method to extract the text and print it to stdout.
associating objects to rows
an easier way to do this sort of thing would be to associate an object to each row. let’s take a moment to see how this might be accomplished:
import wx
class car(object):
""""""
def __init__(self, make, model, year, color="blue"):
"""constructor"""
self.make = make
self.model = model
self.year = year
self.color = color
class mypanel(wx.panel):
""""""
def __init__(self, parent):
"""constructor"""
wx.panel.__init__(self, parent)
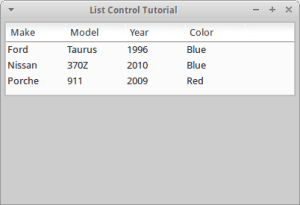
rows = [car("ford", "taurus", "1996"),
car("nissan", "370z", "2010"),
car("porche", "911", "2009", "red")
]
self.list_ctrl = wx.listctrl(self, size=(-1,100),
style=wx.lc_report
|wx.border_sunken
)
self.list_ctrl.bind(wx.evt_list_item_selected, self.onitemselected)
self.list_ctrl.insertcolumn(0, "make")
self.list_ctrl.insertcolumn(1, "model")
self.list_ctrl.insertcolumn(2, "year")
self.list_ctrl.insertcolumn(3, "color")
index = 0
self.myrowdict = {}
for row in rows:
self.list_ctrl.insertstringitem(index, row.make)
self.list_ctrl.setstringitem(index, 1, row.model)
self.list_ctrl.setstringitem(index, 2, row.year)
self.list_ctrl.setstringitem(index, 3, row.color)
self.myrowdict[index] = row
index += 1
sizer = wx.boxsizer(wx.vertical)
sizer.add(self.list_ctrl, 0, wx.all|wx.expand, 5)
self.setsizer(sizer)
def onitemselected(self, event):
""""""
currentitem = event.m_itemindex
car = self.myrowdict[currentitem]
print(car.make)
print(car.model)
print(car.color)
print(car.year)
class myframe(wx.frame):
""""""
def __init__(self):
"""constructor"""
wx.frame.__init__(self, none, wx.id_any, "list control tutorial")
panel = mypanel(self)
self.show()
if __name__ == "__main__":
app = wx.app(false)
frame = myframe()
app.mainloop()
in this example, we have a
car
class that we will use to create
car
object from. these
car
objects will then be associated with a row in the
listctrl
. take a look at
mypanel
's
__init__
method and you will see that we create a list of row objects and then loop over the row objects and insert them into the
listctrl
using the object’s attributes for the text values. you will also note that we have created a class attribute dictionary that's used for associating the row’s index to the
car
object that was inserted into the row.
we also bind the
listctrl
to
evt_list_item_selected
so when an item is selected, it will call the
onitemselected
method and print out the data from the row. you will note that we get the row’s index by using
event.m_itemindex
. the rest of the code should be self-explanatory.
wrapping up
now you know a couple of different approaches for extracting all the data from a
listctrl
. personally, i really like using the
objectlistview
widget. i feel that is superior to the
listctrl
as it has these kinds of features built-in. but it’s not included with wxpython so it’s an extra install.
Published at DZone with permission of Mike Driscoll. See the original article here.
Opinions expressed by DZone contributors are their own.
Comments