Pre-deployment security in CI/CD is quite essential. You can detect vulnerabilities before they end up in your application with the following:
Container Image Authenticity
There are plenty of Docker images and repositories on the Internet for every type of application under the sun, but if you are pulling images without using any trust and authenticity mechanism, you are basically running arbitrary software on your systems.
You can use the following rules to prevent disasters:
- Where did the image come from?
- Do you trust the image creator? Which security policies are they using?
- Do you have objective cryptographic proof that the author is actually that person?
- How do you know the image was not tampered with after you pulled it?
Docker will let you pull and run anything you throw at it by default, so encapsulation won't save you from this. Even if you only consume your own custom images, you want to make sure nobody inside the organization is able to tamper with an image. The solution usually boils down to the classical PKI-based chain of trust.
However, Docker and Docker Hub have integrated image vulnerability scanning. This feature is based on the Snyc tool and scans your images after pushing it into the hub. Below, you can see the image of the vulnerability scan report:
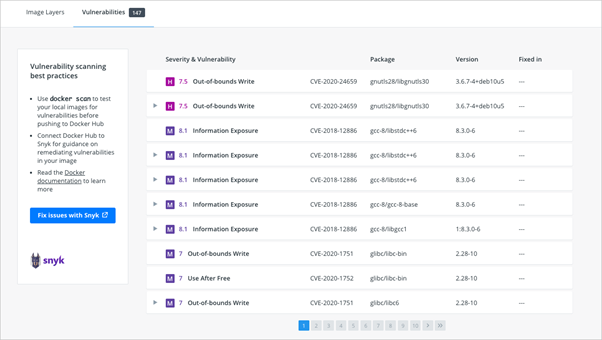
Also, you can achieve the same result using the docker scan command to scan your local images. You can run the following example and see the standard report:
docker scan backend-app:1.1.3
However, if you need an extended report, you can run the following example:
docker scan --file Dockerfile backend-app:1.1.3
Core Practices:
- The regular Internet common sense: Do not run unverified software from sources that you don’t explicitly trust.
- Deploy a container-centric trust server using some of the Docker registry servers.
- Enforce mandatory signature verification for any image that is going to be pulled or run on your systems.
- You should disable image privilege escalation. You can do so by adding the flag
--security-opt=no-new-privileges when running your images.
If you run your Docker container in Kubernetes, you can add the allowPrivilegeEscalation flag:
apiVersion: v1
kind: Pod
metadata:
  name: backend-identity-service
spec:
  containers:
  - name: backend-identity-service
    image: path/to/docker/image/backend-identity-service:1.0.3
    securityContext:
allowPrivilegeEscalation: false
Grant only specific capabilities needed for your containers. You can use the --cap-drop flag. Also, you should not run containers with --privileged flag! The best and recommended approach would be to drop all capabilities and then add one-by-one:
docker run --cap-drop all --cap-add CHOWN backend-svc:1.0.3
Example: Deploying a full-blown trust server is beyond the scope of this Refcard, but you can start signing your images right away.
- Get a Docker Hub account if you don’t have one already.
- Create a directory containing the following trivial Dockerfile:
Enable Docker trust enforcement:
# cat Dockerfile
FROM alpine:latest
 # export DOCKER_CONTENT_TRUST=1
Now, try to retrieve the image you just uploaded:
# cat Dockerfile
FROM alpine:latest

Using default tag: latest
Error: remote trust data does not exist for docker.io/<youruser>/alpineunsigned:
notary.docker.io does not have trust data for docker.io/<youruser>/alpineunsigned
You should receive the following error message:
Using default tag: latest
Error: remote trust data does not exist for docker.io/<youruser>/alpineunsigned:
notary.docker.io does not have trust data for docker.io/<youruser>/alpineunsigned
Now that DOCKER_CONTENT_TRUST is enabled, you can build the container again and it will be signed by default:
# docker build --disable-content-trust=false -t /alpinesigned:latest .
# cat Dockerfile
FROM alpine:latest
Now, you should be able to push and pull the signed container without any security warning. The first time you push a trusted image, Docker will create a root key for you. You will also need a repository key for the image. Both will prompt you for a user-defined password.
Your private keys are in the ~/.docker/trust directory; safeguard and back them up.
The DOCKER_CONTENT_TRUST is just an environment variable and will die with your shell session. But trust validation should be implemented across the entire process, from the images building and the images hosting in the registry to image execution in the nodes.
Docker Credentials and Secrets
Your software needs sensitive information to run: user password hashes, server-side certificates, encryption keys, etc. This situation is made worse by the nature of containers; you don’t just “set up a server” — there’s a large number of distributed containers that may be constantly created and destroyed. You need an automatic and secure process to share this sensitive info.
Core Practices:
- Do not use environment variables for secrets; this is a very common yet very insecure practice.
- Do not embed any secrets in the container image. For example, GitGuardian published a report about secrets in popular Docker images: “Actually, 7% of the images contained at least one secret.”
- Deploy a Docker credentials management software if your deployments get complex enough. Do not attempt to create your own "secrets storage" (curl-ing from a secrets server, mounting volumes, etc.) unless you really know what you are doing.
Examples: First, let’s see how to capture an environment variable:
# docker build --disable-content-trust=false -t /alpinesigned:latest .
# cat Dockerfile
FROM alpine:latest
# docker run -it -e password='S3cr3tp4ssw0rd' alpine sh
/ # env | grep pass
password=S3cr3tp4ssw0rd
It's that simple, even if you are a regular user:
/ # su user
/ $ env | grep pass
password=S3cr3tp4ssw0rd
Nowadays, container orchestration systems offer some basic secrets management. For example, Kubernetes has the secrets resource. Docker Swarm also has its own secrets feature, which will be quickly demonstrated below:
Initialize a new Docker Swarm (you may want to do this on a VM):
# docker swarm init --advertise-addr
Create a file with some random text; this is your secret:
This is my secret.
Create a new secret resource from this file:
# docker secret create somesecret secret.txt
Create a Docker Swarm service with access to this secret; you can modify the uid, gid, mode, etc.:
# docker service create --name nginx --secret source=somesecret,target=somesecret,mode=0400 nginx
Log into the Nginx container; you will be able to use the secret:
root@3989dd5f7426:/# cat /run/secrets/somesecret
# This is my secret
root@3989dd5f7426:/# ls /run/secrets/somesecret
-r-------- 1 root root 19 Aug 28 16:45 /run/secrets/somesecre
This is a minimal proof of concept. At the very least, now your secrets are properly stored and can be revoked or rotated from a central point of authority.
Hashicorp Vault Example
You can use different secret providers. Hashicorp Vault allows you to store SSL Certificates, passwords, and tokens. It supports symmetric and asymmetric keys. To use it in Docker, you need to pull the official Hashicorp Vault image from the Docker Hub. Then you can run the Vault development server using the following command:
$ docker run --cap-add=IPC_LOCK -d --name=dev-vault vault
To run vault in server mode for non-dev environments, you can use the following command:
$ docker run --cap-add=IPC_LOCK -d --name=dev-vault vault
As an alternative to the Hashicorp Vault, you can use Azure Key Vault and environment variables to pass secrets to the Docker container. In AWS, you can use secrets manager. To pass parameters to a Docker container, you can use AWS SDK. For example:
aws --profile <YOUR PROFILE FROM ~/.aws/credentials> --region <REGION eg. us-east-1> secretsmanager get-secret-value --secret-id <YOUR SECRET NAME>
You can also use Kubernetes secrets and use it in the Docker container. You can achieve this by creating an environment variable with the secretKeyRef section.
apiVersion: apps/v1
kind: Deployment
metadata:
 name: back-end-project
spec:
 replicas: 1
 selector:
   matchLabels:
     app: back-end-project
 template:
   spec:
     containers:
     - name: back-end-project
       image: <path to docker container>
       ports:
       - containerPort: 80
       env:
       - name: SOME_ENV_VAR
         valueFrom:
           secretKeyRef:
             name: secret-name
             key: secret-key
Container Resource Abuse
Containers are much more numerous than virtual machines on average. They are lightweight and you can spawn big clusters of them on modest hardware. Software bugs, design miscalculations, or a deliberate malware attack can easily cause a Denial of Service if you don’t properly configure resource limits.
To add to the problem, there are several different resources to safeguard: CPU, main memory, storage capacity, network bandwidth, I/O bandwidth, swapping, etc. There are some kernel resources that are not so evident, and even more obscure resources such as user IDs (UIDs) exist.
Core Practices:
Limits on these resources are disabled by default on most containerization systems; configuring them before deploying to production is basically a must. There are three fundamental steps:
- Use the resource limitation features bundled with the Linux kernel and/or the containerization solution.
- Try to replicate the production loads on pre-production. Some people use synthetic stress tests, and others choose to "replay" the actual real-time production traffic. Load testing is vital to knowing where the physical limits are and where your normal range of operations is.
- Implement Docker monitoring and alerting. You don’t want to hit the wall if there is a resource abuse problem. Malicious or not, you need to set thresholds and be warned before it’s too late.
Example: Control groups, or cgroups, are a feature of the Linux kernel that allow you to limit the access processes and containers have to system resources. We can configure some limits directly from the Docker command line, like so:
# docker run -it --memory=2G --memory-swap=3G ubuntu bash
This will limit the container to 2GB main memory, 3GB total (main + swap). To check that this is working, we can run a load simulator; for example, the stress program present in the Ubuntu repositories:
root@e05a311b401e:/# stress -m 4 --vm-bytes 8G
You will see a "FAILED" notification from the stress output. If you tail the syslog on the hosting machine, you will be able to read something similar to:
Aug 15 12:09:03 host kernel: [1340695.340552] Memory cgroup out of memory: Kill process 22607 (stress) score 210 or sacrifice child
Aug 15 12:09:03 host kernel: [1340695.340556] Killed process 22607 (stress) total-vm:8396092kB, anon-rss:363184kB, file-rss:176kB, shmem-rss:0kB
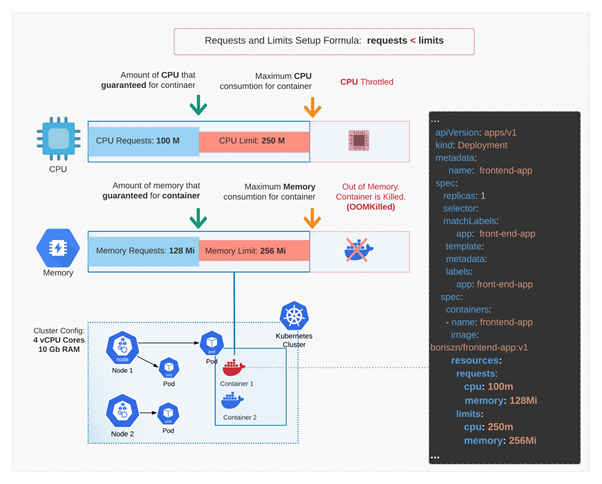
Using Docker stats, you can check current memory usage and limits. If you are using Kubernetes, you can actually book the resources that your application needs to run properly and define maximum limits using requests and limits on each pod definition. Figure 1 below demonstrates the algorithm:
Figure 1
Read-Only Mode for Filesystem and Volumes
You should enable Read-only mode to restrict usage of filesystem or volumes. To achieve this, you can use a --read-onlyflag. For example:
docker run --read-only back-end
You can also temporarily enable access if your app needs to save some data. You can use the flag --tmpfs:
docker run --read-only --tmpfs back-end
Static Vulnerability Scanning
Containers are isolated black boxes: If they are doing their work as expected, it’s easy to forget which software and version are specifically running inside. Maybe a container is performing like a charm from the operational point of view, but it’s running version X.Y.Z of the web server, which happens to suffer from a critical security flaw. This flaw was fixed long ago upstream, but not in your local image. This kind of problem can go unnoticed for a long time if you don’t take the appropriate measures.
Core Practices:
Picturing the containers as immutable atomic units is really nice for architecture design, but from the security perspective, you need to regularly inspect their contents:
- Update and rebuild your images periodically to grab the newest security patches. Of course, you will also need a pre-production testbench to make sure these updates are not breaking production.
- Live-patching containers is usually considered a bad practice. The pattern is to rebuild the entire image with each update. Docker has declarative, efficient, easy-to-understand build systems, so this is easier than it may sound at first.
- Use software from a distributor that guarantees security updates. Anything you install manually out of the distro, you have to manage security patching yourself.
- Docker and microservice-based approaches consider progressively rolling over updates without disrupting uptime, which is a fundamental requirement of their model.
- User data is clearly separated from the images, making this whole process safer.
- Keep it simple. Minimal systems expect less frequent updates. Remember the intro: Less software and moving parts equals less attack surface and updating headaches. Try to split your containers if they get too complex.
- Use a vulnerability scanner. There are plenty out there, both free and commercial. Try to stay up to date on the security issues of the software you use subscribing to the mailing lists, alert services, etc.
- Integrate this vulnerability scanner as a mandatory step of your CI/CD and automate where possible; don’t just manually check the images now and then.
Example: There are multiple Docker image registry services that offer image scanning. For this example, we decided to use CoreOS Quay, which uses the open-source Docker security image scanner Clair. While Quay is a commercial platform, some services are free to use. You can create a personal trial account by following these instructions.
Once you have your account, go to Account Settings and set a new password (you need this to create repos).
Click on the + symbol on your top right and create a new public repo:
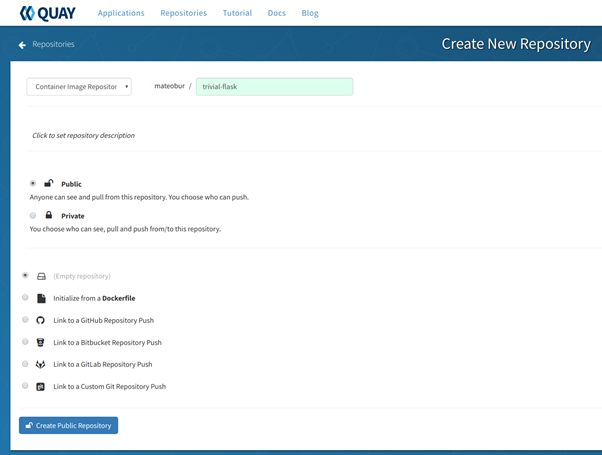
We go for an empty repository here, but you have several other options, as you can see in the image above.
Now, from the command line, we log into the Quay registry and push a local image:
# docker login quay.io
# docker push quay.io/<your_quay_user>/<your_quay_image>:<tag>
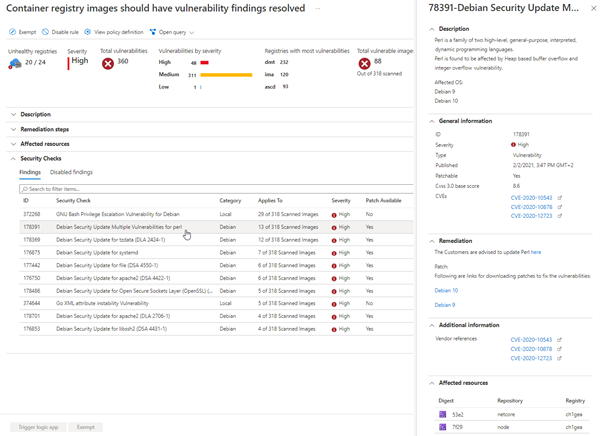
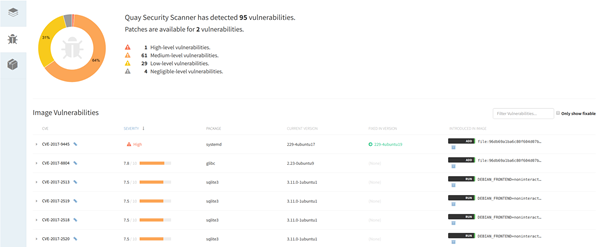
Once the image is uploaded into the repo, you can click on its ID and inspect the image security scan, ordered by severity, with the associated CVE report link and upstream patched package versions.
You can find additional detail in the Lab 2 “Push the example container images to a container image registry.”
Alternatively, you can use tools like:
- Harbor open-source registry with vulnerability scanning. Harbor is based on policy and RBAC access rules. Also, Harbor has an integration with other OIDC providers.
- Trivy is an open-source tool that checks your images, dockerfiles, and even IaC scripts (including Kubernetes and Terraform) for vulnerabilities. Trivy is quite easy to use. Install the binary file and run the following command:
$ trivy image back-end-app:1.2.2
If you use Kubernetes, you can combine one of these tools with kubebench. Therefore, you will cover not only the containers side of things but Kubernetes configuration security as well.