

How to Build an AI Agent to Generate Selenium WebDriver Tests in Java: A Practical Guide for Test Automation Engineers
A step-by-step guide using OpenAI and Ollama to build an AI agent that generates Selenium Java tests from plain-English scenarios.
 CORE
·
CORE
·
Join the DZone community and get the full member experience.
Join For FreeArtificial intelligence is transforming software testing by enabling faster test creation, smarter execution, and more efficient quality assurance processes. With AI agents, we can generate test cases and scripts, run tests, and produce detailed reports with minimal manual effort.
AI agents are software systems that leverage artificial intelligence to achieve goals and perform tasks on behalf of users. They can think through problems, plan actions, and remember things, while also making decisions on their own and improving over time.
In this tutorial, we will build an AI-powered agent that does exactly this. It takes a .txt file with a simple use case written in plain English, processes it using an AI model such as OpenAI or Ollama, and generates Selenium test automation scripts in Java.
How to Build an AI Agent for Test Automation
We will be building an AI agent for test automation that will perform the following tasks:
- Reads a test scenario from a .txt file
- Sends the scenario with the right prompt to OpenAI/Ollama, based on the provider selected in the config file
- Generates the Selenium WebDriver Java test automation scripts bifurcated into:
- Page Object Classes
- Test Class
- Testng.xml
- Readme.md with notes and steps to run the test
Prerequisites
The following prerequisites are required to start building the AI agent for test automation:
- Python 3.14 and above
- Code Editor (VS Code is preferred)
- Basic understanding of Python and the Terminal
- Test scenario written in plain English text
LLM Setup
- OpenAI API Key
- Ollama setup on the local machine
Understanding the Selenium AI Test Generation Workflow
Before we deep dive into building the AI agent, let’s get a high-level overview of how this AI Agent works for generating Selenium Java test automation scripts:
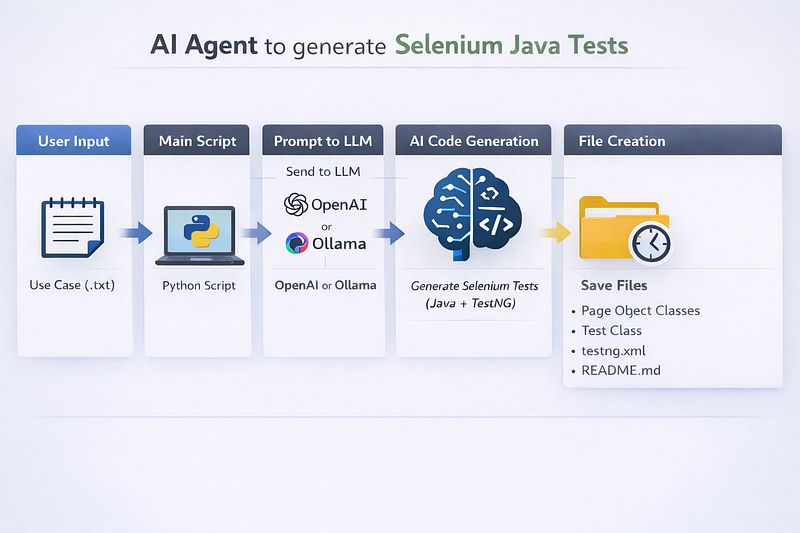
The process is explained step by step below:
- User input: The user provides a plain English test scenario in a .txt file.
- Processing layer: The Python main script reads the test scenario file and forwards it to the LLM model (OpenAI or Ollama), depending on the configuration.
- AI engine: Before sending requests to the LLM, the AI agent converts the test scenario from plain English to a structured prompt and adds clear instructions like:
- Generate Selenium WebDriver code in Java
- Use the TestNG framework
- Follow the Page Object Model
- Generate Multiple Page Object classes(if needed)
- Rules for generating the code
- Output format for files
The LLM understands the test description, steps, and expected behavior, and converts them into the respective files.
- File generation: The AI agent creates a new timestamp-based folder and stores the generated code in separate files, bifurcating the page object classes, test class, testng.xml, and README.md.
.
├── config.py
├── tools.py
├── main.py
├── requirements.txt
├── .env
├── test_cases/
│   ├── input/
│   │   └── sample_test_case.txt
│   └── output/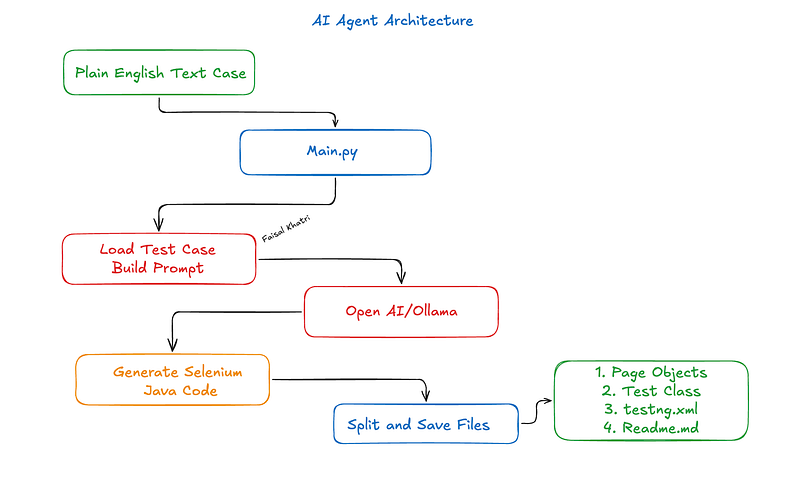
Let’s start building the AI agent using the following step-by-step guide:
Step 1: Creating and Activating a Python Virtual Environment
Run the following command in the terminal to create a Python virtual environment:
python -m venv venvNext, run the following command to activate the virtual environment:
On MacOS/Linux:
source venv/bin/activateOn Windows:
venv\Scripts\activateStep 2: Installing Dependencies
Let’s create a requirements.txt as it serves as a blueprint for recreating the exact environment needed to run the project consistently across different environments.
#requirements.txt
openai==2.28.0
requests==2.32.5
python-dotenv==1.2.2
The following command should be run from the terminal to install the dependencies:
pip install -r requirements.txt
Step 3: Writing the Configuration File
The configuration file holds details related to OpenAI, Ollama, input and output files, and settings for using the desired LLM provider to generate test automation scripts.
#config.py

from dataclasses import dataclass, field
from pathlib import Path
from dotenv import load_dotenv
from dotenv import load_dotenv
from openai import OpenAI
import os

load_dotenv()

@dataclass
class OpenAIConfig:
    model_name: str = os.getenv("OPENAI_MODEL_NAME", "gpt-5")
    max_tokens: int = int(os.getenv("OPENAI_MAX_TOKENS", "4096"))
    temperature: float = float(os.getenv("OPENAI_TEMPERATURE", "0.3"))
    api_key: str = os.getenv("OPENAI_API_KEY", "")

    @property
    def client(self):
        if not self.api_key:
            raise ValueError(
                "OPENAI_API_KEY is required when using OpenAI provider"
            )

        return OpenAI(api_key=self.api_key)

@dataclass
class OllamaConfig:
    model: str = os.getenv("OLLAMA_MODEL_NAME", "llama3")
    prompt: str = "You are a Selenium WebDriver test automation expert. Generate Selenium WebDriver Java test scripts. STRICTLY follow the format. Any deviation is not acceptable."
    stream: bool = False
    temperature: float = float(os.getenv("OLLAMA_TEMPERATURE", "0.3"))
    ollama_baseurl:str = os.getenv("OLLAMA_BASEURL", "http://localhost:11434")
    ollama_endpoint: str = os.getenv("OLLAMA_ENDPOINT", "http://localhost:11434/api/generate")

@dataclass
class FileConfig:
    input_file: Path = Path("test_cases/input/sample_test_case.txt")
    output_file_path: Path = Path("test_cases/output/")

@dataclass
class AppConfig:
    provider:str = "ollama" #openai or ollama
    openai: OpenAIConfig = field(default_factory=OpenAIConfig)
    ollama: OllamaConfig = field(default_factory=OllamaConfig)
    files: FileConfig = field(default_factory=FileConfig)

config = AppConfig()
The configuration file serves as a centralized configuration system for switching between LLM providers and managing file settings. Let’s break it down to understand it further:
- Dataclasses: The
@dataclassautomatically generates the__init__()method, making it easier to create and manage objects without writing boilerplate code. - Separate Configs: Separate config classes are defined for OpenAI, Ollama, and input/output file handling, each with default values. The input file name is currently configured as “sample_test_case.txt.”
- AppConfig: The AppConfig class serves as a central wrapper, enabling switching between providers (OpenAI or Ollama) with a single flag.
- field(default_factory=…): It ensures each config gets its own instance, avoiding shared state issues.
Step 4: Implementing Utility Functions for Reading and Generating Code
In this step, we’ll create a new Python file named tools.py and implement the following utility functions within it:
load_test_case_from_file()build_prompt()generate_with_openai()generate_with_ollama()generate_selenium_test_script()create_timestamped_output_dir()split_and_save_files()
The following packages should be imported in the tools.py file:
import requests

from config import config
from typing import Optional
from pathlib import Path
from datetime import datetime
from logger import logger

import requests

from config import config
from logger import logger
Let’s learn the utility functions one by one.
load_test_case_from_file() function:
def load_test_case_from_file(file_path: str | Path) -> str:
    logger.info(f"Loading test case from: {file_path}")

    try:
        with open(file_path, "r", encoding="utf-8") as file:
            content = file.read()

        logger.info(f"Test case loaded successfully ({len(content)} characters)")
        return content

    except FileNotFoundError:
        logger.error(f"Test case file not found: {file_path}")
        raise FileNotFoundError(f"Test case file not found: {file_path}")
    except Exception as e:
        logger.exception(f"Error reading test case file: {e}")
        raise RuntimeError(f"Error reading test case file: {e}")
The load_test_case_from_file() function takes the test case file path as a parameter, reads its contents, and returns them as a string.
It safely handles errors by raising a clear message if the file is not found and wraps any other unexpected issues in a RuntimeError.
build_prompt() function:
def build_prompt(use_case_text: str) -> str:
    logger.info("Building AI prompt")
    prompt = f"""
You are a test automation expert specializing in Selenium WebDriver with Java.

Generate Selenium automation test script using the following instructions and skills:
- Use Java 17 to write the code
- Use latest Selenium WebDriver Java dependency version to write code
- Do not write code statement "System.setProperty()" to add chromedriver path, in the tests
- Follow Page Object Model (POM)
- Use latest version of TestNG dependency
- Apply best coding practices for writing Java code
- Add comments explaining each step
- Add assertions using TestNG assertion
- Do not add random assertion statements in the code
- Do not mention any text in README that says that ChromeDriver path should be added to the Path
- Never use brittle XPATH and CSS Selectors selectors such as .btn-primary, .container > div:nth-child(2), #content div span, or auto-generated classes.

IMPORTANT: You MUST follow the exact output format below.

Rules:
- ALWAYS start each file with ===FILE: filename===
- Use class names based on the web page(e.g. HomPage.java, LoginPage.java, etc. These names are for instructions only, use class name specific to the web page)
- Do not add "Page" to the test class name
- Do NOT add explanations outside file blocks
- DO NOT skip this format
- If you do not follow this format, the output will be rejected
- DO NOT use markdown (no **, no ``` blocks)
- DO NOT add file names outside ===FILE: markers
- ONLY use ===FILE: filename=== format
- OUTPUT FORMAT FOR FILES(STRICT):
    ===FILE: filename===
    file content

- The following files MUST only be generated in the same order(STRICT). No deviation is acceptable:
  - Multiple Page Object classes(if needed) (Strictly Page object class, no WebDriver instantiation in these classes, Do not create duplicate page object classes)
  - Test class(WebDriver should be instantiated in the Test class, Do not use WebDriverManager to instantiate WebDriver, Use TestNG's @BeforeMethod annotation and define a method to instantiate the WebDriver, Use TestNG's @AfterMethod to quit the WebDriver)
  - Add assertions using TestNG assertion
  - Do not add random assertion statements in the code
  - testng.xml(Follow correct structure as per TestNG guidelines)
  - README.md (Include notes and steps to run the test using testng.xml file)

Use Case:
{use_case_text}
"""
    logger.info(f"Prompt created ({len(prompt)} characters)")
    return prompt
The build_prompt() function is a core part of the application because it constructs the prompt sent to the LLM to generate Selenium Java test automation code.
It takes the use case text as input and embeds it into a detailed instruction template, guiding the model to generate Java-based Selenium tests using best practices such as POM and TestNG.
The prompt also enforces file-formatting rules like (===FILE: filename===) to ensure the output is structured, consistent, and ready for file generation without manual cleanup.
It also enforces rules to generate the POM, test class, testng.xml, and README in strict order to keep the output consistent.
Using Effective Prompts
Effective prompts are essential for generating clean, reliable Selenium test scripts with AI. By clearly defining the requirements, the model can be guided to use best coding practices, create clean test scripts, and use the Page Object Model (POM) to generate well-structured code.
Prompt Design for Better Selenium Java Tests
Clear, specific prompts help the AI generate cleaner Selenium test scripts. Mention details such as using Java for Selenium, using the latest versions of Selenium and TestNG, and following coding best practices so the AI can better meet the requirements and produce well-designed output.
Customizing Prompts for Page Object Model (POM)
The following prompts can be used to train the AI to generate the page object files we need :
- Use best practices to generate the Page Object classes.
- Generate Multiple Page Object classes (if needed).
- Do not instantiate the WebDriver in the Page Object class.
- Do not create duplicate Page Object classes.
- Additionally, we can also mention using best locator strategies, like preferring IDs and CSS selectors over complex XPaths, to make the tests more stable, readable, and easy to maintain.
generate_with_openai() function:
def generate_with_openai(prompt: str) -> Optional[str]:
    response = config.openai.client.chat.completions.create(
        model=config.openai.model_name,
        temperature=config.openai.temperature,
        max_tokens=config.openai.max_tokens,
        messages=[
            {"role": "system", "content": "You are a Selenium WebDriver test automation expert. Generate Selenium WebDriver Java test scripts. STRICTLY follow the format. Any deviation is not acceptable."},
            {"role": "user", "content": prompt},
        ],
    )

    return response.choices[0].message.content
The generate_with_openai() function sends a prompt to the OpenAI API to generate Selenium WebDriver test scripts in Java. The OpenAI client is initialized using the API key from an environment variable, allowing the code to connect and interact with OpenAI services securely.
It uses the model, temperature, and token limits from the configuration. It generates the request with a message that defines the AI’s role and user prompt (the build_prompt() function will be supplied here).
The API returns multiple choices, and the function extracts the generated content from the first response. Finally, it returns the generated test script as a string.
generate_with_ollama() function:
def generate_with_ollama(prompt: str) -> str:
    logger.info(
        f"Generating test code with Ollama model: {config.ollama.model}"
    )

    response = requests.post(
        config.ollama.ollama_endpoint,
        json={
            "model": config.ollama.model,
            "prompt": config.ollama.prompt + "\n" + prompt,
            "stream": config.ollama.stream,
        },
    )

    response.raise_for_status()
    data = response.json()
    generated_text = data.get("response", "")

    logger.info(
        f"Ollama generation completed ({len(generated_text)} characters)"
    )

    return generated_text
The generate_with_ollama() function generates text by sending a POST request to the configured Ollama API endpoint. It combines a predefined base prompt with the user-provided prompt and sends it along with the model name and streaming configuration.
After receiving the response, raise_for_status() checks for HTTP errors, and response.json() parses the response into a Python dictionary. The generated text is extracted from the response field, with an empty string used if the field is missing. Finally, the function logs the response length and returns the generated text.
generate_selenium_test_script() function:
def generate_selenium_test_script(test_case_text: str) -> Optional[str]:
    logger.info("Starting Selenium test generation")
    prompt = build_prompt(test_case_text)

    provider = config.provider.lower()
    logger.info(f"Using AI provider: {provider}")

    if provider == "openai":
        logger.info("Sending prompt to OpenAI")
        return generate_with_openai(prompt)

    elif provider == "ollama":
        logger.info("Sending prompt to Ollama")
        return generate_with_ollama(prompt)

    else:
        logger.error(f"Unsupported provider: {provider}")
        raise ValueError(f"Unsupported provider: {provider}")
The generate_selenium_test_script() function acts as a wrapper to generate a Selenium WebDriver test script based on the input test case. It first builds a prompt using the build_prompt (test_case_text) function, which prepares the input for the LLM.
Next, based on the configured provider, i.e., OpenAI or Ollama, it dynamically calls the respective function to generate the script. If an unsupported provider is specified, it raises a ValueError to prevent unexpected behavior.
create_timestamped_output_dir() function:
def create_timestamped_output_dir(base_output_path: Path) -> Path:
    timestamp = datetime.now().strftime("%Y-%m-%d_%H-%M-%S")
    output_dir = base_output_path / timestamp
    output_dir.mkdir(parents=True, exist_ok=True)
    logger.info(f"Created output directory: {output_dir}")
    return output_dir
The create_timestamped_output_dir() function creates a new folder named with the current date and time, so each run gets its own unique output directory. It ensures the folder exists (creating it if needed) and returns its path for saving files.
split_and_save_files() function:
def split_and_save_files(generated_text: str, base_output_path: Path) -> None:

        sections = generated_text.split("===FILE:")
        if len(sections)<=1:
            logger.error("No structured files found in AI response")
            raise ValueError ("No Structured files found in AI response!")

        logger.info(f"Found {len(sections) - 1} generated files")
        pageobject_dir = base_output_path/"pageobjects"
        pageobject_dir.mkdir(parents=True, exist_ok=True)

        for section in sections[1:]:
            section = section.strip()
            parts = section.split("\n",1)
            raw_filename = parts[0].strip()

            filename =  raw_filename.replace("===", "").strip().split()[0]

            content = parts[1].strip() if len(parts)>1 else ""
            content = content.split("===FILE:")[0].strip()

            if filename.endswith("Page.java"):
                file_path = pageobject_dir / filename
            else:
                file_path = base_output_path / filename

            logger.info(f"Writing file: {file_path}")
            with open(file_path, "w", encoding="utf-8") as f:
                f.write(content)

            logger.info(f"Created: {file_path} ({len(content)} characters)")
The split_and_save_files() function takes the AI-generated response and splits it into multiple files based on a marker (===FILE:). It extracts each filename and its content, then saves them into the appropriate folders.
The Page Object files go into a pageobjects directory, while the test class, testng.xml, and README.md files go into the main output/<timestamped> folder. If the expected structure is missing, it throws an error to avoid saving incorrect output.
Step 5: Writing the Main Script to Glue Everything
In this step, we’ll create a main.py file to orchestrate the complete workflow of generating Selenium test scripts using AI:
import re

from tools import load_test_case_from_file, generate_selenium_test_script,split_and_save_files,create_timestamped_output_dir, check_llm_connection
from config import config
from pathlib import Path
from logger import logger

def main() -> None:
    try:
        logger.info("Starting Selenium AI Test Generator")

        if not check_llm_connection():
            logger.error(
                "❌ LLM connection check failed. "
                "Stopping test generation."
            )
            return

        input_file = config.files.input_file
        output_file_path = config.files.output_file_path
        run_output_dir = create_timestamped_output_dir(output_file_path)

        use_case_text = load_test_case_from_file(input_file)

        if not use_case_text:
            logger.error("Test case file is empty.")
            raise ValueError("Test case file is empty.")

        generated_output = generate_selenium_test_script(use_case_text)

        if not generated_output:
            logger.error("Failed to generate Selenium WebDriver Java test automation scripts.")
            raise RuntimeError("Failed to generate Selenium WebDriver Java test automation scripts.")

        split_and_save_files(generated_output,run_output_dir)
        logger.info(f"✅ All generated files saved successfully to {run_output_dir}")

    except Exception as e:
        logger.error(f"❌ Error occurred while generating output files: {e}")

if __name__ == "__main__":
    main()
The main.py file is where the program starts and manages the whole process of generating Selenium test scripts from start to finish. It reads the input test case file, sends the test case to the AI to generate automation scripts, and generates the timestamped output folder.
Once the scripts are generated, it splits them into multiple files and saves them in the appropriate directories.
In case of any exception, it catches the error and prints the message “Error occurred while generating output files” with the exception details.
Generating First Test Scripts
Let’s create a new text file, ”sample_test_case.txt,” and place it in the input/ folder with the following test scenario to generate the Selenium test scripts using the AI agent we created:
Title: Application Login scenario

Precondition: User is registered in the application.

Steps:
1. Open Chrome browser
2. Navigate to https://ecommerce-playground.lambdatest.io/index.php?route=account/login
3. Enter "[email protected]" in the E-Mail Address field
4. Enter "Password@321" in the Password field
5. Click on the Login Button
5. Add an assert statement to check that "My Account" page is displayed.
Configuration and Setup
Using OpenAI
Create a .env file and add your OpenAI API key in it. This file should always remain on your local machine and should not be committed to the remote repository.
OPENAI_MODEL_NAME=<model name>
OPENAI_MAX_TOKENS=<max tokens>
OPENAI_TEMPERATURE=<temperature value>
OPENAI_API_KEY=<Your OpenAI API Key>
Using Ollama
- Download and install Ollama.
- Start Ollama by running the command
ollama servein the terminal. - Pull the Qwen3:8b model by running the command —
ollama pull qwen3:8b.
Create a .env file and update the following details in it:
OLLAMA_MODEL_NAME=qwen3:8b
OLLAMA_TEMPERATURE=0.3
OLLAMA_ENDPOINT=http://localhost:11434/api/generate
OLLAMA_BASEURL=http://localhost:11434
Before running the model, ensure that Ollama is running in the background. Open Terminal and run the command ollama serve
Note: Running the model explicitly is not required.
Running the AI Agent
Open the terminal and run the following command to generate the test scripts:
python main.pyThe following log should be printed in the console after the Agent is run successfully:
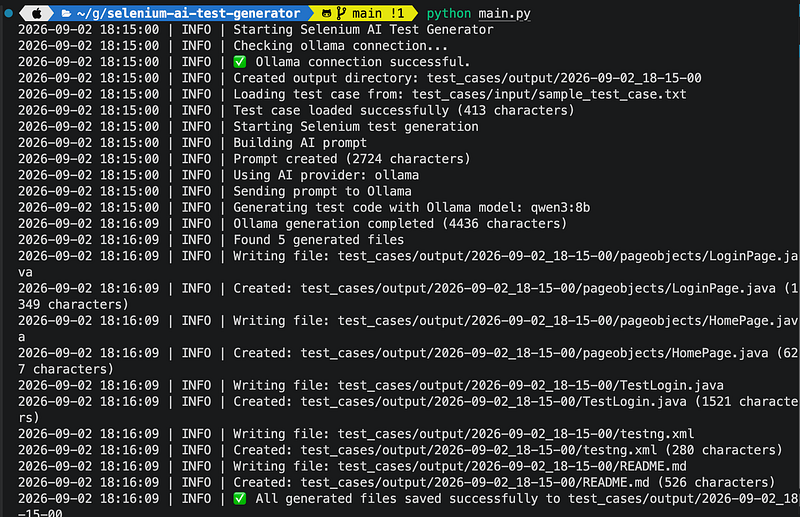
The test scripts should be generated in a new timestamped(YYYY-MM-DD_hh-mm-ss) folder that is generated inside the output/ folder:
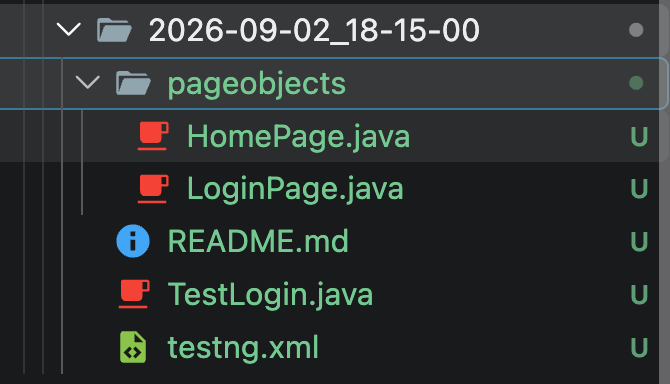
Reviewing the Generated Java Selenium Code
Let’s check each file generated in the output/ folder and review the code to verify if it fits the test scenario we defined and follows the expected structure and best practices.
Let’s check each file generated in the output/ folder and review the code to verify if it fits the test scenario we defined and follows the expected structure and best practices.
The following page object class is generated:
LoginPage.java
public class LoginPage {
    private WebDriver driver;

    public LoginPage(WebDriver driver) {
        this.driver = driver;
    }

    public void navigateToLoginPage() {
        driver.get("https://ecommerce-playground.lambdatest.io/index.php?route=account/login");
    }

    public void enterEmail(String email) {
        driver.findElement(By.name("email")).sendKeys(email);
    }

    public void enterPassword(String password) {
        driver.findElement(By.name("password")).sendKeys(password);
    }

    public void clickLoginButton() {
        driver.findElement(By.xpath("//button[@type='submit']")).click();
    }
}
The page object file is generated correctly using the name and XPath locator strategies, and appropriate methods are created to interact with the respective WebElements on the page. However, the import statements are missing, which should be added to avoid errors.
Additionally, locators should be checked, and explicit waits could be added in this class while locating the elements to reduce flakiness during test execution.
The following test class is generated:
LoginTest.java
import org.openqa.selenium.By;
import org.openqa.selenium.WebDriver;
import org.openqa.selenium.WebElement;
import org.openqa.selenium.chrome.ChromeDriver;
import org.testng.Assert;
import org.testng.annotations.BeforeMethod;
import org.testng.annotations.Test;

public class LoginTest {

private WebDriver driver;

@BeforeMethod
public void setup() {

System.setProperty("webdriver.chrome.driver", "path_to_chrome_driver");
driver = new ChromeDriver();

}

@AfterMethod

public void teardown() {
 driver.quit();
 }

@Test
public void testLoginScenario() {
 LoginPage loginPage = new LoginPage(driver);
 loginPage.navigateToLoginPage();
 loginPage.enterEmail("[email protected]");
 loginPage.enterPassword("Password@321");
 loginPage.clickLoginButton();
 WebElement myAccountPageTitle = driver.findElement(By.xpath("//h1[@class='page-title']"));
 Assert.assertTrue(myAccountPageTitle.isDisplayed(), "My Account page is not displayed");
 }
}
The test class is generated per the provided prompt and includes the @BeforeMethod and @AfterMethod annotations for setup and teardown.
However, it includes System.setProperty(), which can be removed because the latest version of Selenium doesn't require it to set the ChromeDriver path. The import statement for the @AfterMethod annotation is missing, which should be added.
Additionally, the myAccountPageTitle WebElement can be moved to a separate MyAccount Page Object class, and its XPath should also be verified to ensure it's pointing to the correct element on the page.
Testng.xml
<?xml version="1.0" encoding="UTF-8"?>
<!DOCTYPE suite SYSTEM "http://testng.org/testng-1.0.dtd">
<suite name="LoginTestSuite">
 <test name="LoginTest">
 <classes>
 <class name="LoginTest"/>
 </classes>
 </test>
</suite>
The qualified class name should be updated once the code is moved to the project.
README.md
**How to run the test**
1. Install TestNG framework and Selenium WebDriver.
2. Place the Selenium ChromeDriver executable in a directory, update the path_to_chrome_driver variable in `LoginTest.java` with this directory.
3. Run the test using the testng.xml file by executing the command: `java -cp .;test-classes org.testng.TestNG testng.xml`
Note: Update the path_to_chrome_driver variable with your actual ChromeDriver executable path.
The steps for the ChromeDriver executable and the command to run testng.xml can be removed, as they are not accurate. Instead, the step to run the testng.xml by right-clicking on it can be updated here.
Overall, the AI agent generated the test code quickly, saving manual effort and providing a good starting point. However, review, validate, and refine the code before using it in a project.
Best Practices While Using AI Agents
The following best practices should be considered while using AI Agents to generate automation code:
- Improving prompt quality for reliable tests: Clear and detailed prompts help the AI generate stable test scripts. Mention requirements like framework names, naming conventions, and coding standards to improve structure and avoid errors.
- Adding assertions and validations: Always ensure the generated tests include proper assertions to validate expected outcomes. This helps confirm that the application behaves correctly instead of just performing actions.
- Review and refactor generated code before execution: Always review AI-generated code before running it. Refactoring helps remove redundancies, improve readability, and align the code with the project standards.
- Handling invalid/empty inputs: Validate inputs like test case files before processing them. Ensure you add proper steps and verification checks for empty or invalid data to prevent unexpected failures during execution.
- Integrating OpenAI API error handling: Proper error handling for API calls helps manage issues like timeouts, rate limits, or failed responses. Using try-catch blocks and logging error messages improves error readability. Exception handling helps interpret error messages in simple language and makes debugging easier.
- Logging and debugging tips: Adding logs at key steps helps track execution flow and quickly identify issues. Clear logging messages make debugging easier, especially when working with AI-generated outputs and API calls.
Watch the step-by-step YouTube tutorial on How to Build an AI Agent to Generate Selenium WebDriver Tests in Java.
Limitations and Challenges
The following limitations and challenges can be faced while working with AI Agents for test script generation:
- AI-generated scripts may fail: AI-generated test scripts can be a starting point, but they may fail when the input prompt is unclear or missing important details. They can also break because of dynamic elements, incorrect UI assumptions, or environment-specific issues.
- Manual cleanup/selector accuracy: AI may generate locators that are not always reliable or optimal. Always review and refine locators in AI-generated scripts, preferring stable options like IDs or CSS selectors over complex XPaths.
- Test maintenance and flakiness considerations: AI-generated tests may be flaky if they don’t handle waits, dynamic content, or synchronization properly. Adding proper waits and improving test design can reduce flakiness. Regular maintenance is required to keep tests stable as the application evolves.
- Reviewing hallucinations: AI can sometimes generate incorrect or non-existent methods, elements, or logic. Review the code carefully to catch such hallucinations before execution. Validating against actual application behavior ensures the tests are accurate and usable.
Conclusion
To design an AI agent to generate test scripts, create a comprehensive prompt with clear rules, a structured output format, and strict guidelines to ensure consistent results. It’s also important to validate and refine the generated code and handle edge cases and failures gracefully.
It all depends on the team’s decision; since AI is evolving, designing an AI agent that generates test automation scripts can also be a viable and flexible approach, especially when customization and control are important.
Published at DZone with permission of Faisal Khatri. See the original article here.
Opinions expressed by DZone contributors are their own.
Comments