Authenticate Your Angular App With JWTs
Join the DZone community and get the full member experience.
Join For Free
No web application should ever be made without a user registration and authentication feature. Authentication gives permission for a user to access the proper resources or services. The fundamental property of HTTP is a stateless protocol that contradicts authentication, which works to keep the state of the user.
JSON Web Tokens (JWTs) help get around the contradiction between HTTP and authentication. The backend of the Angular app authenticates the JWT, validates the user, and grants them access. To make this happen, the app talks to the backend to generate a token, which then is communicated to the Authorization header to verify the token. You can also address this issue with session-based authentication and cookies. This means that the backend will create a “session cookie,” which provides a process for the server to confirm the user’s identity.
Session vs JWT Authentication in Angular
If you’re like me, you have been developing for the web for some time. You might have come across different ways of resolving this problem. The traditional approach uses sessions to keep the state. When a user visits a website and logs in, the server will store the authentication state in a session.
It then returns a unique session ID to the client, which is usually stored in a browser cookie. Every time the client makes a request to the server, the cookie is sent in the request header, and the server can look up the session data from the session ID. While this approach has been applied successfully for many years, it has some drawbacks.
Session-based authentication relies on session data being stored on the server. The server that authenticates the user must be the same server that checks the authentication and provides the service. Imagine a web service that is deployed on multiple servers and sits behind a load balancer or reverse proxy. Each request that a client makes could end up being handled by a different server. The session data would then have to be shared among all servers. This would undo most of the improvement introduced by the load balancer.
Another downside of session-based authentication is the increased usage of single sign-on services. Here, the user signs on once with a central authentication service. After that, the user can freely use any server that trusts the authentication service. This can not only be useful when registering with websites using Google or Facebook accounts.
Increasingly, businesses organize their workflows with a large number of separate tools. Using a single sign-on, employees will register once and are then able to use all tools without further authentication. It would be highly impractical to implement single sign-on using sessions because the different applications would have to communicate with each other and exchange their private session data.
JWTs to the Rescue for Angular Authentication
Because of the problems outlined above, services are increasingly using JSON Web Tokens (JWT) to implement authentication. With JWT authentication, there is no need for the server to store any session data. The server can be truly stateless. So how does this work?
When a user logs into a service, the server checks the user’s credentials. If successful, the server encodes the key user data, such as a user ID or the user’s email address into a JSON string. The string is then signed using a secret key. This data is the JSON Web Token. It can be sent back to the client and used by the client to authenticate itself.
If a server can validate the token with the appropriate key, it can be sure that it was generated by the authentication server. But it can’t be forged because only the authentication server knows the private key. The authentication can be provided by a service that is separate from the service wanting to restrict access.
Implement a JWT Server and Client with Node and Angular
In this section, I will show you how to implement JWT authentication using a Node and Express server with a client written with Angular. You will see that, even though the concept is simple, the implementation requires knowledge of security best practices. The example given here is not complete and lacks a number of features required by a production server. In the next section, I will show you that Okta provides a simple and elegant solution to these shortcomings.
I will assume that you have some knowledge of JavaScript and that you have installed Node and the npm command line tool on your server.
Build a JWT Authentication Server
To start implementing the server that authenticates users using JSON Web Tokens, open a terminal and create a directory that will contain the server application, I have called my directory jwt-server. Navigate into that directory and run the following command to initialize your project.
npm init -y
You will need a number of packages to implement the server. Install then by running this command.
xxxxxxxxxx
I will explain each of these libraries when they appear in the code. Open up your favorite text editor and create a new file index.js with the following content.
xxxxxxxxxx
const express = require('express');
const cors = require('cors');
const bodyParser = require('body-parser');
const bearerToken = require('express-bearer-token');
const profile = require('./profile');
const port = process.env.PORT || 10101;
const app = express()
.use(cors())
.use(bodyParser.json())
.use(bearerToken());
app.use('/', profile);
app.listen(port, () => {
console.log(`Express server listening on port ${port}`);
});
This is the main server application. It first creates an express server that is used to listen to incoming HTTP requests and lets you register callback functions that generate responses to those requests. The server uses a number of middlewares that extend the behavior of the express server. The cors middleware allows the server to respond to Cross-Origin Requests. Body-parser is needed to parse the HTTP request body and create an object that is attached to the request data. Similarly, express-bearer-token extracts a bearer token from the request header and makes it available through the request object.
The express application attaches a router to the main route /. This router is defined in a separate file called profile.js. The first route that you will be implementing in this file lets a user register an account.
xxxxxxxxxx
const express = require('express');
const bcrypt = require('bcryptjs');
const sqlite3 = require('sqlite3').verbose();
const db = new sqlite3.Database(':memory:');
db.serialize(() => {
db.run("CREATE TABLE users (id INTEGER PRIMARY KEY, name TEXT, email TEXT, password TEXT)");
});
const router = express.Router();
router.post('/register', function(req, res) {
var hashedPassword = bcrypt.hashSync(req.body.password, 8);
db.run("INSERT INTO users (name, email, password) "
+ "VALUES (?, ?, ?)", req.body.name, req.body.email, hashedPassword,
function (err) {
if (err) return res.status(500).send("An error occurred during registration");
res.status(200).send({ status: 'ok' });
});
});
module.exports = router;
I am using sqlite3 to simulate a user database. In this example, the database is purely held in memory. This means that all data will be lost when the server is stopped. In a production server, you should replace this with a proper SQL or NoSQL database.
When a user registers, their password is hashed using the bcryptjs library. Only the hashed password is stored in the database. On success, the server responds with an ok status. Once a user is registered they need to be able to log on. This can be done in a separate route /login. This is where you will start using JSON Web Tokens. Before you start implementing, create a file config.js that will store the secret for creating web tokens.
xxxxxxxxxx
module.exports = {
'secret': 'my_special_secret'
};
Next, add the require statement for njwt and the new config.js to profile.js.
xxxxxxxxxx
const nJwt = require('njwt');
const config = require('./config');
Then, create the /login route in the same file.
xxxxxxxxxx
router.post('/login', function(req, res) {
db.get("SELECT id, name, email, password FROM users "
+ "WHERE email=?", req.body.email, function (err, user) {
if (err) return res.status(500).send({status: 'Server error', err:err});
if (!user) return res.status(404).send('User not found');
if (!bcrypt.compareSync(req.body.password, user.password)) {
return res.status(401).send({ auth: false, token: null });
}
var jwt = nJwt.create({ id: user.id }, config.secret);
jwt.setExpiration(new Date().getTime() + (24*60*60*1000));
res.status(200).send({ auth: true, token: jwt.compact() });
});
});
This route expects two parameters, email and password. The first step is to search in the database for the user’s email and obtain the user’s record. Then, bcrypt is used to compare the user’s password to the hashed password. If successful, a jwt is used to create a token that stores the user’s ID. The token is then sent back to the client in the response.
When a client attempts to access a restricted resource, it needs to send the token in the request header. The server then needs to authenticate the token. You can write an express middleware that performs this authentication task. Create a new file auth.js with the following content.
xxxxxxxxxx
const nJwt = require('njwt');
var config = require('./config');
function jwtAuth(req, res, next) {
if (!req.token) {
return res.status(403).send({ auth: false, message: 'No token provided' });
}
nJwt.verify(req.token, config.secret, function(err, decoded) {
if (err) {
return res.status(500).send({ auth: false, message: 'Could not authenticate token' });
}
req.userId = decoded.body.id;
next();
});
}
module.exports = jwtAuth;
Remember the express-bearer-token middleware which extracts the JWT token from the request and places makes it available through req.token? jwt.verify is used to check whether the token is valid or not. This function also extracts the user ID that was stored in the token and allows you to attach it to the request object.
All this now allows you to create a route that is protected and only available to users that are logged in. Open profile.js again and add the following.
xxxxxxxxxx
const jwtAuth = require('./auth');
router.get('/profile', jwtAuth, function(req, res, next) {
db.get("SELECT id, name, email FROM users WHERE id=?", req.userId, function (err, user) {
if (err) {
return res.status(500).send("There was a problem finding the user.");
}
if (!user) {
return res.status(404).send("No user found.");
}
res.status(200).send(user);
});
});
The /profile route simply returns the user’s profile information. See how the jwtAuth function is added to the /profile route as middleware. This protects the route. It also allows the handler callback to use the req.userId property to look up the user from the database. To test the server, add the following line to the scripts section of package.json.
xxxxxxxxxx
"start": "nodemon server.js",
You can now run the server with this command.
xxxxxxxxxx
npm start
This concludes the simple example of a server that uses JSON Web Tokens for authentication. Next, it is time to implement a client that accesses this server.
Add an Angular Client With JWT Authentication
I will be using Angular to implement the client. First, make sure you have the latest version of the Angular command line tool installed. You might have to run the following command using sudo, depending on your system.
Navigate to a directory of your choice and create a new project for the client.
xxxxxxxxxx
ng new jwt-client --routing --style=css
Navigate into this folder and install the libraries for the Foundation responsive CSS framework.
Open src/styles.css and paste in the imports for the Foundation styles.
xxxxxxxxxx
@import '~foundation-sites/dist/css/foundation.min.css';
@import '~ngx-foundation/dist/css/ngx-foundation.min.css';
Start by creating a service for communicating with the Node/Express server.
xxxxxxxxxx
ng generate service server
Open the file src/app/server.service.ts and replace its contents with the following code.
xxxxxxxxxx
import { Injectable } from '@angular/core';
import { HttpClient, HttpParams } from '@angular/common/http';
const baseUrl = 'http://localhost:10101';
@Injectable({
providedIn: 'root'
})
export class ServerService {
private loggedIn = false;
private token: string;
constructor(private http: HttpClient) {}
setLoggedIn(loggedIn: boolean, token?: string) {
this.loggedIn = loggedIn;
this.token = token;
}
request(method: string, route: string, data?: any) {
if (method === 'GET') {
return this.get(route, data);
}
const header = (this.loggedIn) ? { Authorization: `Bearer ${this.token}` } : undefined;
return this.http.request(method, baseUrl + route, {
body: data,
responseType: 'json',
observe: 'body',
headers: header
});
}
get(route: string, data?: any) {
const header = (this.loggedIn) ? { Authorization: `Bearer ${this.token}` } : undefined;
let params = new HttpParams();
if (data !== undefined) {
Object.getOwnPropertyNames(data).forEach(key => {
params = params.set(key, data[key]);
});
}
return this.http.get(baseUrl + route, {
responseType: 'json',
headers: header,
params
});
}
}
This service provides functions for posting requests to the server and obtaining the data. One important task of this service is to store the JWT token and add it to the request header. Another service will be in charge of authenticating with the server and obtaining the token. Create this service using the command line.
xxxxxxxxxx
ng generate service auth
Fill the newly generated file src/app/auth.service.ts with this code.
xxxxxxxxxx
import { Injectable } from '@angular/core';
import { Router } from '@angular/router';
import { BehaviorSubject } from 'rxjs';
import { ServerService } from './server.service';
@Injectable()
export class AuthService {
private loggedIn = new BehaviorSubject<boolean>(false);
private token: string;
get isLoggedIn() {
return this.loggedIn.asObservable();
}
constructor(private router: Router, private server: ServerService) {
console.log('Auth Service');
const userData = localStorage.getItem('user');
if (userData) {
console.log('Logged in from memory');
const user = JSON.parse(userData);
this.token = user.token;
this.server.setLoggedIn(true, this.token);
this.loggedIn.next(true);
}
}
login(user) {
if (user.email !== '' && user.password !== '' ) {
return this.server.request('POST', '/login', {
email: user.email,
password: user.password
}).subscribe((response: any) => {
if (response.auth === true && response.token !== undefined) {
this.token = response.token;
this.server.setLoggedIn(true, this.token);
this.loggedIn.next(true);
const userData = {
token: this.token,
};
localStorage.setItem('user', JSON.stringify(userData));
this.router.navigateByUrl('/profile');
}
});
}
}
logout() {
this.server.setLoggedIn(false);
delete this.token;
this.loggedIn.next(false);
localStorage.clear();
this.router.navigate(['/']);
}
}
This service takes care of authenticating the user and, when successful, storing the token in the browser’s local storage as well as notifying the ServerService of the token. You can now use AuthService in your application component. Open src/app/app.component.ts and paste the following content.
xxxxxxxxxx
import { Component } from '@angular/core';
import { AuthService } from './auth.service';
@Component({
selector: 'app-root',
templateUrl: './app.component.html',
styleUrls: ['./app.component.css']
})
export class AppComponent {
title = 'jwt-client';
constructor(private authService: AuthService) {}
onLogout() {
this.authService.logout();
}
}
Change the application component in src/app/app.component.html to contain a top bar that is only visible when the user is logged in.
xxxxxxxxxx
<div class="top-bar" *ngIf="authService.isLoggedIn | async as isLoggedIn">
<div class="top-bar-left">
<a class="logo" routerLink="/">MyApp</a>
</div>
<div class="top-bar-right show-for-medium">
<ul class="menu">
<li><a routerLink="/profile">Profile</a></li>
<li><a (click)="onLogout()">Logout</a></li>
</ul>
</div>
</div>
<router-outlet></router-outlet>
Next, create a component that allows a user to register a new user.
xxxxxxxxxx
ng generate component register
Open src/app/register/register.component.ts and create a component that contains a registration form that can be submitted to the server.
xxxxxxxxxx
import { Component, OnInit } from '@angular/core';
import { FormGroup, FormBuilder, Validators } from '@angular/forms';
import { Router } from '@angular/router';
import { ServerService } from '../server.service';
@Component({
selector: 'app-login',
templateUrl: './register.component.html',
styleUrls: ['./register.component.css']
})
export class RegisterComponent implements OnInit {
form: FormGroup;
constructor(
private fb: FormBuilder,
private server: ServerService,
private router: Router
) {}
ngOnInit() {
this.form = this.fb.group({
email: ['', Validators.email],
name: ['', Validators.required],
password: ['', Validators.compose([Validators.required, Validators.minLength(8)])]
},);
}
onSubmit() {
console.log('Submitting');
if (!this.form.valid) {
console.log('Form not valid. Please check that fields are correctly filled in');
return;
}
console.log('Form valid');
const request = this.server.request('POST', '/register', {
email: this.form.get('email').value,
name: this.form.get('name').value,
password: this.form.get('password').value
});
request.subscribe(() => {
this.router.navigate(['/login']);
})
}
}
Note that the user is not logged in after registration. For this reason, the user is redirected to the login route when the registration was successful. The template for this component goes into src/app/register/register.component.html.
xxxxxxxxxx
<div class="grid-container">
<div class="grid-x">
<div class="small-12 medium-10 medium-offset-1 large-8 large-offset-2 cell">
<form [formGroup]="form" (ngSubmit)="onSubmit()">
<h2>Sign Up</h2>
<p>Please enter your details</p>
<label class="full-width-input">
Email
<input type="text" placeholder="Email" formControlName="email" required>
</label>
<label class="full-width-input">
Name
<input type="text" placeholder="Name" formControlName="name" required>
</label>
<label class="full-width-input">
Password
<input type="password" placeholder="Password" formControlName="password" required>
</label>
<button class="button">Register</button>
</form>
<div class="login-link">
Already registered? <a routerLink="/login">Login Here!</a>
</div>
</div>
</div>
</div>
Creating the component for logging in follows the same steps.
xxxxxxxxxx
ng generate component login
In src/app/login/login.component.ts, create the logic for showing the form and using AuthService to log in.
xxxxxxxxxx
import { Component, OnInit } from '@angular/core';
import { FormGroup, FormBuilder, Validators } from '@angular/forms';
import { AuthService } from '../auth.service';
@Component({
selector: 'app-login',
templateUrl: './login.component.html',
styleUrls: ['./login.component.css']
})
export class LoginComponent implements OnInit {
form: FormGroup;
public loginInvalid: boolean;
private formSubmitAttempt: boolean;
constructor(private fb: FormBuilder, private authService: AuthService) {
}
ngOnInit() {
this.form = this.fb.group({
email: ['', Validators.email],
password: ['', Validators.required]
});
}
async onSubmit() {
this.loginInvalid = false;
this.formSubmitAttempt = false;
if (this.form.valid) {
try {
await this.authService.login(this.form.value);
} catch (err) {
this.loginInvalid = true;
}
} else {
this.formSubmitAttempt = true;
}
}
}
The template src/app/login/login.component.html contains the HTML form for user email and password.
xxxxxxxxxx
<div class="grid-container">
<div class="grid-x">
<div class="small-12 medium-10 medium-offset-1 large-8 large-offset-2 cell">
<form [formGroup]="form" (ngSubmit)="onSubmit()">
<h2>Log In</h2>
<p>Please login to continue</p>
<label class="full-width-input">
Email
<input type="text" placeholder="Email" formControlName="email" required>
</label>
<label class="full-width-input">
Password
<input type="password" placeholder="Password" formControlName="password" required>
</label>
<button class="button">Login</button>
</form>
<div class="register-link">
Not yet registered? <a routerLink="/register">Register Now</a>
</div>
</div>
</div>
</div>
Finally, you need a route for showing the user’s profile.
xxxxxxxxxx
ng generate component profile
Copy the code below into src/app/profile/profile.component.ts. This component simply gets the profile data from the server and stores it for display.
xxxxxxxxxx
import { Component, OnInit } from '@angular/core';
import { ServerService } from '../server.service';
@Component({
selector: 'app-profile',
templateUrl: './profile.component.html',
styleUrls: ['./profile.component.css']
})
export class ProfileComponent implements OnInit {
name: string;
email: string;
constructor(private server: ServerService) { }
ngOnInit() {
this.server.request('GET', '/profile').subscribe((user: any) => {
if (user) {
this.name = user.name;
this.email = user.email;
}
});
}
}
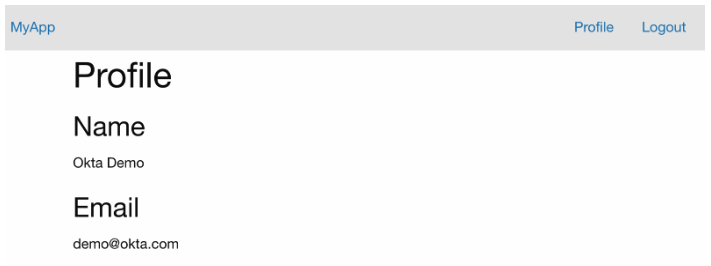
The template in src/app/profile/profile.component.html simply displays the result.
xxxxxxxxxx
<div class="grid-container">
<div class="grid-x">
<div class="small-12 medium-10 medium-offset-1 large-8 large-offset-2 cell">
<h2>Profile</h2>
<h3>Name</h3>
<p>
{{name}}
</p>
<h3>Email</h3>
<p>
{{email}}
</p>
</div>
</div>
</div>
OK, now I’ve thrown a lot of code at you. But it’s all quite simple really. The first two components display a form to the user, and, when submitted, the data is sent to the server. The last component acquires data from the server and display it. To make the whole thing work, some modules need to be imported. Open src/app/app.module.ts and add the following imports.
xxxxxxxxxx
import { HttpClientModule } from '@angular/common/http';
import { FormsModule, ReactiveFormsModule } from '@angular/forms';
import { AuthService } from './auth.service';
Then, add the following to the imports array.
xxxxxxxxxx
@NgModule({
imports: [
..
HttpClientModule,
FormsModule,
ReactiveFormsModule
],
})
Finally, add AuthService to the providers array.
xxxxxxxxxx
@NgModule({
providers: [AuthService],
bootstrap: [AppComponent]
})
The last thing left to do is to register the component with the router. Open src/app/app-routing.module.ts and replace its content with the following code.
xxxxxxxxxx
import { NgModule } from '@angular/core';
import { Routes, RouterModule } from '@angular/router';
import { LoginComponent } from './login/login.component';
import { RegisterComponent } from './register/register.component';
import { ProfileComponent } from './profile/profile.component';
const routes: Routes = [
{ path: '', component: RegisterComponent },
{ path: 'login', component: LoginComponent },
{ path: 'register', component: RegisterComponent },
{ path: 'profile', component: ProfileComponent },
];
@NgModule({
imports: [RouterModule.forRoot(routes)],
exports: [RouterModule]
})
export class AppRoutingModule { }
Your client is ready to try out. Start it by running the following command.
xxxxxxxxxx
ng serve -o
The client allows a user to register, then log in, and view their profile data. Is this all there is to know about JSON Web Tokens? No, I have not covered a number of issues. In terms of user experience, it would be nice if the /profile route could be protected in the client. Currently, a user that is not logged in to the server can still navigate to the /profile route. The server will refuse to send any data, so an empty page will be presented.
Another big topic that I have completely avoided covers token expiration and refreshing tokens when a user interacts with a website. Both are necessary to guarantee security while also providing a good user experience.
Build Secure JWT Authentication in Angular and Express
Okta provides authentication services that can be easily integrated into your application. The Okta service is based on JWT, and it takes care of all the issues related to security and user experience. You don’t need to store passwords, generate tokens yourself, or think about automatically refreshing them. To start off, you will need a developer account with Okta.
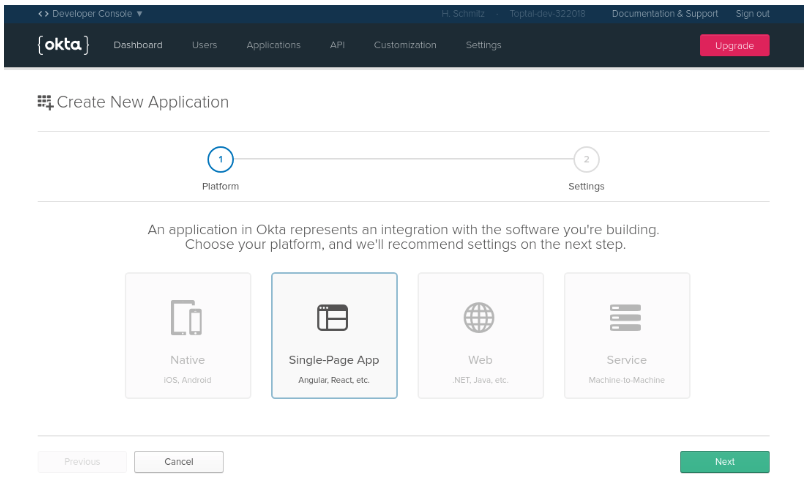
In your browser, navigate to developer.okta.com, click on Create Free Account, and enter your details. You will receive an activation email to finish creating your account. Once you are done, you will be taken to your developer dashboard. Click on the Add Application button to create a new application. Start by creating a new single-page application. Choose Single Page App and click Next.
On the next page, you will need to edit the default settings. Make sure that the port number is 4200. This is the default port for Angular applications. Then click Done.
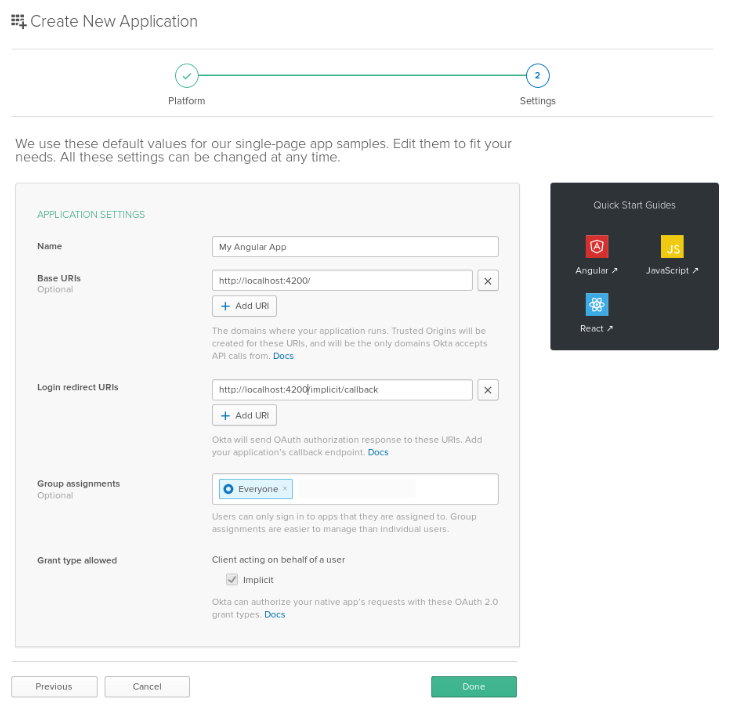
That’s it. You should now see a Client ID which you will need to paste into your JavaScript code.
Express Server for Authentication
The server that uses authentication using the Okta service does not need to implement any user registration or login. Registration is, of course, useful to keep track of user data, but it is not strictly necessary. Create a new directory called okta-server and run npm init -y in it as with the jwt-server. The libraries needed are slightly different.
The main application file index.js is the same as jwt-server/index.js. The authentication middleware auth.js looks slightly different because it now uses Okta.
xxxxxxxxxx
const OktaJwtVerifier = require('@okta/jwt-verifier');
const oktaJwtVerifier = new OktaJwtVerifier({
issuer: 'https://{yourOktaDomain}/oauth2/default',
clientId: '{yourClientId}'
});
function oktaAuth(req, res, next) {
if (!req.token) {
return res.status(403).send({ auth: false, message: 'No token provided' });
}
oktaJwtVerifier.verifyAccessToken(req.token).then(function(jwt) {
req.userId = jwt.claims.uid;
req.userEmail = jwt.claims.sub;
next();
}, function(err) {
return res.status(500).send({ auth: false, message: 'Could not authenticate token' });
});
}
module.exports = oktaAuth;
Here, {yourClientId} is the client ID from the application that you created earlier in the Okta dashboard. The router implementation in profile.js only contains a single route. I have removed the /register and /login routes and only kept the /profile route.
xxxxxxxxxx
var express = require('express');
var oktaAuth = require('./auth');
var router = express.Router();
router.get('/profile', oktaAuth, function(req, res, next) {
console.log('ME', req.userId);
res.status(200).send({id: req.userId, email: req.userEmail});
});
module.exports = router;
This route returns the data contained in the token. You could choose to use a database to store additional data and send it to the client, but I want to show you here that this is not required.
Add the following line to the scripts section of package.json.
xxxxxxxxxx
"start": "nodemon server.js",
Start the server with npm start.
Single Sign-On for Your Angular Client
Start off in the same way as creating the jwt-client application, but call it okta-client.
xxxxxxxxxx
ng new okta-client --routing --style=css
Install foundation-sites and ngx-foundation, and then edit src/style.css and src/app/app.component.html in the same way, as with the Angular client in the previous section.
Edit src/styles.css and paste in the imports for the Foundation styles.
xxxxxxxxxx
@import '~foundation-sites/dist/css/foundation.min.css';
@import '~ngx-foundation/dist/css/ngx-foundation.min.css';
Copy src/app/app.component.html from jwt-client to okta-client.
In src/app/app.component.html, on the first line, change *ngIf="authService.isLoggedIn | async as isLoggedIn" to *ngIf="isLoggedIn | async as isLoggedIn".
xxxxxxxxxx
<div class="top-bar" *ngIf="isLoggedIn | async as isLoggedIn">
Next, install the Okta packages.
Just as before, create a server service.
xxxxxxxxxx
ng generate service server
The implementation of the service in src/app/server.service.ts is very similar to the previous client. The only difference is that the JWT token is obtained through the OktaAuthService.
xxxxxxxxxx
import { Injectable } from '@angular/core';
import { HttpClient, HttpParams } from '@angular/common/http';
import { OktaAuthService } from '@okta/okta-angular';
import { Subject } from 'rxjs';
const baseUrl = 'http://localhost:10101';
@Injectable({
providedIn: 'root'
})
export class ServerService {
constructor(public oktaAuth: OktaAuthService, private http: HttpClient) {
}
request(method: string, route: string, data?: any) {
if (method === 'GET') {
return this.get(route, data);
}
const subject = new Subject<any>();
this.oktaAuth.getAccessToken().then((token) => {
const header = (token) ? {Authorization: `Bearer ${token}`} : undefined;
const request = this.http.request(method, baseUrl + route, {
body: data,
responseType: 'json',
observe: 'body',
headers: header
});
request.subscribe(subject);
});
return subject;
}
get(route: string, data?: any) {
const subject = new Subject<any>();
this.oktaAuth.getAccessToken().then((token) => {
const header = (token) ? {Authorization: `Bearer ${token}`} : undefined;
let params = new HttpParams();
if (data !== undefined) {
Object.getOwnPropertyNames(data).forEach(key => {
params = params.set(key, data[key]);
});
}
const request = this.http.get(baseUrl + route, {
responseType: 'json',
headers: header,
params
});
request.subscribe(subject);
});
return subject;
}
}
The client still contains a login component, but in this case, it simply contains a widget provided by the @okta/okta-signin-widget library.
ng generate component login --inlineStyle=true --inlineTemplate=true
Modify the contents of src/app/login/login.component.ts so it looks like the following code:
xxxxxxxxxx
import { Component, OnInit } from '@angular/core';
import { Router, NavigationStart} from '@angular/router';
import { OktaAuthService } from '@okta/okta-angular';
import * as OktaSignIn from '@okta/okta-signin-widget';
@Component({
selector: 'app-login',
template: `
<div class="grid-container">
<div class="grid-x">
<div class="small-12 medium-10 medium-offset-1 large-8 large-offset-2 cell">
<div id="okta-signin-container"></div>
</div>
</div>
</div>
`,
styles: []
})
export class LoginComponent implements OnInit {
widget = new OktaSignIn({
baseUrl: 'https://{yourOktaDomain}'
});
constructor(private oktaAuth: OktaAuthService, router: Router) {
// Show the widget when prompted, otherwise remove it from the DOM.
router.events.forEach(event => {
if (event instanceof NavigationStart) {
switch (event.url) {
case '/login':
case '/profile':
break;
default:
this.widget.remove();
break;
}
}
});
}
ngOnInit() {
this.widget.renderEl({
el: '#okta-signin-container'},
(res) => {
if (res.status === 'SUCCESS') {
this.oktaAuth.loginRedirect('/profile', { sessionToken: res.session.token });
// Hide the widget
this.widget.hide();
}
},
(err) => {
throw err;
}
);
}
}
Copy the jwt-client/src/app/profile directory into your okta-client project and change ProfileComponent to retrieve the name from Okta’s Angular SDK.
xxxxxxxxxx
import { Component, OnInit } from '@angular/core';
import { ServerService } from '../server.service';
import { OktaAuthService } from '@okta/okta-angular';
@Component({
selector: 'app-profile',
templateUrl: './profile.component.html',
styleUrls: ['./profile.component.css']
})
export class ProfileComponent implements OnInit {
id: string;
email: string;
name: string;
constructor(private server: ServerService, oktaAuth: OktaAuthService) {
oktaAuth.getUser().then(user => {
this.name = user.name;
})
}
ngOnInit() {
this.server.request('GET', '/profile').subscribe((user: any) => {
if (user) {
this.id = user.id;
this.email = user.email;
}
});
}
}
Next, open src/app/app.module.ts and paste the following code into it.
xxxxxxxxxx
import { BrowserModule } from '@angular/platform-browser';
import { NgModule } from '@angular/core';
import { HttpClientModule } from '@angular/common/http';
import { FormsModule, ReactiveFormsModule } from '@angular/forms';
import { OKTA_CONFIG, OktaAuthModule } from '@okta/okta-angular';
import { AppRoutingModule } from './app-routing.module';
import { AppComponent } from './app.component';
import { LoginComponent } from './login/login.component';
import { ProfileComponent } from './profile/profile.component';
const oktaConfig = {
issuer: 'https://{yourOktaDomain}/oauth2/default',
redirectUri: 'http://localhost:4200/implicit/callback',
clientId: '{yourClientId}',
scope: 'openid profile'
};
@NgModule({
declarations: [
AppComponent,
LoginComponent,
ProfileComponent
],
imports: [
BrowserModule,
AppRoutingModule,
HttpClientModule,
FormsModule,
ReactiveFormsModule,
OktaAuthModule
],
providers: [{ provide: OKTA_CONFIG, useValue: oktaConfig }],
bootstrap: [AppComponent]
})
export class AppModule { }
All that is left to do now is to register the components with the router in src/app/app-routing.module.ts.
xxxxxxxxxx
import { NgModule } from '@angular/core';
import { Routes, RouterModule } from '@angular/router';
import { OktaCallbackComponent, OktaAuthGuard } from '@okta/okta-angular';
import { LoginComponent } from './login/login.component';
import { ProfileComponent } from './profile/profile.component';
export function onAuthRequired({ oktaAuth, router }) {
router.navigate(['/login']);
}
const routes: Routes = [
{ path: '', component: ProfileComponent, canActivate: [OktaAuthGuard], data: { onAuthRequired } },
{ path: 'login', component: LoginComponent },
{ path: 'profile', component: ProfileComponent, canActivate: [OktaAuthGuard], data: { onAuthRequired } },
{ path: 'implicit/callback', component: OktaCallbackComponent }
];
@NgModule({
imports: [RouterModule.forRoot(routes)],
exports: [RouterModule]
})
export class AppRoutingModule { }
Finally, open src/app/app.component.ts and replace its contents with the following code.
xxxxxxxxxx
import { Component, OnInit } from '@angular/core';
import { OktaAuthService } from '@okta/okta-angular';
import { BehaviorSubject } from 'rxjs';
@Component({
selector: 'app-root',
templateUrl: './app.component.html',
styleUrls: ['./app.component.css']
})
export class AppComponent implements OnInit {
title = 'okta-client';
isLoggedIn = new BehaviorSubject<boolean>(false);
constructor(public oktaAuth: OktaAuthService) {
this.oktaAuth.$authenticationState.subscribe(this.isLoggedIn);
}
ngOnInit() {
this.oktaAuth.isAuthenticated().then((auth) => {this.isLoggedIn.next(auth)});
}
onLogout() {
this.oktaAuth.logout('/');
}
}
Your Angular app now implements authentication using Okta and JWTs! It guards the routes that should be accessed and automatically redirects the user to the login page when they are not logged in. In contrast to the example in the previous section, the implementation in this section is complete. The Okta libraries take care of all remaining issues that were not covered by the bare-bones JWT implementation.
You can test the client by running the ng serve command as usual. Enter valid credentials when prompted.
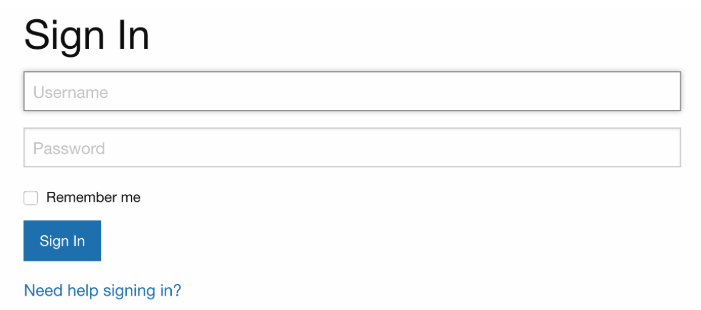
Once logged in, you will be redirected to the profile page and you’ll see your user information, just like before.
Learn More About Angular and JWTs
I hope that, in this tutorial, I have given you some insight into JSON Web Tokens and their uses. They solve some of the problems faced by traditional session based authentication by encrypting the user information and passing it back to the client. I have shown you how to implement a server and client using JWT. This example showed you the basics but, in order to be used for a production server, additional steps would need to be taken. Okta simplifies the task of creating token-based authentication. Using only a few steps you can implement a fully working server and client.
The code for this tutorial can be found on GitHub at oktadeveloper/angular-jwt-authentication-example.
If you want to learn more about JWT, Okta, or implementing RESTful servers with Angular and Node, check out the following links.
Published at DZone with permission of Holger Schmitz. See the original article here.
Opinions expressed by DZone contributors are their own.
Comments