Azure Databricks Automated Testing Using Great Expectations and C#
This article will show you how to use the Great Expectations library to test data migration and how to automate your tests in Azure Databricks using C# and NUnit.
Join the DZone community and get the full member experience.
Join For FreeWe all know how important data testing is in this digital transformation world. ETL testing mainly consists of ensuring that data has safely traveled from its source to its destination. Data processing is prone to errors, and you may end up with some data loss, corrupted, or irrelevant data as a result of various issues during the transformation phase. This is why ETL testing is so important: it ensures that nothing has been lost or corrupted along the way.
To validate the data, the tester usually writes the ETL script or SQL by hand. The scripts will be run against the source and destination, and the results will be compared to validate the data. In this article, we'll look at how we can use Great Expectations, Databricks, and C# code to automate data quality and completeness tests.
Great Expectations and Azure Databricks
Great Expectations is a shared, open data quality standard that helps in data testing. Expectations are data assertions. In Great Expectations, they are the workhorse abstraction, covering all kinds of common data issues. Expectations are declarative, adaptable, and scalable. They offer a large vocabulary for data quality.

Azure Databricks is an Apache Spark-based analytics platform and one of the leading technologies for big data processing, developed jointly by Microsoft and Databricks.
For the purpose of this tutorial, we are treating generic-food_source.csv as the source data set and generic-food_destination.csv as the destination dataset.
Step 1: Install the Great Expectations Library in the Databricks Cluster
- Navigate to Azure Databricks --> Compute.
- Select the cluster you'd like to work on.
- From Libraries, install new library "great-expectations."
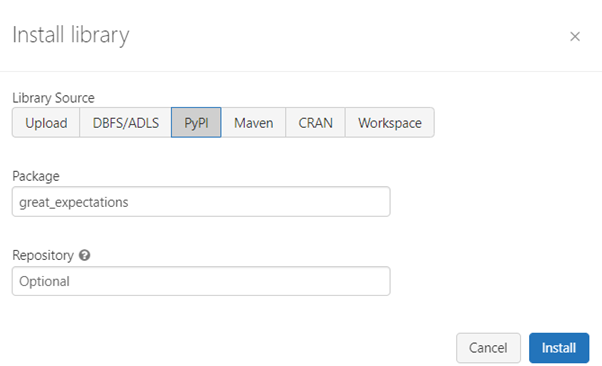
After successful installation, we can see that the library was successfully installed.

Step 2: Create a Notebook for Validating Data (Test Scripts)
Assumptions
For the purposes of this tutorial, we have already created two data files that will serve as the source and destination in our case. In a real-world scenario, these will be various sources (on-premise, AWS, GCP, etc.) and destinations.
These two files have to be uploaded to Azure Databricks' dbfs file storage (use File->Upload Data option in the notebook):
- Create a Python notebook in the Databrick workspace (give a meaningful name for the notebook).
- Import "great_expectations" and "pandas" into the first cell.

Step 3: Create Source and Destination Data Frames and Validate Tests Using Great Expectations
- Create a source pandas’ data frame.
- Create a destination pandas’ data frame.

- Convert this pandas data frame to a great expectations dataset so that we can validate our tests using inbuilt methods of Great Expectations.

- Compare source and destination data frames to validate our tests. We can make use of a different set of expectation assertions here.
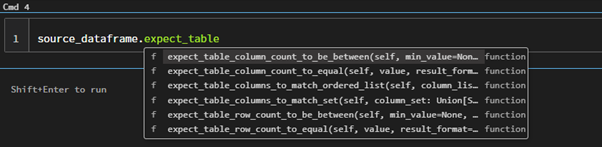
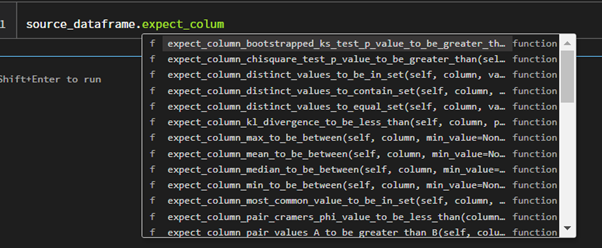
Now you can see all the available tests under great expectation (dataframe.(ctrl+space)).
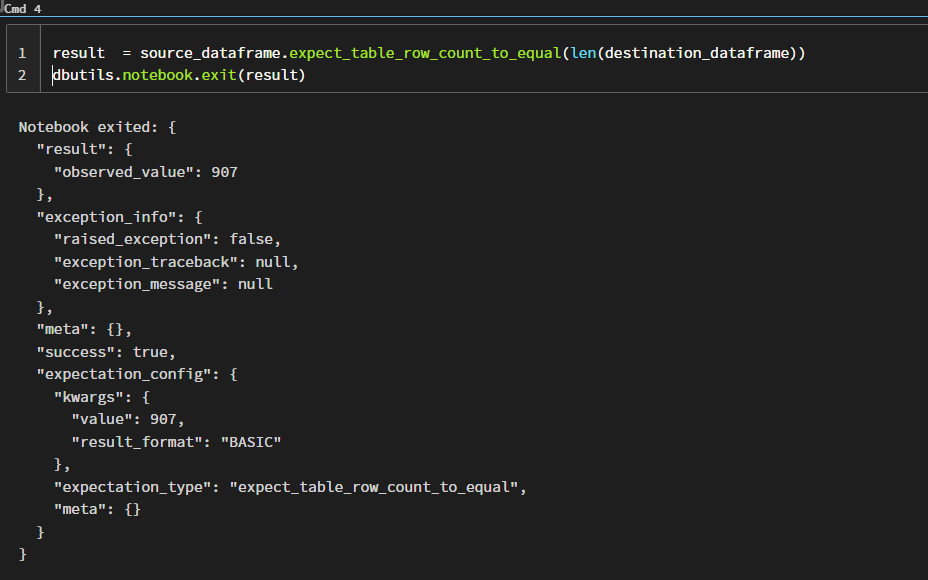
- For the current implementation, we are just verifying it using one test method here:
expect_table_row_count_to_equal.
This will validate the row count between source and destination.

Step 4: Execution of the Notebook and Validating the Output
We now have our test notebook ready, and all we need to do is run each cell from top to bottom to get the result. When you execute the last cell, you will get the output shown below, which will clearly indicate whether our test passed or failed, as well as some other useful information.
That's it! You've just finished one of your data validations, which can be reused to produce the desired results every time.
If you look closely, you can see the value for "Success":true, which represents whether or not our test was successful. If the count does not match, this function will return false. The actual record count can be found in the "observed value" and the actual value (kwargs). Isn't it simple and effective?
There are many more expectations (assertions) in the Great Expectations library that you can try out for yourself.
Automation of Created Notebook
Now that we have a test notebook created in Azure Databricks, we will execute it from the code level and retrieve the results from Databricks. We'll be using C#, NUnit, and the Databricks client.
Before starting, we must make sure:
- Is Visual Studio installed on your system?
- Create a job in Azure Databricks using our notebook that we just developed.
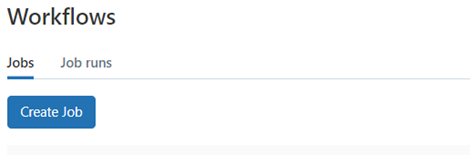
- Navigate to Azure Databricks--> Workflows.
- Click the Create Job button.
![Create Job button]()
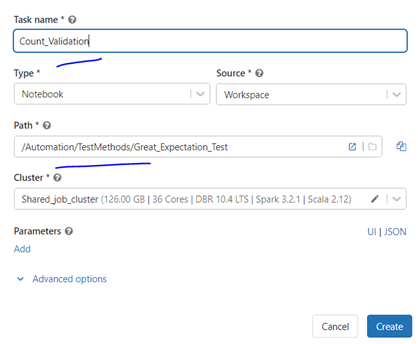
- Give a Task Name.
- Choose the notebook path we have created.
- As of now, leave the rest of this field.
- If your test needs any specific input as a parameter, you need to add parameters using the Add button at the bottom and give it as a key-value pair.
- After all the input, click Create button.
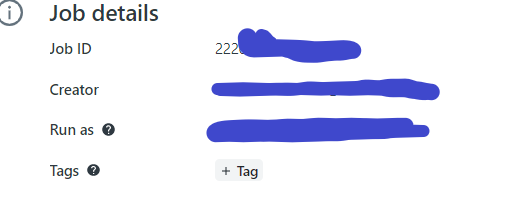
- You will have successfully created a job. Please note the job ID, which will be a long number.
![Create button]()
![Job details > Job ID]()
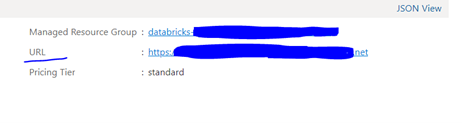
- Get the ADB URL and save it for coding purposes.
- Go to your Azure Portal -->Azure Databricks Services.
![Azure Portal -->Azure Databricks Services]()
- Go to your Azure Portal -->Azure Databricks Services.
- Generate a token from ADB for establishing a connection to ADB. Generate and save it.
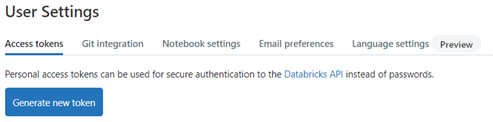
- Go to Databricks -->Settings-->User Settings.
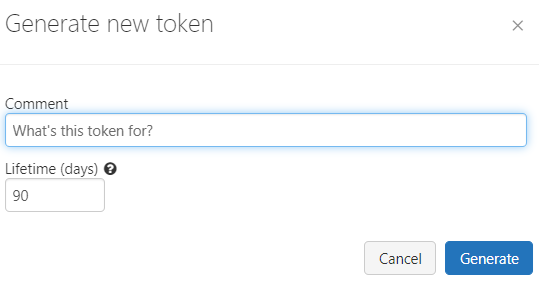
- Click Generate a new token --> Give a name and validity and generate the token.
- Save it as soon as it's created.
![Generate new token button]()
![Give a name and validity and generate the token]()
- Get the cluster id of your working cluster from Azure Databricks.
- Go to Databricks-->Compute--> Cluster.
- Click on JSON on the left side.
- Find the cluster id [cluster_id] value in the JSON.
![Find the cluster id [cluster_id] value in the JSON]()
![Find the cluster id [cluster_id] value in the JSON](https://dz2cdn1.dzone.com/storage/temp/16119158-clusterid.png)
Automating the Databricks Test Script From Visual Studio
Step 1: Create an NUnit Test Project in Visual Studio

Give a project name and location to save the project.
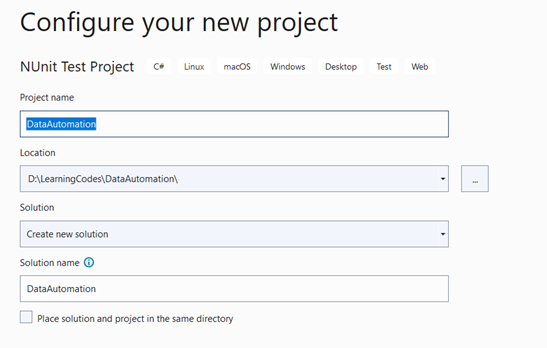
Click the Next button to complete the process.
Step 2: Install Dependencies
Right-click on dependencies in the project solution.
Click Manage NuGet Packages.
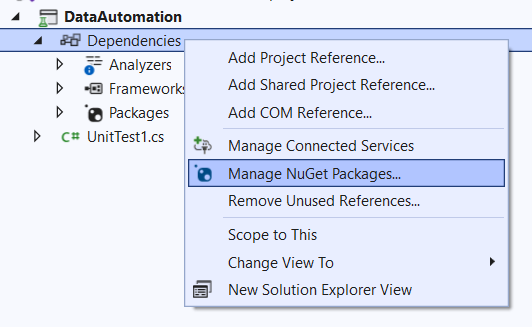
Search for "databricks" and install the Azure Databricks client.

Once this is installed successfully, we are ready with all our dependencies and can start coding to execute tests.
Step 3: Scripting and Validating the Tests
Once you create an NUnit test project, you can see that Visual Studio has provided a test class with some sample test code. We just need to edit this test class file and add some NUnit test annotations to organize the code.
Copy and paste the code below, replacing the parameters with your data.
Notebook Path: Azure Databricks notebook pathJobID: This was saved earlier during the job creation process.ClusterID: The cluster ID that we use to run the jobADB url: The URL obtained from the Azure Portal->Databricks servicesADB token: Generated in the Azure Databricks to establish the connection from code
using Microsoft.Azure.Databricks.Client;
using Newtonsoft.Json.Linq;
using NUnit.Framework;
using System;
using System.Collections.Generic;
using System.Threading.Tasks;

namespace DataAutomation
{
    public class Tests
    {
        private DatabricksClient? _client;

        [OneTimeSetUp]
        public void Setup()
        {
             _client = DatabricksClient.CreateClient(
                            "ADB url",
                            "ADB token");
        }

        [Test]
        public async Task Count_Validation_Databricks()
        {
            //You need to add parameters here if your notebook requires any.
            //our example we don't have any parameters to pass
            Dictionary<string,string> notebookParametes = new Dictionary<string,string>();
            using (_client)
            {
                //JobName - Give a job name
                //Notebook Path - The notebook path we created in databricks
                //Parameters - Parameters if any -Dictionary
                //Cluster ID - Which cluster would you like to use for running
                #region Here we create a new notebook job settings.
                var jobSettings = JobSettings.GetNewNotebookJobSettings(
                        "Count_Validation_Test",
                        "/Automation/TestMethods/Great_Expectation_Test"
                        ,notebookParametes).WithExistingCluster("ClusterID");

                await _client.Jobs.Update(JobId, jobSettings);

                #endregion

                //Job id required to get the runid,
                //which will use for polling the job completion
                #region Wait to complete the job run
                var runId = (await _client.Jobs.RunNow(JobId, null)).RunId;
                while (true)
                {
                    var run = await _client.Jobs.RunsGet(runId);

                    Console.WriteLine("[{0:s}] Run Id: {1}\tLifeCycleState: {2}\tStateMessage: {3}",
                        DateTime.UtcNow, runId,
                        run.State.LifeCycleState,
                        run.State.StateMessage);

                    if (run.State.LifeCycleState == RunLifeCycleState.PENDING ||
                        run.State.LifeCycleState == RunLifeCycleState.RUNNING ||
                        run.State.LifeCycleState == RunLifeCycleState.TERMINATING)
                    {
                        await Task.Delay(TimeSpan.FromSeconds(15));
                    }
                    else
                    {
                        break;
                    }
                }
                #endregion


                //pass the runid to get the exit message from notebbok
                #region Get the result from notebook
                var result = (await _client.Jobs.RunsGetOutput(runId)).Item1;

                JObject json = JObject.Parse(result);
                string value = (string)json["success"];


                if (value == "True")
                    Console.WriteLine("Passed");
                else
                    value = "False";
                #endregion

                Assert.AreEqual("True", value);
            }
        }
    }
}
When you pass the correct parameters and build the solution, you will see the test listed in Visual Studio's Test Explorer.
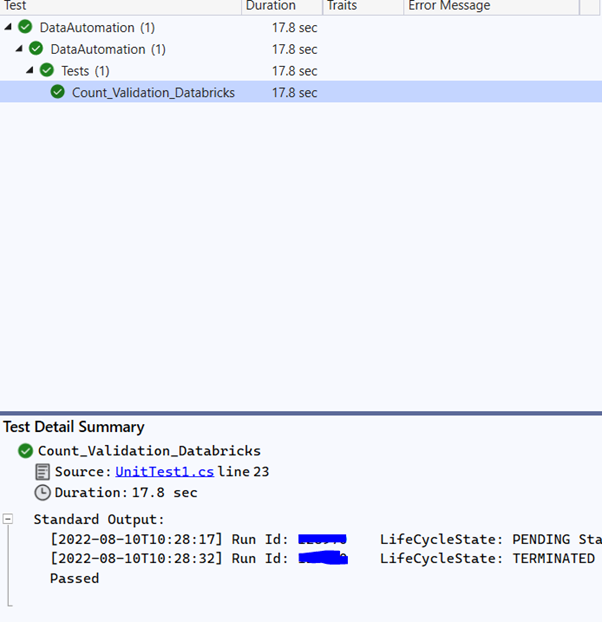
And there you have it! You have automated your first Azure Databricks test from Visual Studio. You can add to it by writing a number of test case validations.
Keep in mind that:
- The initial test case execution may take some time because the cluster must start if it is idle.
- You can run the test from Visual Studio and manually check the progress in Azure Databricks if necessary.
- NUnit will generate a default XML report for you to utilize in your reporting.
Opinions expressed by DZone contributors are their own.
Comments