Build a Full Stack App With SvelteKit and OceanBase
In this article, I'll guide you through the process of setting up OceanBase and SvelteKit and integrating them to build the todo app.
Join the DZone community and get the full member experience.
Join For FreeIn the previous post of our series about how to use OceanBase in solving real-world problems, I talked about how to install OceanBase on an AWS EC2 instance. Today, we're going to dive into the world of Node/JavaScript and demonstrate how to implement OceanBase in a full-stack app.
For this project, we'll be building a Todo app that allows users to create, read, update, and delete tasks. The app will utilize SvelteKit for the front end and server and OceanBase as the database.
In this article, I'll guide you through the process of setting up OceanBase and SvelteKit and integrating them to build the todo app. We'll cover everything from creating the necessary components and routes to connecting to the database and performing CRUD operations.
By the end of this article, you'll have a fully functional app that utilizes the OceanBase database and the ease of use of SvelteKit. So, let's dive in and get started!
About OceanBase and SvelteKit
SvelteKit is a framework built on top of Svelte (similar to how Next.js is to React). It is designed to build web applications of all sizes with flexible file system-based routing. Unlike other single-page apps, SvelteKit does not compromise on SEO, progressive enhancement, or the initial load experience — but unlike traditional server-rendered apps, navigation is instantaneous for that app-like feel.
SvelteKit and OceanBase make a dynamic duo. OceanBase is a distributed relational database management system developed by Ant Group. It's designed to handle extremely large amounts of data and provide high availability and scalability.
OceanBase simplifies the process of building and deploying cloud-native applications, reducing deployment time significantly. With OceanBase’s powerful distributed architecture, you can build apps faster and more efficiently while ensuring reliability and performance across various regions.
What We Are Going to Build: A Todo App
We are going to build a Todo app that allows users to create, read, update, and delete tasks. The app will use SvelteKit for the front end and the server and OceanBase as the database. Since OceanBase is compatible with MySQL, we can use MySQL clients to connect the server and the OceanBase database instance.
This Todo app, built with SvelteKit and OceanBase, serves as a great example of how to use OceanBase in a project. Even though OceanBase is usually used in much more sophisticated use cases, like banking, fraud detection, and insurance, this project provides an overview of how to implement OceanBase in a full-stack app built with SvelteKit, from setting up the necessary components and routes to connecting to the database and performing CRUD operations.
The task data will be stored in an OceanBase database on an EC2 instance in AWS. Here is what the final app looks like. I will also include a GitLab repository at the end of the article so that you can try it out yourself.

The technologies used in this project include:
- OceanBase, a distributed relational database
- SvelteKit, a full-stack web framework based on Svelte
- Tailwind CSS, a utility-first CSS framework for styling the frontend components
- MySQL2, a MySQL driver for Node.js
Setting up OceanBase
To set up the project, you first need a running OceanBase cluster. You have several options for doing so. You can install OceanBase in your local environment, spin up a virtual machine in the cloud to run it or use OceanBase Cloud in the AWS marketplace to set up your cluster in just a few clicks.
In this project, I’m going to use the EC2 approach and the demo server for simplicity. In production, please see OceanBase’s official guide on deploying in a Kubernetes cluster.
After running the demo server, I created a demo user with the password “demo” that only has access to the todos database that I created for this project.
Here's an example schema for the tasks table:
CREATE TABLE tasks (
  id INT NOT NULL AUTO_INCREMENT,
  text VARCHAR(255) NOT NULL,
  completed BOOLEAN NOT NULL DEFAULT false,
  PRIMARY KEY (id)
);
This creates a tasks table with three columns: id (an auto-incrementing integer), text (a string of up to 255 characters, which is the name of the todo item), and completed (a boolean value that defaults to false). The primary key for the table is the id column.
Setting up SvelteKit
To get started with SvelteKit, you'll need to have Node.js installed on your machine. You can download the latest version of Node.js from the official website.
Once you have Node.js installed, you can create a new SvelteKit project using the following command:
npx degit sveltejs/kit oceanbase-app
cd oceanbase-app
npm install
This will create a new SvelteKit project in the oceanbase-app directory and install all the necessary dependencies.
Now, run the following command to start the development server.
npm run dev
This will start the server and allow you to view your app in the browser at http://localhost:3000.
The User Interface
Svelte is a component-based framework, meaning that we need to create a few Svelte components in the src folder. In the components folder, we need to create two Svelte components: Todo.svelte, TodoForm.svelte. The Todo component will display a list of tasks, and the TodoForm component will allow users to create and update tasks.
Here is the Todo.svelte component. It's responsible for rendering a single todo item on the screen, including a checkbox to mark the task as completed, the task text, and a "Delete" button to remove the task from the list.
The component receives a todo object as a prop, which contains information about the task, such as its ID, text, and completion status. The toggleTodoCompleted function is called when the user clicks on the checkbox, and the deleteTodo function is called when the user clicks on the "Delete" button. Both functions are imported from the todoStore.js file, which handles the CRUD operations for the todo items in the OceanBase database.
<script>
    export let todo;
    import {deleteTodo, toggleTodoCompleted} from '../stores/todoStore.js';
</script>

<li class="bg-white flex items-center shadow-sm border border-gray-200 rounded-lg my-2 py-2 px-4">
    <input
        name="completed"
        type="checkbox"
        checked={todo.completed}
        on:change={() => toggleTodoCompleted(todo.id, todo.completed)}
        class="mr-2 form-checkbox h-5 w-5"
    />
    <span
        class={`flex-1 text-gray-800  ${
            todo.completed ? 'line-through' : ''
        }`}
    >
        {todo.text}
    </span>
    <button
        type="button"
        class="text-sm bg-red-500 hover:bg-red-600 text-white py-1 px-2 rounded focus:outline-none focus:shadow-outline"
        on:click={() => deleteTodo(todo.id)}
    >
        Delete
    </button>
Here is the TodoForm.svelte component. It imports an addTodo function from the todoStore.js file, which handles the CRUD operations for the todo items in the OceanBase database. The form includes a label and input field for the user to enter the task text, and a submit button to add the task to the app.
<script>
    import { addTodo } from '../stores/todoStore.js';
    let todo = '';

    const handleSubmit = () => {
        addTodo(todo);
        todo = '';
    };
</script>

<form class="form my-6" on:submit|preventDefault={handleSubmit}>
    <div class="flex flex-col text-sm mb-2">
        <label for="todo" class="font-bold mb-2 text-gray-800 "> Todo </label>
        <input
            type="text"
            name="todo"
            bind:value={todo}
            placeholder="ex. Learn about authentication in Next.js"
            class="appearance-none shadow-sm border border-gray-200 p-2 focus:outline-none focus:border-gray-500 rounded-lg "
        />
    </div>
    <button
        type="submit"
        class=" w-full shadow-sm rounded bg-green-500 hover:bg-green-600 text-white py-2 px-4"
    >
        Submit
    </button>
</form>
Then we need to display all todos on the page. We will use the default index page to do so. In the /src/route/index.svelte page, we can iterate all todos and display them.
<script>
    import Todo from '../components/Todo.svelte';
    import TodoForm from '../components/TodoForm.svelte';
    import { todos } from '../stores/todoStore.js';
</script>

<main>
    <h1 class="text-2xl font-bold text-center text-gray-800 md:text-3xl">
        Todo App
    </h1>
    <TodoForm />
    {#each $todos as todo (todo.id)}
        <Todo {todo} />
    {/each}
</main>
In the src/stores/todoStore.js file, we have the functions for adding, deleting, and updating tasks. These functions connect to the OceanBase database and perform the necessary operations to create, read, update and delete tasks.
The loadTodos function loads the tasks from the database and updates the todos store with the data. The addTodo, deleteTodo, and toggleTodoCompleted functions connect to the OceanBase database and perform the necessary operations to create, delete and update tasks. By using these functions, we can perform CRUD operations on tasks through the UI.
Note that for security reasons, these function talks to the /api/todos API route, not directly with the database. In this case, database queries run safely on the server side. I will dive into the API routes in the next section of this article.
import { writable } from 'svelte/store';

export const todos = writable([]);

export const loadTodos = async () => {
    try {
        const response = await fetch('/api/todos');
        const data = await response.json();
        todos.set(data);
    } catch (error) {
        console.error('Error fetching data:', error);
    }
};
loadTodos();

export const addTodo = async (text) => {
    try {
        const response = await fetch('/api/todos', {
            method: 'POST',
            headers: {
                'Content-Type': 'application/json',
            },
            body: JSON.stringify({ text: text, completed: false }),
        });

        const data = await response.json();
        todos.update((currentTodos) => [...currentTodos, data]);
    } catch (error) {
        console.error('Error adding todo:', error);
    }
};

export const deleteTodo = async (id) => {
    try {
        await fetch(`/api/todos/${id}`, {
            method: 'DELETE',
        });

        todos.update((currentTodos) =>
            currentTodos.filter((todo) => todo.id !== id)
        );
    } catch (error) {
        console.error('Error deleting todo:', error);
    }
};

export const toggleTodoCompleted = async (id, currentState) => {
    try {
        const response = await fetch(`/api/todos/${id}`, {
            method: 'PUT',
            headers: {
                'Content-Type': 'application/json',
            },
            body: JSON.stringify({ completed: !currentState }),
        });

        const data = await response.json();
        todos.update((currentTodos) =>
            currentTodos.map((todo) => (todo.id === id ? data : todo))
        );
    } catch (error) {
        console.error('Error toggling todo completed status:', error);
    }
Connecting SvelteKit and OceanBase
Now let’s talk about the server-side code. The server side consists of two parts: a database module that sets up a connection between the server and our running OceanBase instance and an API route that performs CRUD actions in the OceanBase database from the server.
In the lib/db/oceanbase.js file, we can use the MySQL2 client to set up a connection with OceanBase and then export the connection for our API routes to consume. It is always a good practice to store your database credentials in a .env file and use the dotenv package to access those values.
import mysql from 'mysql2/promise';
import * as dotenv from 'dotenv';
dotenv.config();
export const oceanbaseConnection = await mysql.createConnection({
    host: process.env.HOST,
    port: 2881,
    user: process.env.USERNAME,
    database: 'todos',
In the src/routes/api folder, we have an index.js and a [id].js file. These files contain the API endpoints that our app will utilize to interact with the OceanBase database. The index.js file handles the CRUD operations for all todos, while the [id].js file handles CRUD operations for a single todo by ID.
In the index.js file, we first need to import the oceanbaseConnection object from our database module and write the GET and POST request functions. The two functions will allow the frontend to get all todos from the database and insert a new todo item into the database.
import { oceanbaseConnection } from '../../../lib/db/oceanbase';For the GET request, we need to make a SELECT everything SQL query to the database’s tasks table.
export async function get() {
    let results = await oceanbaseConnection
        .query('SELECT * FROM tasks')
        .then(function ([rows, fields]) {
            console.log(rows);
            return rows;
        });

    return {
        body: results,
    };
}
For the POST method, we need to get the text and completed properties from the request and corporate them in an INSERT SQL statement that inserts a row into the tasks table.
export async function post(request) {
console.log(request);
const { text, completed } = request.body;
let newTask = await oceanbaseConnection
.query('INSERT INTO tasks (text, completed) VALUES (?, ?)', [
text,
completed,
])
.then(function ([result]) {
return { id: result.insertId, text: text, completed: completed };
});
return {
body: newTask,
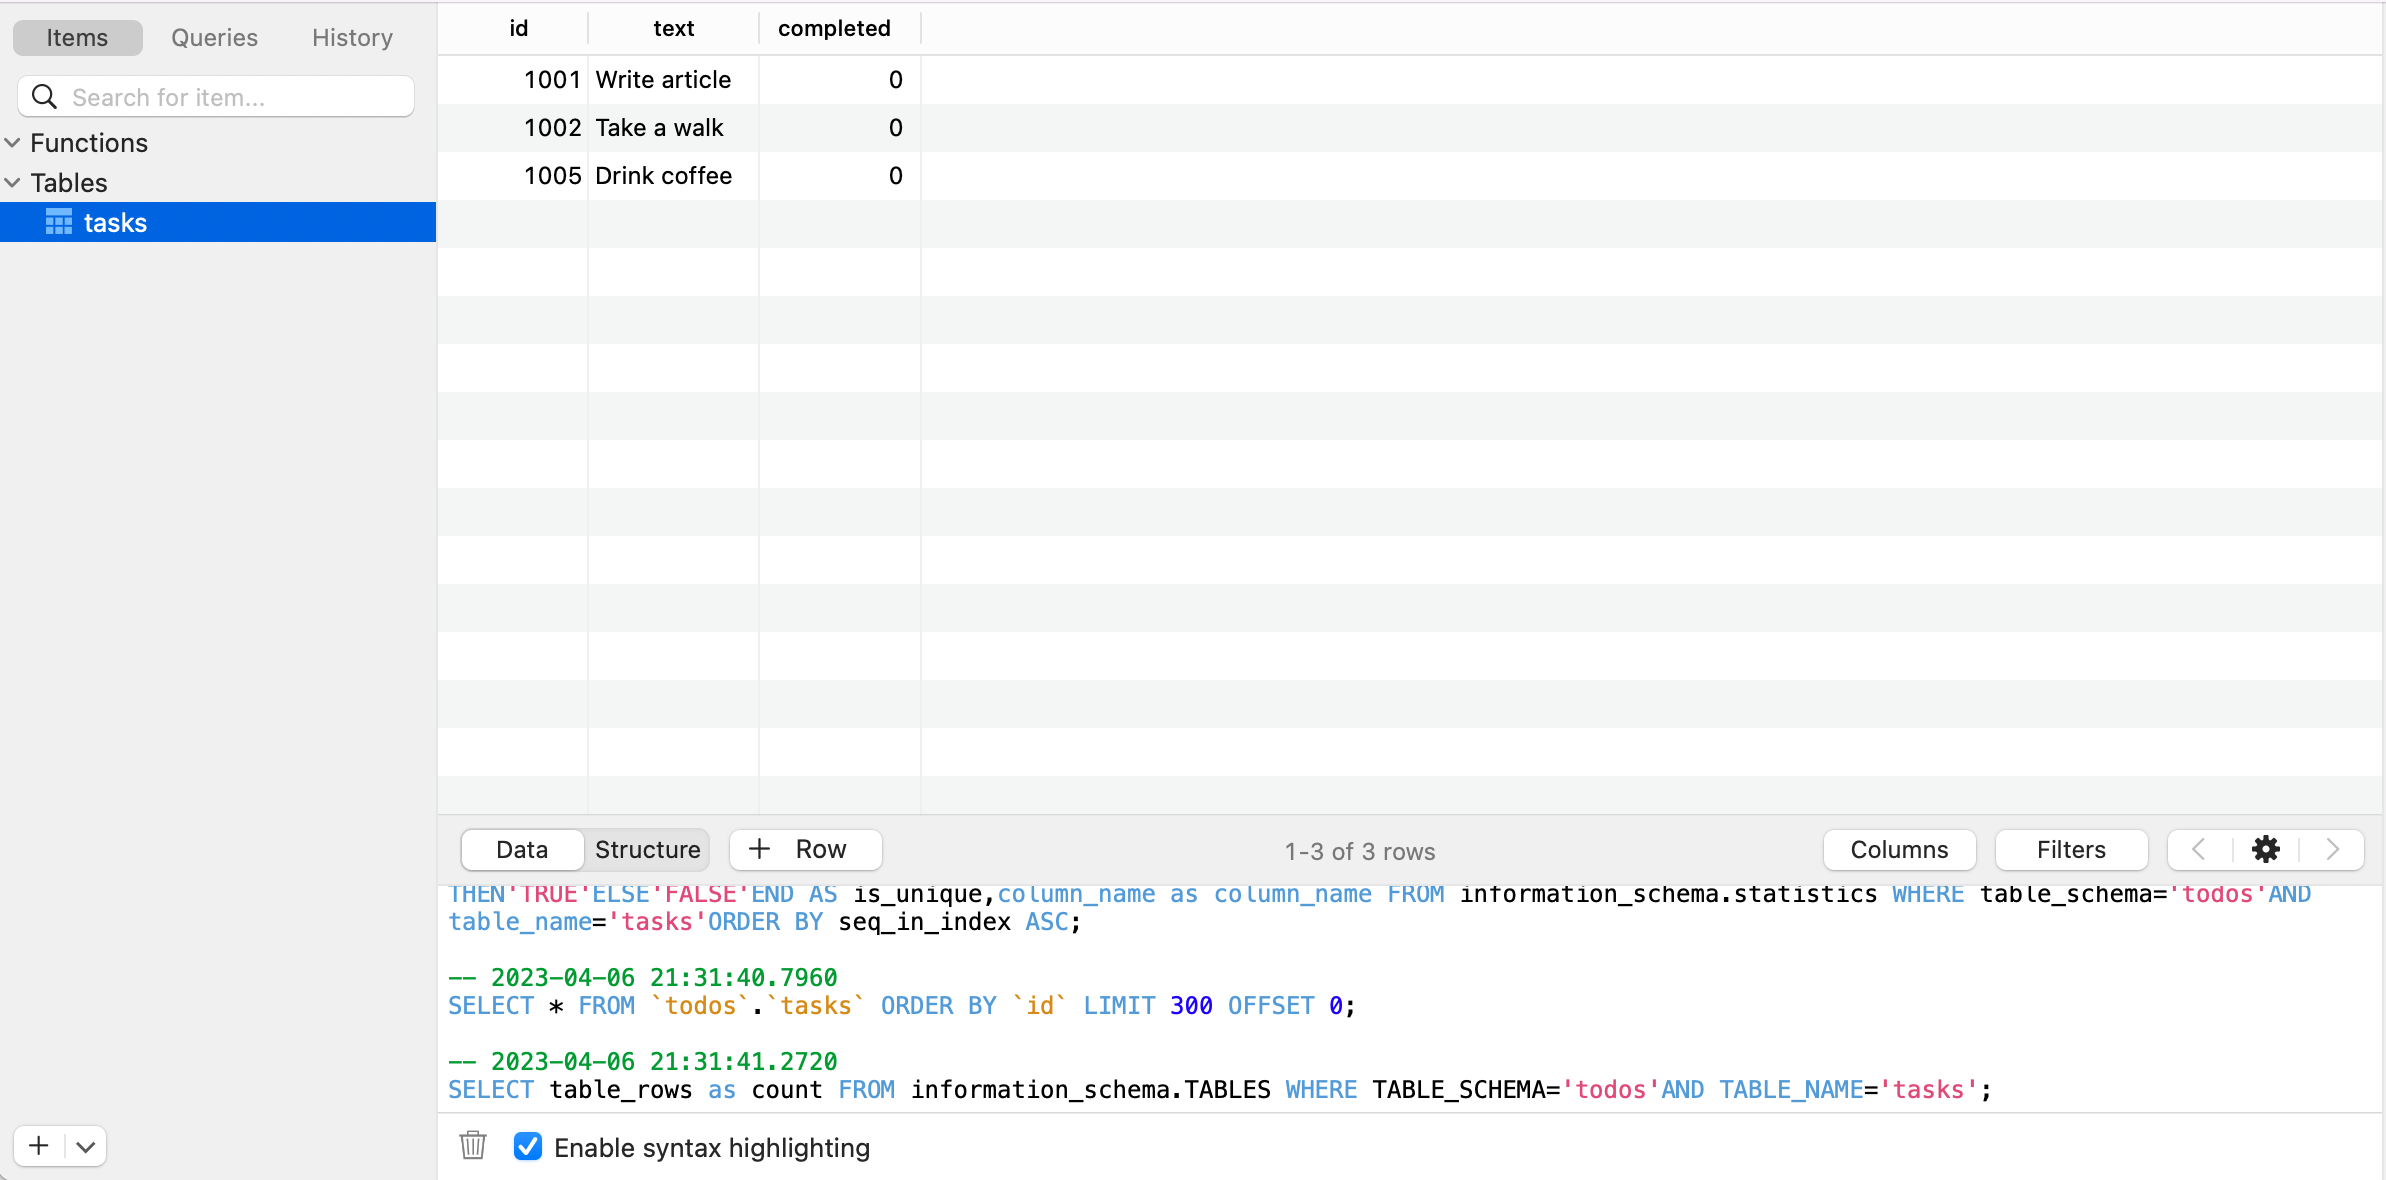
};After adding a few todo items from the UI, we can see the following rows in our OceanBase database:
Similarly in the [id].js file, we need to set up a DELETE and a PUT function so that the front end can perform a delete action or toggle the completed status of a todo.
First, let's also import the oceanbaseConnection object from the database module.
import { oceanbaseConnection } from '../../../lib/db/oceanbase';In the [id].js file, a DELETE method is implemented to delete an item from the tasks table. This is achieved by using the DELETE FROM SQL statement using the id parameter from the request.
export async function del(req) {
    const { id } = req.params;
    try {
        await oceanbaseConnection.query('DELETE FROM tasks WHERE id = ?', [id]);
        return {
            status: 200,
            body: { message: `Todo with id ${id} deleted successfully.` },
        };
    } catch (error) {
        console.error('Error deleting todo:', error);
        return {
            status: 500,
            body: { message: 'Error deleting todo. Please try again later.' },
        };
    }
}
A PUT method is implemented to update the completed status of a todo item in the tasks table. We will use the UPDATE statement to update the item in the database.
export async function put(req) {
    const { id } = req.params;
    const { completed } = req.body;

    try {
        await oceanbaseConnection.query(
            'UPDATE tasks SET completed = ? WHERE id = ?',
            [completed, id]
        );
        const [updatedTodo] = await oceanbaseConnection.query(
            'SELECT * FROM tasks WHERE id = ?',
            [id]
        );
        return {
            status: 200,
            body: JSON.stringify(updatedTodo),
        };
    } catch (error) {
        console.error('Error toggling todo completed status:', error);
        return {
            status: 500,
            body: {
                message:
                    'Error toggling todo completed status. Please try again later.',
            },
        };
    }
}
Conclusion
I have uploaded a project to GitLab that you can clone and use to start your own project using SvelteKit and OceanBase. You can find the project here. Simply clone the repository and follow the instructions in the README file to set up the project in your local environment.
To run the application, you need to modify the .env.example file using your own database credentials and rename the file to a .env file.
In conclusion, building a full-stack app with SvelteKit and OceanBase can be a great way to learn how to use OceanBase in a project. By setting up the necessary components and routes, connecting to the database, and performing CRUD operations, you can gain a better understanding of how to use OceanBase in a practical setting. With the help of this Todo app, you can explore the features of OceanBase and see how it works in conjunction with your Node applications.
Opinions expressed by DZone contributors are their own.
Comments