Build AI Agents With MCP Server in C# and Run in VS Code
Learn to build a custom MCP Server with tools, connect it via an MCP Client in VS Code, and enable real-time communication with AI agents using MCP.
Join the DZone community and get the full member experience.
Join For FreeRelatively newer AI agents based on large language models (LLMs), such as GPT-4o, Claude, or Gemini, are very proficient at general reasoning and answering broad questions. However, they usually struggle with domain-specific queries—like “Give me only Dell devices information”—because they don’t have access to proprietary, internal, or organization-level data.
To answer these kinds of questions correctly, an LLM requires more than just a prompt: it needs contextual information made available through trusted internal sources. This article shows you how to build an AI agent that can access and use domain-specific context, thanks to the Model Context Protocol (MCP). It includes a code example of custom MCP Server creation and demonstrates how an MCP Host (in this case, VS Code) talks to the server and uses a Tool.
Here’s a quick look at the key building blocks you’ll need to create AI agents using MCP:
- MCP Host: A host is typically an IDE supported by MCP (like VS Code in our example below), used by any MCP client.
- MCP Server: This is where your tools live. It serves up contextual data to the AI by exposing those tools through the MCP protocol so the client can use them.
- MCP Client: Serves as the link between the MCP Host and the MCP Server. It connects to the MCP Server and discovers the tools that are available.
For a deeper understanding of MCP, follow the MCP Introduction.
1. Create MCP Server Project
A custom MCP Server provides external information using tools. Below is a code snippet that uses the C# SDK to build the custom server.
First things first, add the ModelContextProtocol package to your C# Web API project. Then, add the snippet below to your project’s startup file. That’s pretty much all it takes to create an MCP Server using the Model Context Protocol C# SDK.
var builder = WebApplication.CreateBuilder(args);

try
{
    // Add MCP server
    builder.Services
        .AddMcpServer()
        .WithStdioServerTransport()
        .WithToolsFromAssembly();
}
catch (Exception ex)
{
    Console.WriteLine($"Error: {ex.Message}");
}

var app = builder.Build();AddMcpServer() method enables this project to run as an MCP Server.
2. Create MCP Tools Onto Your MCP Server
Every MCP tool has metadata—title and description. This metadata helps the LLM determine which tool to invoke by semantically matching the user’s prompt to the tool’s description.
In the code above, WithToolsFromAssembly() scans your project, finds anything tagged with McpServerTool, and registers those tools with the MCP Server.
using System.Net.Http;
using System.Net.Http.Headers;
using AIWebAPIs.Tools;

namespace AIWebAPIs.Tools
{
    [McpServerToolType]
    public class BYODTool
    {
        [McpServerTool(Description = "Gets the peripheral device information")]
        public string GetPeripherals(string message)
        {
            using (var client = new HttpClient())
            {
                // Add Authorization header with Bearer token
                client.DefaultRequestHeaders.Authorization =
                    new AuthenticationHeaderValue("Bearer", "<your-token>");

                var response = client.GetAsync(Constants.GetPeripheralGroupsUrl).Result;

                if (response.IsSuccessStatusCode)
                {
                    return response.Content.ReadAsStringAsync().Result;
                }
                else
                {
                    return $"Error: {response.StatusCode}";
                }
            }
        }
    }
}
3. Add MCP Server in Your Workspace in VSCode
So, what’s next? Pop open your project in VS Code and toss an mcp.json file into the .vscode folder. That little file is basically a communicator between the MCP Client and the MCP Server—it tells the client where to find your server and which tools it’s allowed to use. Below is an example of what the mcp.json file looks like.
{
    "servers": {
      "my-mcp-server": {
        "type": "stdio",
        "command": "dotnet",
        "args": [
          "run",
          "--project",
          "C:/Users/mcpserver/source/repos/AIWebAPIs/AIWebAPIs/AIWebAPIs.csproj",
        ]
      }
    }
  }
4. Run MCP Server in VSCode
The VS Code snippet below shows where I started my MCP Server and entered a prompt in the GitHub Copilot chat window to request only Dell devices. The MCP Server then returned the appropriate response.
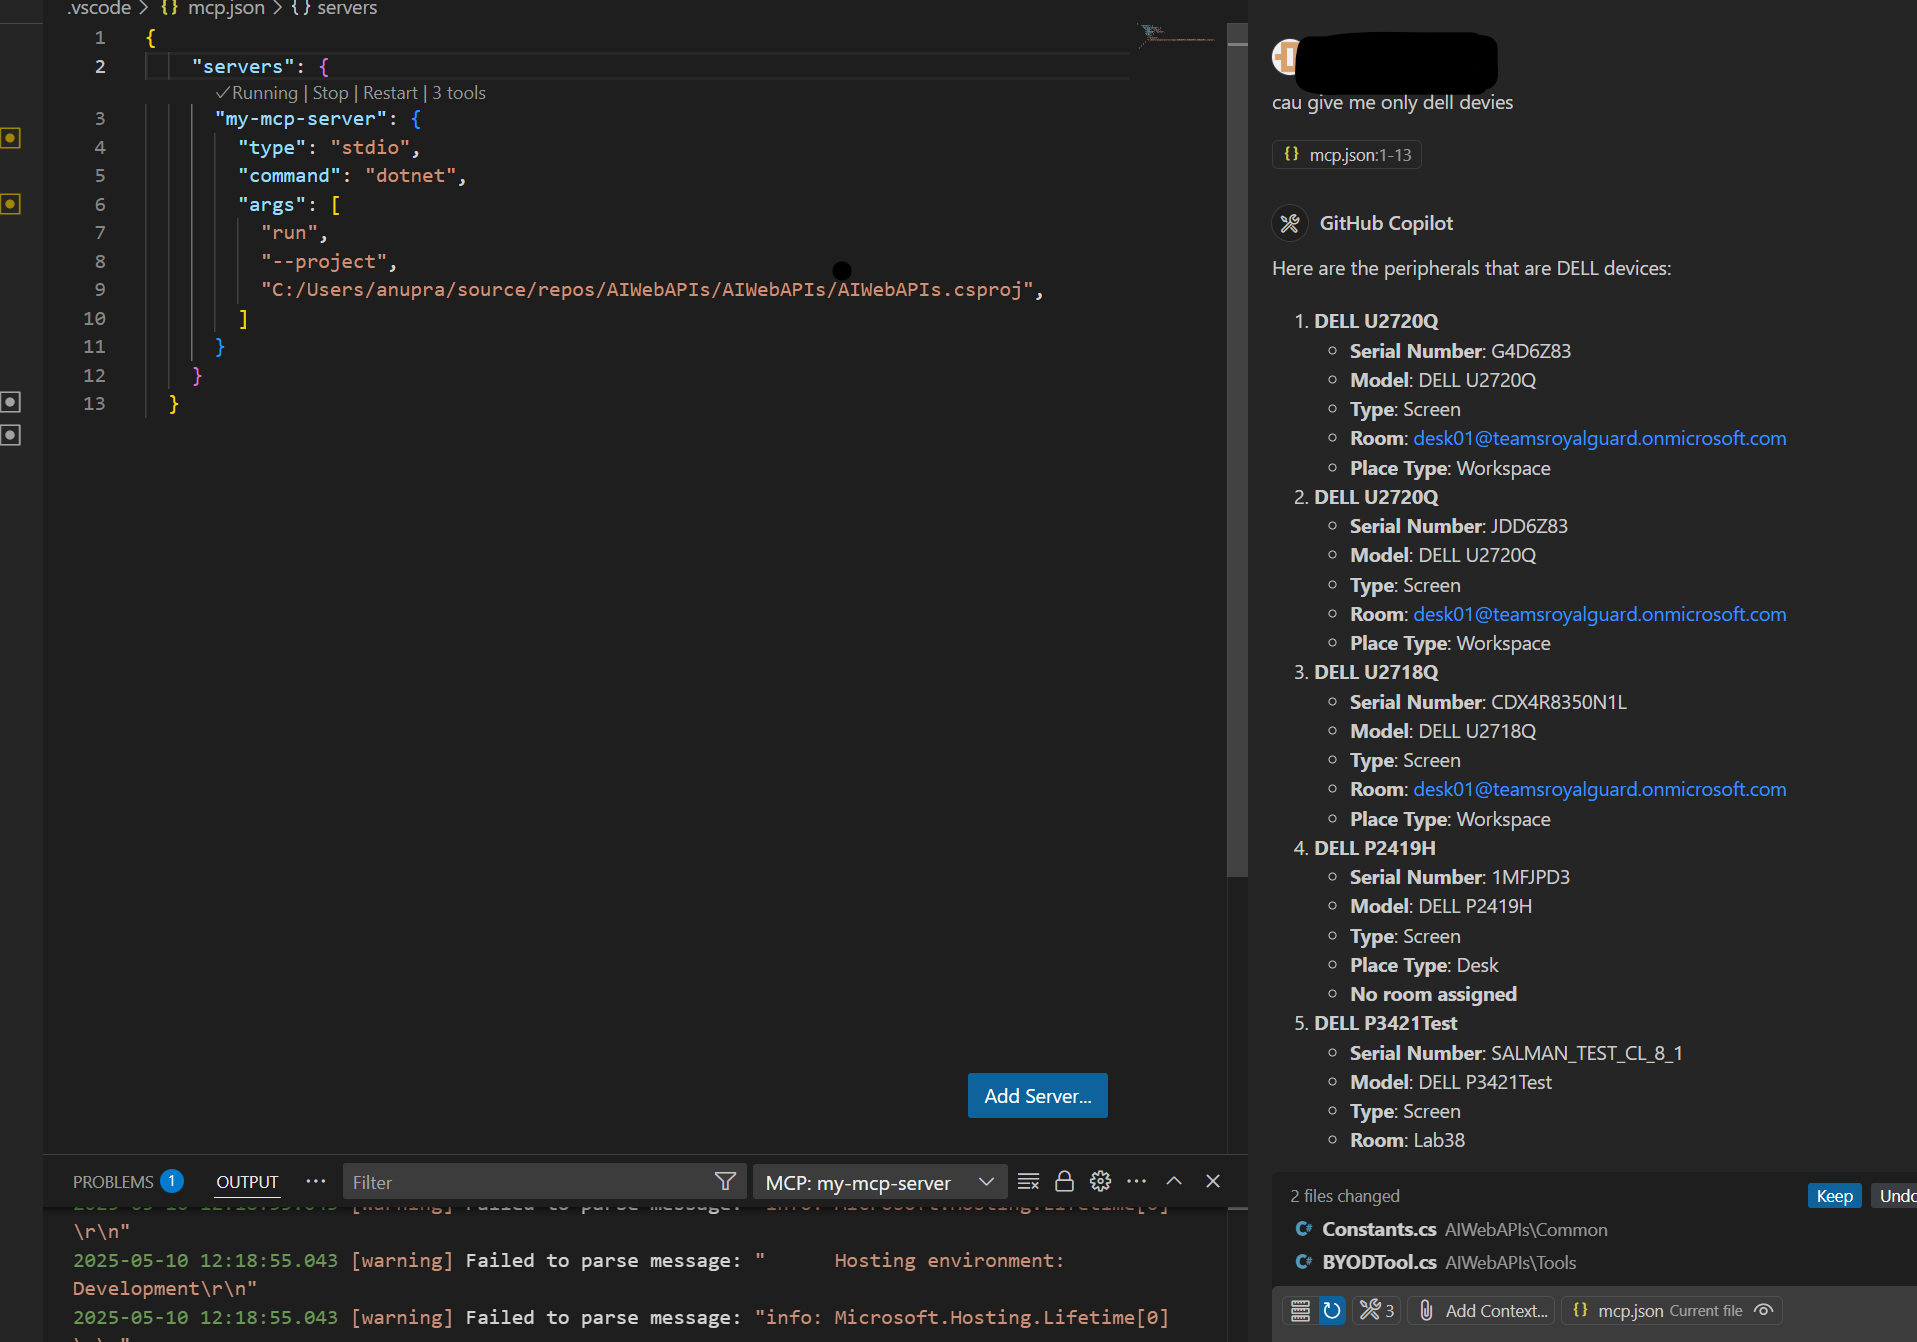
Alright, so my MCP Server’s ready and kicking. Now, your MCP Client—the one hosted in VS Code—can actually talk to the MCP Server. It exposes the GetPeripherals MCP tool to the client, which the LLM uses to fetch relevant data.
The diagram below shows the end-to-end flow:
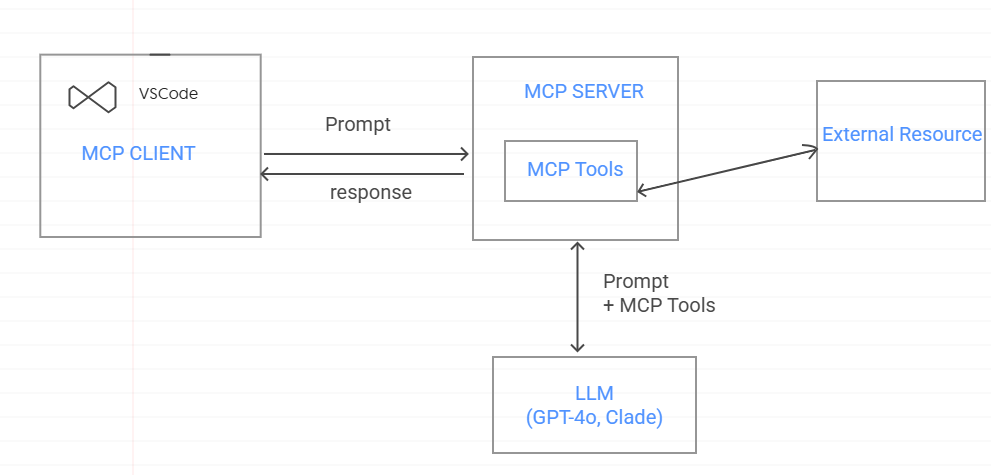
- The MCP Server is already connected via MCP Client hosted in VSCode (MCP Host).
- The user interacts by prompts in a GitHub Copilot chat window.
- The user's prompt, along with the available MCP Tools on the Server, is sourced to the LLM as contextual info.
- The LLM decides which tools to execute to obtain relevant external info.
- Based on the retrieved data, the LLM generates informative response.
Conclusion
By using the MCP C# SDK to build a custom MCP Server and running it inside Visual Studio Code with GitHub Copilot, developers can start creating powerful AI agents. The MCP Server shares tools with the IDE, and thanks to Copilot’s smarts, AI agents can match a user’s prompt to the right tool automatically. Once that tool is triggered, it fetches relevant data to help the LLM respond accurately. This setup, built on the MCP architecture and the Model Context Protocol, makes it much easier to bring real-world context into AI interactions. It also keeps things modular, reusable, and scalable, which simplifies development for anyone building AI-driven applications.
Opinions expressed by DZone contributors are their own.
Comments