

Building a Food Inventory Management App With Next.js, Material-UI, Firebase, Flask, and Hugging Face
Use Next.js, Material-UI, Firebase, Flask, and Hugging Face to create a Food Inventory Management App that will track food items and also generate recipes.
Join the DZone community and get the full member experience.
Join For FreeThese days, restaurants, food banks, home kitchens, and any other business that deals with products and foods that go bad quickly need to have good food inventory management. Kitchens stay organized and waste is kept to a minimum by keeping track of stock, checking expiration dates, and managing usage well.
I will show you how to make a Food Inventory Management App in this guide. With this app, users can:
- Add food items or ingredients to the inventory.
- Monitor the quantity of each item.
- Remove items when they’re used or expired.
- Optionally, generate recipes or suggest uses for the items.
The Food Inventory Management App will not only track food items but also generate recipes based on the available ingredients using a Hugging Face model. I will use Next.js for the front end, Material-UI for the user interface, Firebase Firestore for real-time database functionality, and a Hugging Face model for recipe generation.
Setting Up the Environment for Development
We need to set up our working environment before we start writing code for our Food Inventory Management App.
1. Install Node.js and npm
The first step is to install Node.js and npm. Go to the Node.js website and get the Long Term Support version for your computer's running system. Follow the steps given for installation.
2. Making a Project With Next.js
Start up your terminal and go to the location where you want to make your project. After that, run these commands:
npx create-next-app@latest food-inventory-management-app(With the@latestflag, npm gets the most recent version of the Next.js starting setup.)cd food-inventory-management-app
It will make a new Next.js project and take you to its path. You'll be given a number of configuration choices during the setup process, set them as given below:
- Would you like to use TypeScript? No
- Would you like to use ESLint? Yes
- Would you like to use Tailwind CSS? No
- Would you like to use the
src/directory? No - Would you like to use App Router? Yes
- Would you like to customize the default import alias? No
3. Installing Firebase and Material-UI
In the directory of your project, execute the following command:
npm install @mui/material @emotion/react @emotion/styled firebase
Setting Up Firebase
- Launch a new project on the Firebase Console.
- Click "Add app" after your project has been built, then choose the web platform (</>).
- Give your app a name when you register it, such as "Food Inventory Management App."
- Make a copy of the Firebase setup file. Afterwards, this will be useful.
4. Create a Firebase Configuration File
Make a new file called firebase.js in the root directory of your project and add the following code, replacing the placeholders with the real Firebase settings for your project:
import { initializeApp } from 'firebase/app';
import { getFirestore } from 'firebase/firestore';
const firebaseConfig = {
apiKey: "YOUR_API_KEY",
authDomain: "YOUR_PROJECT_ID.firebaseapp.com",
projectId: "YOUR_PROJECT_ID",
storageBucket: "YOUR_PROJECT_ID.appspot.com",
messagingSenderId: "YOUR_MESSAGING_SENDER_ID",
appId: "YOUR_APP_ID"
 };

const app = initializeApp(firebaseConfig);

const db = getFirestore(app);

export { db };
Building a Flask API for Recipe Generation Using Hugging Face
I'll show you how to make a Flask-based API that uses a Hugging Face model to make recipes. With a POST request, users will be able to send ingredients to the API. It will then use a pre-trained model from Hugging Face to return a recipe based on those ingredients. We will use environment variables to safely handle Hugging Face tokens.
1. Setting Up the Python Environment
- Install Python if not already present (
brew install python). - Verify installation (
python3 --version). - Install dependencies (
pip install Flask flask-cors transformers huggingface_hub).
2. Setting Up the Hugging Face Token
- Go to the Hugging Face website.
- If you already have an account, click on Sign In. If not, click Sign Up to create a new account.
- Navigate to the dropdown menu, and select Settings.
- In the Settings menu, look for the Access Tokens tab on the left side of the page and click on it.
- Under the Access Tokens section, you will see a button to create a new token. Click on New Token.
- Give your token a descriptive name (e.g., "Food Inventory App Token").
- Choose Read as the token scope for basic access to models and datasets. If you need write access for uploading models or data, choose Write.
- Click Generate Token. The token will be displayed on the screen.
- After generating the token, copy it. Make sure to save it in a secure place, as you will need it for authentication when making API calls.
3. Keeping Hugging Face API Token Safe
Your Hugging Face API token should be kept safely in an environment variable instead of being written in your script as code. To do this:
- Create an .env file in the root of your project: (
touch .env). - Inside this file, add your Hugging Face token (
HF_TOKEN=your_hugging_face_token_here). - Load this environment variable securely in your Flask app using Python’s
osmodule.
import os
huggingface_token = os.getenv('HF_TOKEN')
4. Building the Flask API
Flask app with Hugging Face's recipe generation model (note: this sample model is free). Name the file as backend.py.
import os
from flask import Flask, request, jsonify
from flask_cors import CORS
from huggingface_hub import login
from transformers import pipeline

app = Flask(__name__)
CORS(app)

# Securely get the Hugging Face token from the environment
huggingface_token = os.getenv('HF_TOKEN')
if huggingface_token:
    login(token=huggingface_token)

# Load Hugging Face food recipe model pipeline
try:
    model_name = "flax-community/t5-recipe-generation"
    recipe_generator = pipeline("text2text-generation", model=model_name)
except Exception as e:
    print(f"Error loading model: {e}")
    recipe_generator = None

@app.route('/generate_recipe', methods=['POST'])
def generate_recipe():
    data = request.json
    print("Hello")
    ingredients = data.get('ingredients')
    if not ingredients:
        return jsonify({"error": "Ingredients not provided."}), 500
    if recipe_generator:
        try:
            response = recipe_generator(f"Generate a recipe using the following ingredients: {ingredients}")
            return jsonify({"recipe": response[0]['generated_text']})
        except Exception as e:
            print(f"Error generating recipe: {e}")
            return jsonify({"error": "Error generating recipe"}), 500
    else:
        return jsonify({"error": "Recipe generator model is not available."}), 500

if __name__ == '__main__':
    app.run(debug=True, port=5001)
- Note: The flax-community/t5-recipe-generation model is loaded using the Hugging Face pipeline. This model can be utilized to generate recipes using the given/stored ingredients.
Building the Core Components for the Food Inventory Management
1. Import All Necessary Libraries
'use client';

import React, { useEffect, useState } from 'react';
import { Box, Stack, Typography, Button, TextField, IconButton, Tabs, Tab } from '@mui/material';
import { DatePicker, LocalizationProvider } from '@mui/x-date-pickers';
import { AdapterDayjs } from '@mui/x-date-pickers/AdapterDayjs';
import { collection, addDoc, deleteDoc, doc, onSnapshot, updateDoc, query, where, getDocs } from 'firebase/firestore';
import { db } from './firebase'; // Firebase configuration
import DeleteIcon from '@mui/icons-material/Delete';
import dayjs from 'dayjs';
import axios from 'axios';
In this step, we set up our component with the basic layout and imports it needs. This is a client-side component, as shown by the 'use client' command at the top.
2. Utility Functions
# We define a utility function that capitalizes the first letter of a string.
const capitalizeFirstLetter = (string) => string.charAt(0).toUpperCase() + string.slice(1);
3. State Management and useEffect for Firestore Snapshot
We need to set up states to keep track of pantry items, new item input, expiration dates, search queries, active tabs, and recipe suggestions.
items: Stores pantry itemsnewItem: Stores the name of the item to be addedexpirationDate: Stores the expiration date of the new itemsearchQuery: Stores the search input for filtering itemstabIndex: Stores the current tab (Available,Soon to Expire,Expired)recipe: Stores the generated recipe
The useEffect hook monitors changes in Firestore data using the onSnapshot method, ensuring that the pantry items are always up to date.
export default function Pantry() {
  const [items, setItems] = useState([]);
  const [newItem, setNewItem] = useState('');
  const [expirationDate, setExpirationDate] = useState(null);
  const [searchQuery, setSearchQuery] = useState('');
  const [tabIndex, setTabIndex] = useState(0);
  const [recipe, setRecipe] = useState('');

  // Fetch items from Firestore and update state in real-time
  useEffect(() => {
    const unsubscribe = onSnapshot(collection(db, 'pantryItems'), (snapshot) => {
      const itemsList = snapshot.docs.map((doc) => ({
        id: doc.id,
        name: doc.data().name,
        quantity: doc.data().quantity,
        expirationDate: doc.data().expirationDate,
      }));
      setItems(itemsList);
    });
    return () => unsubscribe();
  }, []);
4. Add a New Item to Firestore
This function is used to add a new item to the Firestore database. If the item is already present, its quantity is increased. Alternatively, the new item can be added with a designated expiration date.
  // Add a new item to Firestore
  const addItemToFirestore = async () => {
    if (newItem.trim() !== '' && expirationDate) {
      const q = query(collection(db, 'pantryItems'), where('name', '==', newItem));
      const querySnapshot = await getDocs(q);

      if (querySnapshot.empty) {
        await addDoc(collection(db, 'pantryItems'), { name: newItem, quantity: 1, expirationDate: expirationDate.toISOString() });
      } else {
        querySnapshot.forEach(async (document) => {
          const itemRef = doc(db, 'pantryItems', document.id);
          await updateDoc(itemRef, { quantity: document.data().quantity + 1 });
        });
      }

      setNewItem('');
      setExpirationDate(null);
    }
  };
5. Remove an Item from Firestore or Decrease Its Quantity
This function either decreases the quantity of an existing item or removes the item entirely if the quantity reaches zero.
  // Remove an item or decrease its quantity
  const removeItemFromFirestore = async (id) => {
    const itemRef = doc(db, 'pantryItems', id);
    const itemDoc = await getDoc(itemRef);

    if (itemDoc.exists()) {
      const currentQuantity = itemDoc.data().quantity;

      if (currentQuantity > 1) {
        await updateDoc(itemRef, { quantity: currentQuantity - 1 });
      } else {
        await deleteDoc(itemRef);
      }
    }
  };
6. Fetch Recipe Suggestions From Flask Backend
This function sends a list of available items and items that are close to their expiration date to the Flask backend for recipe generation. The backend generates a recipe and stores it in the recipe state.
  // Fetch recipe suggestions using ingredients
  const fetchRecipeSuggestions = async (availableItems, soonToExpireItems) => {
    const ingredients = [...availableItems, ...soonToExpireItems].map(item => item.name).join(', ');

    try {
      const response = await axios.post('http://127.0.0.1:5001/generate_recipe', { ingredients });
      setRecipe(response.data.recipe);
    } catch (error) {
      console.error('Error fetching recipe suggestions:', error.message);
      setRecipe('Error fetching recipe suggestions. Please try again later.');
    }
  };
7. Filter and Categorize Items Based on Expiration
The pantry items are sorted according to their expiration dates. Three categories can be established: Available Items, Soon to Expire, and Expired Items.
  // Filter and categorize items based on expiration
  const filteredItems = items.filter((item) => item.name.toLowerCase().includes(searchQuery.toLowerCase()));
  const soonToExpireItems = filteredItems.filter((item) => dayjs(item.expirationDate).diff(dayjs(), 'day') <= 7);
  const expiredItems = filteredItems.filter((item) => dayjs(item.expirationDate).diff(dayjs(), 'day') <= 0);
  const availableItems = filteredItems.filter((item) => !soonToExpireItems.includes(item) && !expiredItems.includes(item));
Building the UI Components for the Food Inventory Management
  return (
    <LocalizationProvider dateAdapter={AdapterDayjs}>
      <Box>
        {/* Add new pantry item */}
        <Stack spacing={2}>
          <Typography>Add Pantry Item</Typography>
          <TextField label="Add Pantry Item" value={newItem} onChange={(e) => setNewItem(e.target.value)} />
          <DatePicker label="Expiration Date" value={expirationDate} onChange={(newValue) => setExpirationDate(newValue)} />
          <Button onClick={addItemToFirestore}>Add Item</Button>
        </Stack>

        {/* Search and Tabs */}
        <TextField label="Search Pantry Items" value={searchQuery} onChange={(e) => setSearchQuery(e.target.value)} />
        <Tabs value={tabIndex} onChange={(e, newValue) => setTabIndex(newValue)}>
          <Tab label="Available Items" />
          <Tab label="Soon to Expire" />
          <Tab label="Expired Items" />
        </Tabs>

        {/* Display Items */}
        {tabIndex === 0 && availableItems.map((item) => (
          <Box key={item.id}>
            <Typography>{capitalizeFirstLetter(item.name)} - {item.quantity}</Typography>
            <IconButton onClick={() => removeItemFromFirestore(item.id)}><DeleteIcon /></IconButton>
          </Box>
        ))}
        {tabIndex === 1 && soonToExpireItems.map((item) => (
          <Box key={item.id}>
            <Typography>{capitalizeFirstLetter(item.name)} - {item.quantity} (Expires: {dayjs(item.expirationDate).format('YYYY-MM-DD')})</Typography>
            <IconButton onClick={() => removeItemFromFirestore(item.id)}><DeleteIcon /></IconButton>
          </Box>
        ))}
        {tabIndex === 2 && expiredItems.map((item) => (
          <Box key={item.id}>
            <Typography>{capitalizeFirstLetter(item.name)} - {item.quantity} (Expired: {dayjs(item.expirationDate).format('YYYY-MM-DD')})</Typography>
            <IconButton onClick={() => removeItemFromFirestore(item.id)}><DeleteIcon /></IconButton>
          </Box>
        ))}

        {/* Fetch Recipe Suggestions */}
        <Button onClick={() => fetchRecipeSuggestions(availableItems, soonToExpireItems)}>Get Recipe Suggestions</Button>
        {recipe && <Typography>{recipe}</Typography>}
      </Box>
    </LocalizationProvider>
  );
}
Explanation of UI Components
1. <Box> (Container)
- Purpose: Acts as a flexible container for managing layout, padding, and alignment
- Used for: Wrapping sections like the form, search bar, and item lists
2. <Stack> (Vertical/Horizontal Layout)
- Purpose: Organizes child components in a vertical or horizontal layout
- Used for: Structuring form elements and item listings with proper spacing
3. <Typography> (Text Display)
- Purpose: Renders and styles text content
- Used for: Displaying headings, item names, expiration dates, and recipe suggestions
4. <TextField> (Input Field)
- Purpose: Provides a text input field.
- Used for: Inputting new pantry item names and search queries
5. <DatePicker> (Date Selection)
- Purpose: Allows users to pick a date from a calendar
- Used for: Selecting expiration dates for pantry items, integrated with the Day.js adapter
6. <Button> (Clickable Button)
- Purpose: A clickable button for actions
- Used for: Adding items to Firestore, fetching recipes, and interacting with the database
7. <Tabs> and <Tab> (Tab Navigation)
- Purpose: Creates a tabbed interface for navigation
- Used for: Switching between available, soon-to-expire, and expired items
8. <IconButton> (Icon-Based Button)
- Purpose: Button with an icon for quick actions.
- Used for: Deleting or reducing the quantity of items, using a delete icon
9. <LocalizationProvider> (Date Localization)
- Purpose: Manages date localization and formatting
- Used for: Ensuring correct display and handling of dates in the date picker
10. <DeleteIcon> (Icon)
- Purpose: Displays a delete icon for action
- Used for: Indicating delete action on buttons for item removal
11. Recipe Suggestion Section
- Purpose: Displays recipe suggestions based on available ingredients
- Used for: Showing the recipe generated by the Flask API when the "Get Recipe Suggestions" button is clicked
12. <Grid> (Responsive Layout)
- Purpose: Creates responsive layouts with flexible columns.
- Used for aligning content: Organizing elements like forms and buttons within a structured grid.
- Dividing UI into columns: Structuring content into columns and rows for a clean, responsive layout on various screen sizes.
Running the Food Inventory Management Application
1. Start the Development Server
npm run devNavigate to http://localhost:3000 as prompted by opening your browser.
2. Start the Flask Development Server
Start the Flask Development Server along with the below.
python backend.pyThis will initiate the Flask API at http://127.0.0.1:5001.
Please remember the interaction between React and Flask is done using Axios to send HTTP requests and display the results in real time.
The Hugging Face model I used is free to use. If you want to use a different model, like Llama, you can do that too.
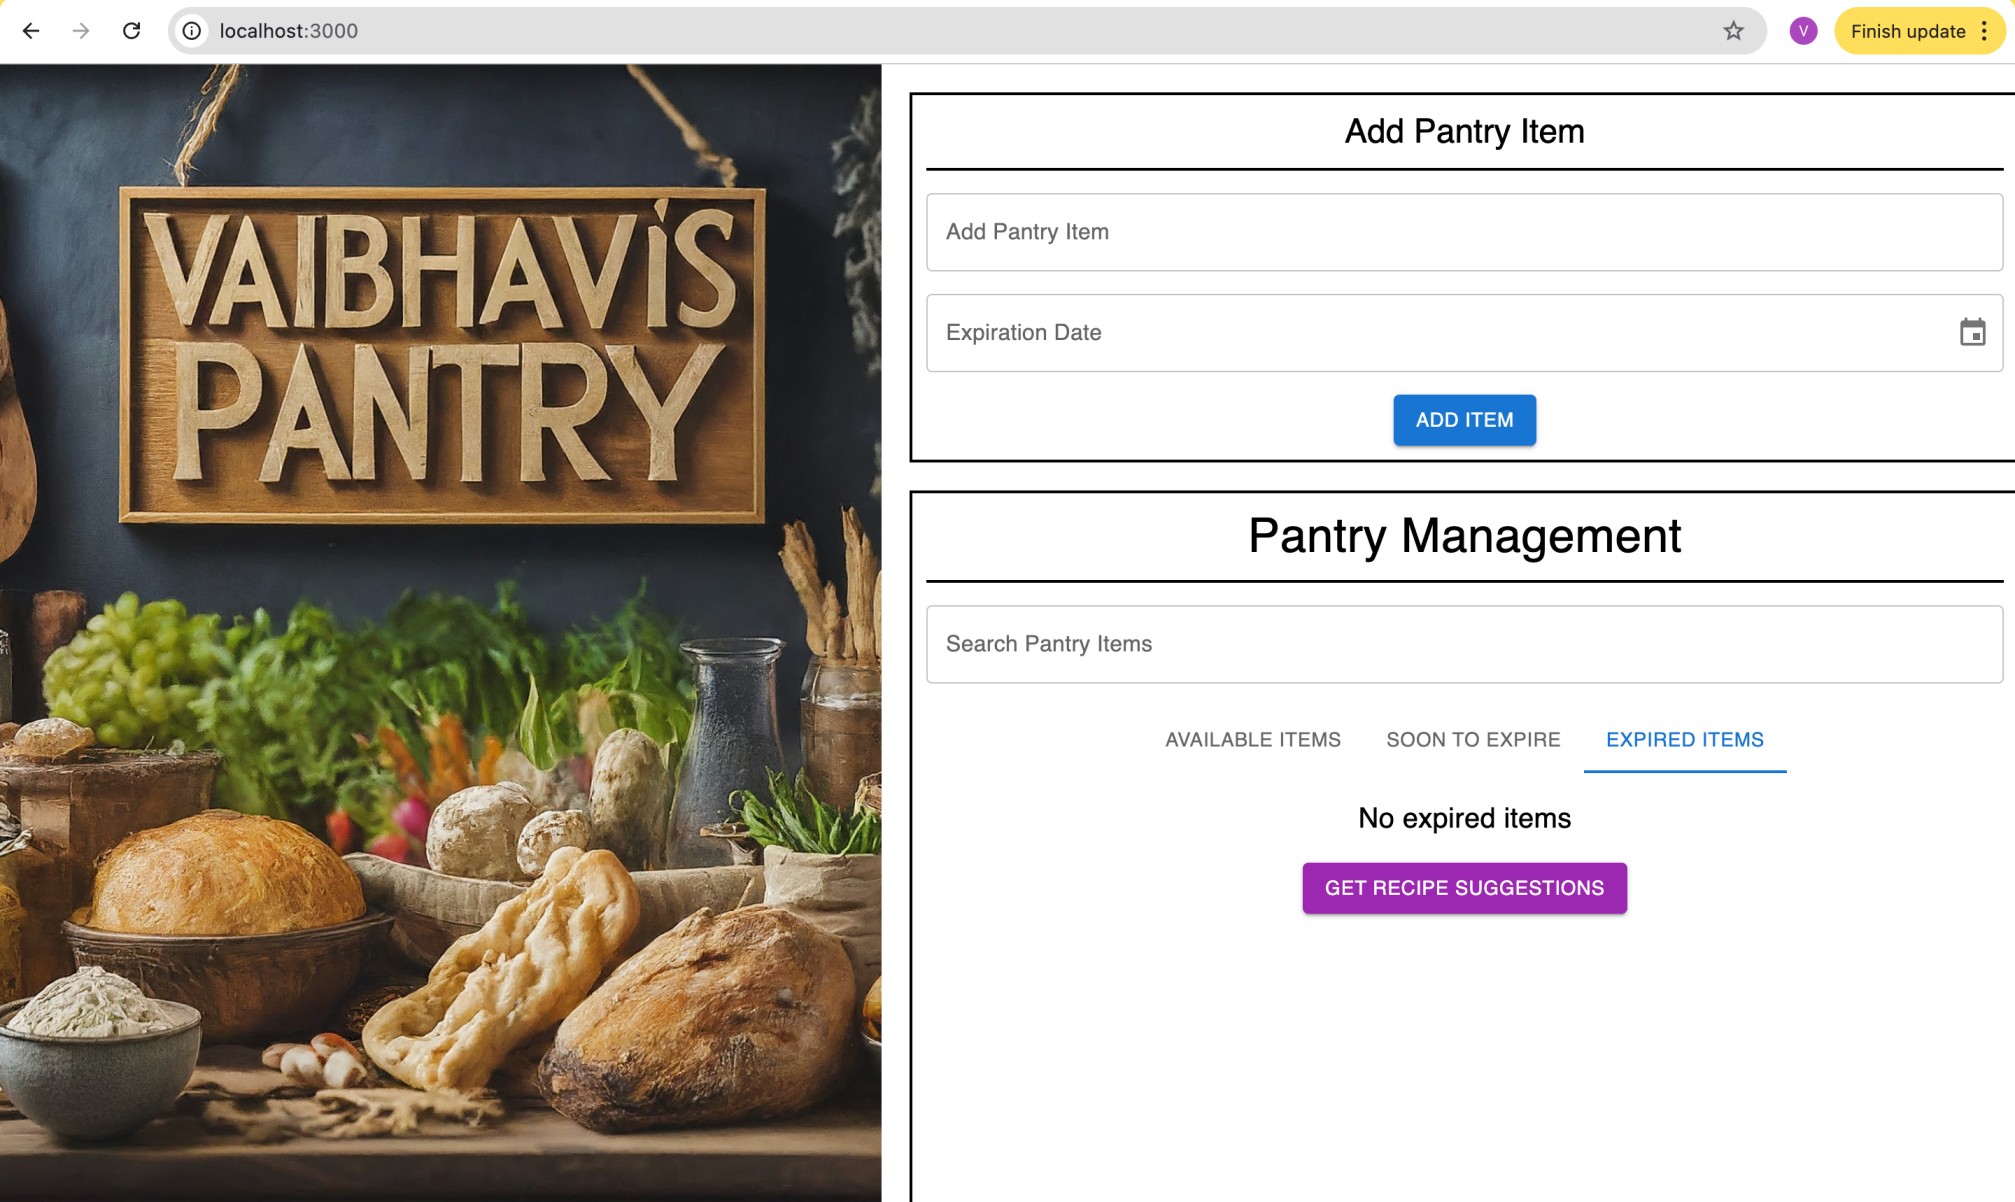
Sample Image of the Food Inventory Management Application After Development
Conclusion
Congratulations! You have successfully developed a functional Food Inventory Management Application.
Happy coding!
Opinions expressed by DZone contributors are their own.
Comments