Building a Slack App with Native SFDC Integration: Part 3
Let's look at how to use the Slack Starter Kit and Bolt to create an application that allows users to view and change records, entirely in Slack.
Join the DZone community and get the full member experience.
Join For FreeSynchronizing Data
At last, we’ve arrived at the final part of our series on using Salesforce’s Slack Starter Kit to quickly scaffold a deployable Slack App that interacts with Salesforce data. The Slack Starter Kit makes it tremendously easy to authenticate with Salesforce, organize your code into reusable chunks, and deploy the project to Heroku for live access. We’ve largely based this series on these video tutorials showcasing how to build Slack Apps.
In our first post, we got acquainted with the Slack Starter Kit and set up our development environment. In our second post, our Slack app issued a query to fetch data from a Salesforce org and then presented the result with UI components from Block Kit. Now, we’re going to extend that pattern to showcase how you can edit Salesforce data entirely within Slack. Let’s get started!

Photo by Edgar Moran on Unsplash
Creating a Shortcut
Outside of the Block Kit UI, Slack has support for two other interactivity systems: Slash Commands and shortcuts. Slash Commands are entered by a user in Slack’s text input (available in every channel), while shortcuts are graphical in nature. Since they’re easier to visualize, we’ll demonstrate shortcuts by creating a shortcut that will fetch our list of contacts and give us the ability to edit them.
Adding a shortcut (or a Slash Command, for that matter) first requires that you tell Slack the name of the command. Go to your app’s Overview page on Slack, and then click Interactivity & Shortcuts:
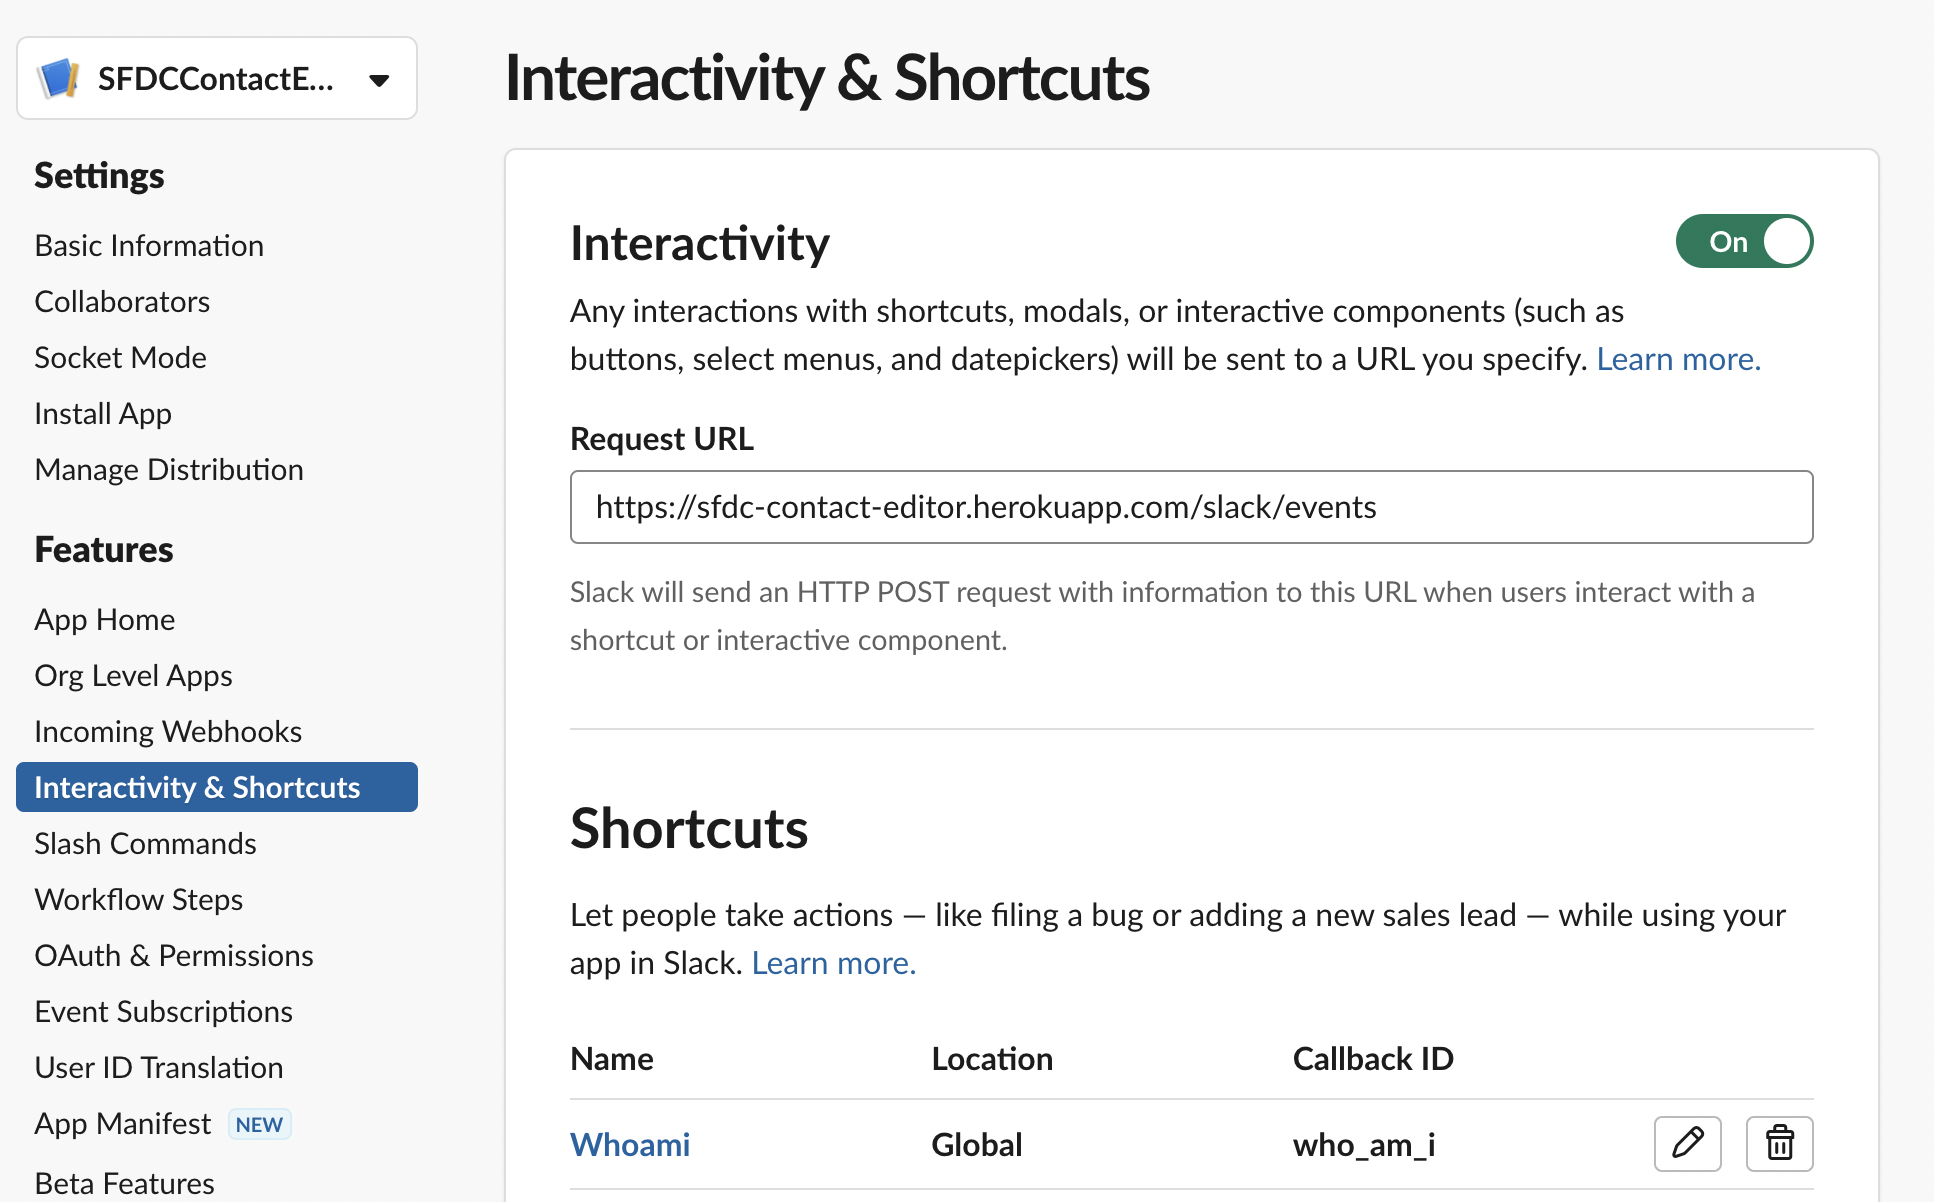
Click Create New Shortcut, and select Global as your shortcut type, then click Next. On the next page, enter these values:
- Name: Edit contacts
- Short Description: Edits contacts on SFDC
- Callback ID:
edit-contact-shortcut
Click on Create, then click Save Changes. Switch over to your Slack workspace, and click on the plus sign in the text area. You’ll be able to browse all of your workspace shortcuts. Here, you’ll also see the brand new shortcut you just created:
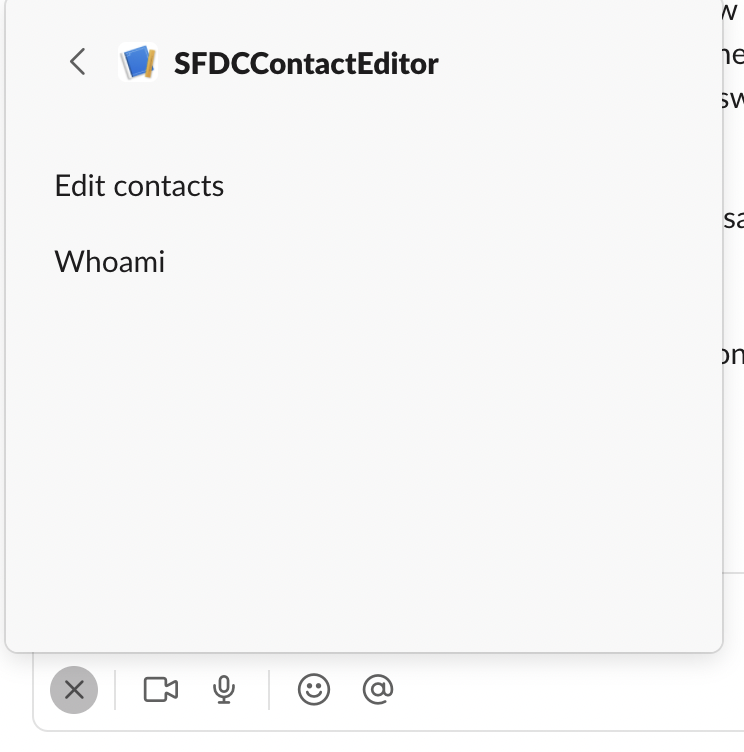
This shortcut doesn’t do anything yet, but this process is necessary for Slack to know about your shortcut. Next, let’s add the code to handle the event that fires whenever someone clicks on this shortcut.
Wiring up the Shortcut
In your code editor, navigate to apps/slack-salesforce-starter-app/listeners/shortcuts/index.js. This is the spot where we connect shortcut events to the code that’s executed. There’s already one shortcut given to us by the Starter Kit: whoami. The given line suggests to us what we need to do: We call a function called shortcut and pass in a string and a function name. In this case, our string is the callback ID we previously defined, and our function name is the code we’ve yet to write. Change the file contents to look like this:
const { whoamiCallback } = require('./whoami');
const { editContactCallback } = require('./edit-contact');

module.exports.register = (app) => {
   app.shortcut('who_am_i', whoamiCallback);
   app.shortcut('edit-contact-shortcut', editContactCallback);
};
We’re laying the groundwork here by saying: “Slack App, if you get a shortcut with a callback ID of edit-contact-shortcut run editContactCallback.”
In this same folder, create a file called edit-contact.js, and paste these lines into it:
'use strict';

const {
  editContactResponse,
  authorize_sf_prompt
} = require('../../user-interface/modals');

const editContactCallback = async ({ shortcut, ack, client, context }) => {
  try {
    await ack();
    if (context.hasAuthorized) {
      const conn = context.sfconnection;
      await client.views.open({
        trigger_id: shortcut.trigger_id,
        view: await editContactResponse(conn)
      });
    } else {
      // Get BotInfo
      const botInfo = await client.bots.info({ bot: context.botId });
      // Open a Modal with message to navigate to App Home for authorization
      await client.views.open({
        trigger_id: shortcut.trigger_id,
        view: authorize_sf_prompt(context.teamId, botInfo.bot.app_id)
      });
    }
  } catch (error) {
    // eslint-disable-next-line no-console
    console.error(error);
  }
};

module.exports = { editContactCallback };
Now, this might look intimidating, but most of it simply concerns the authentication boilerplate, ensuring that a user has an active SFDC connection. In the first logical path (if context.hasAuthorized is true), we execute a function called editContactResponse, which accepts our open Salesforce connection. In the negative case, we ask the user to go to the Home tab to reauthenticate, just as we did in Part 1 of this tutorial.
Navigate to the apps/slack-salesforce-starter-app/user-interface/modals folder, and create a file called edit-contact-response.js. Here, we’ll pop open a modal with contact information similar to the rows we saw in the Home tab in Part 2 of this tutorial:
'use strict';
const { Elements, Modal, Blocks } = require('slack-block-builder');

const editContactResponse = async (conn) => {
  const result = await conn.query(
    `Select Id, Name, Description FROM Contact`
  );
  let records = result.records;

  let blockCollection = records.map((record) => {
    return Blocks.Section({
      text: `*${record.Name}*\n${record.Description}`
    }).accessory(
      Elements.Button()
        .text(`Edit`)
        .actionId(`edit_contact`)
        .value(record.Id)
    );
  });

  return Modal({ title: 'Salesforce Slack App', close: 'Close' })
    .blocks(blockCollection)
    .buildToJSON();
};

module.exports = { editContactResponse };
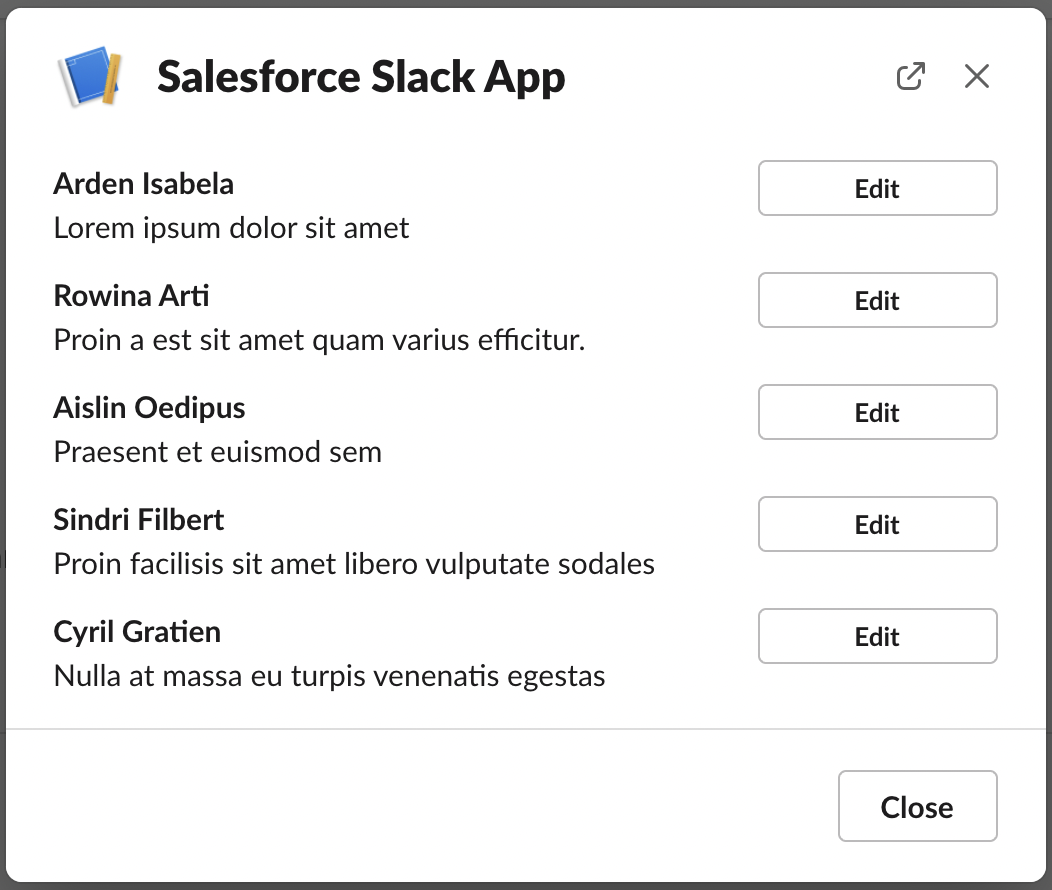
The main difference between the code in Part 2 and this block is that we’re using an array called blockCollection, which lets us construct an array of blocks (in this case, Section blocks). blocks knows how to take this array and transform it into a format that Slack understands, which makes it super simple to create data through a looped array, as we’ve done here. In Part 2 of our series, we constructed a giant string of data. By using BlockCollection, however, we can attach other Slack elements—such as buttons—which we’ve done here.
Lastly, in apps/slack-salesforce-starter-app/user-interface/modals/index.js, we’ll need to export this function, so that it can be imported by our edit-contact.js function:
'use strict';
const { whoamiresponse } = require('./whoami-response');
const { editContactResponse } = require('./edit-contact-response');
const { authorize_sf_prompt } = require('./authorize-sf-prompt');

module.exports = { whoamiresponse, editContactResponse, authorize_sf_prompt };
After you’ve deployed this new code to Heroku via git push, switch to your Slack workspace and try executing the shortcut; you’ll be greeted with a dialog box similar to this one:
Updating Salesforce Data
We’re able to fetch and display Salesforce data. Now, it’s time to connect the Edit button to change Salesforce data!
Many of Slack’s interactive components have an action_id, which, like the callback_id, serves to identify the element which a user acted upon. Just like everything else in the Starter Kit, there’s a special directory where you can define listeners for these action IDs: apps/slack-salesforce-starter-app/listeners/actions. In the index.js file there, let’s add a new line that ties together the action ID with our yet-to-be-written functionality:
'use strict';
const { appHomeAuthorizeButtonCallback } = require('./app-home-authorize-btn');
const { editContactButtonCallback } = require('./edit-contact-btn');

module.exports.register = (app) => {
  app.action('authorize-with-salesforce', appHomeAuthorizeButtonCallback);
  app.action('edit_contact', editContactButtonCallback);
};
In this same folder, create a new file called edit-contact-btn.js, and paste these lines into it:
'use strict';
const {
  editIndividualContact,
  authorize_sf_prompt
} = require('../../user-interface/modals');

const editContactButtonCallback = async ({ body, ack, client, context }) => {
  const contactId = body.actions[0].value;
  try {
    await ack();
  } catch (error) {
    // eslint-disable-next-line no-console
    console.error(error);
  }

  if (context.hasAuthorized) {
    const conn = context.sfconnection;
    const result = await conn.query(
      `SELECT Id, Name, Description FROM Contact WHERE Id='${contactId}'`
    );
    let record = result.records[0];
    await client.views.push({
      trigger_id: body.trigger_id,
      view: editIndividualContact(record)
    });
  } else {
    // Get BotInfo
    const botInfo = await client.bots.info({ bot: context.botId });
    // Open a Modal with message to navigate to App Home for authorization
    await client.views.push({
      trigger_id: body.trigger_id,
      view: authorize_sf_prompt(context.teamId, botInfo.bot.app_id)
    });
  }
};

module.exports = { editContactButtonCallback };
The beginning and end of this file should look familiar: We’re sending an ack response back to Slack to let it know that our app received the event payload (in this case, from clicking on the Edit button). We’re also checking whether or not we’re still authenticated. Here, we’re doing a single DB lookup using the ID of the contact, which we attached as a value to the Edit button when constructing our UI.
This chunk of code creates another modal design that we need to define. Back in apps/slack-salesforce-starter-app/user-interface/modals, create a file called edit-individual-contact.js and paste these lines into it:
'use strict';
const { Elements, Modal, Blocks } = require('slack-block-builder');

const editIndividualContact = (record) => {
  return Modal({ title: 'Edit Contact', close: 'Close' })
    .blocks(
      Blocks.Input({ blockId: 'description-block', label: record.Name }).element(
        Elements.TextInput({
          placeholder: record.Description,
          actionId: record.Id
        })
     )
   )
   .submit('Save')
   .callbackId('edit-individual')
   .buildToJSON();
};

module.exports = { editIndividualContact };
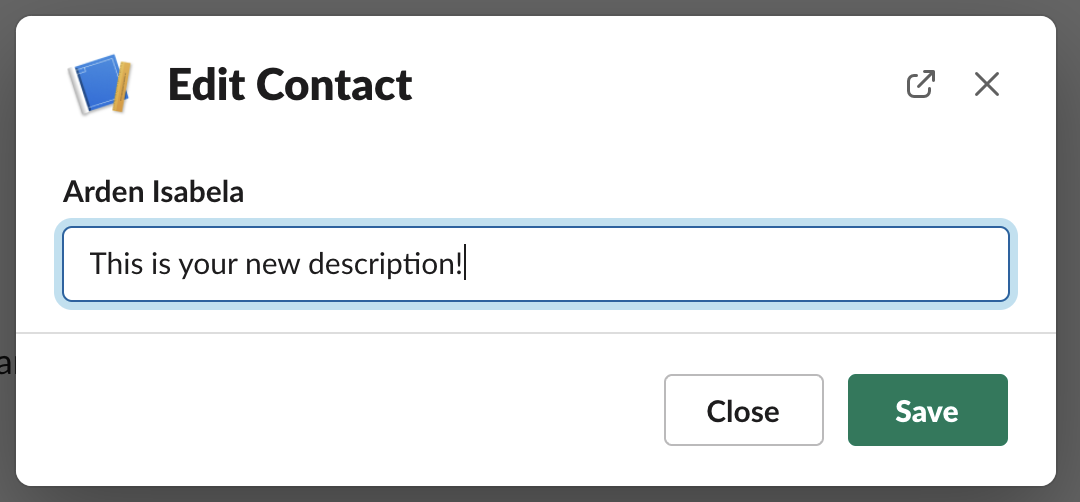
Here, we’ve created a modal with a single block: an input element. The element will be pre-populated with the contact’s description. We can edit this block and change the description to whatever we want.
There are two important notes to point out in this code snippet:
- Notice that we’re attaching an
actionIdto the input element. This is analogous to the ID we attached to the Edit button earlier, except this time, it’s dynamically generated based on the ID of the record we’re editing. - You’ll also notice that we have another ID, the
callbackID, which is attached to the modal itself. Keep the existence of these IDs in the back of your mind: we’ll address both of these in a moment. For now, open up theindex.jsfile in this same directory, andrequire/exportthis new modal-creating function:
const { editIndividualContact } = require('./edit-individual-contact');
// ...
module.exports = {
  whoamiresponse,
  editContactResponse,
  editIndividualContact,
  authorize_sf_prompt
};
Now when you click the Edit button, you’ll be prompted to change the description:
We now need to send this updated text to Salesforce. Click on the Save button and…nothing happens. Why? Well, Slack has a different set of events for interactions like these, called view submissions. The Starter Kit provides a good jumping-off point when building an app, but it doesn’t handle every Slack use case, including this one. But that’s not a problem: we’ll add the functionality ourselves!
Within the apps/slack-salesforce-starter-app/user-interface folder, create a new folder called views. Just like before, our Save button here has an action ID to identify it: edit-individual-contact. We’ll head back into apps/slack-salesforce-starter-app/listeners/actions/index.js to configure this to a function:
const { editIndividualButtonCallback } = require('./edit-individual-btn);

// ...

app.action('edit-individual-contact', editIndividualButtonCallback);
Create a new file called edit-individual-contact.js, and paste these lines into it:
'use strict';

const { submitEditCallback } = require('./submit-edit');

module.exports.register = (app) => {
  app.view('edit-individual', submitEditCallback);
};
This format is identical to the other listeners provided by the Slack Starter Kit. The only difference is that we are calling the view method. We also need to register this listener alongside the others. Open up apps/slack-salesforce-starter-app/listeners/index.js, and require/register the new view listener:
const viewListener = require('./views');

module.exports.registerListeners = (app) => {
  // ...
  viewListener.register(app);
};
Next, in apps/slack-salesforce-starter-app/listeners/views, create another file called submit-edit.js and paste these lines into it:
'use strict';
const { editContactResponse, authorize_sf_prompt } = require('../../user-interface/modals');

const submitEditCallback = async ({ view, ack, client, context }) => {
  try {
    await ack();
  } catch (error) {
    // eslint-disable-next-line no-console
    console.error(error);
  }

  if (context.hasAuthorized) {
    const contactId = view.blocks[0].element.action_id;
    const newDescription =
      view.state.values['description-block'][contactId].value;
    const conn = context.sfconnection;
    await conn.sobject('Contact').update({
      Id: contactId,
      Description: newDescription
    });

    await client.views.open({
      trigger_id: view.trigger_id,
      view: await editContactResponse(conn)
    });
  } else {
    // Get BotInfo
    const botInfo = await client.bots.info({ bot: context.botId });
    // Open a Modal with message to navigate to App Home for authorization
    await client.views.push({
      trigger_id: view.trigger_id,
       view: authorize_sf_prompt(context.teamId, botInfo.bot.app_id)
    });
  }
};

module.exports = { submitEditCallback };
Let’s discuss those IDs that we set before. When Slack sends event payloads over to our app, it automatically generates an ID for every input element by default. That’s because Slack doesn’t know what the underlying data is. It’s your responsibility to name the elements via action IDs. Slack uses these IDs as keys to populate the payload. When you receive Slack’s payload, you can use the keys you provided to parse the data the user entered.
Now, if you go through the flow to edit your contact’s description, you’ll notice that the modal will correctly save. To verify that the data on the Salesforce side was updated, run sfdx force:org:open in your terminal and navigate to the Contacts tab.
Conclusion
The Slack Starter Kit has made it an absolute breeze to build a Slack App that listens to user events. Beyond that, though, it also makes interacting with Salesforce and Heroku an absolute pleasure. We’ve covered just about everything that the Starter Kit can do. If you’d like to learn more about how Slack and Salesforce can work together, check out our blog post on building better together. Also, the backend framework that interacts with Salesforce is the wonderful JSforce project. Be sure to check out both its documentation and the Salesforce API Reference to learn more about what you can build!
Opinions expressed by DZone contributors are their own.

Comments