DZone
Thanks for visiting DZone today,
Edit Profile
  • Manage Email Subscriptions
  • How to Post to DZone
  • Article Submission Guidelines
Sign Out View Profile
  • Post an Article
  • Manage My Drafts
Over 2 million developers have joined DZone.
Log In / Join
Please enter at least three characters to search
Refcards Trend Reports
Events Video Library
Refcards
Trend Reports

Events

View Events Video Library

Zones

Culture and Methodologies Agile Career Development Methodologies Team Management
Data Engineering AI/ML Big Data Data Databases IoT
Software Design and Architecture Cloud Architecture Containers Integration Microservices Performance Security
Coding Frameworks Java JavaScript Languages Tools
Testing, Deployment, and Maintenance Deployment DevOps and CI/CD Maintenance Monitoring and Observability Testing, Tools, and Frameworks
Culture and Methodologies
Agile Career Development Methodologies Team Management
Data Engineering
AI/ML Big Data Data Databases IoT
Software Design and Architecture
Cloud Architecture Containers Integration Microservices Performance Security
Coding
Frameworks Java JavaScript Languages Tools
Testing, Deployment, and Maintenance
Deployment DevOps and CI/CD Maintenance Monitoring and Observability Testing, Tools, and Frameworks

The software you build is only as secure as the code that powers it. Learn how malicious code creeps into your software supply chain.

Apache Cassandra combines the benefits of major NoSQL databases to support data management needs not covered by traditional RDBMS vendors.

Generative AI has transformed nearly every industry. How can you leverage GenAI to improve your productivity and efficiency?

Modernize your data layer. Learn how to design cloud-native database architectures to meet the evolving demands of AI and GenAI workloads.

Related

  • Achieving Micro-frontend Architecture Using Angular Elements
  • Migrating from React Router v5 to v6: A Comprehensive Guide
  • Playwright: Filter Visible Elements With locator.filter({ visible: true })
  • Rediscovering Angular: Modern Advantages and Technical Stack

Trending

  • AI-Based Threat Detection in Cloud Security
  • How Kubernetes Cluster Sizing Affects Performance and Cost Efficiency in Cloud Deployments
  • Mastering Advanced Traffic Management in Multi-Cloud Kubernetes: Scaling With Multiple Istio Ingress Gateways
  • Mastering Fluent Bit: Installing and Configuring Fluent Bit on Kubernetes (Part 3)
  1. DZone
  2. Coding
  3. Frameworks
  4. Content Projection in Angular Element With Slot in Angular 7.0

Content Projection in Angular Element With Slot in Angular 7.0

We take a look at a few new techniques Angular developers can use to perform content projection in Angular 7. Read on to get started!

By 
Dhananjay Kumar user avatar
Dhananjay Kumar
·
Nov. 02, 18 · Tutorial
Likes (3)
Comment
Save
Tweet
Share
24.0K Views

Join the DZone community and get the full member experience.

Join For Free

In this article, we will learn how to project content in an Angular Element. If you are not familiar with the following:

  • Shadow DOM
  • ViewEncapsulation
  • Content Projection

I recommend you to read the below articles before moving forward:

  • Understanding ViewEncapsulation in Angular

  • Simplifying Content Projection in Angular

We can use ng-content to perform content projection, as shown in the listing below:

import { Component } from '@angular/core';
@Component({
    selector: 'app-greet',
    template: `
 <h2>{{title}}</h2>
 <ng-content></ng-content>
`
})
export class GreetComponent {
    title = 'Greet';
}

You can project content as shown in the next listing:

<h1>
      Welcome to {{ title }}!
</h1>
<app-greet>
      <h3>Hello Foo</h3>
</app-greet>

The challenge with the above approach is, "If you use GreetComponent as an Angular Element" then you will not able to project content. To understand this better, let us start by converting GreetComponent  to an Angular Element. You can learn how to create Angular Element step-by-step, here.

After converting GreetComponent to an Angular Element, AppModule should look like the listing below:

import { AppComponent } from './app.component';
import { GreetComponent } from './greet.component';

@NgModule({
    declarations: [
        AppComponent, GreetComponent
    ],
    imports: [
        BrowserModule
    ],
    providers: [],
    bootstrap: [GreetComponent],
    entryComponents: [GreetComponent]
})
export class AppModule {

    constructor(private injector: Injector) {
        const customElement = createCustomElement(GreetComponent, { injector });
        customElements.define('app-root', customElement);
    }

    ngDoBootstrap() {

    }
}

Now you can use GreetComponent in the index.html file, as shown in the listing below:

<body>
     <!-- <app-root></app-root> -->
     <app-greet>
         <h2>hey Foo</h2>
     </app-greet>
</body>

Upon running application, you will find that <h2> element has not been projected to the Angular ElementGreetComponent.

After starting Angular 7, we have another option for performing content projection, slot. To do content projection in an Angular Element, you have to do following:

  1. Set ViewEnacpsulation to ShadowDom.
  2. Use slot instead of <ng-content>

Let us modify GreetComponent as shown in the listing below:

import { Component, ViewEncapsulation } from '@angular/core';
@Component({
    selector: 'app-greet',
    template: `
 <h2>{{title}}</h2>
 <slot name='message'></slot>
`,
    encapsulation: ViewEncapsulation.ShadowDom
})
export class GreetComponent {
    title = 'Greet Component';
}

We have set the encapsulation to ShadowDom and replaced <ng-content> with <slot>

Angular has been supporting ShadowDom since its beginning. Until Angular 6.0, there were three-encapsulation modes:

  1. Emulated

  2. Native

  3. None

Emulated was the default mode and the Native mode was used to create ShadowDom V.0. Starting with Angular 6.1, Angular started supporting ShadowDom V.1, also. You can enable ShadowDom V.1 on components using a fourth option for the ShadowDom. If you set encapsulation to ShadowDom, Angular creates Shadow Dom V.1. To do content projection in an Angular Element, you need to have encapsulation set to ShadowDom.

Now, upon running the application, you will find the content has been projected as shown in the image below:

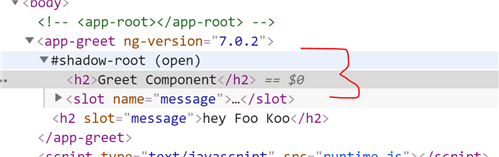
Therefore, by using ShadowDom Encapsulation mode and slot you can project content in Angular Element in Angular 7.0. I hope you found this post useful. Thanks for reading. If you like this post, please share it. 

AngularJS Element

Published at DZone with permission of Dhananjay Kumar, DZone MVB. See the original article here.

Opinions expressed by DZone contributors are their own.

Related

  • Achieving Micro-frontend Architecture Using Angular Elements
  • Migrating from React Router v5 to v6: A Comprehensive Guide
  • Playwright: Filter Visible Elements With locator.filter({ visible: true })
  • Rediscovering Angular: Modern Advantages and Technical Stack

Partner Resources

×

Comments
Oops! Something Went Wrong

The likes didn't load as expected. Please refresh the page and try again.

ABOUT US

  • About DZone
  • Support and feedback
  • Community research
  • Sitemap

ADVERTISE

  • Advertise with DZone

CONTRIBUTE ON DZONE

  • Article Submission Guidelines
  • Become a Contributor
  • Core Program
  • Visit the Writers' Zone

LEGAL

  • Terms of Service
  • Privacy Policy

CONTACT US

  • 3343 Perimeter Hill Drive
  • Suite 100
  • Nashville, TN 37211
  • support@dzone.com

Let's be friends:

Likes
There are no likes...yet! 👀
Be the first to like this post!
It looks like you're not logged in.
Sign in to see who liked this post!