Creating a Spring Boot Project With Eclipse and Maven
In this article, we look at three options for creating Spring Boot projects with Maven and Eclipse: using Spring Initializr, using the STS plugin, and doing it manually.
Join the DZone community and get the full member experience.
Join For FreeHow to Create a Spring Boot Project With Eclipse and Maven:
- Naming a Project- We give a name to the project.
- Declaring Dependencies -Dependencies are frameworks that you need in order to develop your project
- Creating Spring Boot Projects with Eclipse and Maven- There are three options to create Spring Boot Projects with Eclipse and Maven:
Option 1. Bootstrap Spring Boot Project with Spring Initializr. We will use Spring Web MVC as our web framework.
Option 2. Use STS or STS Eclipse Plugin to Create Spring Boot Maven Project. Download the complete installation of STS or you can install the STS Eclipse plugin.
Option 3. Manually Create a Maven Spring Boot Project. Create the project manually.
Setting up a basic project with Spring Boot is a cake walk. In this article, we will explore the different options of creating Spring Boot projects with Maven and Eclipse. You will learn:
- How to bootstrap a simple project with Spring Initializr.
- How to use the Spring Starter Eclipse Plugin to create a simple project with Spring Boot, Maven, and Eclipse.
- How to create a Spring Boot project manually, step-by-step.
Video References
Tools You Will Need
- Maven 3.0+ is your build tool
- Your favorite IDE (we use Eclipse in this article)
- JDK 1.8+
Introduction to Maven
Defining what Maven does is very difficult. To help explain, let's consider some of the things that a developer does every day...
- Manages dependencies
- Web layer (Spring MVC)
- Data layer (JPA, Hibernate)
- Build a JAR or a WAR or an EAR
- Run the application locally
- Deploy to a T environment
- Add new dependencies to a project
- Run unit tests
- Generate projects
- Create Eclipse Workspace
Maven helps us do all of this and more!
Naming a Project
How can other projects use our project? By using our project groupId and artifactId. We give a name to the project in the pom.xml, as shown below:
    <groupId>com.in28minutes.learning.maven</groupId>
    <artifactId>maven-in-few-steps</artifactId>
Declaring Dependencies
Dependencies are frameworks that you need in order to develop your project. In the example below, we add two dependencies:
<dependency>
    <groupId>org.springframework.boot</groupId>
    <artifactId>spring-boot-starter-web</artifactId>
</dependency>

<dependency>
    <groupId>org.springframework.boot</groupId>
    <artifactId>spring-boot-starter-test</artifactId>
    <scope>test</scope>
</dependency>
Maven Build Lifecycle
When we run mvn clean install, we are executing the complete Maven build lifecycle. This lifecycle is a sequence of the following steps:
- Validate
- Compile
- Test
- Package
- Integration test
- Verify
- Install
- Deploy
Maven follows convention over configuration.
The predefined folder structure looks like this:
- Source code
${basedir}/src/main/java${basedir}/src/main/resources
- Test code
How Does Maven Work?
A Maven repository contains all the JARs indexed by artifact ID and group ID. Once we add a dependency to our pom.xml, Maven asks the Maven repository for the JAR dependencies, giving group ID and the artifact ID as the input.
The JAR dependencies are stored on your machine in a folder called maven local repository. All our projects refer to the JARs from here.
Note: A local repository is a temp folder on your machine where Maven stores the JAR and dependency files that are downloaded from the Maven repository.
Important Maven Commands
mvn -version: Finds the Maven versionmvn compile: Compiles source filesmvn test-compile: Compiles test files as well as source filesmvn clean: Deletes target directorymvn test: Runs unit testsmvn package: Creates a JAR for the projecthelp:effective-settings: Debugs Maven settingshelp:effective-pom: Look at the complete pom after all inheritances from parent poms are resolveddependency:tree: Look sat all the dependencies and transitive dependenciesdependency:sources: Downloads source code for all dependencies-debug: Debug flag; can be used with all the above commands
Creating Spring Boot Projects With Eclipse and Maven
There are three options to create Spring Boot Projects with Eclipse and Maven
- Spring Initializr
- Use STS or STS Eclipse Plugin and create a Spring Boot Maven project directly from Eclipse
- Manually create a Maven project and add Spring Boot starter dependencies
We will use a Spring Boot Starter Web as an example.
Option 1: Bootstrap Spring Boot Project With Spring Initializr
Creating a web application with Spring Initializr is a cake walk. We will use Spring Web MVC as our web framework. Spring Initializr is a great tool to bootstrap your Spring Boot projects.
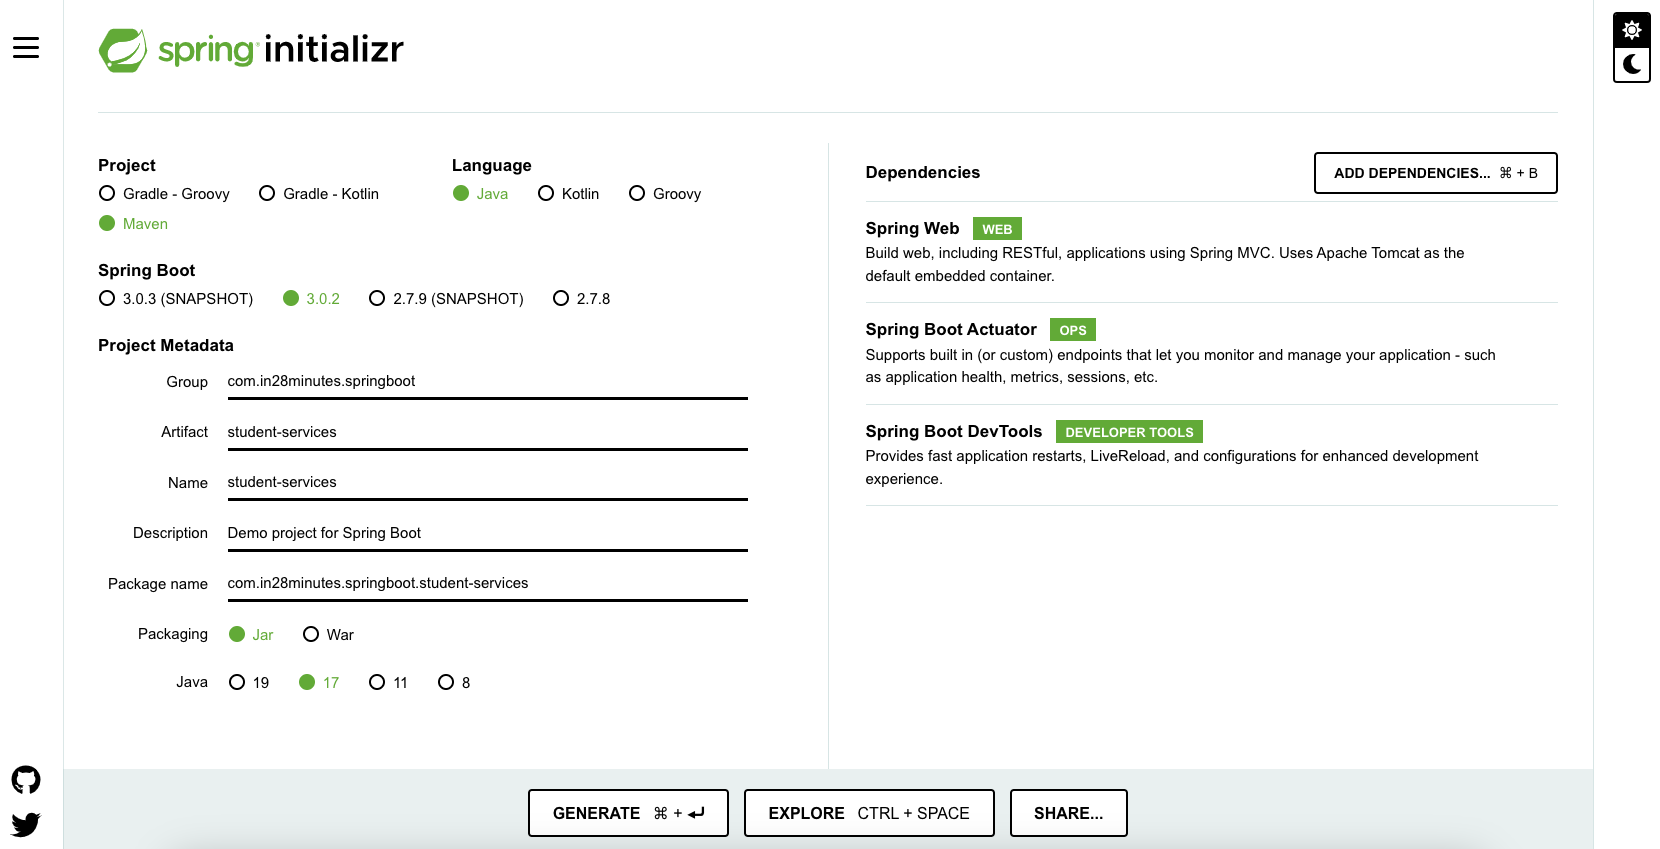
As shown in the image above, following steps have to be done:
- Launch Spring Initializr and choose the following
- Choose
com.in28minutes.springbootas Group - Choose
student-servicesas Artifact - Choose from the following dependencies:
- Web
- Actuator
- DevTools
- Choose
- Click Generate Project.
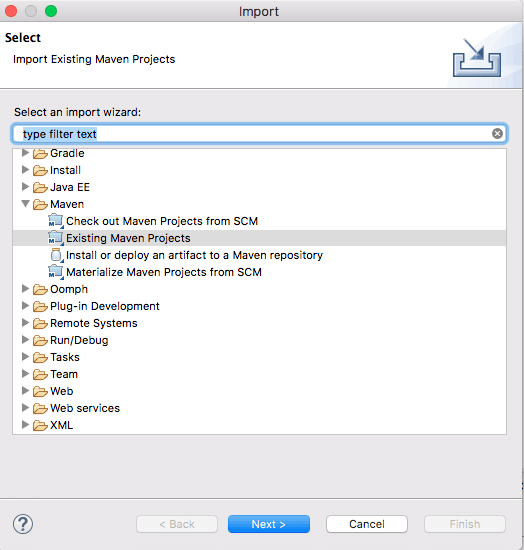
This would download a ZIP file to your local machine. Unzip the zip file and extract to a folder. In Eclipse, Click File > Import > Existing Maven Project as shown below.
Navigate or type in the path of the folder where you extracted the ZIP file on the next screen.
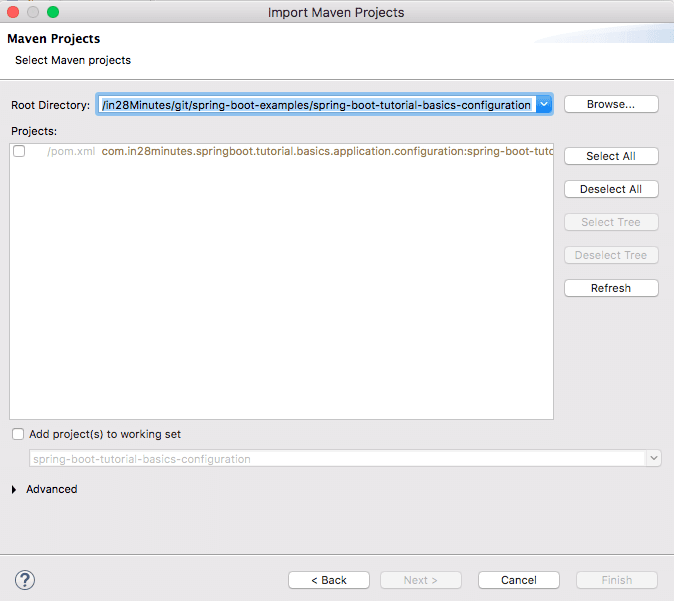
Once you click Finish, Maven will take some time to download all the dependencies and initialize the project.
That's it. Your first Spring project is ready!
Follow these links to understand more about the project that we created:
Option 2: Use STS or STS Eclipse Plugin to Create Spring Boot Maven Project
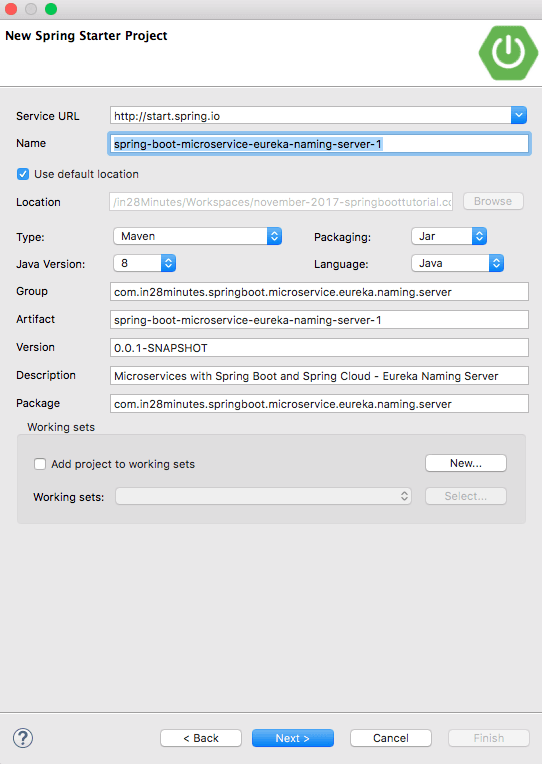
With the Spring tool suite, you can directly create a Spring Boot project from Eclipse. You should either download the complete installation of STS or you can install the STS Eclipse plugin. This link provides the complete download of STS as well as the update sites for the STS Eclipse Plugin.
In Eclipse/STS, start with File > New > Spring Starter Project. In the next screen, you can choose the following for your project:
Group ID
Artifact ID
Root package
Version
Description
Java version
Language
Packaging
Make sure you choose Maven as Type.
In the next screen, you can choose the dependencies that you want to add to your Spring Boot project. 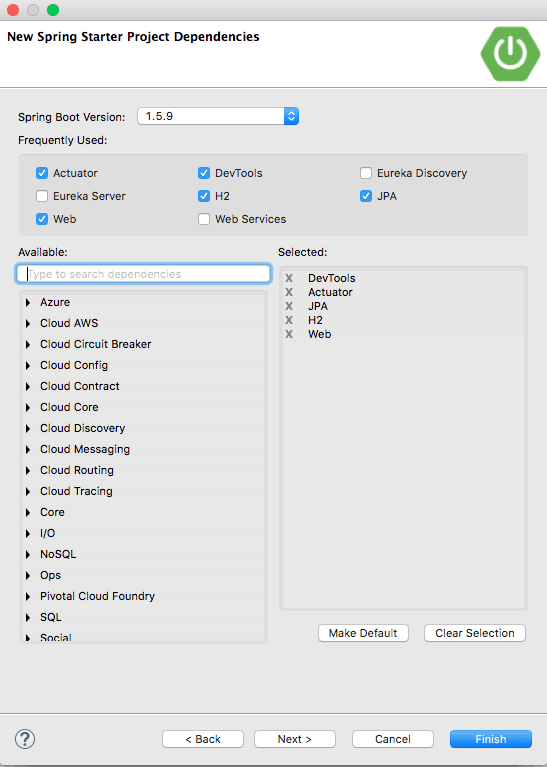
Once you click Finish, Maven will take some time to download all the dependencies and initialize the project.
Now your Spring project is ready!
Option 3: Manually Create a Maven Spring Boot Project
The last option is to create the project manually.
In Eclipse, start with File > New > MavenProject.
Choose Create a simple project, as shown in the screenshot below: 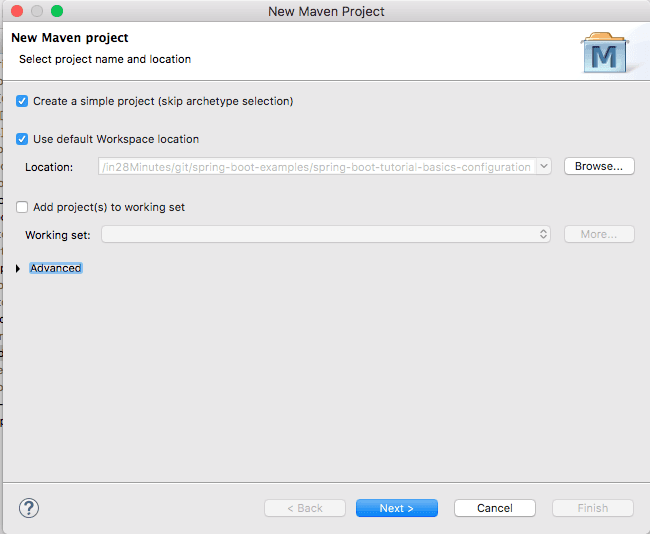
In the next screen, provide these details for your project and click Finish.
Group ID
Artifact ID
Version
This would create a basic Maven project with zero dependencies. Next, add in the appropriate Spring Boot starters into the pom.xml:
<dependency>
    <groupId>org.springframework.boot</groupId>
    <artifactId>spring-boot-starter-web</artifactId>
</dependency>

<dependency>
    <groupId>org.springframework.boot</groupId>
    <artifactId>spring-boot-devtools</artifactId>
    <scope>runtime</scope>
</dependency>

<dependency>
    <groupId>org.springframework.boot</groupId>
    <artifactId>spring-boot-starter-test</artifactId>
    <scope>test</scope>
</dependency>
Starter Web is used for developing Spring Boot Web applications or RESTful services. Starter Test provides unit testing and integration test capabilities with Spring Test, Mockito, and JUnit.
One this we are missing is the version for these dependencies. We will add a Spring Boot starter parent as the parent pom in the pom.xml:
<parent>
    <groupId>org.springframework.boot</groupId>
    <artifactId>spring-boot-starter-parent</artifactId>
    <version>2.0.0.M6</version>
    <relativePath /> <!-- lookup parent from repository -->
</parent>
Let's configure the Java version to use 1.8:
<properties>
    <project.build.sourceEncoding>UTF-8</project.build.sourceEncoding>
    <project.reporting.outputEncoding>UTF-8</project.reporting.outputEncoding>
    <java.version>1.8</java.version>
</properties>
The next step is to create a Spring Boot application class that will be the launching point of the web application.
/src/main/java/com/in28minutes/springboot/tutorial/SpringBootWebApplication.java:
package com.in28minutes.springboot.tutorial;

import org.springframework.boot.SpringApplication;
import org.springframework.boot.autoconfigure.SpringBootApplication;

@SpringBootApplication
public class SpringBootWebApplication {

    public static void main(String[] args) {
        SpringApplication.run(SpringBootWebApplication.class, args);
    }
}
All you need to do is add @SpringBootApplication and use the SpringApplication.run() static method to launch the Spring application context.
When you launch this class as a Java application, you will see that an embedded Tomcat server launches and you are ready to add features to this application.
Summary
In this article, we looked at the different options for creating Spring Boot projects with Maven and Eclipse. I love Option 2: creating the project directly from Eclipse using the STS plugin. But, you might have your own preference.
Published at DZone with permission of Ranga Karanam, DZone MVB. See the original article here.
Opinions expressed by DZone contributors are their own.
Comments