Creating a build pipeline using Maven, Jenkins, Subversion and Nexus.
Join the DZone community and get the full member experience.
Join For Free
for a while now, we had been operating in the wild west when it comes to building our applications and deploying to production. builds were typically done straight from the developer’s ide and manually deployed to one of our app servers. we had a manual process in place, where the developer would do the following steps.
- check all project code into subversion and tag
- build the application.
- archive the application binary to a network drive
- deploy to production
- update our deployment wiki with the date and version number of the app that was just deployed.
the problem is that there were occasionally times where one of these steps were missed, and it always seemed to be at a time when we needed to either rollback to the previous version, or branch from the tag to do a bugfix. sometimes the previous version had not been archived to the network, or the developer forgot to tag svn. we were already using jenkins to perform automated builds, so we wanted to look at extending it further to perform release builds.
the maven release plug-in provides a good starting point for creating an automated release process. we have also just started using the nexus maven repository and wanted to incorporate that as well to archive our binaries to, rather than archiving them to a network drive.
the first step is to set up the project’s pom file with the deploy plugin as well as include configuration information about our nexus and subversion repositories.
<plugin>
   <groupid>org.apache.maven.plugins</groupid>
   <artifactid>maven-release-plugin</artifactid>
   <version>2.2.2</version>
   <configuration>
      <tagbase>http://mks:8080/svn/jrepo/tags/frameworks/siestaframework</tagbase>
    </configuration
</plugin>
the release plugin configuration is pretty straightforward. the configuration takes the subversion url of the location where the tags will reside for this project.
the next step is to configure the svn location where the code will be checked out from.
<scm>
   <connection>scm:svn:http://mks:8080/svn/jrepo/trunk/frameworks/siestaframework</connection>
   <url>http://mks:8080/svn</url>
</scm>
the last step in configuring the project is to set up the location where the binaries will be archived to. in our case, the nexus repository.
<distributionmanagement>
   <repository>
       <id>lynden-java-release</id>
       <name>lynden release repository</name>
       <url>http://cisunwk:8081/nexus/content/repositories/lynden-java-release</url>
    </repository>
</distributionmanagement>
the project is now ready to use the maven release plug-in. the release plugin provides a number of useful goals.
- release:clean – cleans the workspace in the event the last release process was not successful.
-
release: prepare – performs a number of operations
- checks to make sure that there are no uncommitted changes.
- ensures that there are no snapshot dependencies in the pom file,
- changes the version of the application and removes snapshot from the version. ie 1.0.3-snapshot becomes 1.0.3
- run project tests against modified poms
- commit the modified pom
- tag the code in subersion
- increment the version number and append snapshot. ie 1.0.3 becomes 1.0.4-snapshot
- commit modified pom
-
release: perform – performs the release process
- checks out the code using the previously defined tag
- runs the deploy maven goal to move the resulting binary to the repository.
putting it all together
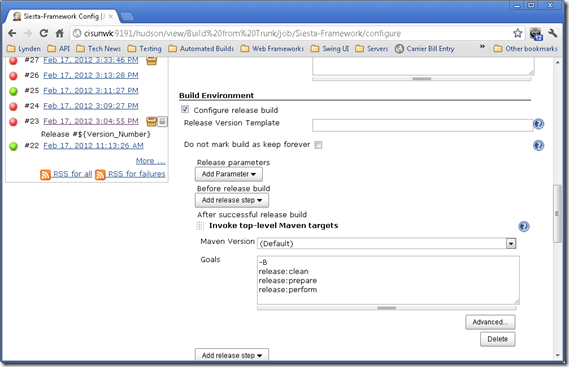
the last step in this process is to configure jenkins to allow release builds on-demand, meaning we want the user to have to explicitly kick off a release build for this process to take place. we have download and installed the release jenkins plug-in in order to allow developers to kick off release builds from jenkins. the release plug-in will execute tasks after the normal build has finished. below is a screenshot of the configuration of one of our projects. the release build option for the project is enabled by selecting the “configure release build” option in the “build environment” section.
the maven release plug-in is activated by adding the goals to the “after successful release build” section. (the –b option enables batch mode so that the release plug-in will not ask the user for input, but use defaults instead.)
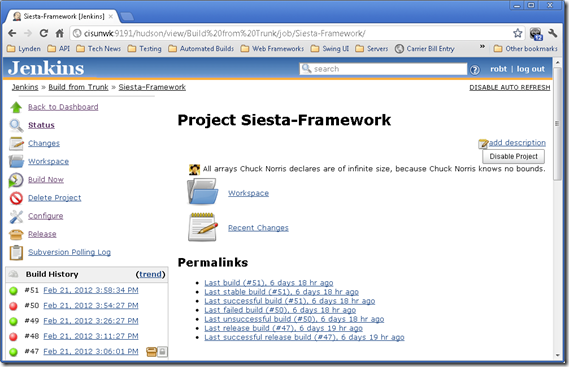
once the release option has been configured for a project there will be a “release” icon on the left navigation menu for the project. selecting this will kick off a build and then the maven release process, assuming the build succeeds.
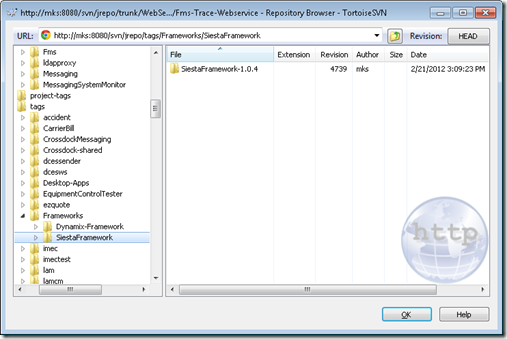
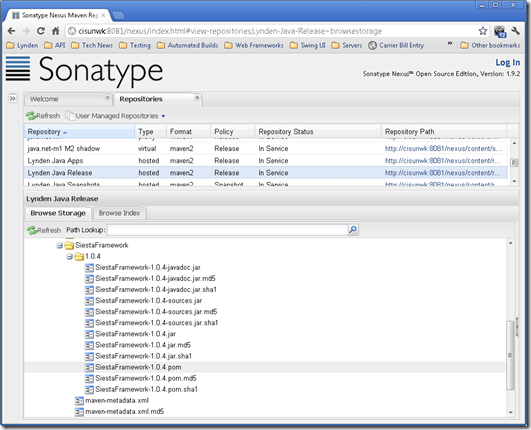
finally a look at svn and nexus verifies that the build for version 1.0.4 of the siesta-framework project has been tagged in svn and uploaded to nexus.
the next steps for this project will be to generate release notes for release builds, and also to automate a deployment pipeline, so that developers can deploy to our test, staging and production servers via jenkins rather than manually from their development workstations.
twitter: @robterp
Opinions expressed by DZone contributors are their own.


Comments