Creating Executable Uber Jar’s and Native Applications with Java 8 and Maven
Join the DZone community and get the full member experience.
Join For Free
solution 1: the maven-dependency-plugin
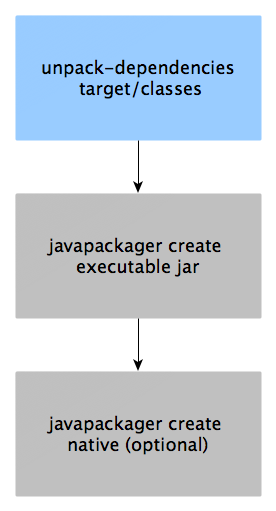
the maven-dependency-plugin contains the goal “unpack-dependencies”. we can use this goal to enhance the default “target/classes” folder with all the dependencies you need to run your application. we assume that the default maven build creates all classes of your project in the “target/classes” folder and the “unpack-dependencies” plugin copies all the project dependencies to this folder. the result is a valid input for the javapackager tool, which creates the executable.

the “unpack-dependencies” goal is easy to use; you just need to set the output directory to the “target/classes” folder to ensure everything is together in one folder. a typical configuration looks like this:
<plugin>
    <artifactid>maven-dependency-plugin</artifactid>
    <version>2.6</version>
    <executions>
        <execution>
            <id>unpack-dependencies</id>
            <phase>package</phase>
            <goals>
                <goal>unpack-dependencies</goal>
            </goals>
            <configuration>
                <excludescope>system</excludescope>
                <excludegroupids>
                    org.springframework.jmx
                </excludegroupids>
                <outputdirectory>
                    ${project.build.directory}/classes
                </outputdirectory>
            </configuration>
        </execution>
    </executions>
</plugin>
to create an executable jar from the target/classes directory we use the “exec-maven-plugin” to execute the javapackager commandline tool.
<plugin>
    <groupid>org.codehaus.mojo</groupid>
    <artifactid>exec-maven-plugin</artifactid>
    <executions>
        <execution>
            <id>package-jar</id>
            <phase>package</phase>
            <goals>
                <goal>exec</goal>
            </goals>
            <configuration>
                <executable>
                    ${env.java_home}/bin/javapackager
                </executable>
                <arguments>
                    <argument>-createjar</argument>
                    <argument>-appclass</argument>
                    <argument>${app.main.class}</argument>
                    <argument>-srcdir</argument>
                    <argument>
                        ${project.build.directory}/classes
                    </argument>
                    <argument>-outdir</argument>
                    <argument>./target</argument>
                    <argument>-outfile</argument>
                    <argument>
                        ${project.artifactid}-app
                    </argument>
                    <argument>-v</argument>
                </arguments>
            </configuration>
        </execution>
    </executions>
</plugin>
now we can create an executable jar, which contains all the project dependencies and that can simply be executed with “java –jar myapp.jar”.
in the next step we want to create a native executable or an installer. specific configuration details for the javapackager can be found here:
http://docs.oracle.com/javase/8/docs/technotes/tools/unix/javapackager.html
, for this tutorial we assume that we want to create a native installer. to do so, we add a second “execution” to your “exec-maven-plugin” like this:
<execution>
    <id>package-jar2</id>
    <phase>package</phase>
    <goals>
        <goal>exec</goal>
    </goals>
    <configuration>
        <executable>
            ${env.java_home}/bin/javapackager
        </executable>

        <arguments>
            <argument>-deploy</argument>
            <argument>-native</argument>
            <argument>installer</argument>
            <argument>-appclass</argument>
            <argument>${app.main.class}</argument>
            <argument>-srcfiles</argument>
            <argument>
                ${project.build.directory}/${artifactid}-app.jar
            </argument>
            <argument>-outdir</argument>
            <argument>./target</argument>
            <argument>-outfile</argument>
            <argument>
                ${project.artifactid}-app
            </argument>
            <argument>-v</argument>
        </arguments>
    </configuration>
</execution>
once the configuration is done, you can run “mvn clean package” and you will find your executable jar as well as the native installer in your target folder.
this solution works fine in most cases, but sometimes you can get in trouble with this plugin. when you have configuration files in your project that also exist in one of your dependencies, the unpack-dependency goal will overwrite your configuration file. for example your project contains a file like “meta-inf/service/com.myconf.file” and any dependency does contain the same file. in this case solution 2 may be a better approach.
solution 2: the maven-shade plugin
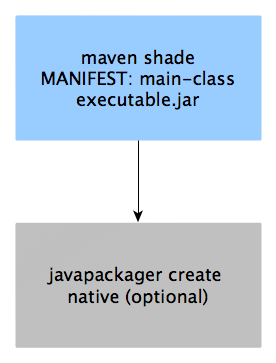
the maven-shade plugin provides the capability to package artifacts into an uber-jar, including its dependencies. it also provides various transformers to merge configuration files or to define the manifest of your jar file. this capability allows us to create an executable uber jar without involving the javapackager, so the packager is only needed to create the native executable.
to build an executable uber jar following plugin configuration is needed:
<plugin>
    <groupid>org.apache.maven.plugins</groupid>
    <artifactid>maven-shade-plugin</artifactid>
    <version>2.3</version>
    <executions>
        <execution>
            <phase>package</phase>
            <goals>
                <goal>shade</goal>
            </goals>
            <configuration>
                <artifactset>
                    <excludes>
                        <exclude>junit:junit</exclude>
                        <exclude>jmock:*</exclude>
                        <exclude>*:xml-apis</exclude>
                        …
                    </excludes>
                </artifactset>
                <transformers>
                    <transformer
                            implementation="org.apache.maven.plugins.shade.resource.appendingtransformer">
                        <resource>
                            meta-inf/services/conf.file
                        </resource>
                    </transformer>
                    <transformer
                            implementation="org.apache.maven.plugins.shade.resource.manifestresourcetransformer">
                        <manifestentries>
                            <main-class>${app.main.class}</main-class>
                            <x-compile-source-jdk>${maven.compile.java.version}</x-compile-source-jdk>
                            <x-compile-target-jdk>${maven.compile.java.version}</x-compile-target-jdk>
                        </manifestentries>
                    </transformer>
                </transformers>
            </configuration>
        </execution>
    </executions>
</plugin>
this configuration defines a main-class entry in the manifest and merges all “meta-inf/services/conf.files” together. the resulting executable jar file is now a valid input for the javapacker to create a native installer. the configuration to create a native installer with “exec-maven-plugin” and javapacker tool is exactly the same like in solution 1.
i provided two example projects on github https://github.com/amoahcp/mvndemos where you can test both configurations. these are two simple projects with a main class starting a jetty webserver on port 8080, so the only dependency is jetty. both solutions can be used for any type of java projects, even with swing or javafx.
reference:
Opinions expressed by DZone contributors are their own.

Comments