Mule 4 Custom Connector and Icon
In this step-by-step tutorial, learn how to create a simple Mule 4 custom connector using Mule XML SDK and how to change the icon for this custom connector.
Join the DZone community and get the full member experience.
Join For FreeIn this article, we will see how to create a custom connector using XML SDK and change the icon for Mule 4 custom connector.
Firstly, you need to create a custom connector in Mule 4. Let's create a simple logging connector that prints a message in the console, and we will also change the default icon for the connector.
We will be creating a connector using XML SDK. There are certain things we need to understand (listed below) before proceeding further with the development.
- Operations: It is just like a function with a set of input parameters, body, and output. In our case, we will be creating a logger that takes messages and displays the output on the console.
- Input parameters: Type of parameter when calling the operation.
- Body: Here you can call a Mule flow or display the output directly.
- Output: Define the type of the payload after it is processed.
- Errors: Error types that can be raised.
To start with, we need to first run the below Maven command to create a Maven project using a Maven archetype. Run this command in a command prompt in the folder where you want this project to be generated.
mvn archetype:generate
-DarchetypeGroupId=org.mule.extensions
-DarchetypeArtifactId=mule-extensions-xml-archetype
-DarchetypeVersion=1.2.0
-DgroupId=org.mule.extension
-DartifactId=mule-custom-logger
-DmuleConnectorName=logger
Once the project is created you can now import the same in Anypoint Studio. Below is the structure I see.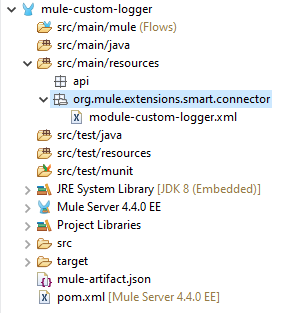
Let us now modify the module-custom-logger.xml file. Since we are creating a simple logger, we will add only the message field as a parameter in the LogMessage operation and print it on the console.
<?xml version="1.0" encoding="UTF-8"?>
<module name="Custom Logger"
        prefix="module-custom-logger"
        doc:description="This module relies in runtime provided components"

        xmlns="http://www.mulesoft.org/schema/mule/module"
        xmlns:mule="http://www.mulesoft.org/schema/mule/core"
        xmlns:doc="http://www.mulesoft.org/schema/mule/documentation"
        xmlns:tns="http://www.mulesoft.org/schema/mule/module-custom-logger"
        xmlns:xsi="http://www.w3.org/2001/XMLSchema-instance"
        xsi:schemaLocation="
           http://www.mulesoft.org/schema/mule/module http://www.mulesoft.org/schema/mule/module/current/mule-module.xsd
           http://www.mulesoft.org/schema/mule/core http://www.mulesoft.org/schema/mule/core/current/mule.xsd
           http://www.mulesoft.org/schema/mule/module-hello http://www.mulesoft.org/schema/mule/module-custom-logger/current/mule-module-custom-logger.xsd">

<operation name="LogMessage"
		doc:description="This operation builds a standard message and logs into the log file'">
		<parameters>
			<parameter name="logLevel" displayName="Log Level" type="any" defaultValue='INFO'
				doc:description="Select the appropriate log level" />
			<parameter name="message" displayName="Message"
				use="OPTIONAL" type="any" defaultValue='Message to log'
				doc:description="Message to be logged" />
		</parameters>
		<body>
			<mule:logger level="INFO" doc:name="Log DEBUG" doc:id="e2a25903-83a5-4949-bf93-878ac1a6015e" message='#[output application/json
---
{
	logLevel: vars.logLevel default "INFO",
	message: vars.message}]'/>
		</body>
		<output type="string" />
	</operation>

 </module>
Once this is done, we will now change the default icon for the connector in the root repository, create an icon folder, and add an icon.svg image of your choice inside of it (as shown below).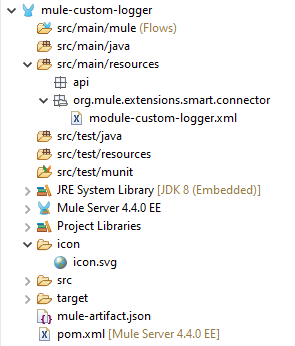
After this, modify your POM file, i.e. add your organization id in groupId element tag and also add respository. Then deploy your code. Also make sure you have set your Anypoint username and password in the settings.xml file. Below is my project POM file.
<?xml version="1.0" encoding="UTF-8"?>
<project xmlns="http://maven.apache.org/POM/4.0.0" xmlns:xsi="http://www.w3.org/2001/XMLSchema-instance" xsi:schemaLocation="http://maven.apache.org/POM/4.0.0 http://maven.apache.org/xsd/maven-4.0.0.xsd">
	<modelVersion>4.0.0</modelVersion>

	<groupId>353f142f-2292-45c3-a93b-778a4430b8a9</groupId>
	<artifactId>mule-custom-logger</artifactId>
	<packaging>mule-extension</packaging>
	<version>1.0.2-SNAPSHOT</version>

	<name>mule-custom-logger</name>
	<description>A Mule extension done with pure Mule DSL that depends in the runtime operations (set-payload, set-variable, etc.)</description>

	<properties>
		<mule.version>4.1.1</mule.version>
		<mule.extensions.maven.plugin.version>1.1.6</mule.extensions.maven.plugin.version>

		<munit.version>2.1.0</munit.version>
		<munit.extensions.maven.plugin.version>1.0.0-BETA</munit.extensions.maven.plugin.version>
		<munit.input.directory>src/test/munit</munit.input.directory>
		<munit.output.directory>${basedir}/target/test-mule/munit</munit.output.directory>

		<maven.resources.version>3.0.2</maven.resources.version>
	</properties>

	<dependencies>
		<!--Needed to discover the 'xml-based' XmlExtensionLoader for smart connectors-->
		<dependency>
			<groupId>org.mule.runtime</groupId>
			<artifactId>mule-module-extensions-xml-support</artifactId>
			<version>${mule.version}</version>
			<scope>provided</scope>
		</dependency>
		<!--MUnit Dependencies-->

	</dependencies>

	<build>
		<pluginManagement>
			<plugins>
				<plugin>
					<groupId>com.mulesoft.munit</groupId>
					<artifactId>munit-extensions-maven-plugin</artifactId>
					<version>${munit.extensions.maven.plugin.version}</version>
					<executions>
						<execution>
							<id>munit-extension-test</id>
							<phase>integration-test</phase>
							<goals>
								<goal>test</goal>
							</goals>
						</execution>
					</executions>
					<configuration>
						<dynamicPorts>
							<dynamicPort>a.dynamic.port</dynamicPort>
						</dynamicPorts>
						<environmentVariables>
							<MY_ENV>envVar</MY_ENV>
						</environmentVariables>
					</configuration>
				</plugin>
				<plugin>
					<groupId>org.apache.maven.plugins</groupId>
					<artifactId>maven-resources-plugin</artifactId>
					<version>${maven.resources.version}</version>
					<executions>
						<execution>
							<id>copy-munit-resources</id>
							<phase>process-test-resources</phase>
							<goals>
								<goal>copy-resources</goal>
							</goals>
							<configuration>
								<outputDirectory>${munit.output.directory}</outputDirectory>
								<resources>
									<resource>
										<directory>${munit.input.directory}</directory>
										<filtering>true</filtering>
									</resource>
								</resources>
							</configuration>
						</execution>
					</executions>
				</plugin>
			</plugins>
		</pluginManagement>

		<plugins>
			<plugin>
				<groupId>org.mule.runtime.plugins</groupId>
				<artifactId>mule-extensions-maven-plugin</artifactId>
				<version>${mule.extensions.maven.plugin.version}</version>
				<extensions>true</extensions>
			</plugin>
			<plugin>
				<groupId>com.mulesoft.munit</groupId>
				<artifactId>munit-extensions-maven-plugin</artifactId>
			</plugin>
		</plugins>
	</build>
<repositories>
		<repository>
			<id>MuleRepository</id>
			<name>MuleSoft Master Repository</name>
			<url>https://repository.mulesoft.org/nexus/content/repositories/releases-ee</url>
			<layout>default</layout>
		</repository>
	</repositories>
	<pluginRepositories>
		<pluginRepository>
			<id>mulesoft-releases</id>
			<name>mulesoft release repository</name>
			<layout>default</layout>
			<url>https://repository.mulesoft.org/releases/</url>
			<snapshots>
				<enabled>false</enabled>
			</snapshots>
		</pluginRepository>
	</pluginRepositories>
	<distributionManagement>
		<repository>
			<id>exchange-server</id>
			<name>Anypoint Exchange</name>
			<url>https://maven.anypoint.mulesoft.com/api/v2/organizations/353f142f-2292-45c3-a93b-778a4430b8a9/maven</url>
			<layout>default</layout>
		</repository>
	</distributionManagement>
</project>
Settings.xml file config:
<server>
		<id>exchange-server</id>
		<username>username</username>
		<password>password</password>
	</server>
To publish your code to Exchange, use this Maven command: mvn deploy.
You can now see the connector in Exchange, pictured below.
Now create a Mule application and import the connector from Exchange in your project as below. You can see the custom icon is also applied to your connector. Now run the code and you will see logs in the console.
Opinions expressed by DZone contributors are their own.
Comments