Deploying Databricks Asset Bundles
This article provides details on the Databricks Asset Bundle, including its benefits and a step-by-step guide for deploying it in the Azure cloud environment.
Join the DZone community and get the full member experience.
Join For FreeDisclaimer: All the views and opinions expressed in the blog belong solely to the author and not necessarily to the author's employer or any other group or individual. This article is not a promotion for any cloud/data management platform. All the images and code snippets are publicly available on the Azure/Databricks website.
In my other blogs, I have provided details on Databricks, how to create Unity Catalog, etc. in Azure cloud. In this blog, I will provide information on the Databricks Asset Bundle, when to use it, and how to deploy it in a Databricks workspace in Azure using the Databricks CLI.
What Is Databricks Asset Bundle (DABs)?
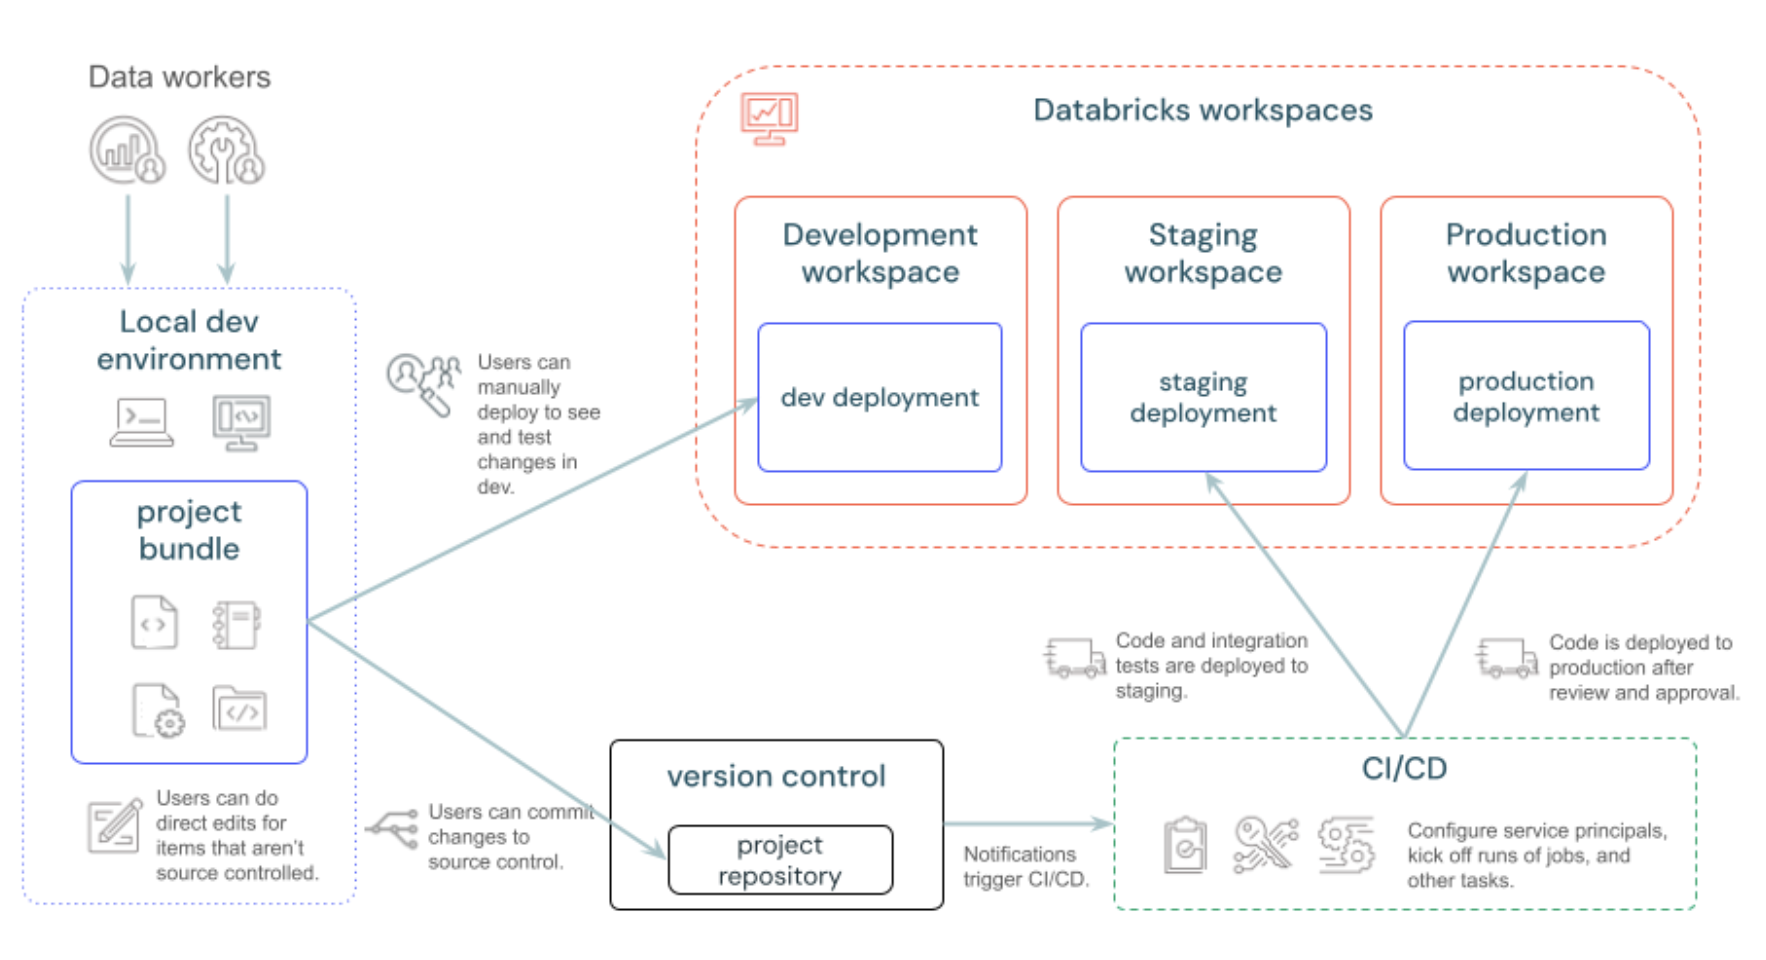
Databricks Assets Bundles are an Infrastructure as Code (IaC) approach to managing your Databricks objects. Since bundles are defined and managed through YAML templates and files you create and maintain alongside source code, they map well to scenarios where IaC is an appropriate approach.
The Databricks Asset Bundle is a tool that makes it easier to move things like code, data pipelines, machine learning models, and settings from one Databricks workspace to another. Imagine you have built some data tools or projects in one place and want to set them up in another; the Asset Bundle helps "package" everything together so you can move and reuse it without having to recreate each part. It's like zipping up a folder with all your work to send somewhere else, making it much faster and more organized to share or deploy.

Why Use Databricks Asset Bundle (DABs)?
Databricks Asset Bundles make it easy to move and manage data projects across different workspaces or environments.
- Simplifies Deployment: If you’ve developed code, models, or data workflows in one environment (like a development environment), Asset Bundles let you deploy everything to another (like production) Databricks workspace without redoing the setup, following DevOps best practices.
- Easy Collaboration: Teams can share complete data projects, including all necessary components, in a structured way. This makes it easy for others to set up and use those projects.
- Version Control and Consistency: Asset Bundles help ensure that all parts of a project stay consistent and up-to-date across environments so no steps are missed.
- Reduces Setup Time: By packaging everything into a single bundle, you save time on configuration, making it faster to roll out updates or set up projects in new workspaces.
How to Deploy a Databricks Job Using Databricks Asset Bundle (DABs)
Prerequisites
- Databricks workspace is already configured in Azure cloud.
- The user running the CLI commands has access to the workspace and is able to create jobs in it.
- Databricks CLI is installed and configured on the local machine. For information on how to install it, please refer to this website and follow the instructions based on your OS.
DAB Demo
Step 1: Validate That the Databricks CLI Is Installed Correctly
Run the following command in the command prompt or terminal:
databricks -vYou should see an output similar to the one below (your version could be different):
Databricks CLI v0.221.1
Step 2: Log In to the Workspace
Run the following command to initiate OAuth token management locally for each target workspace:
databricks auth login --host <workspace-url>The CLI prompts for the Databricks Profile Name. Press enter to accept the default or enter a name to change the profile name. The profile information is saved in the ~/.databrickscfg file (on Mac).
Step 3: Initialize the Bundle
Run the following command to initiate the bundle creation:
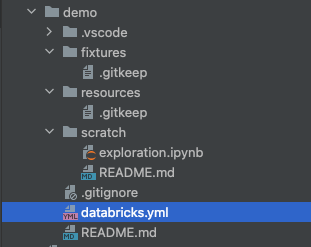
databricks bundle initEnter a unique name for this project, such as demo. Select "no" for all other questions. After the command runs successfully, you should see the following folders created.

Step 4: Update the Bundle
Create a new file demo.yaml inside the Resources folder, and copy and paste the content below. This file contains the Databricks job definition for a Python notebook task. Also it contains the job cluster (required compute) definition. Replace the notebook path with the existing notebook in your workspace.
For more asset bundle configuration options, refer here.
resources:
  jobs:
    sb_demo_job:
      name: "sb demo job"
      tasks:
        - task_key: demo_task
          notebook_task:
            notebook_path: <REPLACE THIS BLOCK WITH AN EXISTING NOTEBOOK IN YOUR WORKSPACE>
            source: WORKSPACE
          job_cluster_key: Job_cluster
      job_clusters:
        - job_cluster_key: Job_cluster
          new_cluster:
            spark_version: 15.4.x-scala2.12
            azure_attributes:
              first_on_demand: 1
              availability: ON_DEMAND_AZURE
              spot_bid_max_price: -1
            node_type_id: Standard_D4ds_v5
            spark_env_vars:
              PYSPARK_PYTHON: /databricks/python3/bin/python3
            enable_elastic_disk: true
            data_security_mode: SINGLE_USER
            runtime_engine: PHOTON
            num_workers: 1
      queue:
        enabled: true
Step 5: Validate the Bundle
Run the following command to validate the bundle. Make sure you are running this command within your bundle folder, where the databricks.yml file is present.
databricks bundle validateAny error in the bundle configuration will show as an output of this command.
If you have multiple profiles in your .databrickscfg file, put the -p <PROFILE NAME> in the command as a parameter.
Step 6: Deploy the Bundle
Run the following command to deploy the bundle in the Databricks dev workspace using -t parameter. You can find all the targets in the databricks.yml inside your bundle folder.
databricks bundle deploy -t devIf you have multiple profiles in your .databrickscfg file, then put the -p <PROFILE NAME> in the command.
You should see similar prompts as below:

Step 7: Validate the Bundle Deployment
Log into the Databricks workspace and click on the "Workflows" menu in the left menu panel. Search with the job name in your bundle YAML file; the job should appear like the image below. This validates that you have successfully configured and deployed a Databricks job with a notebook task in the workspace.

Now, you can commit and push the YAML file to your favorite Git repository and deploy it in all environments using the CI/CD pipeline.
Conclusion
Automating deployment through the Databricks Asset Bundle ensures that all the jobs and Delta Live Table pipelines are deployed consistently in Databricks workspaces. It also ensures that the configurations are codified, version-controlled, and migrated across environments following DevOps best practices.
The above steps demonstrate how anyone can easily develop, validate, and deploy a job in a Databricks workspace using Databricks CLI from a local workstation during the development and unit testing phases. Once validated, the same YAML file and the associated notebook(s) can be pushed to a version control tool (e.g., Github), and a CI/CD pipeline can be implemented to deploy the same job in test and production environments.
Opinions expressed by DZone contributors are their own.

Comments