Dockerizing Jenkins, Part 2: Deployment With Maven and JFrog Artifactory
In the second part of this Dockerizing Jenkins series, learn to deploy your artifacts, run Artifactory on Docker, and dockerize Maven settings in Jenkins.
Join the DZone community and get the full member experience.
Join For FreeIn the first part of this tutorial, we looked at how to dockerize installation of the Jenkins plugins, Java and Maven tool setup in Jenkins 2, and created a declarative build pipeline for a Maven project with test and SonarQube stages. In this part, we will focus on deployment.
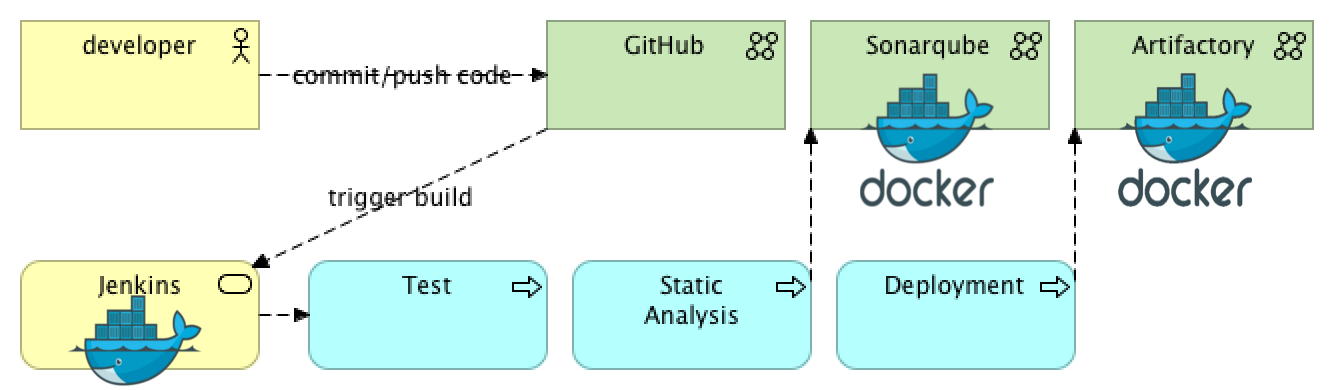 Couldn’t we simply add another stage for deployment in part 1, you may ask? Well, in fact, deployment requires quite a few steps to be taken, including Maven pom and settings file configuration, artifact repository availability, repository credentials encryption, etc. Let’s add them to the list and then implement them step by step like we did in the previous session.
- Running JFrog Artifactory on Docker.
- Configuring the Maven pom file.
- Configuring the Maven settings file.
- Using Config File Provider Plugin for persistence of Maven settings.
- Dockerizing the installation and configuration process.
If you are already familiar with first part of this tutorial, created your project from the scratch and using your own repository, then you can just follow the steps as we go further, otherwise, if you are starting now, you can just clone/fork the work we did in the last example and then add changes as they follow in the tutorial:
git clone https://github.com/kenych/jenkins_docker_pipeline_tutorial1 && cd jenkins_docker_pipeline_tutorial1 && ./runall.shPlease note all steps have been tested on MacOS Sierra and Docker version 17.05.0-ce and you should change them accordingly if you are using MS-DOS, FreeBSD, etc.
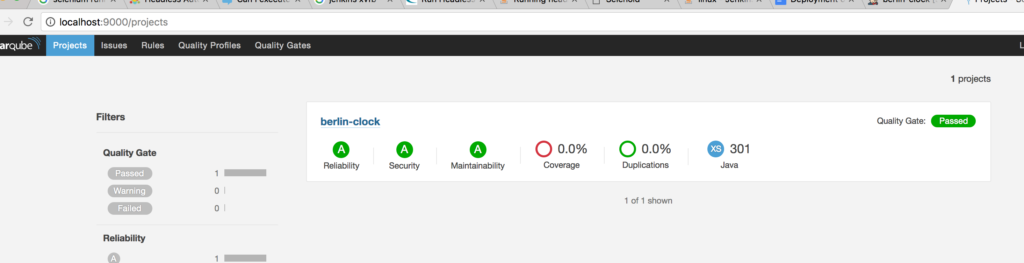
The script above is going to take a while as it is downloading Java 7, Java 8, Maven, SonarQube, and Jenkins Docker images, so please be patient. Once done, you should have Jenkins and Sonar up and running as we created in part 1:
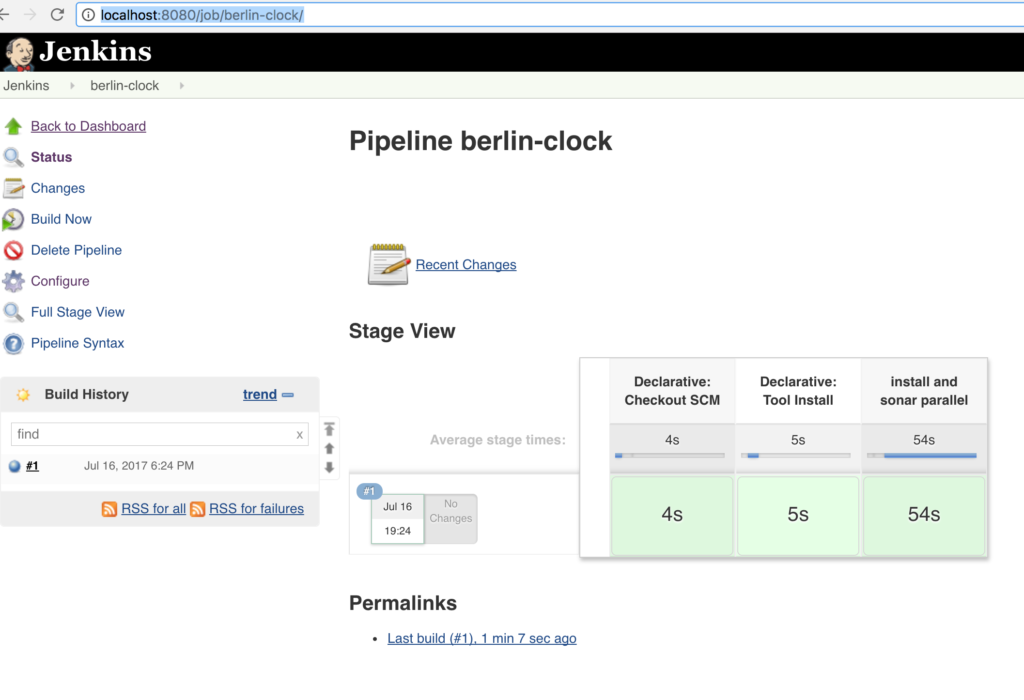
If you got errors about some port being busy, just use the free ports from your host, as I explain here. Otherwise, you can use dynamic ports.
Chapter 1: Running JFrog Artifactory on Docker
So let’s look at the first step. Obviously, if we want to test the deployment in our example, we need some place to deploy our artifacts to. We are going to use a limited open source version of JFrog Artifactory called “artifactory oss.” Let’s run it on Docker to see how easy it is to have your own artifact repo. The port 8081 on my machine was busy, so I had to run it on 8082. You should do so according to free ports available on your machine:
docker run --rm -p 8082:8081 --name artifactory docker.bintray.io/jfrog/artifactory-oss:5.4.4Normally you would run Artifactory with volumes to preserve its state (the jar files in our case), but for the sake of our tutorial which is about Dockerizing Jenkins, we will simply run it on “in memory” fashion. Once it is up and running, we should be ready to deploy our artifacts to it.
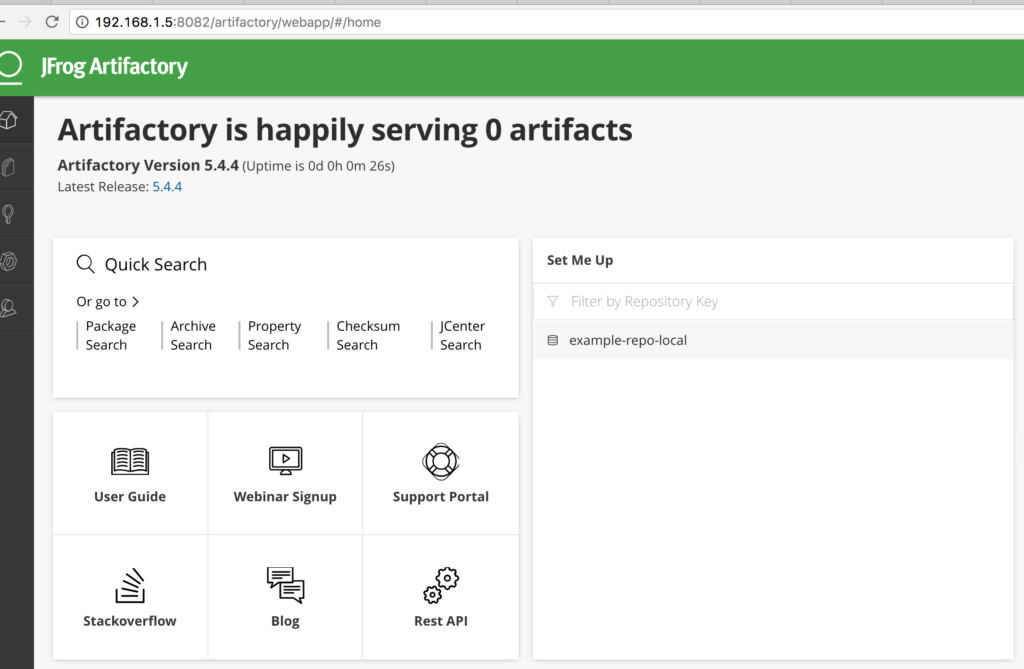
Please pay attention to the name of the path for the default repository it has created; it was example-repo-local in my case, and we will refer to it very soon.
By the time I finished part two, I improved the runall script; now it uses dynamic ports and should run with no issues if some of the ports used by SonarQube, Jenkins or Artifactory were busy (8080, 8081, 9000, etc):
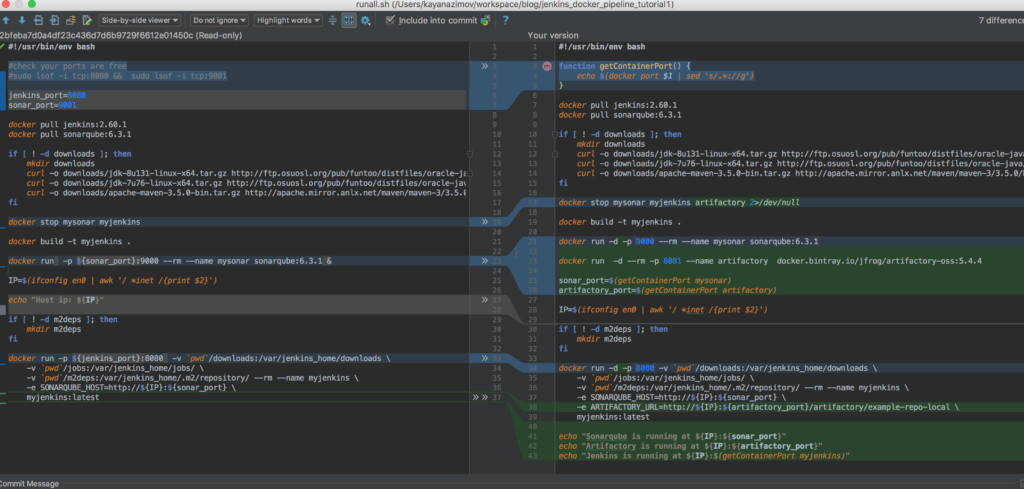
So let’s switch to updated script. It will just stop all containers, build a Jenkins image, and then rerun with dynamic ports:
#!/usr/bin/env bash

function getContainerPort() {
    echo $(docker port $1 | sed 's/.*://g')
}

docker pull jenkins:2.60.1
docker pull sonarqube:6.3.1

if [ ! -d downloads ]; then
    mkdir downloads
    curl -o downloads/jdk-8u131-linux-x64.tar.gz http://ftp.osuosl.org/pub/funtoo/distfiles/oracle-java/jdk-8u131-linux-x64.tar.gz
    curl -o downloads/jdk-7u76-linux-x64.tar.gz http://ftp.osuosl.org/pub/funtoo/distfiles/oracle-java/jdk-7u76-linux-x64.tar.gz
    curl -o downloads/apache-maven-3.5.0-bin.tar.gz http://apache.mirror.anlx.net/maven/maven-3/3.5.0/binaries/apache-maven-3.5.0-bin.tar.gz
fi

docker stop mysonar myjenkins artifactory 2>/dev/null

docker build -t myjenkins .

docker run -d -p 9000 --rm --name mysonar sonarqube:6.3.1

docker run  -d --rm -p 8081 --name artifactory  docker.bintray.io/jfrog/artifactory-oss:5.4.4

sonar_port=$(getContainerPort mysonar)
artifactory_port=$(getContainerPort artifactory)

IP=$(ifconfig en0 | awk '/ *inet /{print $2}')

if [ ! -d m2deps ]; then
    mkdir m2deps
fi

docker run -d -p 8080 -v `pwd`/downloads:/var/jenkins_home/downloads \
    -v `pwd`/jobs:/var/jenkins_home/jobs/ \
    -v `pwd`/m2deps:/var/jenkins_home/.m2/repository/ --rm --name myjenkins \
    -e SONARQUBE_HOST=http://${IP}:${sonar_port} \
    -e ARTIFACTORY_URL=http://${IP}:${artifactory_port}/artifactory/example-repo-local \
    myjenkins:latest

echo "Sonarqube is running at ${IP}:${sonar_port}"
echo "Artifactory is running at ${IP}:${artifactory_port}"
echo "Jenkins is running at ${IP}:$(getContainerPort myjenkins)"
Run it in debug mode to see what is happening:
bash +x runall.sh
2.60.1: Pulling from library/jenkins
Digest: sha256:fa62fcebeab220e7545d1791e6eea6759b4c3bdba246dd839289f2b28b653e72
Status: Image is up to date for jenkins:2.60.1
6.3.1: Pulling from library/sonarqube
Digest: sha256:d5f7bb8aecaa46da054bf28d111e5a27f1378188b427db64cc9fb392e1a8d80a
Status: Image is up to date for sonarqube:6.3.1
mysonar
myjenkins
artifactory
Sending build context to Docker daemon  365.1MB
Step 1/6 : FROM jenkins:2.60.1
 ---> f426a52bafa9
Step 2/6 : MAINTAINER Kayan Azimov
 ---> Using cache
 ---> 760e7bb0f335
Step 3/6 : ENV JAVA_OPTS "-Djenkins.install.runSetupWizard=false"
 ---> Using cache
 ---> e3dbac0834cd
Step 4/6 : COPY plugins.txt /usr/share/jenkins/ref/plugins.txt
 ---> Using cache
 ---> 39966bece010
Step 5/6 : RUN /usr/local/bin/install-plugins.sh < /usr/share/jenkins/ref/plugins.txt ---> Using cache
 ---> 987bdeca2517
Step 6/6 : COPY groovy/* /usr/share/jenkins/ref/init.groovy.d/
 ---> Using cache
 ---> e5ec6b7f49aa
Successfully built e5ec6b7f49aa
Successfully tagged myjenkins:latest
85d8716d3c7fd6272b6915d977daa37dbe9e4ece0f5c367dd9798fbfca272b2d
5fc3f649d3ba5c47df48a54b761d432611ed18872aa727114cdcf1a0f30cac0c
21e98466cb4f6e78817d9869d39bda57f475d7174f565031f168eb836118d701
Sonarqube is running at 192.168.1.2:32836
Artifactory is running at 192.168.1.2:32837
Jenkins is running at 192.168.1.2:32838
We now see the ports for all running containers in the logs, so we can access any of them if we like. As you may have noticed, our shell script has become a bit too complicated; this is just to run three containers, so it means that next time, I should probably switch to using docker compose instead!
We obviously need to update our pipeline which we created in part 1, add a deployment step to it, push the updated Jenkins file, and build the job. If you are using your own repo, alternatively, just amend the existing job as below by using Replthe ay button on the last successful build and then run it:
pipeline {
    agent any

    tools {
        jdk 'jdk8'
        maven 'maven3'
    }

    stages {
        stage('install and sonar parallel') {
            steps {
                parallel(
                        install: {
                            sh "mvn -U clean test cobertura:cobertura -Dcobertura.report.format=xml"
                        },
                        sonar: {
                            sh "mvn sonar:sonar -Dsonar.host.url=${env.SONARQUBE_HOST}"
                        }
                )
            }
            post {
                always {
                    junit '**/target/*-reports/TEST-*.xml'
                    step([$class: 'CoberturaPublisher', coberturaReportFile: 'target/site/cobertura/coverage.xml'])
                }
            }
        }
        stage('deploy') {
            steps {
                    sh "mvn deploy -DskipTests"
            }
        }
    }
}
This is what going to happen:
[INFO] BUILD FAILURE
[INFO] ------------------------------------------------------------------------
[INFO] Total time: 9.265 s
[INFO] Finished at: 2017-07-16T18:39:51Z
[INFO] Final Memory: 17M/95M
[INFO] ------------------------------------------------------------------------
[ERROR] Failed to execute goal org.apache.maven.plugins:maven-deploy-plugin:2.7:deploy (default-deploy) on project berlin-clock: Deployment failed: repository element was not specified in the POM inside distributionManagement element or in -DaltDeploymentRepository=id::layout::url parameter -> [Help 1]
[ERROR]
[ERROR] To see the full stack trace of the errors, re-run Maven with the -e switch.
[ERROR] Re-run Maven using the -X switch to enable full debug logging.
[ERROR]
[ERROR] For more information about the errors and possible solutions, please read the following articles:
[ERROR] [Help 1] http://cwiki.apache.org/confluence/display/MAVEN/MojoExecutionException
[Pipeline] }
The job fails, but Maven is clever enough to figure out the reason, and it prompted us with a message that the distributionManagement section in the pom file is missing. So the Maven deploy plugin doesn’t basically know where to deploy the artifact, would you know?
Chapter 2: Configuring Maven pom File
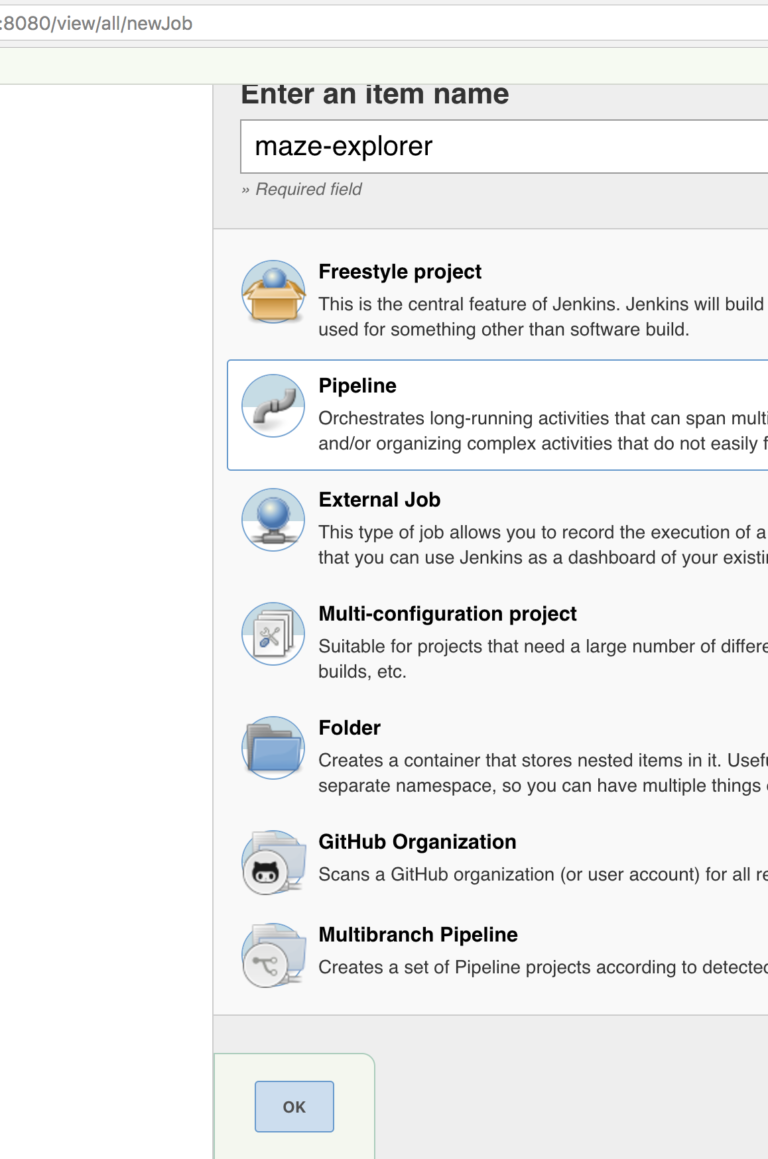
Let’s configure the missing part in the pom file inside the project. If you are not using your own git project for this tutorial, you won’t be able to amend the POM file, as it is in my repository and you don’t have access, unfortunately. But you can switch to another project in that case, which I prepared for you. So please create another pipeline job for the project maze-explorer, which has the necessary pom changes. If you are using your own Git project, just ignore this note. Obviously, I could have used just a branch in the same project, but let’s have a couple jobs in Jenkins!
Creating a new pipeline:
Configuring the repository:
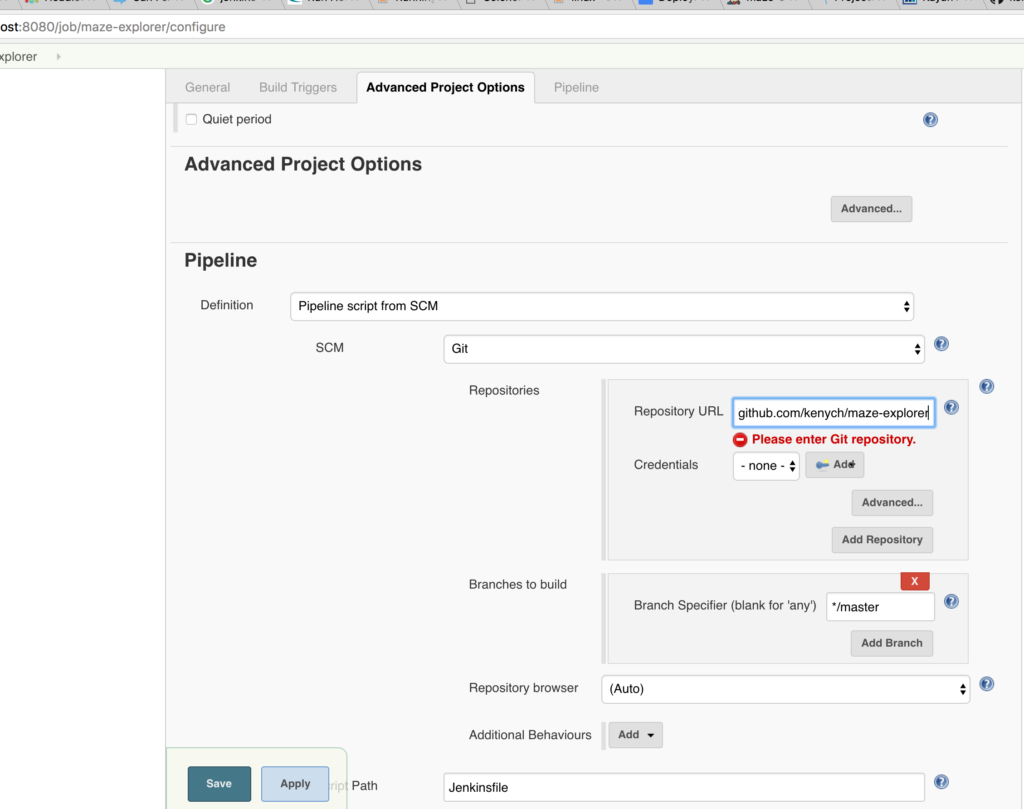
Here is how your changes in the POM will look, We added distributionManagement to the project section:
<project xmlns:xsi="http://www.w3.org/2001/XMLSchema-instance" xmlns="http://maven.apache.org/POM/4.0.0" xsi:schemaLocation="http://maven.apache.org/POM/4.0.0 http://maven.apache.org/xsd/maven-4.0.0.xsd">
    <modelVersion>4.0.0</modelVersion>

    <groupId>kayan</groupId>
    <artifactId>maze</artifactId>
    <version>1.0-SNAPSHOT</version>
    <packaging>jar</packaging>

    <url>http://maven.apache.org</url>

    <properties>
        <project.build.sourceEncoding>UTF-8</project.build.sourceEncoding>
    </properties>

    <distributionManagement>
        <snapshotRepository>
            <id>artifactory</id>
            <name>artifactory</name>
            <url>${artifactory_url}</url>
        </snapshotRepository>
    </distributionManagement>


 (the rest of POM file)
The URL should point to the URL of Artifactory, so we need to pass it to Maven through Jenkins as an environment variable, just like we did for Sonar. Obviously it can’t be static as the IP of the host can change.
If you run the job now, it is still going to fail, even if it has distributionManagement configured:
[INFO] BUILD FAILURE
[INFO] ------------------------------------------------------------------------
[INFO] Total time: 4.459 s
[INFO] Finished at: 2017-07-16T20:13:34Z
[INFO] Final Memory: 13M/137M
[INFO] ------------------------------------------------------------------------
[ERROR] Failed to execute goal org.apache.maven.plugins:maven-deploy-plugin:2.7:deploy (default-deploy) on project maze: Failed to deploy artifacts: Could not transfer artifact kayan:maze:jar:1.0-20170716.201334-1 from/to artifactory (http://192.168.1.5:8082/artifactory/example-repo-local): Failed to transfer file: http://192.168.1.5:8082/artifactory/example-repo-local/kayan/maze/1.0-SNAPSHOT/maze-1.0-20170716.201334-1.jar. Return code is: 401, ReasonPhrase: Unauthorized. -&amp;amp;gt; [Help 1]
[ERROR]
[ERROR] To see the full stack trace of the errors, re-run Maven with the -e switch.
[ERROR] Re-run Maven using the -X switch to enable full debug logging.
This is because we need to have credentials in order to deploy. The default credentials of JFrog are “admin:password.” Try to log in and check. In order to pass credentials to the deployment plugin, we need to set them in the Maven settings.xml file.
Chapter 3: Configuring the Maven Settings File
If we have Maven installed locally, then we can run it first just to check that the deployment actually works with our configuration, and then we can start looking at how to configure it with Jenkins. Let's check what we have in the settings file:
mvn help:effective-settings
You will see something similar if the settings file is absent or empty.
<settings xmlns="http://maven.apache.org/POM/4.0.0" xmlns:xsi="http://www.w3.org/2001/XMLSchema-instance" xsi:schemaLocation="http://maven.apache.org/SETTINGS/1.1.0 http://maven.apache.org/xsd/settings-1.1.0.xsd">
  <localRepository xmlns="http://maven.apache.org/SETTINGS/1.1.0">/Users/kayanazimov/.m2/repository</localRepository>
  <pluginGroups xmlns="http://maven.apache.org/SETTINGS/1.1.0">
    <pluginGroup>org.apache.maven.plugins</pluginGroup>
    <pluginGroup>org.codehaus.mojo</pluginGroup>
  </pluginGroups>
</settings>
Now let’s go to /Users/YOUR_USER_NAME_HERE/.m2/ and change or create settings.xml as below. In order to pass credentials of the repo, we need to add a server in the servers section of the Maven settings:
<?xml version="1.0" encoding="UTF-8"?>
<settings xsi:schemaLocation="http://maven.apache.org/SETTINGS/1.1.0 http://maven.apache.org/xsd/settings-1.1.0.xsd" xmlns="http://maven.apache.org/SETTINGS/1.1.0" xmlns:xsi="http://www.w3.org/2001/XMLSchema-instance">
<servers>
    <server>
      <id>artifactory</id>
      <username>admin</username>
      <password>password</password>
    </server>
   </servers>
</settings>
Please note, the id should be same as the id you used earlier in the pom file for snapshotRepository.
You can check if Maven is picking it up:
mvn help:effective-settingsNow clone the project, or if you're using your own project, just run it from the project folder (use the Artifactory port, which will be shown when running the runall script):
mvn deploy -DskipTests -Dartifactory_url=http://localhost:8082/artifactory/example-repo-local

[INFO] Scanning for projects...
[INFO]
[INFO] ------------------------------------------------------------------------
[INFO] Building maze 1.0-SNAPSHOT
[INFO] ------------------------------------------------------------------------
[INFO]
[INFO] --- maven-resources-plugin:2.6:resources (default-resources) @ maze ---
[INFO] Using 'UTF-8' encoding to copy filtered resources.
[INFO] skip non existing resourceDirectory /Users/kayanazimov/workspace/learn/maze-explorer/src/main/resources
[INFO]
[INFO] --- maven-compiler-plugin:2.5.1:compile (default-compile) @ maze ---
[INFO] Nothing to compile - all classes are up to date
[INFO]
[INFO] --- maven-resources-plugin:2.6:testResources (default-testResources) @ maze ---
[INFO] Using 'UTF-8' encoding to copy filtered resources.
[INFO] Copying 10 resources
[INFO]
[INFO] --- maven-compiler-plugin:2.5.1:testCompile (default-testCompile) @ maze ---
[INFO] Nothing to compile - all classes are up to date
[INFO]
[INFO] --- maven-surefire-plugin:2.12.4:test (default-test) @ maze ---
[INFO] Tests are skipped.
[INFO]
[INFO] --- maven-jar-plugin:2.4:jar (default-jar) @ maze ---
[INFO] Building jar: /Users/kayanazimov/workspace/learn/maze-explorer/target/maze-1.0-SNAPSHOT.jar
[INFO]
[INFO] --- maven-install-plugin:2.4:install (default-install) @ maze ---
[INFO] Installing /Users/kayanazimov/workspace/learn/maze-explorer/target/maze-1.0-SNAPSHOT.jar to /Users/kayanazimov/.m2/repository/kayan/maze/1.0-SNAPSHOT/maze-1.0-SNAPSHOT.jar
[INFO] Installing /Users/kayanazimov/workspace/learn/maze-explorer/pom.xml to /Users/kayanazimov/.m2/repository/kayan/maze/1.0-SNAPSHOT/maze-1.0-SNAPSHOT.pom
[INFO]
[INFO] --- maven-deploy-plugin:2.7:deploy (default-deploy) @ maze ---
Downloading: http://localhost:8082/artifactory/example-repo-local/kayan/maze/1.0-SNAPSHOT/maven-metadata.xml
Uploading: http://localhost:8082/artifactory/example-repo-local/kayan/maze/1.0-SNAPSHOT/maze-1.0-20170718.083952-1.jar
Uploaded: http://localhost:8082/artifactory/example-repo-local/kayan/maze/1.0-SNAPSHOT/maze-1.0-20170718.083952-1.jar (28 kB at 126 kB/s)
Uploading: http://localhost:8082/artifactory/example-repo-local/kayan/maze/1.0-SNAPSHOT/maze-1.0-20170718.083952-1.pom
Uploaded: http://localhost:8082/artifactory/example-repo-local/kayan/maze/1.0-SNAPSHOT/maze-1.0-20170718.083952-1.pom (2.1 kB at 49 kB/s)
Downloading: http://localhost:8082/artifactory/example-repo-local/kayan/maze/maven-metadata.xml
Uploading: http://localhost:8082/artifactory/example-repo-local/kayan/maze/1.0-SNAPSHOT/maven-metadata.xml
Uploaded: http://localhost:8082/artifactory/example-repo-local/kayan/maze/1.0-SNAPSHOT/maven-metadata.xml (753 B at 25 kB/s)
Uploading: http://localhost:8082/artifactory/example-repo-local/kayan/maze/maven-metadata.xml
Uploaded: http://localhost:8082/artifactory/example-repo-local/kayan/maze/maven-metadata.xml (267 B at 9.9 kB/s)
[INFO] ------------------------------------------------------------------------
[INFO] BUILD SUCCESS
[INFO] ------------------------------------------------------------------------
[INFO] Total time: 1.828 s
[INFO] Finished at: 2017-07-18T09:39:52+01:00
[INFO] Final Memory: 13M/207M
[INFO] ------------------------------------------------------------------------

➜  maze-explorer git:(master)
Now check the Artifactory:
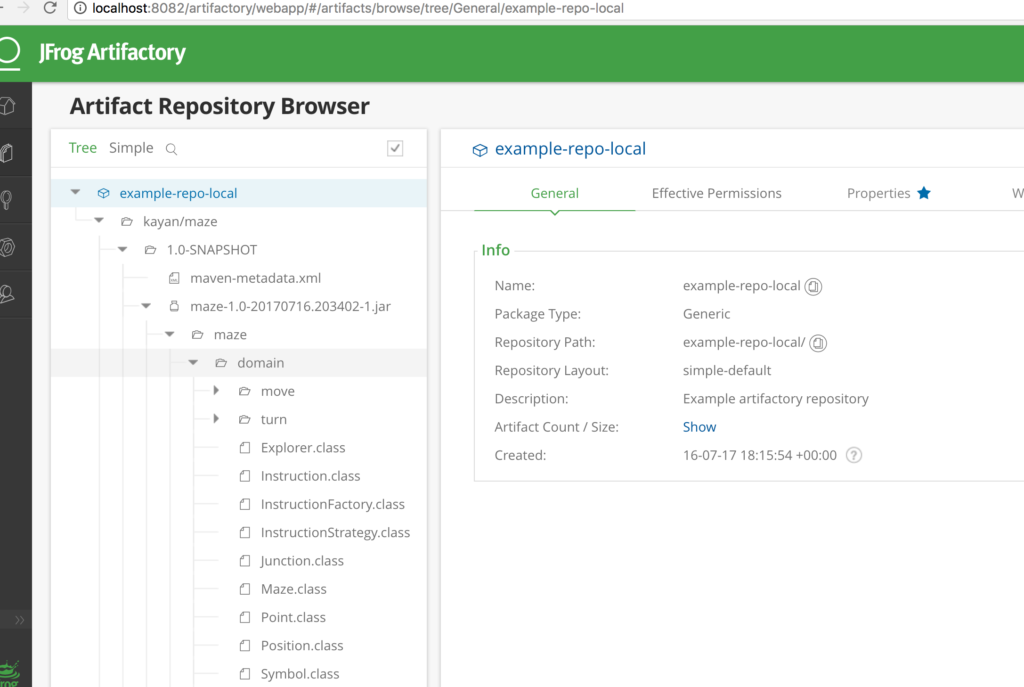
As you can see we successfully deployed it, Yay! Now it is time to prepare this step in Jenkins.
Chapter 4: Using the Config File Provider Plugin for Persistence of Maven Settings
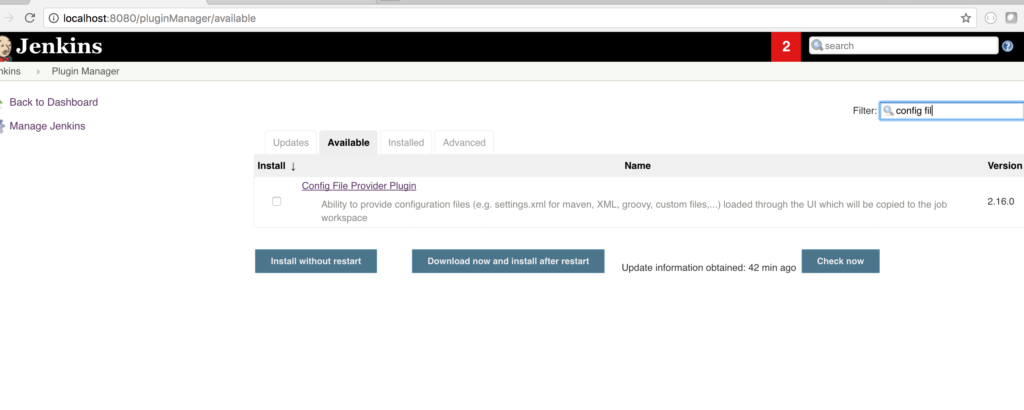
In order to apply the settings file to Maven in Jenkins, we need the config file provider plugin, which lets us preserve multiple settings files (please be aware, we might need more than one settings depending on a project running the job in real life). Now let’s install the plugin manually first:
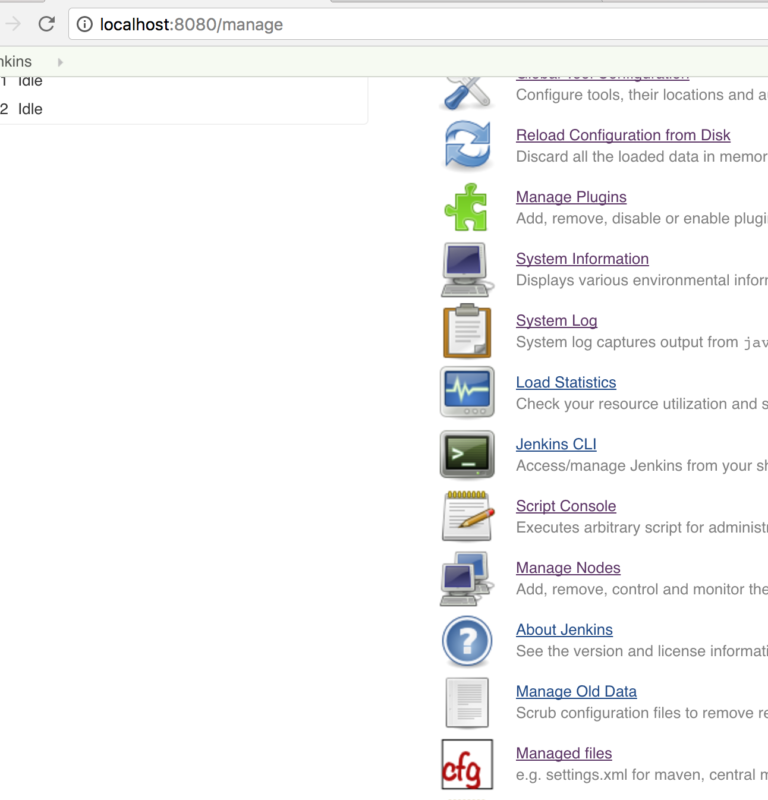
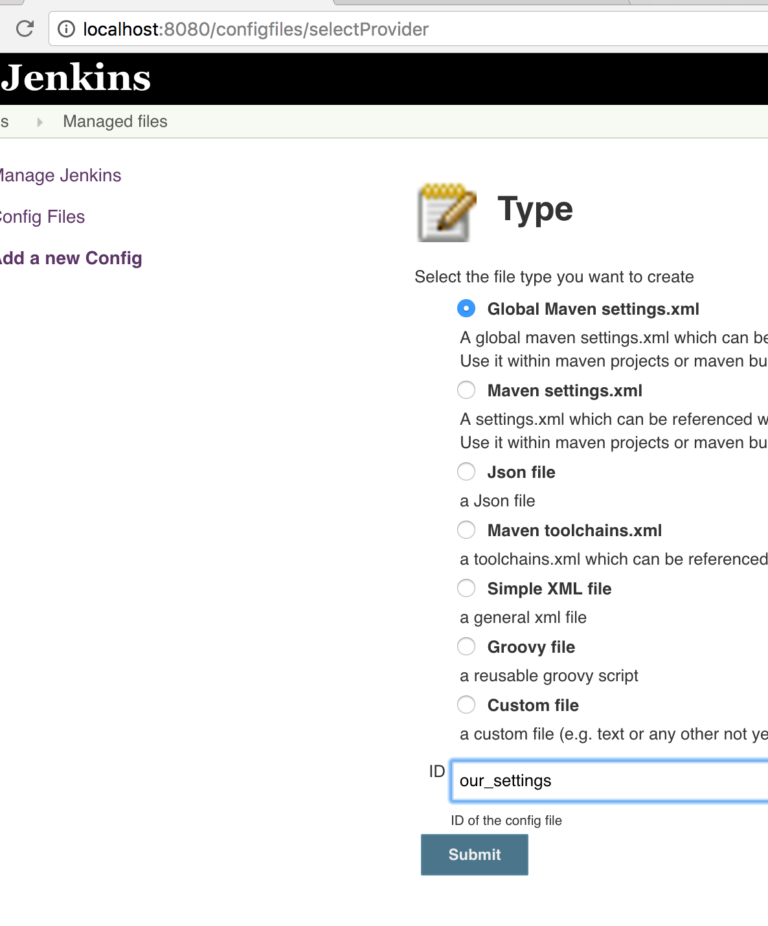
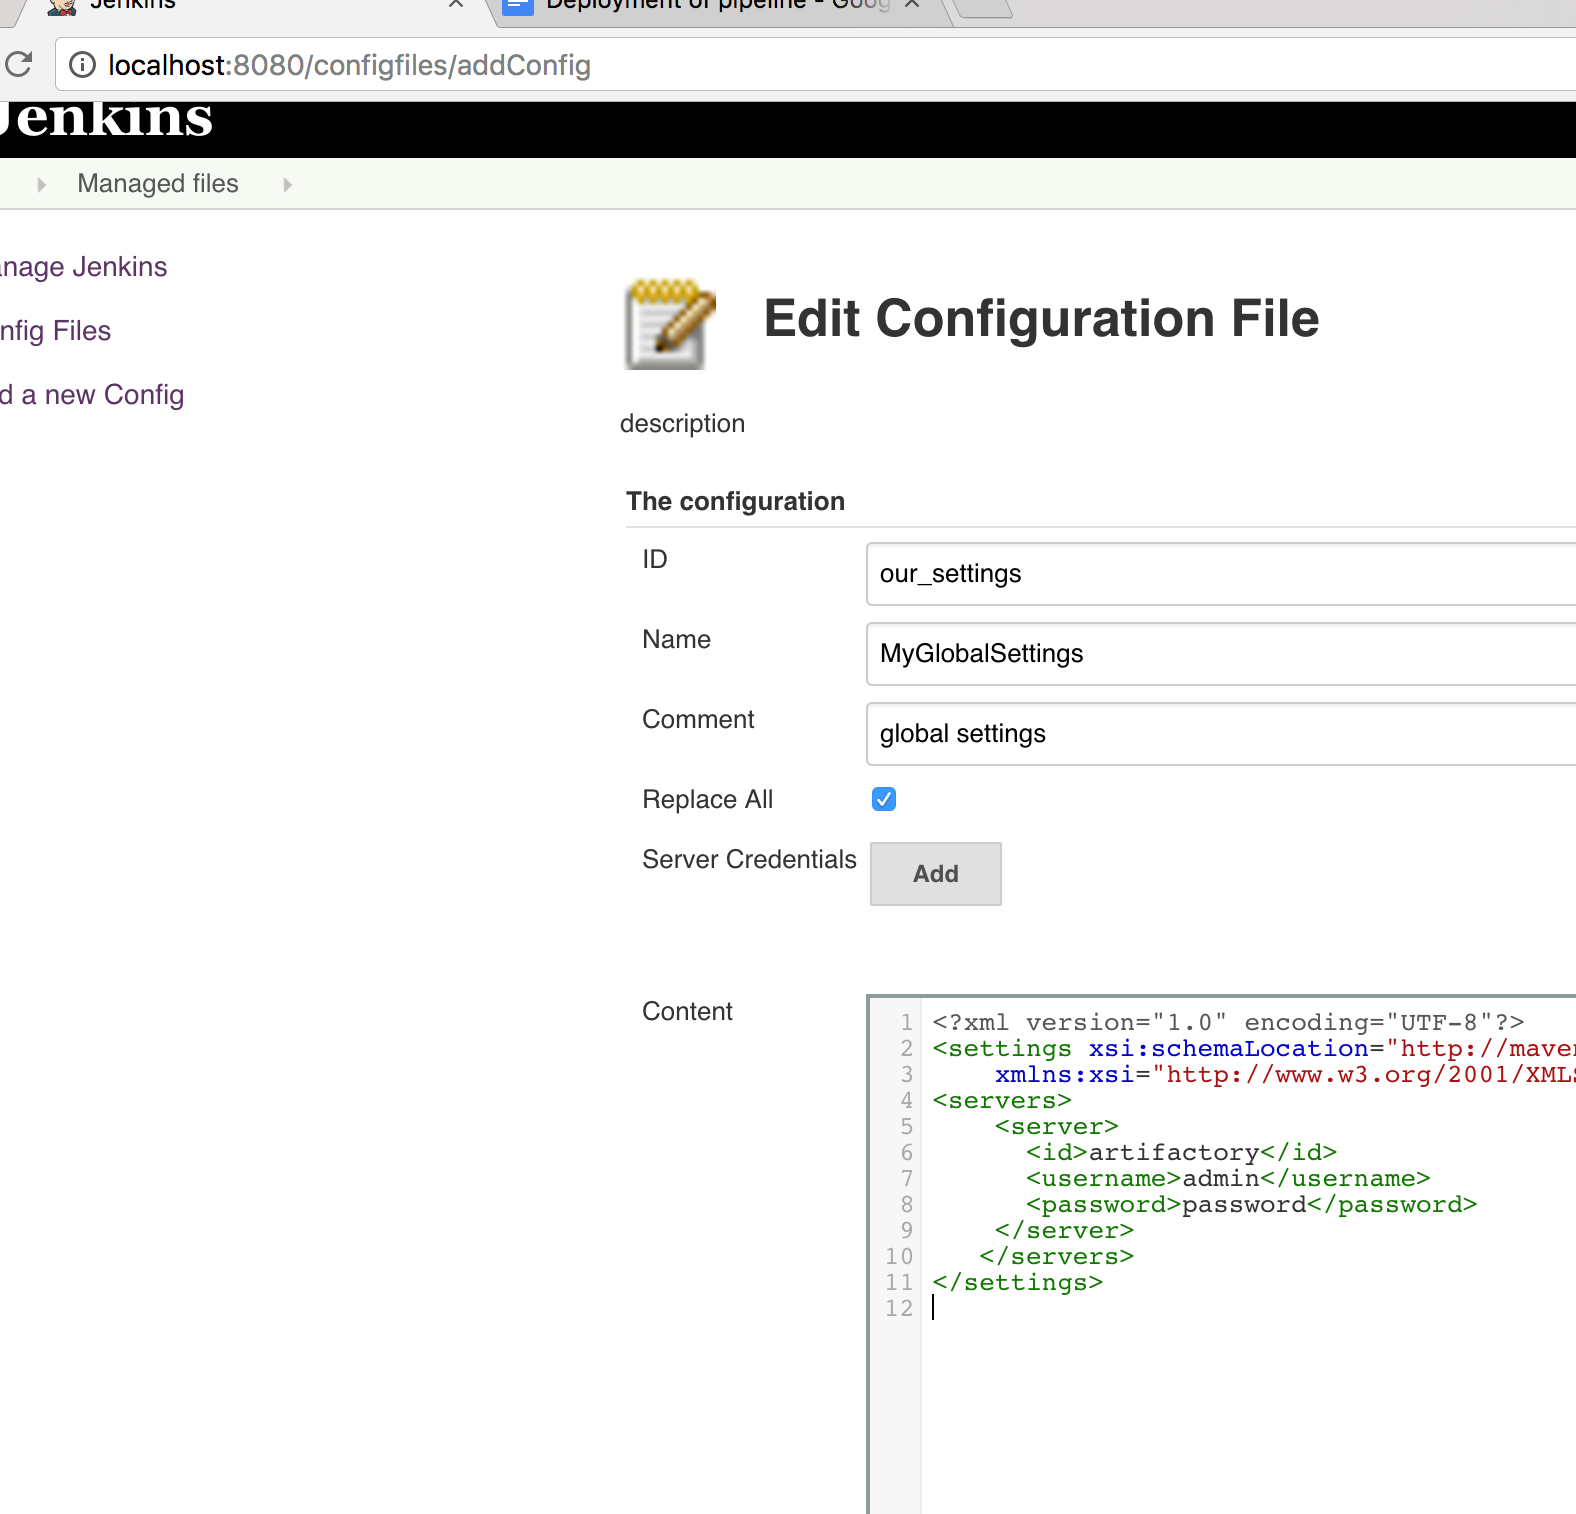
We need to set up the Maven settings file in the plugin. Go to manage Jenkins, managed files, and add new config, set the id to “our_settings” and copy the content from the settings.xml we used before:
Click Managed files:
Select Global Maven Settings and set id:
And set content:
Now we can use the Config File Provider plugin in our pipeline. Please Replay the job and update the pipeline as below:
pipeline {
agent any
tools {
jdk 'jdk8'
maven 'maven3'
}
stages {
stage('install and sonar parallel') {
steps {
parallel(
install: {
sh "mvn -U clean test cobertura:cobertura -Dcobertura.report.format=xml"
},
sonar: {
sh "mvn sonar:sonar -Dsonar.host.url=${env.SONARQUBE_HOST}"
}
)
}
post {
always {
junit '**/target/*-reports/TEST-*.xml'
step([$class: 'CoberturaPublisher', coberturaReportFile: 'target/site/cobertura/coverage.xml'])
}
}
}
stage ('deploy'){
steps{
configFileProvider([configFile(fileId: 'our_settings', variable: 'SETTINGS')]) {
sh "mvn -s $SETTINGS deploy -DskipTests -Dartifactory_url=${env.ARTIFACTORY_URL}"
}
}
}
}
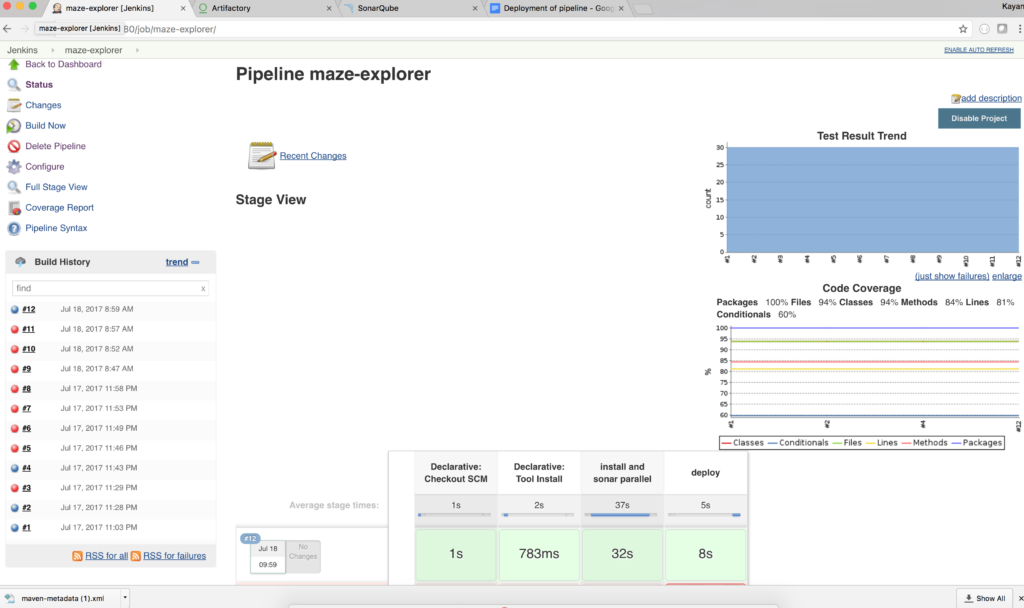
}Let's run the build:

If you are lucky, you will get the screen above. Otherwise, read what can go wrong with containers when running out of memory.
Chapter 5: Dockerizing the Installation and Configuration Process
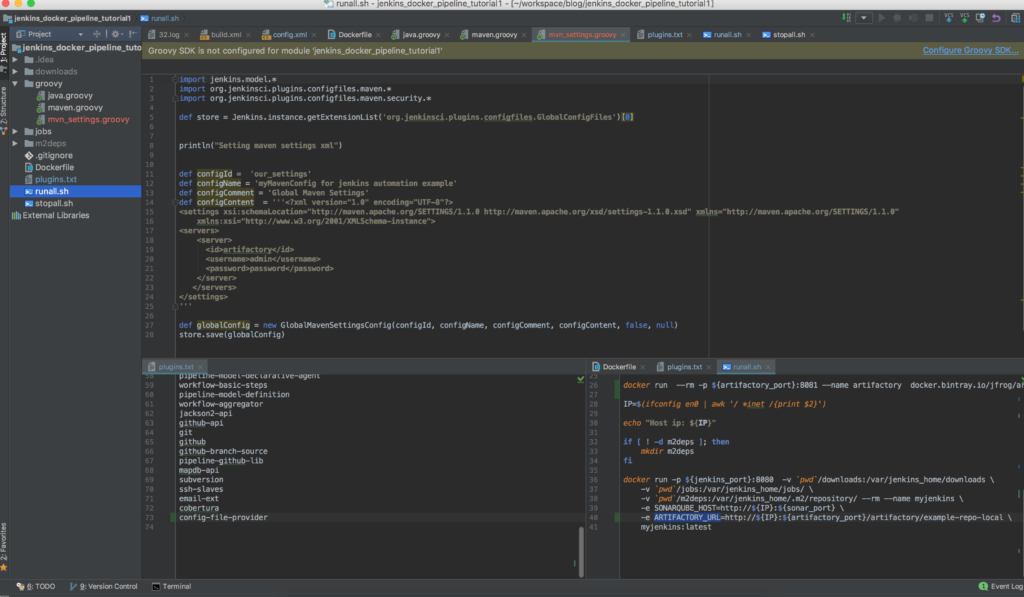
Now let’s dockerize the plugin installation and configuration. Create mvn_settings.groovy file, copy it to the groovy folder that we created in the first part of the tutorial, and set content as below:
import jenkins.model.*
import org.jenkinsci.plugins.configfiles.maven.*
import org.jenkinsci.plugins.configfiles.maven.security.*

def store = Jenkins.instance.getExtensionList('org.jenkinsci.plugins.configfiles.GlobalConfigFiles')[0]


println("Setting maven settings xml")


def configId =  'our_settings'
def configName = 'myMavenConfig for jenkins automation example'
def configComment = 'Global Maven Settings'
def configContent  = '''<?xml version="1.0" encoding="UTF-8"?>
<settings xsi:schemaLocation="http://maven.apache.org/SETTINGS/1.1.0 http://maven.apache.org/xsd/settings-1.1.0.xsd" xmlns="http://maven.apache.org/SETTINGS/1.1.0" xmlns:xsi="http://www.w3.org/2001/XMLSchema-instance">
<servers>
   <server>
     <id>artifactory</id>
     <username>admin</username>
     <password>password</password>
   </server>
  </servers>
</settings>
'''

def globalConfig = new GlobalMavenSettingsConfig(configId, configName, configComment, configContent, false, null)
store.save(globalConfig)
And don’t forget to install the “config-file-provider” plugin, just add it to the plugins.txt like in this screenshot:
Time to rebuild and rerun your Jenkins, just run the runall script. Once Jenkins is ready, run the build:
We now have the CI pipeline for our project and almost fully automated Jenkins. Why almost?

Because we need to hide the passwords firstly. But I am running late, and my girlfriend has already started complaining…

But I promise we will look at how to use encrypted passwords in Jenkins very soon in the next session.
Again, If you were lazy and don’t like “hands on” stuff, just clone the complete code for the second part of the tutorial, run it, enjoy it, and share it if you like:
git clone https://github.com/kenych/dockerizing-jenkins-part-2 && cd dockerizing-jenkins-part-2 && ./runall.shHope you managed to run everything without any issues and enjoyed this tutorial. Should you have any issue don't hesitate to comment and I will try to help.
Opinions expressed by DZone contributors are their own.
Comments