Dropwizard Microservice Deployment on Google Cloud Kubernetes Engine With Docker
A tutorial for setting up Kubenetes cluster and deploy dropwizard(Java-based microservices framework) hello world application.
Join the DZone community and get the full member experience.
Join For FreeOnce microservices are developed and they are ready to be shipped; here comes the question about how and which platform. In this tutorial, we will cover setting up Kubenetes cluster and deploy dropwizard(Java-based microservices framework) hello world application.
Things you need:
Your favorite IDE with JDK configured
Google Cloud account with billing enabled.
Google Cloud SDK, Kubectl client installed on your local system.
Docker CE 14.X
Maven 3
1.Create a Hello World Application Using Dropwizard Framework
Generate sample project using maven's default archetypes "maven-archetype-quickstart". Once the project is generated change POM.xml as per below.
<?xml version="1.0" encoding="UTF-8"?>

<project xmlns="http://maven.apache.org/POM/4.0.0" xmlns:xsi="http://www.w3.org/2001/XMLSchema-instance"
  xsi:schemaLocation="http://maven.apache.org/POM/4.0.0 http://maven.apache.org/xsd/maven-4.0.0.xsd">
  <modelVersion>4.0.0</modelVersion>

  <groupId>com.creativetutor</groupId>
  <artifactId>hello-world</artifactId>
  <version>1.0-SNAPSHOT</version>

  <name>hello-world</name>
  <!-- FIXME change it to the project's website -->
  <url>http://www.example.com</url>

  <properties>
    <project.build.sourceEncoding>UTF-8</project.build.sourceEncoding>
    <maven.compiler.source>1.7</maven.compiler.source>
    <maven.compiler.target>1.7</maven.compiler.target>
    <dropwizard.version>1.3.14</dropwizard.version>
  </properties>

  <dependencies>
    <dependency>
      <groupId>junit</groupId>
      <artifactId>junit</artifactId>
      <version>4.11</version>
      <scope>test</scope>
    </dependency>
    <dependency>
      <groupId>io.dropwizard</groupId>
      <artifactId>dropwizard-core</artifactId>
      <version>${dropwizard.version}</version>
    </dependency>
  </dependencies>

  <build>
    <plugins>
      <plugin>
        <groupId>org.apache.maven.plugins</groupId>
        <artifactId>maven-shade-plugin</artifactId>
        <version>2.3</version>
        <configuration>
          <createDependencyReducedPom>true</createDependencyReducedPom>
          <filters>
            <filter>
              <artifact>*:*</artifact>
              <excludes>
                <exclude>META-INF/*.SF</exclude>
                <exclude>META-INF/*.DSA</exclude>
                <exclude>META-INF/*.RSA</exclude>
              </excludes>
            </filter>
          </filters>
        </configuration>
        <executions>
          <execution>
            <phase>package</phase>
            <goals>
              <goal>shade</goal>
            </goals>
            <configuration>
              <transformers>
                <transformer implementation="org.apache.maven.plugins.shade.resource.ServicesResourceTransformer"/>
                <transformer implementation="org.apache.maven.plugins.shade.resource.ManifestResourceTransformer">
                  <mainClass>com.creativetutor.HelloWorldApplication</mainClass>
                </transformer>
              </transformers>
            </configuration>
          </execution>
        </executions>
      </plugin>
      <plugin>
        <groupId>org.apache.maven.plugins</groupId>
        <artifactId>maven-compiler-plugin</artifactId>
        <version>3.8.1</version>
        <configuration>
          <source>1.8</source>
          <target>1.8</target>
        </configuration>
      </plugin>

    </plugins>
    <pluginManagement><!-- lock down plugins versions to avoid using Maven defaults (may be moved to parent pom) -->
      <plugins>
        <!-- clean lifecycle, see https://maven.apache.org/ref/current/maven-core/lifecycles.html#clean_Lifecycle -->
        <plugin>
          <artifactId>maven-clean-plugin</artifactId>
          <version>3.1.0</version>
        </plugin>

        <!-- default lifecycle, jar packaging: see https://maven.apache.org/ref/current/maven-core/default-bindings.html#Plugin_bindings_for_jar_packaging -->
        <plugin>
          <artifactId>maven-resources-plugin</artifactId>
          <version>3.0.2</version>
        </plugin>
        <plugin>
          <artifactId>maven-compiler-plugin</artifactId>
          <version>3.8.0</version>
        </plugin>
        <plugin>
          <artifactId>maven-surefire-plugin</artifactId>
          <version>2.22.1</version>
        </plugin>
        <plugin>
          <artifactId>maven-jar-plugin</artifactId>
          <version>3.0.2</version>
        </plugin>
        <plugin>
          <artifactId>maven-install-plugin</artifactId>
          <version>2.5.2</version>
        </plugin>
        <plugin>
          <artifactId>maven-deploy-plugin</artifactId>
          <version>2.8.2</version>
        </plugin>
        <!-- site lifecycle, see https://maven.apache.org/ref/current/maven-core/lifecycles.html#site_Lifecycle -->
        <plugin>
          <artifactId>maven-site-plugin</artifactId>
          <version>3.7.1</version>
        </plugin>
        <plugin>
          <artifactId>maven-project-info-reports-plugin</artifactId>
          <version>3.0.0</version>
        </plugin>
      </plugins>
    </pluginManagement>
  </build>
</project>
Application configuration class will look like below:
package com.creativetutor.configuration;
import io.dropwizard.Configuration;
import com.fasterxml.jackson.annotation.JsonProperty;
import org.hibernate.validator.constraints.NotEmpty;

public class HelloWorldConfiguration extends Configuration {
    @NotEmpty
    private String template;

    @NotEmpty
    private String defaultName = "Stranger";

    @JsonProperty
    public String getTemplate() {
        return template;
    }

    @JsonProperty
    public void setTemplate(String template) {
        this.template = template;
    }

    @JsonProperty
    public String getDefaultName() {
        return defaultName;
    }

    @JsonProperty
    public void setDefaultName(String name) {
        this.defaultName = name;
    }
}
Let's create a model class which will return JSON response and it like below:
package com.creativetutor.model;

import com.fasterxml.jackson.annotation.JsonProperty;
import org.hibernate.validator.constraints.Length;

public class Saying {
    private long id;

    @Length(max = 3)
    private String content;

    public Saying() {
        // Jackson deserialization
    }

    public Saying(long id, String content) {
        this.id = id;
        this.content = content;
    }

    @JsonProperty
    public long getId() {
        return id;
    }

    @JsonProperty
    public String getContent() {
        return content;
    }
}
As Dropwizard is a combination of the jersey, Jackson, and jetty all of the features of those individual frameworks can be used to build the application. To expose microservice API we will write HelloworldResource class like below:
package com.creativetutor.resource;

import com.codahale.metrics.annotation.Timed;
import com.creativetutor.model.Saying;

import javax.ws.rs.GET;
import javax.ws.rs.Path;
import javax.ws.rs.Produces;
import javax.ws.rs.QueryParam;
import javax.ws.rs.core.MediaType;
import java.util.Optional;
import java.util.concurrent.atomic.AtomicLong;

@Path("/hello-world")
@Produces(MediaType.APPLICATION_JSON)
public class HelloWorldResource {
    private final String template;
    private final String defaultName;
    private final AtomicLong counter;

    public HelloWorldResource(String template, String defaultName) {
        this.template = template;
        this.defaultName = defaultName;
        this.counter = new AtomicLong();
    }

    @GET
    @Timed
    public Saying sayHello(@QueryParam("name") Optional<String> name) {
        final String value = String.format(template, name.orElse(defaultName));
        return new Saying(counter.incrementAndGet(), value);
    }
}
Health checks for microservices are key and they allow load balancers / kubernetes controller to check whether nodes are healthy. Dropwizard has a special class that allows developers to write applications specific health check requirements. Our class will look like below:
package com.creativetutor.health;

import com.codahale.metrics.health.HealthCheck;

public class TemplateHealthCheck extends HealthCheck {
    private final String template;

    public TemplateHealthCheck(String template) {
        this.template = template;
    }

    @Override
    protected Result check() throws Exception {
        final String saying = String.format(template, "TEST");
        if (!saying.contains("TEST")) {
            return Result.unhealthy("template doesn't include a name");
        }
        return Result.healthy();
    }
}
And finally, our application class which will be the entry point of our application. We have to extend the Dropwizard's Application class to allow Dropwizard to call lifecycle methods and initialize the application.
package com.creativetutor;

/**
 * Hello world!
 *
 */
import com.creativetutor.configuration.HelloWorldConfiguration;
import com.creativetutor.health.TemplateHealthCheck;
import com.creativetutor.resource.HelloWorldResource;
import io.dropwizard.Application;
import io.dropwizard.setup.Bootstrap;
import io.dropwizard.setup.Environment;

public class HelloWorldApplication extends Application<HelloWorldConfiguration> {
    public static void main(String[] args) throws Exception {
        new HelloWorldApplication().run(args);
    }

    @Override
    public String getName() {
        return "hello-world";
    }

    @Override
    public void initialize(Bootstrap<HelloWorldConfiguration> bootstrap) {
        // nothing to do yet
    }

    @Override
    public void run(HelloWorldConfiguration configuration,
                    Environment environment) {
        final HelloWorldResource resource = new HelloWorldResource(
                configuration.getTemplate(),
                configuration.getDefaultName()
        );
        final TemplateHealthCheck healthCheck =
                new TemplateHealthCheck(configuration.getTemplate());
        environment.healthChecks().register("template", healthCheck);
        environment.jersey().register(resource);
    }

}
The application requires a lot of configuration metadata/env to supplied as a runtime argument. Dropwizard follows the same approach and hence our configuration will file like below:
server:
  applicationConnectors:
    - type: http
      port: 8080

template: Hello, %s!
defaultName: Stranger
2. Packaging and Containerizing Our Dropwizard Application
We have added a shaded jar plugin to flat the jar contents into a single java executable. Once the shade lifecycle will be performed jar name will look like hello-world-1.0-SNAPSHOT.jar. Let's containerize this application using below Dockerfile:
FROM openjdk:8

EXPOSE 8080/tcp

RUN mkdir app

COPY hello-world-1.0-SNAPSHOT.jar app
COPY hello-world.yml app

WORKDIR app

RUN java -jar hello-world-1.0-SNAPSHOT.jar server hello-world.yml
Let's build our container and push it to any docker repository. I am using the public docker hub repository mentioned below.
https://hub.docker.com/r/omkarjoshi/dropwizard-microservice
docker build -t omkarjoshi/dropwizard-microservice .3. Create a Kubernetes Cluster and Deploy Our Application
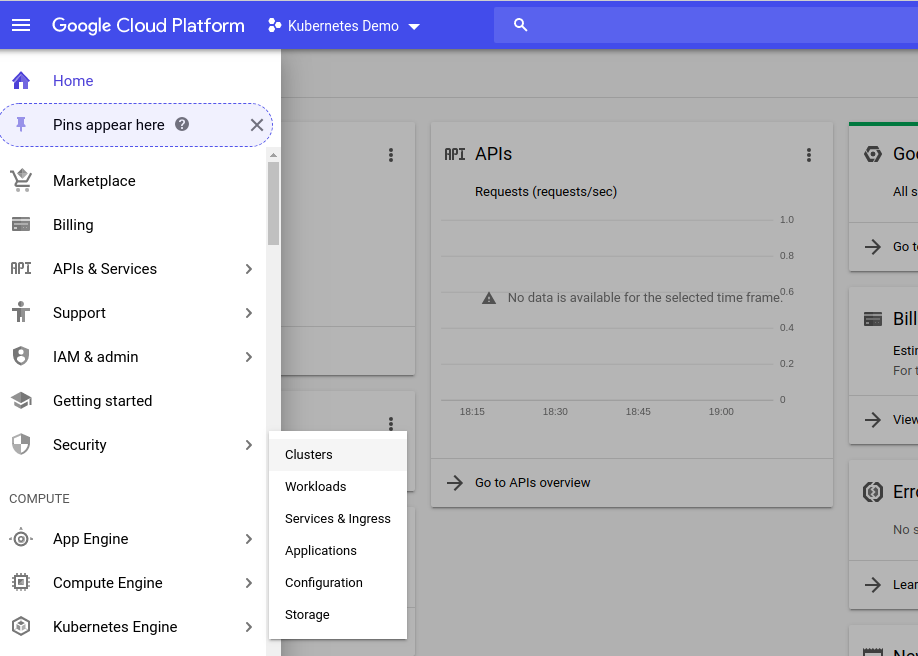
Log on to Google Cloud platform and go to Kubernetes Engine Service and click on clusters.
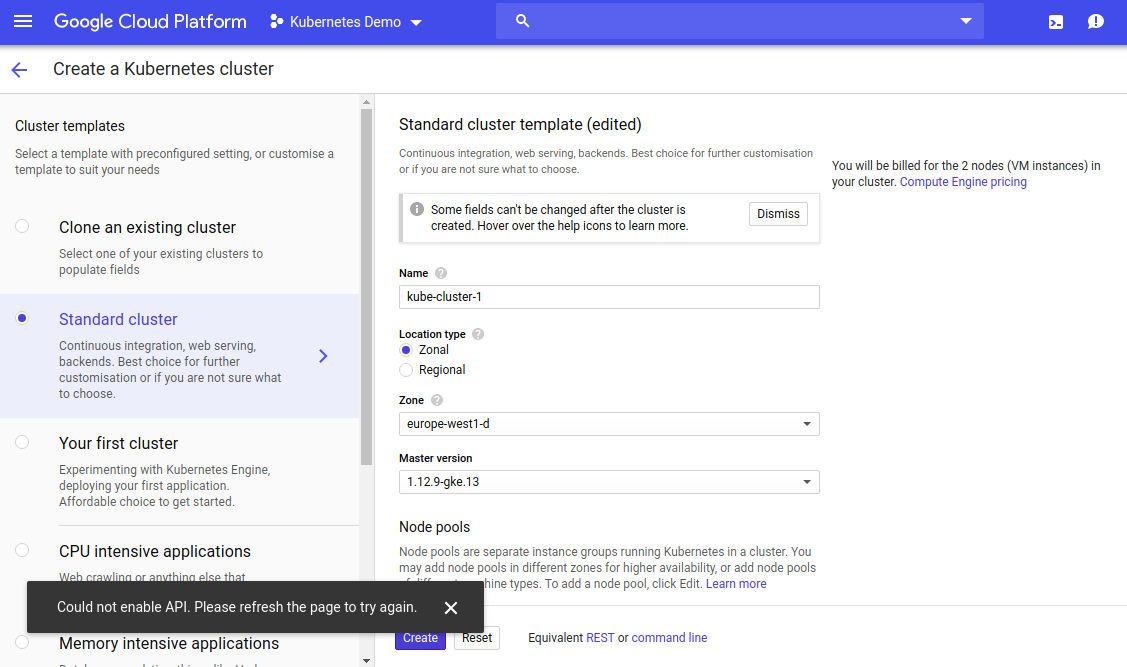
Click on create cluster as per the screen below and select two nodes with small instance size(we don't require high configuration nodes as this is just a hello world demo, in future, you can select your nodes as per your requirement). I have created a zonal cluster but in real life, you might require to have high availability where you will create a regional cluster.
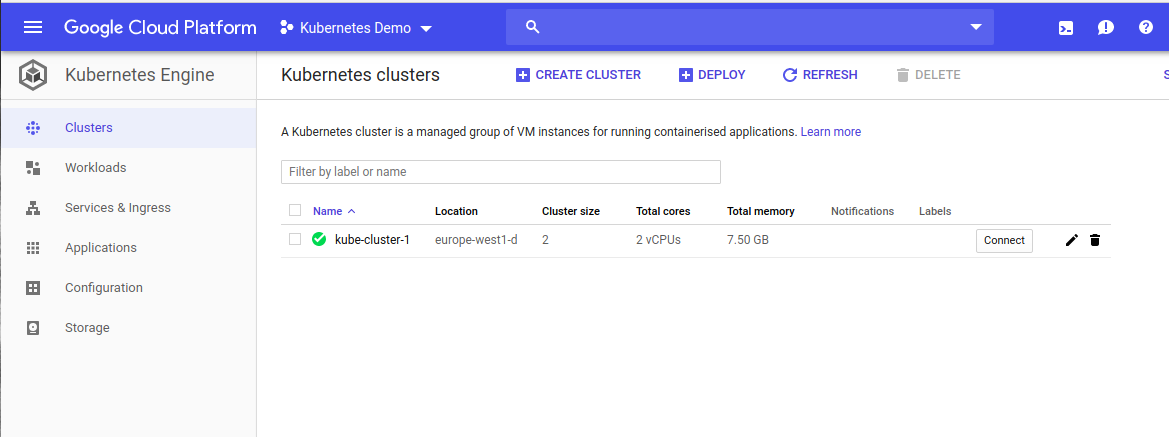
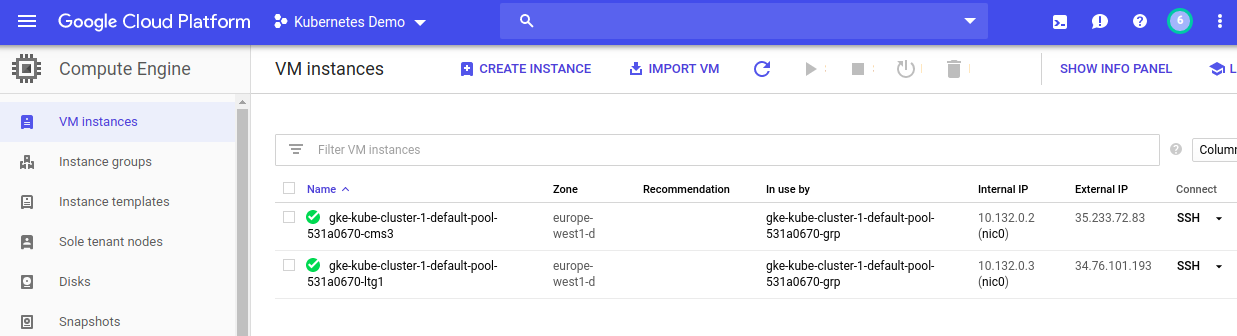
Once all configuration is defined, verify once and click on the create button. This will then in the background start a process to spin up VM instances and kubernetes cluster. Once the cluster is ready you will see cluster and VM's are up and running like below:
Great now your cluster is ready and can accept any new deployments. Now to throw new deployments to your cluster you need to configure your kubectl context pointed to this cluster, use below command to do that.
gcloud container clusters get-credentials kube-cluster-1 --zone europe-west1-d --project YOUR_PROJECT_ID

Fetching cluster endpoint and auth data.
kubeconfig entry generated for kube-cluster-1.
Above command will retrieve auth data and will store in local kubectl configuration and now to see whether kubectl current context pointed to our new cluster, fire below command which will return gke cluster information:
kubectl config current-context

gke_{YOUR_PROJECT_ID}_europe-west1-d_kube-cluster-1
Now we are all set to deploy our application but before that let's create our deployment yaml file with application-specific details. This file will look like below:
apiVersion: apps/v1
kind: Deployment
metadata:
  name: hello-world
spec:
  selector:
    matchLabels:
      app: hello-world
      department: basic
  replicas: 3
  template:
    metadata:
      labels:
        app: hello-world
        department: basic
    spec:
      containers:
      - name: hello
        image: "omkarjoshi/dropwizard-microservice"
Basically above file has details like what kind of file it is(Deployment) and spec is to define the specification of our application. At last, we have defined our image reference which is in my case will be omkarjoshi/dropwizard-microservice. The absolute image doesn't need to be given here as we are using docker hub-based images but in case you are using gcr (google container registry) or ecr (elastic container registry) registries then add complete image reference. Let's instruct kubectl to apply this deployment file to the current context by firing the below command.
kubectl apply -f deployment.yaml

deployment.apps "hello-world" created
Great now our deployment is created, you can quickly go to Workloads section under Google Kubernetes Engine service and can see 3 pods are ready which will look like below:
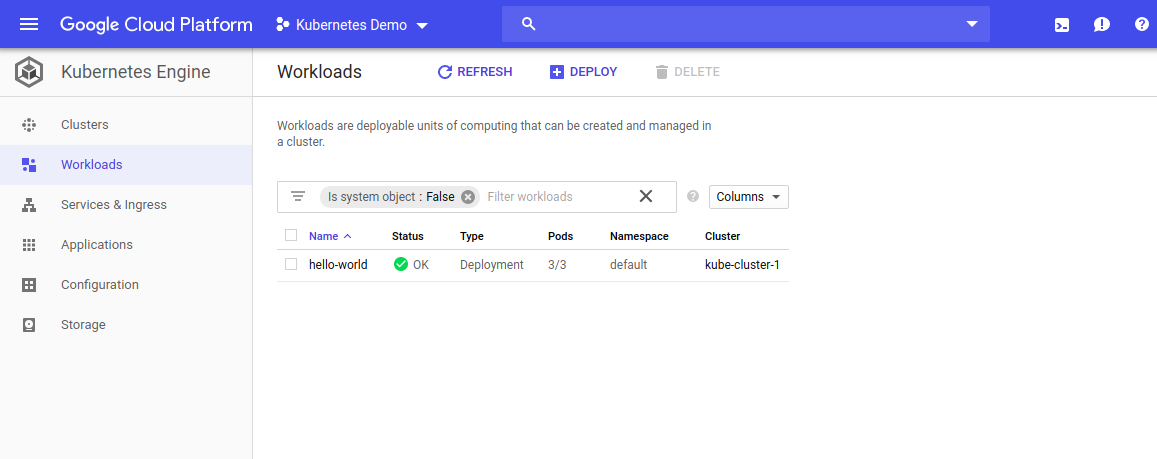
We have specified three replicas of our deployment and their status is looking OK. It's not over yet lets put load balancer in front of our application and access it as a service. To have a load balancer in front of our application, we need to create kubernetes service. Lets quickly create new yaml file with below configuration:
apiVersion: v1
kind: Service
metadata:
  name: my-hello-world-service
spec:
  type: LoadBalancer
  selector:
    app: hello-world
    department: basic
  ports:
  - protocol: TCP
    port: 80
    targetPort: 8080
As specified above selector of our deployment and service is exactly matching. This is to allow load balancer to match similar nodes from deployments and distribute traffic amongst them. Port mapping is required to forward HTTP requests to the correct container port. We have exposed our application on port 8080 and we will be accessing our application through Kubernetes service on default HTTP web port(port 80). Once deployed under Services and Ingress section you should something like below:
kubectl apply -f deployment-service-lb.yaml

service "my-hello-world-service" created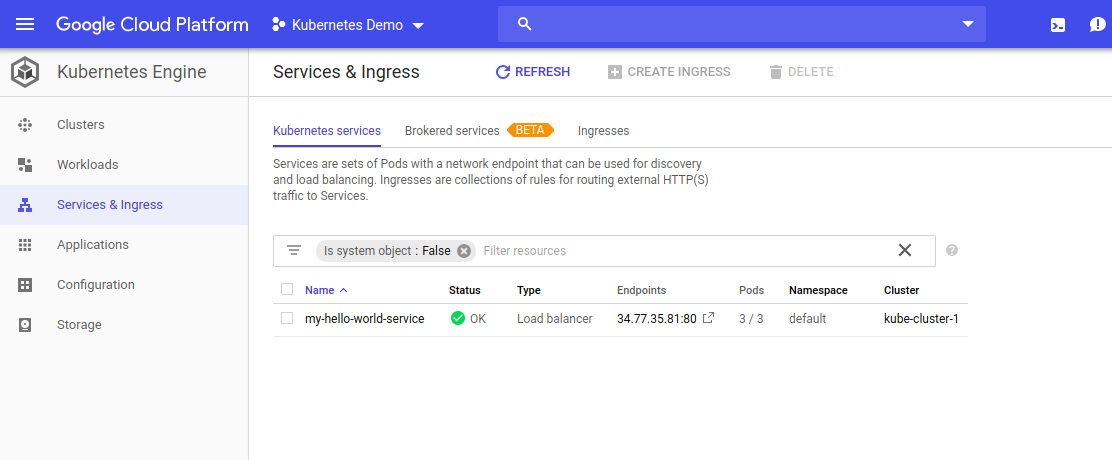
Once you see service status is OK you can grab endpoint(load-balanced public IP) from the console and access our endpoint as per below-using web browser:
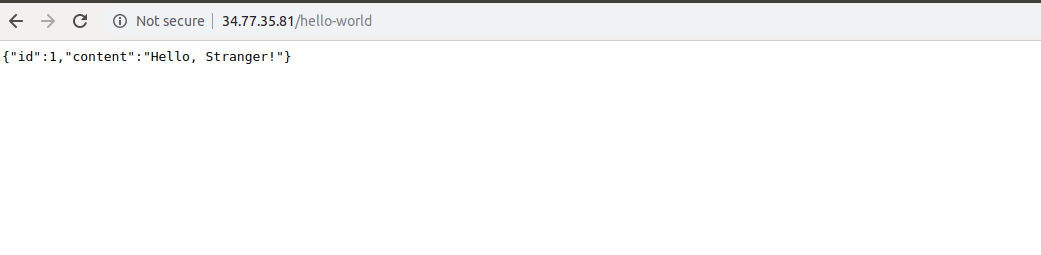
Great our service is returning desired microservice response from one of the pod. The load balancer is routing this request from any of the available pods and making sure our service is always available.
By this, you can deploy any complex applications on Google Cloud platform Kubernetes engine and use any other GCP services such as cloud datastore, cloud spanner.
Thank you.
Opinions expressed by DZone contributors are their own.
Comments