Effective Microservices CI/CD With GitHub Actions and Ballerina
See how an effective CI/CD pipeline can be created using the Ballerina programming language, which specializes in microservices development.
Join the DZone community and get the full member experience.
Join For FreeIntroduction
In a microservice architecture, continuous integration and continuous delivery (CI/CD) is critical in creating an agile environment for incorporating incremental changes to your system. This requires every code change you push to your repository to be immediately built, tested, and deployed to your infrastructure. There are many technologies that help make this happen, and it often requires you to set up complex pieces of software to get things done.
Recently GitHub Actions has been out of its beta period and is available for general usage. GitHub Actions provides a convenient mechanism for implementing CI/CD pipelines using their workflows concept, right from our GitHub repositories. Rather than installing your own software, it’s available as a cloud service for all.
In this article, we will check how GitHub Actions complements the usage of the Ballerina language, which is a platform that specializes in microservices development and deployment. With the Ballerina GitHub Action, which is available in the GitHub Marketplace, we can create a Ballerina development environment with built-in CI/CD with GitHub. We will specifically be covering three development scenarios using Ballerina.
- Ballerina microservices deployment with Kubernetes.
- Ballerina serverless deployment with AWS Lambda.
- Ballerina module deployment to Ballerina Central.
Ballerina Microservices Deployment with Kubernetes
Ballerina contains rich support for deploying microservices in a Kubernetes environment. By simply adding the relevant annotations to our services, the compiler will automatically generate the Docker image and the Kubernetes artifacts for you. Then, as the final step, you can simply use the kubectl tool in order to deploy your application to a target Kubernetes cluster. Check out this Ballerina by Example on Kubernetes Deployment for more information.
Let’s create a simple Ballerina service to demonstrate this functionality. This service will simply take in a binary request payload, which will pass the content to an Azure Computer Vision connector, which will then contact the cloud service and do an image to text conversion. Our requirement here is for the application to be built, tested, and deployed to our Kubernetes cluster every time we do a code update to our service. This can be done by defining a GitHub Actions workflow for our repository. The main steps for this are as follows:
- Checkout the Ballerina project code into a workspace.
- Build the code and run unit tests.
- Pass in API keys as secrets.
- Generate a unique Docker image for each build and deploy it to DockerHub.
- Provide the DockerHub username/password as secrets.
- Execute kubectl to deploy the built application to the Kubernetes cluster.
The above steps must be defined in our workflow. Let’s first start by looking at the source code for the Ballerina service, which is shown in Listing 1.
import ballerina/http;
import ballerina/kubernetes;
import ballerina/system;
import wso2/azurecv;
azurecv:Configuration conf = {
key: system:getEnv("CV_KEY"),
region: "eastus"
};
azurecv:Client cvClient = new(conf);
:Service {
serviceType: "LoadBalancer",
port: 80
}
:Deployment {
image: "$env{docker_username}/ballerina-k8s-actions-sample-$env{GITHUB_SHA}",
push: true,
username: "$env{docker_username}",
password: "$env{docker_password}",
imagePullPolicy: "Always",
env: { "CV_KEY": "$env{CV_KEY}" }
}
:ServiceConfig {
basePath: "/image2Text"
}
service Image2Text on new http:Listener(8080) {
:ResourceConfig {
path: "/"
}
resource function process(http:Caller caller, http:Request request) returns error? {
byte[] payload = check request.getBinaryPayload();
string result = check cvClient->ocr(<> payload);
check caller->respond(<> result);
}
}
Listing 1 — image2Text.bal
In the above source code, we can see that we need some additional parameters in build-time and in the runtime. In the build-time, we need the DockerHub username/password pair in order for the Docker image of the application to be uploaded to DockerHub (or any other Docker registry).
Since our application is now built in the GitHub environment, we can set environment variables in our GitHub Actions workflow, to be read in by the Ballerina build. Also, any sensitive information can be set as secrets in your GitHub repository settings, as shown in Figure 1. These are also provided as environment variables in our build execution.
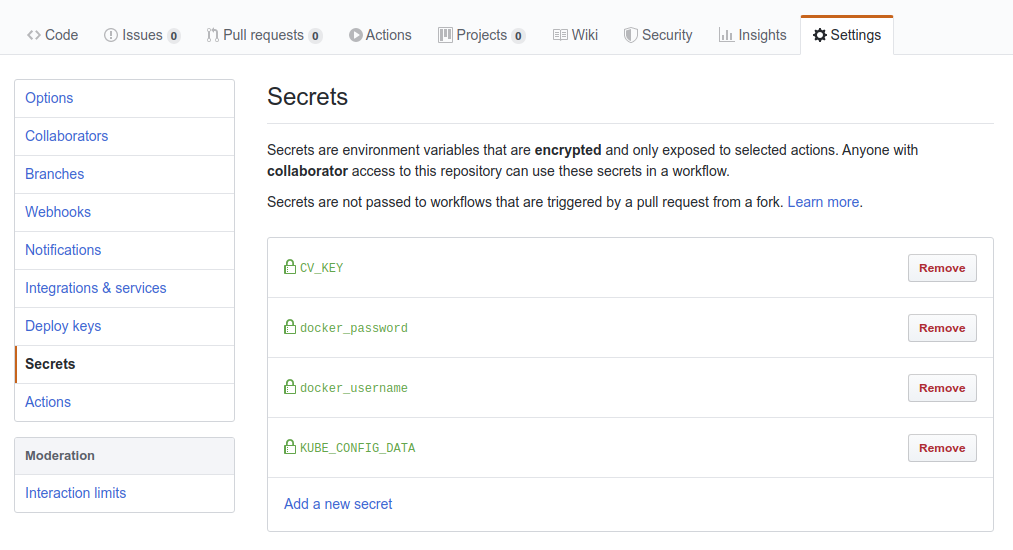
In the runtime, we need the API key for the Azure Computer Vision Service in order to use the connector. This is done by first providing the API key to the GitHub build environment by setting it as a secret (“CV_KEY”) and passing it as an environment variable through the workflow. Now in the build-time, we get access to this value as an environment variable, and we set it in the Kubernetes deployment artifacts using the “@kubernetes:Deployment” annotations “env” attribute.
This takes in a map of key/value pairs for environment variables that need to be set in the target container. Using this pattern, we can pass through a secret value from the GitHub build environment to the target Kubernetes cluster’s runtime to be used in our applications.
Also notice that we have added the suffix “$env{GITHUB_SHA}” to the “@kubernetes:Deployment” annotation’s “image” attribute (“GITHUB_SHA” is an environment variable automatically populated by GitHub Actions, which contains the SHA value of the last Git commit that triggered the workflow). This is done in order to create a unique image name for redeployments. In this manner, Kubernetes will pick up the updated image each time a deployment is done.
Let’s now take a look at the GitHub Actions workflow we would define in order to carry out the required steps.
xxxxxxxxxx
nameDeploy to K8s
onpush
jobs
build
runs-onubuntu-latest
steps
nameCheckout
usesactions/checkout@v1
nameBallerina Build
usesballerina-platform/ballerina-action/@1.1.1
with
args
build image2Text.bal
env
docker_username$ secrets.docker_username
docker_password$ secrets.docker_password
CV_KEY$ secrets.CV_KEY
nameKubectl
usesdanielr1996/[email protected]
with
argsapply -f $GITHUB_WORKSPACE/kubernetes/
kubeconfig$ secrets.KUBE_CONFIG_DATA
Listing 2 — Ballerina Service Kubernetes Deployment Workflow Definition
Workflows are defined in your GitHub repository by adding a YAML file inside the “/.github/workflows/” directory. Listing 2 above shows the definition of the workflow: how it is triggered on every code push and where it first starts with the checkout of the source code. It then executes the Ballerina Action in order to execute a “ballerina build” command against our Ballerina source code.
After the build, the Docker image would be uploaded to the registry, and the generated Kubernetes artifacts will be available in the workspace. In the workflow, after the Ballerina build, we execute a kubectl action in order to use our generated Kubernetes artifacts and deploy the application to the target cluster.
In my example, I’ve used the Azure Kubernetes Service (AKS) in order to create a Kubernetes cluster in the cloud. Afterwards, I’ve populated my local kubeconfig with the AKS Kubernetes cluster information by using the following Azure CLI command.
xxxxxxxxxx
az aks get-credentials --resource-group connector --name k8s-1
In order to execute the kubectl command in the GitHub Actions environment, we need to provide the kubeconfig in order to locate the target cluster. This is done by setting the environment variable “kubeconfig” for the kubectl action, which contains a base 64 encoded text of the kubeconfig data. For example, our local kubeconfig can be extracted in this format with the following shell command.
xxxxxxxxxx
cat ~/.kube/config | base64
In my GitHub repository settings, I’ve set the above kubeconfig content using the “KUBE_CONFIG_DATA” secret, as shown in Figure 1, which in turn is used in the workflow to set the “kubeconfig” environment variable for the kubectl action.
Now with the GitHub Actions workflow in place, let’s see the operations that occur when we do a code push to our code repository.

Figure 2, shows the “Actions” tab in the GitHub repository, and how the workflow is executed. After checking out the code, it does the Ballerina build, and it executes the kubectl action to deploy our service to the Kubernetes cluster in AKS.
After the workflow execution is done, we can locally execute the kubectl command in order to monitor our deployed application, and here specifically, to locate the external IP the service will be available at.
xxxxxxxxxx
$ kubectl get svc
NAME TYPE CLUSTER-IP EXTERNAL-IP PORT(S) AGE
image2text-svc LoadBalancer 10.0.254.92 52.138.123.109 80:30435/TCP 23s
kubernetes ClusterIP 10.0.0.1 <none> 443/TCP 96m
We can see our service is deployed in a specific external IP, and we can send requests to this endpoint.
xxxxxxxxxx
$ curl --data-binary "@input.jpeg" http://52.138.123.109/image2Text
NOTHING
EXISTS
EXCEPT
ATOMS
AND EMPTY
SPACE.
Everything else
is opinion.
The full source to this sample and the workflow used for this can be found here: https://github.com/lafernando/ballerina-k8s-actions-sample.
Ballerina Serverless Deployment With AWS Lambda
Ballerina has in-built support for writing AWS Lambda functions. This is done by writing a Ballerina function according to a certain signature, and annotating it with the “@awslambda:Function” annotation.
An example lambda function in Ballerina is shown in Listing 3.
xxxxxxxxxx
import ballerinax/awslambda;
:Function
public function hello(awslambda:Context ctx, json input) returns json|error {
return "Hello, World!";
}
Listing 3: hello.bal
Here, we are simply returning a constant string value from the lambda function. This can be any JSON value that we return.
We can build the above code using the “ballerina build” command, and it would result in a similar output as shown below.
xxxxxxxxxx
$ ballerina build hello.bal
Compiling source
hello.bal
Generating executables
hello.jar
@awslambda:Function: hello
Run the following commands to deploy each Ballerina AWS Lambda function:
aws lambda create-function --function-name <FUNCTION_NAME> --zip-file fileb://aws-ballerina-lambda-functions.zip --handler hello.<FUNCTION_NAME> --runtime provided --role <LAMBDA_ROLE_ARN> --timeout 10 --memory-size 1024
aws lambda update-function-configuration --function-name <FUNCTION_NAME> --layers arn:aws:lambda:<REGION_ID>:141896495686:layer:ballerina:2
Run the following command to re-deploy an updated Ballerina AWS Lambda function:
aws lambda update-function-code --function-name <FUNCTION_NAME> --zip-file fileb://aws-ballerina-lambda-functions.zip
This generates the lambda zip file (“aws-ballerina-lambda-functions.zip”) that is packaged in the format required by AWS Lambda. This also prints out the AWS CLI commands required in order to deploy the function. We can do the initial deployment of the function with a command similar to the following.
xxxxxxxxxx
$ aws lambda create-function --function-name hello --zip-file fileb://aws-ballerina-lambda-functions.zip --handler hello.hello --runtime provided --role arn:aws:iam::908363916138:role/lambda-role --layers arn:aws:lambda:us-west-1:141896495686:layer:ballerina:2
{
"FunctionName": "hello",
"FunctionArn": "arn:aws:lambda:us-west-1:908363916138:function:hello",
"Runtime": "provided",
"Role": "arn:aws:iam::908363916138:role/lambda-role",
"Handler": "hello.hello",
"CodeSize": 20951578,
"Description": "",
"Timeout": 3,
"MemorySize": 128,
"LastModified": "2020-02-08T09:44:07.804+0000",
"CodeSha256": "+NlTLe0SDUPbkwNNrnlg+Bwj6yCIaZeFDzZEnrwLa9c=",
"Version": "$LATEST",
"TracingConfig": {
"Mode": "PassThrough"
},
"RevisionId": "7df9f305-22ea-44cf-aee2-396df4df021e",
"Layers": [
{
"Arn": "arn:aws:lambda:us-west-1:141896495686:layer:ballerina:2",
"CodeSize": 697
}
]
}
After the initial deployment is done, each time you do a code change, we can re-deploy the code using the following command.
xxxxxxxxxx
$ aws lambda update-function-code --function-name hello --zip-file fileb://aws-ballerina-lambda-functions.zip
Let’s automate our deployment of the updated Lambda function using a GitHub Actions workflow. Let’s start with the definition we have used to achieve this, as shown in Listing 4.
xxxxxxxxxx
nameAWS Lambda Deploy
onpush
jobs
build
runs-onubuntu-latest
steps
usesactions/checkout@v2
nameBallerina Build
usesballerina-platform/ballerina-action/@1.1.1
with
args
build hello.bal
nameAWS CLI
usesItsKarma/[email protected]
with
args
lambda update-function-code --function-name hello --zip-file fileb://aws-ballerina-lambda-functions.zip
env
AWS_DEFAULT_REGIONus-west-1
AWS_SECRET_ACCESS_KEY$ secrets.AWS_SECRET_ACCESS_KEY
AWS_ACCESS_KEY_ID$ secrets.AWS_ACCESS_KEY_ID
Listing 4: AWS Lambda Deployment Workflow Definition
Here, similar to our Kubernetes deployment workflow, we first start by checking out the code and building the Ballerina source. Afterward, we execute the action, which runs the AWS CLI. This action uses three environment variables: “AWS_DEFAULT_REGION”, “AWS_SECRET_ACCESS_KEY”, and “AWS_ACCESS_KEY_ID”. The last two are read in as secrets from the GitHub repository settings. The access/secret values can be looked up from your AWS account.
Now, each time a code push is done to the repository, the workflow will execute and re-deploy the lambda function to AWS. The steps seen in the workflow will be similar to Figure 3.

We can validate the deployment by invoking the lambda function in the following manner.
xxxxxxxxxx
$ aws lambda invoke --function-name hello out.json
{
"StatusCode": 200,
"ExecutedVersion": "$LATEST"
}
$ cat out.json
"Hello, World!"
The full source to this sample and the workflow used for this can be found here: https://github.com/lafernando/lambda-actions-example.
Ballerina Module Deployment to Ballerina Central
Ballerina has its own public module repository known as Ballerina Central. Whenever we have a Ballerina module that can be reused and needs to be shared with others, we would push the module to Ballerina Central.
Generally, after we develop some improvements to the module, we would do a GitHub repository release to tag a release, and then build and push the module to Ballerina Central. The earlier manual operations of the building, running tests, and deploying the module can now be automated using GitHub Actions. Let’s see a sample module where we have done this.
The Azure CV module, which is used in our first scenario, is developed and released using a GitHub Actions workflow. Here, we are using two separate workflows for our continuous integration (CI) activities, which builds and runs tests for each code push. Another workflow is specifically for deploying to Ballerina Central, which is triggered when a module release is done.
Let’s take a look at the CI workflow that we have in Listing 5 below.
xxxxxxxxxx
nameCI
onpush
jobs
build
runs-onubuntu-latest
steps
usesactions/checkout@v2
nameBallerina Build
usesballerina-platform/ballerina-action/@1.1.1
with
args
build -a -c
env
AZURE_CV_KEY$ secrets.AZURE_CV_KEY
Listing 5 — Ballerina Azure CV Module CI Workflow Definition
Here, we are simply checking out the code and doing a Ballerina build to run the tests to see if everything works properly with our new change. Also, we are passing in the GitHub repository secret value “AZURE_CV_KEY” as an environment variable, which is used in the tests as the API key of the connector.
In the next workflow, we would execute additional commands to push the module to Ballerina Central. This is shown in Listing 6 below.
xxxxxxxxxx
nameDeployment
onrelease
jobs
build
runs-onubuntu-latest
steps
usesactions/checkout@v2
nameBallerina Build
usesballerina-platform/ballerina-action/@1.1.1
with
args
build -a -c
env
AZURE_CV_KEY$ secrets.AZURE_CV_KEY
nameBallerina Push
usesballerina-platform/ballerina-action/@1.1.1
with
args
push -a
env
BALLERINA_CENTRAL_ACCESS_TOKEN$ secrets.BALLERINA_CENTRAL_ACCESS_TOKEN
Listing 6 — Ballerina Azure CV Module Deployment Workflow Definition
You can notice that the above workflow is triggered with the “release” event rather than the “push” event we have been using earlier. Also, after we do the code checkout, build the code and run the tests, we finally do a “ballerina push” in order to upload the built Ballerina module to Ballerina Central.
In order to do this, we need to provide the Ballerina Central access token as an environment variable (“BALLERINA_CENTRAL_ACCESS_TOKEN”). The Ballerina Central access token value can be looked up by logging into Ballerina Central and navigating to https://central.ballerina.io/dashboard.
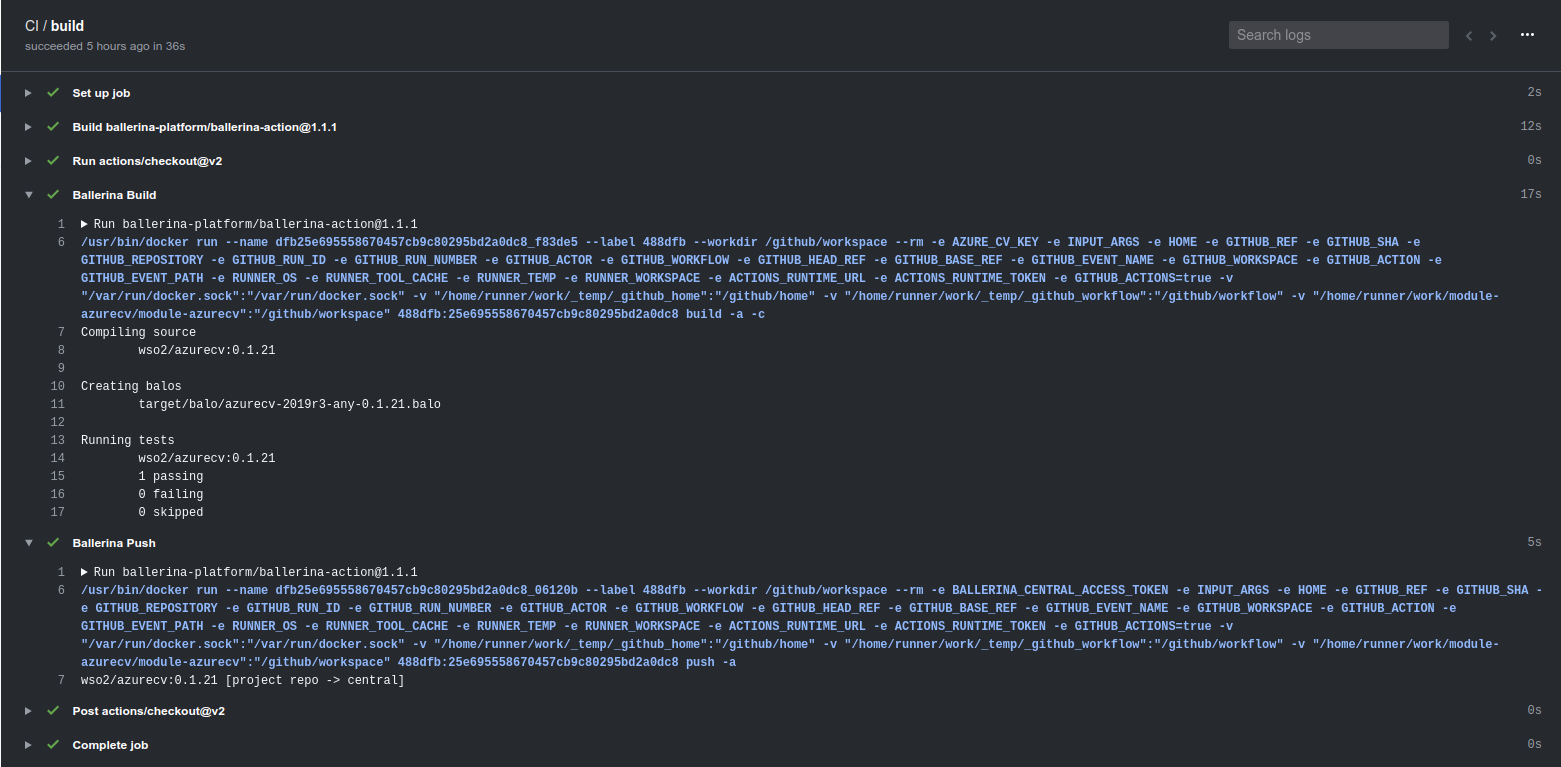
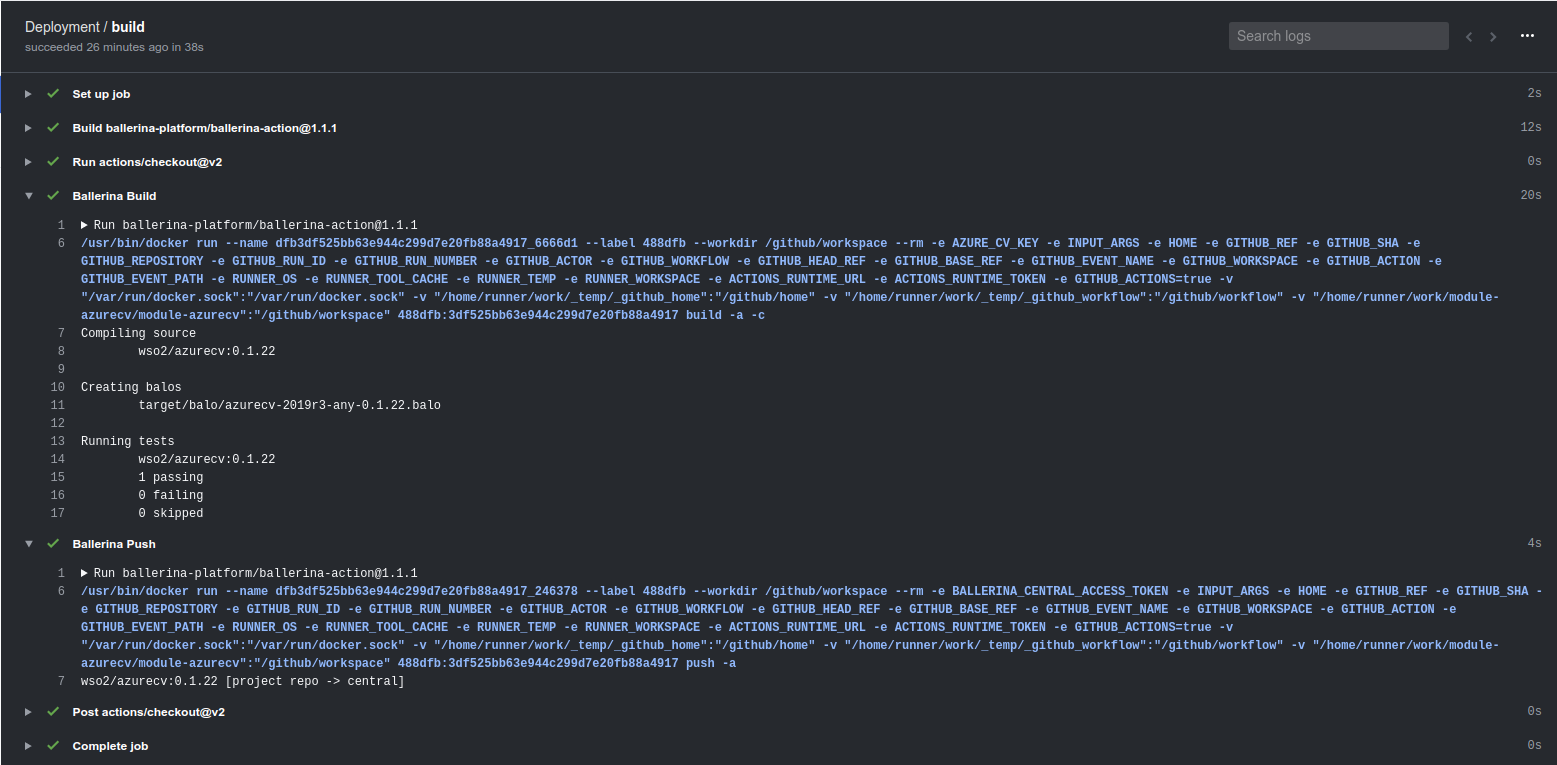
The two workflows in action can be seen in Figure 4 and Figure 5 for the CI and release definitions respectively.
Summary
In this article, we saw how an effective CI/CD pipeline can be created using the Ballerina programming language, which specializes in microservices development, in conjunction with GitHub Actions, which provides a pure cloud service for defining our own execution workflows. Thus, we no longer have to create our own infrastructure for CI/CD operations, but rather we can define the functionality we need directly from our GitHub repositories.
Further Reading
Opinions expressed by DZone contributors are their own.
Comments