ReactJS App on Oracle Kubernetes Engine with Travis CI and GitHub
Join the DZone community and get the full member experience.
Join For FreeIntroduction
This article demonstrates the steps required to host a Node application with Oracle Kubernetes Engine (OKE) using Travis Continuous Integration Server. Travis CI is very tightly coupled with GitHub, so any public repository created by you will be visible automatically in Travis.
This is a development/sample code demo only. You need to optimize the code (given in this article) or write extra code to make it production-quality. You can access the sample code used in this article from here: https://github.com/kumarsirish/sample-travis-oke.
Prerequisites
- You should have an account in Oracle Cloud Infrastructure (OCI) and should have access to Developer Services, like Oracle Container Registry (OCIR) and OKE. Get an account from https://www.oracle.com/index.html if you don't have one.
- You should have an OKE cluster configured and running (https://www.oracle.com/webfolder/technetwork/tutorials/obe/oci/oke-full/index.html).
- You should have OCI CLI installed (https://oracle.github.io/learning-library/oci-library/DevOps/OCI_CLI/OCI_CLI_HOL.html).
- You should have an account in GitHub.
- You should have registered on Travis.
- JavaScript runtime environment Node.js is installed in your development environment (https://nodejs.org/en/).
Pipeline Overview
Any check-in in the GitHub project code will trigger an automated build in Travis, which will create the project image and push it to the OCIR. In the deployment step of the build, the image will be pulled from OCIR and deployment to OKE.
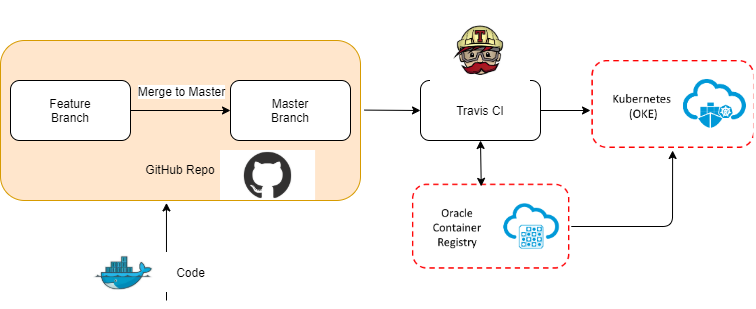
GitHub and Travis can be configured for the feature branch-based builds or master branch-based builds. Any branch when merged with master automatically triggers a build in Travis.
Bootstrap the ReactJS Project
Bootstrap ReactJS sample-travis-oke project.
x
$ npx create-react-app sample-travis-oke
$ cd sample-travis-oke
# Change src/App.js for any custom message
# Run optimized build
$ npm run build
$ npm install -g serve
# ReactJS Apps can be hosted by Nginx or lightweight "serve" Application. For this tutorial we will be using nginx server but to check the created application you can run "serve" command below to verify the application.
$ serve -s build
Containerize the Project
The project will be containerized, along with the following tools:
- OCI CLI.
- kubectl command.
Make sure that you have OCI tenancy's COMPARTMENT_ID value, and I am assuming that your development environment is behind the corporate firewall so set variables HTTP_PROXY and NPM_REGISTRY accordingly.
Below is a sample Dockerfile, which creates the application and also deploys it to the OKE.
Create the Dockerfile in project directory root.
xxxxxxxxxx
FROM oraclelinux:7-slim as builder
ARG NPM_REGISTRY
ARG HTTP_PROXY
ARG COMPARTMENT_ID
WORKDIR '/app'
COPY package.json .
# optional line below
COPY ol7_developer_nodejs8.repo /etc/yum.repos.d/
RUN echo proxy=${HTTP_PROXY} >>/etc/yum.conf
RUN yum -y update && \
rm -rf /var/cache/yum && \
yum -y install nodejs
RUN yum -y install python3
RUN npm config set registry ${NPM_REGISTRY}
RUN npm install
COPY . .
RUN npm run build
RUN curl -LO https://storage.googleapis.com/kubernetes-release/release/v1.16.0/bin/linux/amd64/kubectl \
&& chmod +x ./kubectl \
&& rm -rf /tmp/*
ENV PATH="/app:/bin:/root/bin:${PATH}"
ENV KUBECONFIG="/root/.kube/oci_config"
ENV LC_ALL="en_US.utf8"
ENV C ${COMPARTMENT_ID}
RUN curl -LO https://raw.githubusercontent.com/oracle/oci-cli/master/scripts/install/install.sh \
&& chmod +x ./install.sh \
&& ./install.sh --accept-all-defaults
EXPOSE 5000
ENTRYPOINT ["/bin/bash"]
CMD []
Verify that the image is getting built with the following command:
xxxxxxxxxx
#create the docker image
$ docker build --build-arg http_proxy=<proxy> --build-arg NPM_REGISTRY="https://registry.npmjs.org/" --build-arg COMPARTMENT_ID="$COMPARTMENT_ID" -t sample-travis-oke:travis
Verify the Container locally using the below command:
xxxxxxxxxx
#Run the container
$ docker run -v "<local_oci_config_path>/.oci":"/root/.oci" -v "<local_kube_config_path>/.kube":"/root/.kube" -p 5000:3000 sample-travis-oke:travis /bin/serve -s build
The application should now be up and running. Access the application at port 3000 of localhost (http://localhost:3000)
Push to GitHub
This step is required to integrate the project with Travis CI. Create the project repository "sample-travis-oke" in GitHub and push the existing code to this repository.
xxxxxxxxxx
$ cd sample-travis-oke
$ git init
$ git remote add origin https://github.com/<your_account>/sample-travis-oke.git
$ git add .
$ git commit -m "First Commit"
$ git push origin master
Feel free to check out GitHub's information page for more details: https://help.github.com/en/github/importing-your-projects-to-github/adding-an-existing-project-to-github-using-the-command-line
Setup Travis CI
Lets set up Continuous Integration in Travis CI for this project. Here is what we require from Travis:
- Build to kick off automatically whenever code is merged-in into the "master" branch.
- Build should create the Docker image and push the Docker image to the OCI container registry (OCIR).
- Pull the image from OCIR and push to OCI OKE (Oracle Kubernetes Engine).
To do all these, first, you need to login with Travis CI with your GitHub account. This way, all your GitHub public repositories will automatically be visible on Travis. You can check the newly created sample-travis-oke repository from https://travis-ci.org/account/repositories. Click on "Sync account" and refresh the page if you do not see the repository.
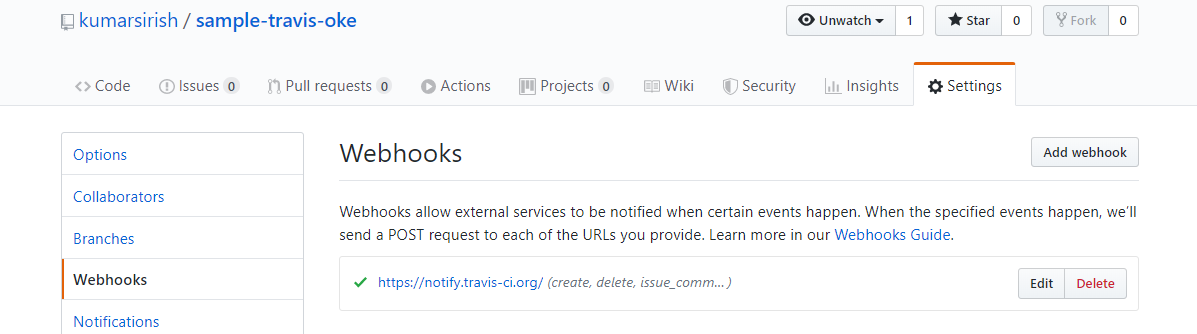
Once synced up with GitHub, a Webhook will automatically appear in the GitHub project like below:
Set up OCIR in your tenancy if you haven't already done so. Refer to this link for more details: https://www.oracle.com/webfolder/technetwork/tutorials/obe/oci/registry/index.html.
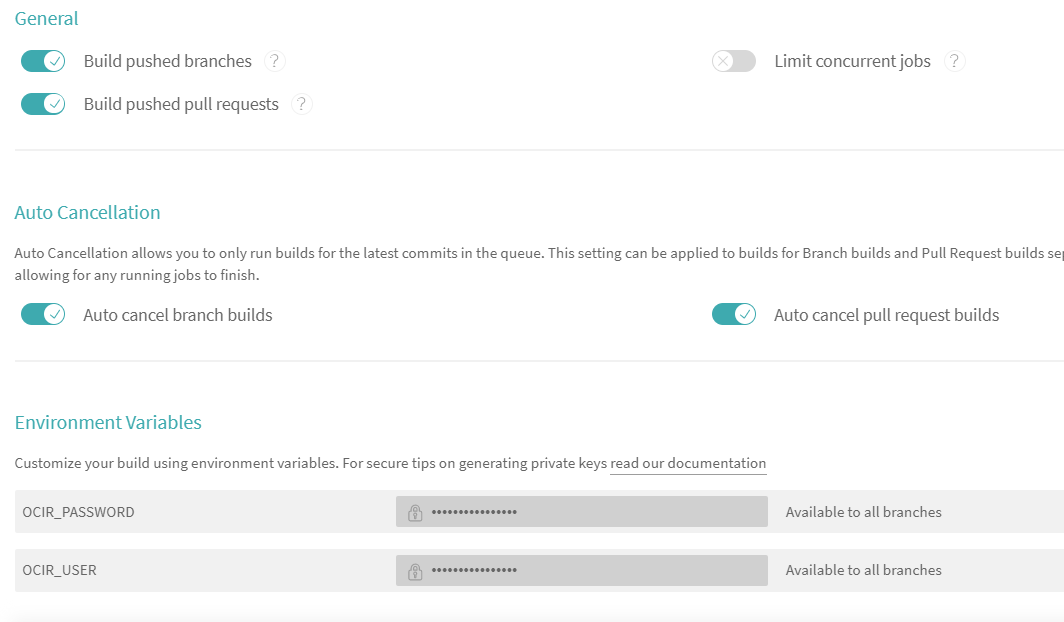
In your project settings (e.g https://travis-ci.org/<user_name>/sample-travis-oke/settings), add OCIR_USER, OCIR_PASSWORD, and COMPARTMENT_ID as secret keys. Your Travis project setting screen should be similar to below:
Every Travis project requires a .travis.yml file in the root of the project. Currently, OKE deployment is not supported out-of-the box from Travis, so we need to write our own deployment steps. Make sure that OCI config and Kube config are part of the image.
A sample Travis file for building the image and pushing to the OKE is given below:
xxxxxxxxxx
languagegeneric
sudorequired
services
docker
before_install
docker build --build-arg NPM_REGISTRY=$NPM_REGISTRY --build-arg COMPARTMENT_ID=$C
-t $OCIR_URL/sample-travis-oke:travis .
docker login $OCIR_URL -p $OCIR_PASSWORD -u $OCIR_USER
docker push $OCIR_URL/sample-travis-oke:travis
script
docker run $OCIR_URL/sample-travis-oke:travis -c /bin/serve -s build
deploy
kubectl cluster-info
kubectl apply -f k8s
kubectl get pods
kubectl get services
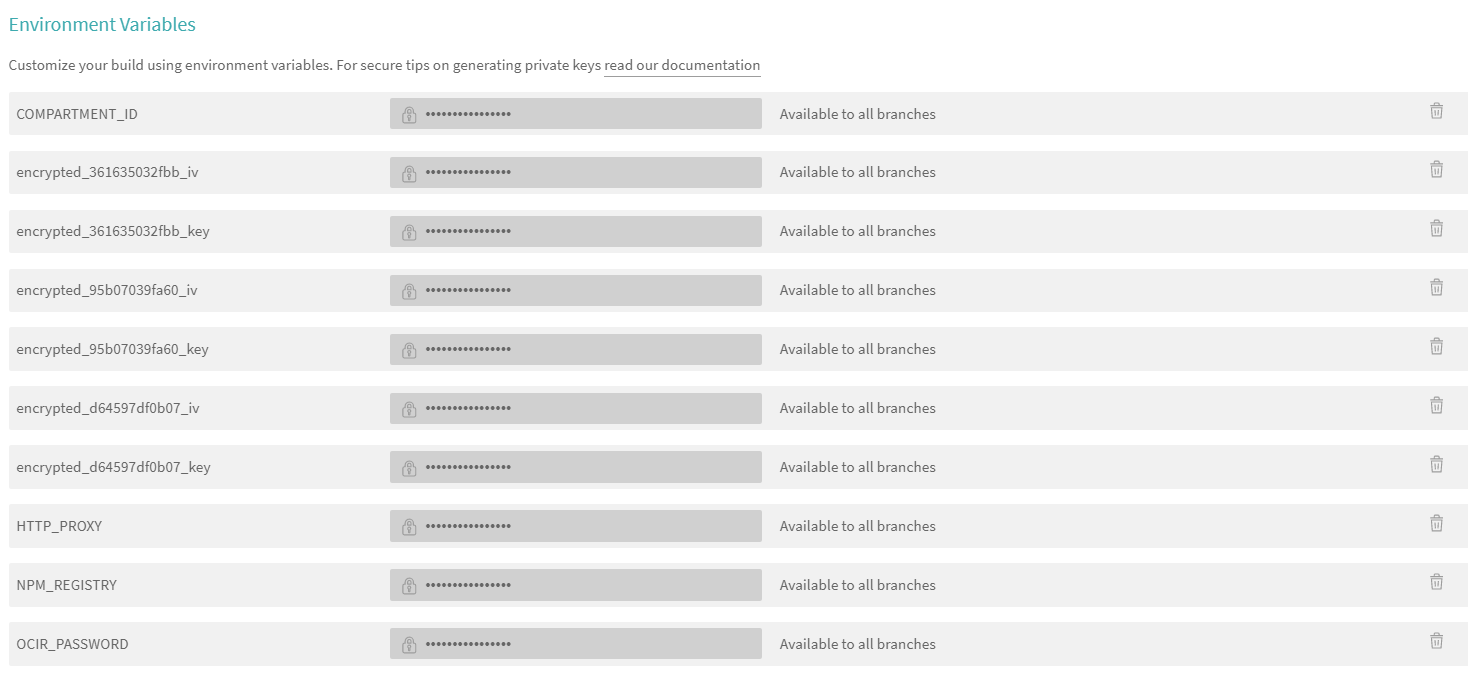
Notice the kubectl commands used under deploy section. This section is different for different cloud providers. OCI config files and Kubernetes config file need to be protected. Travis provides a mechanism to encrypt such files and use it internally in build without making its content public. To do so, you need to install Travis CLI in your development environment and use it to encrypt the config files. Refer to https://docs.travis-ci.com/user/encrypting-files#Encrypting-multiple-files for more details.
xxxxxxxxxx
$ sudo gem install travis
$ tar cvf secrets.tar .oci/* .kube/*
$ travis encrypt-file secrets.tar --add
The --add option automatically updates the .travis.yml file. You can verify that keys used for encryption are already part of your project settings in Travis.
Configure OKE Deployment
Create pod creation and service creation files for the project for OKE. These are just like any other Kubernetes files, and there is nothing OKE specific here. However, make sure that you have OCI config set up, your private key set up, or authentication token and Kubernetes config set up for OKE. Steps to do that are already given above. Sample Kubernetes files for this project will be like the following:
xxxxxxxxxx
apiVersionv1
kindPod
metadata
nameapp-oci-oke-pod
labels
componentweb
spec
containers
nameapp-oci-oke
imageOCIR_URL/sample-travis-oketravis
command"/bin/serve -s build"
ports
containerPort5000
------------------------------------
apiVersionv1
kindService
metadata
nameoci-oke-app-service
spec
typeLoadBalancer
selector
componentweb
ports
port3000
targetPort5000
Deploy on OKE
As part of the Deploy step of Travis build, the following steps are executed within the container:
xxxxxxxxxx
kubectl cluster-info
kubectl apply -f k8s
kubectl get pods
kubectl get services
Keep on giving the kubectl get services command until the external-IP is exposed:
xxxxxxxxxx
NAME TYPE CLUSTER-IP EXTERNAL-IP PORT(S) AGE
oci-oke-app-service LoadBalancer 1x.x.x4.x 1x.x.x.198 3000:31305/TCP 110m
Use the external IP to load the application.
Congrats! Your ReactJS application is now running on OKE deployed via Travis.
Opinions expressed by DZone contributors are their own.
Comments