Enabling Multicloud K8s Communication With Skupper
In this post, I will be introducing you to Skupper, an open-source project for enabling secure communication across the Kubernetes cluster.
Join the DZone community and get the full member experience.
Join For FreeIntro
There are many challenges that engineering teams face when attempting to incorporate a multi-cloud approach into their infrastructure goals. Kubernetes does a good job of addressing some of these issues, but managing the communication of clusters that span multiple cloud providers in multiple regions can become a daunting task for teams. Often this requires complex VPNs and special firewall rules to multi-cloud cluster communication.
In this post, I will be introducing you to Skupper, an open-source project for enabling secure communication across the Kubernetes cluster. Skupper allows your application to span multiple cloud providers, data centers, and regions. Let's see it in action!
Getting Started
This tutorial will demonstrate how to distribute the Istio Bookinfo Application microservices across multiple public and private clusters. The services require no coding changes to work in the distributed application environment. With Skupper, the application behaves as if all the services are running in the same cluster.
In this tutorial, you will deploy the productpage and ratings services on a remote, public cluster in the namespace aws-eu-west and the details and reviews services in a local, on-premises cluster in namespace laptop.
Overview
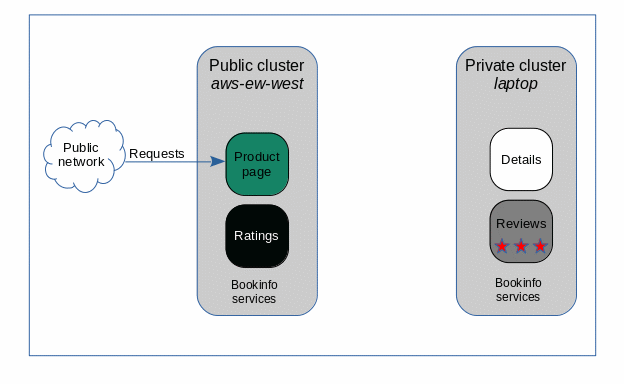
The image above shows how the services will be deployed.
- Each cluster runs two of the application services.
- An ingress route to the productpage service provides internet user access to the application.
If all services were installed on the public cluster, then the application would work as originally designed. However, since two of the services are on the laptop cluster, the application fails. productpage can not send requests to details or reviews.
This demo will show how Skupper can solve the connectivity problem presented by this arrangement of service deployments.
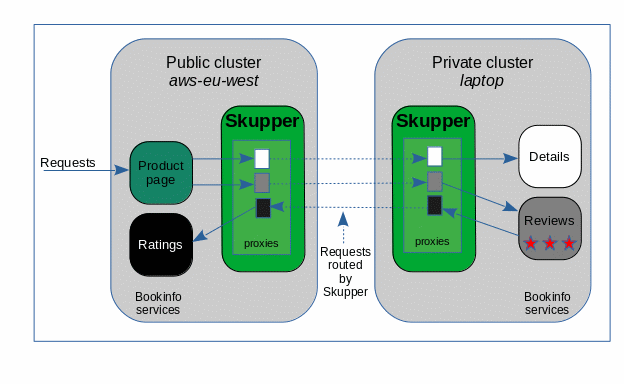
Skupper is a distributed system with installations running in one or more clusters or namespaces. Connected Skupper installations share information about what services each installation exposes. Each Skupper installation learns which services are exposed to every other installation. Skupper then runs proxy service endpoints in each namespace to properly route requests to or from every exposed service.
- In the public namespace, the details and reviews proxies intercept requests for their services and forward them to the Skupper network.
- In the private namespace, the details and reviews proxies receive requests from the Skupper network and send them to the related service.
- In the private namespace, the ratings proxy intercepts requests for its service and forwards them to the Skupper network.
- In the public namespace, the ratings proxy receives requests from the Skupper network and sends them to the related service.
Prerequisites
To run this tutorial you will need:
- The
kubectlcommand-line tool, version 1.15 or later (installation guide) - The
skuppercommand-line tool, the latest version (installation guide) - Two Kubernetes namespaces, from any providers you choose, on any clusters you choose
- The YAML files from https://github.com/skupperproject/skupper-examples-bookinfo.git
- Two logged-in console terminals, one for each cluster or namespace
Step 1: Deploy the Bookinfo Application
This step creates a service and a deployment for each of the four Bookinfo microservices.
Namespace aws-eu-west:
$ kubectl apply -f private-cloud.yaml
service/details created
deployment.extensions/details-v1 created
service/reviews created
deployment.extensions/reviews-v3 created
Step 2: Expose the Public Productpage Service
Namespace aws-eu-west:
xxxxxxxxxx
kubectl expose deployment/productpage-v1 --port 9080 --type LoadBalancer
The Bookinfo application is accessed from the public internet through this ingress port to the productpage service.
Step 3: Observe That the Application Does Not Work
The web address for the Bookinfo application can be discovered from namespace aws-eu-west:
xxxxxxxxxx
$ echo $(kubectl get service/productpage -o jsonpath='http://{.status.loadBalancer.ingress[0].hostname}:9080')
Open the address in a web browser. Productpage responds but the page will show errors as services in the namespace laptop are not reachable.
We can fix that now.
Step 4: Set Up Skupper
This step initializes the Skupper environment on each cluster.
Namespace laptop:
skupper init
Namespace aws-eu-west:
skupper init
Now the Skupper infrastructure is running. Use skupper status in each console, terminal to see that Skupper is available.
$ skupper status Namespace '<ns>' is ready.
It is connected to 0 other namespaces.
As you move through the steps that follow, you can use skupper status at any time to check your progress.
Step 5: Connect Your Skupper Installations
Now you need to connect your namespaces with a Skupper connection. This is a two-step process.
The skupper connection-token <file> command directs Skupper to generate a secret token file with certificates that grant permission to other Skupper instances to connect to this Skupper's network.
Note: Protect this file as you would do for any file that holds login credentials.
- The
skupper connect <file>command directs Skupper to connect to another Skupper's network. This step completes the Skupper connection.
Note that in this arrangement the Skupper instances join to form peer networks. Typically the Skupper opening the network port will be on the public cluster. A cluster running on laptop may not even have an address that is reachable from the internet. After the connection is made, the Skupper network members are peers and it does not matter which Skupper opened the network port and which connected to it.
The console terminals in this demo are run by the same user on the same host. This makes the token file in the ${HOME} directory available to both terminals. If your terminals are on different machines then you may need to use scp or a similar tool to transfer the token file to the system hosting the laptop terminal.
Generate a Skupper Network Connection Token
Namespace aws-eu-west:
skupper connection-token
${HOME}/PVT-to-PUB-connection-token.yaml
Open a Skupper Connection
Namespace laptop:
skupper connect ${HOME}/PVT-to-PUB-connection-token.yaml
Check the Connection
Namespace aws-eu-west:
$ skupper status Skupper enabled for "aws-eu-west".
It is connected to 1 other sites.
Namespace laptop:
$ skupper status Skupper enabled for "laptop".
It is connected to 1 other sites.
Step 6: Virtualize the Services You Want Shared
You now have a Skupper network capable of multi-cluster communication but no services are associated with it. This step uses the kubectl annotate command to notify Skupper that a service is to be included in the Skupper network.
Skupper uses the annotation as the indication that a service must be virtualized. The service that receives the annotation is the physical target for network requests and the proxies that Skupper deploys in other namespaces are the virtual targets for network requests. The Skupper infrastructure then routes requests between the virtual services and the target service.
Namespace aws-eu-west:
$ kubectl annotate service ratings
skupper.io/proxy=http service/ratings annotated
Namespace laptop:
$ kubectl annotate service details skupper.io/proxy=http service/details annotated
$ kubectl annotate service reviews skupper.io/proxy=http service/reviews annotated
Skupper is now making the annotated services available to every namespace in the Skupper network. The Bookinfo application will work as the productpage service on the public cluster has access to the details and reviews services on the private cluster and as the reviews service on the private cluster has access to the ratings service on the public cluster.
Step 7: Observe That the Application Works
The web address for the Bookinfo app can be discovered from namespace aws-eu-west:
$ echo $(kubectl get service/productpage -o
jsonpath='http://{.status.loadBalancer.ingress[0].hostname}
:9080')
Open the address in a web browser. The application should now work with no errors.
Clean Up
Skupper and the Bookinfo services may be removed from the clusters.
Namespace aws-eu-west:
skupper delete kubectl delete -f public-cloud.yaml
Namespace laptop:
skupper delete kubectl delete -f private-cloud.yaml
Final Thoughts
Enabling a multi-cloud approach has a lot of benefits and is getting easier, thanks to tools like Skupper. If you have time, try some of Skupper's other examples on its Github Repo. I hope you learned something from this post. Stay tuned for more!
Published at DZone with permission of Sudip Sengupta. See the original article here.
Opinions expressed by DZone contributors are their own.
Comments